...
Before you work on any equipment, be aware of the hazards involved with electrical circuitry, and be familiar with standard practices for preventing accidents.
Ultimate disposal of this product should be handled according to all national laws and regulations.
The Installation of the equipment must comply with local and national electrical codes.
This unit is intended to be installed in the rackmount. Please read the mounting instructions carefully before beginning installation. Failure to use the correct hardware or to follow the correct procedures could result in a hazardous situation to for people and damage to the system.
This product is intended to be installed indoors. Keep this product away from water, fire, humidity, or hot environments.
Use only the power supply and accessories approved by the manufacturer, and which can be found in the original packaging of this product.
Read the installation instructions before connecting the system to the power source.
We cannot guarantee that no accidents or damage will occur due to the improper use of the device. Please use this product with care and operate at your own risk!
In the case of device failure, please disconnect it from power. The fastest way to do so is by unplugging the power plug from the power outlet.
It is the customer's responsibility to follow local country regulations, including operation within legal frequency channels, output power, cabling requirements, and Dynamic Frequency Selection (DFS) requirements. All Mikrotik radio devices must be professionally installed.
...
Make sure your Internet service provider is allowing hardware change and will issue an automatic IP address;
Connect your ISP cable to the first Ethernet port;
- Connect the device to the power source;
- Open network connections on your computer and search for MikroTik wireless network - connect to it;
- The configuration has to be done through the wireless network using a web browser or mobile app. Alternatively, you can use a WinBox configuration tool https://mt.lv/winbox;
- Open https://192.168.88.1 in your web browser to start configuration, user name: admin and there is no password by default (or, for some models, check user and wireless passwords on the sticker);
- Click the Check for updates button and update your RouterOS software to the latest version, must have an active Internet connection;
- In the Quick Set, WISP AP menu choose your country and apply country regulation and wireless settings;
- Set up your wireless network password;
- Set up your router password.
- The following RouterOS "npk" packages are required for the core functionality of the product: gps, lora, system.
Mounting
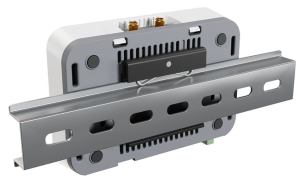
- The device can be mounted using provided DIN rail mount set. Designed to fit standard 35 mm x 7.5 mm DIN rails. Attach it with two provided screws to the device and attach the device to the DIN rail. The DIN rail is not provided in the package.
- Alternatively, it is possible to attach the device to a wall, using the provided screw holes on the back of the unit. The device should be mounted in a way that the cable openings are pointing downward as shown in the picture.
...