Introduction
Our TG-BT5-OUT Bluetooth tag model has a temperature sensor built in. This means that it can be used to measure the surrounding temperature.
The temperature's value is "written" into the advertising payload that the tag is going to broadcast over Bluetooth advertising channels. Based on how you configure the tag, the tag can broadcast the payload periodically or/and when a trigger is detected. You can find more information about the tag's configuration options in iOS and Android Beacon Manager guides.
You can see/display the payloads using our KNOT model under IoT>Bluetooth>Advertising reports tab:
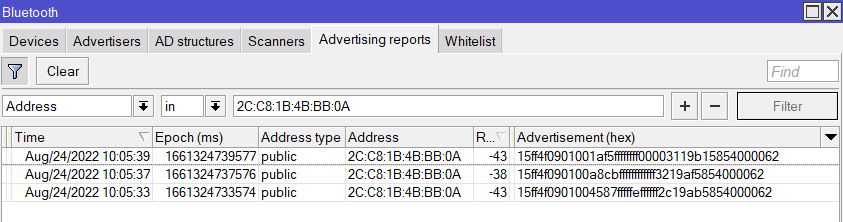
The payloads will be shown in the "Advertisement (hex)" field and they will be in the hexadecimal format.
When the tag is configured in the MikroTik format, the payload's 14th and 15th octets indicate the temperature (ambient temperature in Celsius in signed 16-bit integer [twos complement] 8.8 fixed point format) that was "sensed" at the moment of the broadcast.
An example of the payload in MikroTik's format is shown below:
| 15ff4f09010032a500000000ffff 5019 bd5954000061 |
|---|
Please note that all multi-byte values in the payload are in little-endian. So, if #14 and #15 octets indicate the temperature as "50 19" → you will need to switch octets places, to 0x1950.
![]() temperature:
temperature:
We've captured the temperature as 0x1950 (hex.) → 6480 (dec.). To get the actual temperature value, divide the result by 256 → 6480/256=25.31 C.
![]() temperature:
temperature:
We've captured the temperature as 0xFE80 (hex.). Keep in mind that the twos-complement format is used → -384 (decimal from signed 2's complement). To get the actual temperature value, divide the result by 256 → -384/256=-1.5 C.
With this knowledge, we can then utilize RouterOS scripting to structure a message out of the received payloads and send it to the MQTT/HTTP server. It is suggested for the server to be responsible for the data conversion from hexadecimal format to decimal format. But! if you are willing to load the RouterOS device, you can perform hexadecimal value conversion to decimal format using RouterOS scripting (it will load the device and can affect RouterOS performance → we advise converting values on the server and not on the RouterOS). In this guide, we will achieve the results using MQTT post to ThingsBoard.
ThingsBoard server and MQTT configuration
You will require to have a ThingsBoard server up and running. You can find useful information on how to set up your server by following the link. You can install the server locally onto a machine or use their cloud solution.
After you have the server ready, you will need to configure it to be able to receive MQTT messages. Please follow the "ThingsBoard configuration" link to set up your "device".
RouterOS configuration
Please check the link over here on how you can set up your MQTT broker depending on the device credential used by the ThingsBoard server.
After setting up your broker, confirm that the Bluetooth tag is broadcasting information as shown in the picture above under the IoT>Bluetooth>Advertising reports tab.
System>Script
Paste in the script below (under System>Scripts>Add):
# Required packages: iot
################################ Configuration ################################
# Name of an existing MQTT broker that should be used for publishing
:local broker "tb"# MQTT topic where the message should be published
:local topic "v1/devices/me/telemetry"# Interface whose MAC should be used as 'Locator ID'
:local locatorIface "ether1"# POSIX regex for filtering advertisement Bluetooth addresses. E.g. "^BC:33:AC"
# would only include addresses which start with those 3 octets.
# To disable this filter, set it to ""
:local addressRegex "2C:C8:1B:4B:BB:0A"# POSIX regex for filtering Bluetooth advertisements based on their data. Same
# usage as with 'addressRegex'.
:local advertisingDataRegex ""# Signal strength filter. E.g. -40 would only include Bluetooth advertisements
# whose signal strength is stronger than -40dBm.
# To disable this filter, set it to ""
:local rssiThreshold ""####The lines below are used for the data conversion from hex to dec###
:global invertU16 do={
:local inverted 0
:for idx from=0 to=15 step=1 do={
:local mask (1 << $idx)
:if ($1 & $mask = 0) do={
:set $inverted ($inverted | $mask)
}
}
return $inverted
}:global le16ToHost do={
:local lsb [:pick $1 0 2]
:local msb [:pick $1 2 4]:return [:tonum "0x$msb$lsb"]
}
:local from88 do={
:global invertU16
:global le16ToHost
:local num [$le16ToHost $1]# Handle negative numbers
:if ($num & 0x8000) do={
:set num (-1 * ([$invertU16 $num] + 1))
}# Convert from 8.8. Scale by 1000 since floating point is not supported
:return (($num * 125) / 32)
}################################## Bluetooth ##################################
:put ("[*] Gathering Bluetooth info...")
:global btOldestAdvertisementTimestamp
:if ([:typeof $btOldestAdvertisementTimestamp] = "nothing") do={
# First time this script has been run since booting, need to initialize
# persistent variables
:set $btOldestAdvertisementTimestamp 0
}
:local btProcessingStart [/system clock get time]
:local advertisements [/iot bluetooth scanners advertisements print detail \
as-value where \
epoch > $btOldestAdvertisementTimestamp and \
address ~ $addressRegex and \
data ~ $advertisingDataRegex and \
rssi > $rssiThreshold
]
:local advJson ""
:local advCount 0
:local advSeparator ""
:local lastAdvTimestamp 0
# Remove semicolons from MAC/Bluetooth addresses
:local minimizeMac do={
:local minimized
:local lastIdx ([:len $address] - 1)
:for idx from=0 to=$lastIdx step=1 do={
:local char [:pick $address $idx]
:if ($char != ":") do={
:set $minimized "$minimized$char"
}
}
:return $minimized
}:foreach adv in=$advertisements do={
:local address ($adv->"address")
:local ts ($adv->"epoch")
:local rssi ($adv->"rssi")
:local ad ($adv->"data")
:local tempf [:pick ($adv->"data") 28 32]#The line below will set temperature in hexadecimal format, like "0x1950"
:local temp ([:pick $tempf 2 4].[:pick $tempf 0 2])#The line below will set temperature in decimal format, like "25313". It is commented with "#", so if you wish to use it instead of the hexadecimal format value, comment the line above and uncomment the line below > remove "#" from the line below and add "#" to the line above.
# :local temp [$from88 [:pick $ad 28 32]]
:local obj "{\
\
\"ts\":$ts,\
\"values\":{\
\"id\":\"$[$minimizeMac address=$address]\",\
\"rssi\":\"$rssi\",\
\"temp\":\"$temp\",\
\"ad\":\"$ad\"\
}\
}"
:set $advCount ($advCount + 1)
:set $lastAdvTimestamp $ts
# Ensure that the last object is not terminated by a comma
:set $advJson "$advJson$advSeparator$obj"
:if ($advSeparator = "") do={
:set $advSeparator ","}
}:if ($advCount > 0) do={
:set $btOldestAdvertisementTimestamp $lastAdvTimestamp
}
:put ("[*] Found $advCount new advertisements \
(processing time: $[([/system clock get time] - $btProcessingStart)])")#################################### MQTT #####################################
:local message \
"[$advJson]"
:log info "$message";
:put ("[*] Total message size: $[:len $message] bytes")
:put ("[*] Sending message to MQTT broker...")
/iot mqtt publish broker=$broker topic=$topic message=$message
:put ("[*] Done")
Change the broker's name that you have chosen for the MQTT broker within the quotation marks (in our example, we called it tb):
:local broker "tb"
The default topic used by the ThingsBoard is (you do not have to change it):
:local topic "v1/devices/me/telemetry"
Change the MAC address of the tag that you wish to monitor (in our example, we have the MAC address 2C:C8:1B:4B:BB:0A):
:local addressRegex "2C:C8:1B:4B:BB:0A"
The lines below will take the payload's 14th and 15th octets and "re-structure" the values from "ABCD" to "CDAB" (per our example from the Introduction section, from "5019" to "1950") → basically structure the message with temperature in hexadecimal format:
:local tempf [:pick ($adv->"data") 28 32]
:local temp ([:pick $tempf 2 4].[:pick $tempf 0 2])
Your second option is to convert the temperature from hexadecimal to decimal format using RouterOS (if you want to keep hexadecimal format - ignore this step). This can be achieved by "commenting" (adding "#") to the previous line (or removing it altogether) and "uncommenting" (removing the "#") from the upcoming line, like so:
# :local temp ([:pick $tempf 2 4].[:pick $tempf 0 2])
:local temp [$from88 [:pick $ad 28 32]]
Because of the fact that floating point is not supported → every calculation behind a decimal point will be "rounded up" to a whole number. This is why the script will calculate the temperature scaled by 1000 (multiplied by 1000) and as a result, the temperature will look like "25546" (that would mean 25.546 C). You can add additional scripting to set up a decimal point (but remember that additional manipulations will load the device) and you can also do it on the server itself.
The MQTT message that we are posting is structured in the following section (you do not have to change it):
:local obj "{\
\
\"ts\":$ts,\
\"values\":{\
\"id\":\"$[$minimizeMac address=$address]\",\
\"rssi\":\"$rssi\",\
\"temp\":\"$temp\",\
\"ad\":\"$ad\"\
}\
}"
The message that is structured per the example above will be displayed in JSON (the only real value we are going to focus on are "timestamp"→ "ts" and "temperature"→ "temp", so feel free to remove additional parameters). If the temperature is calculated in hexadecimal format, the message would look like this:
[ { "ts": 1661333913375, "values": { "id": "2CC81B4BBB0A", "rssi": "-43", "temp": "1939", "ad": "15ff4f0901002de0ffff010000003919877c54000061" } } ] |
|---|
If the temperature is calculated in decimal format, it would look like this:
[ { "ts": 1661333913375, "values": { "id": "2CC81B4BBB0A", "rssi": "-43", "temp": "25222", "ad": "15ff4f0901002de0ffff010000003919877c54000061" } } ] |
|---|
Save the script and run it:
[admin@MikroTik] > system script run name_of_the_script
[*] Gathering system info...
[*] Gathering Bluetooth info...
[*] Found 1 new advertisements (processing time: 00:00:00)
[*] Total message size: 134 bytes
[*] Sending message to MQTT broker...

[*] Done
[admin@MikroTik] >
System>Scheduler
Apply a scheduler to the script to run it with a required interval. Please note! If you have set up a scheduler to run the script, for example, every 2 minutes, it will mean that every received payload (broadcasted by the tag) during the 2-minute interval will be "structured" into the MQTT message. You will, most likely, not need to know the temperature of the tag every 2-5 seconds, so you can either change the MQTT message that is structured to only post the latest temperature reading or just change the IoT>Bluetooth>Scanners setting Filter duplicates to "keep-newest" (that way, the Bluetooth scanner will overwrite every new report from each individual tag's MAC address) and the script will only post 1 payload that was "scanned" at the moment when the script ran.
Results
You will be able to verify the results under the Latest telemetry section under the device you have created for ThingsBoard (in our example, we called the "device" KNOT):
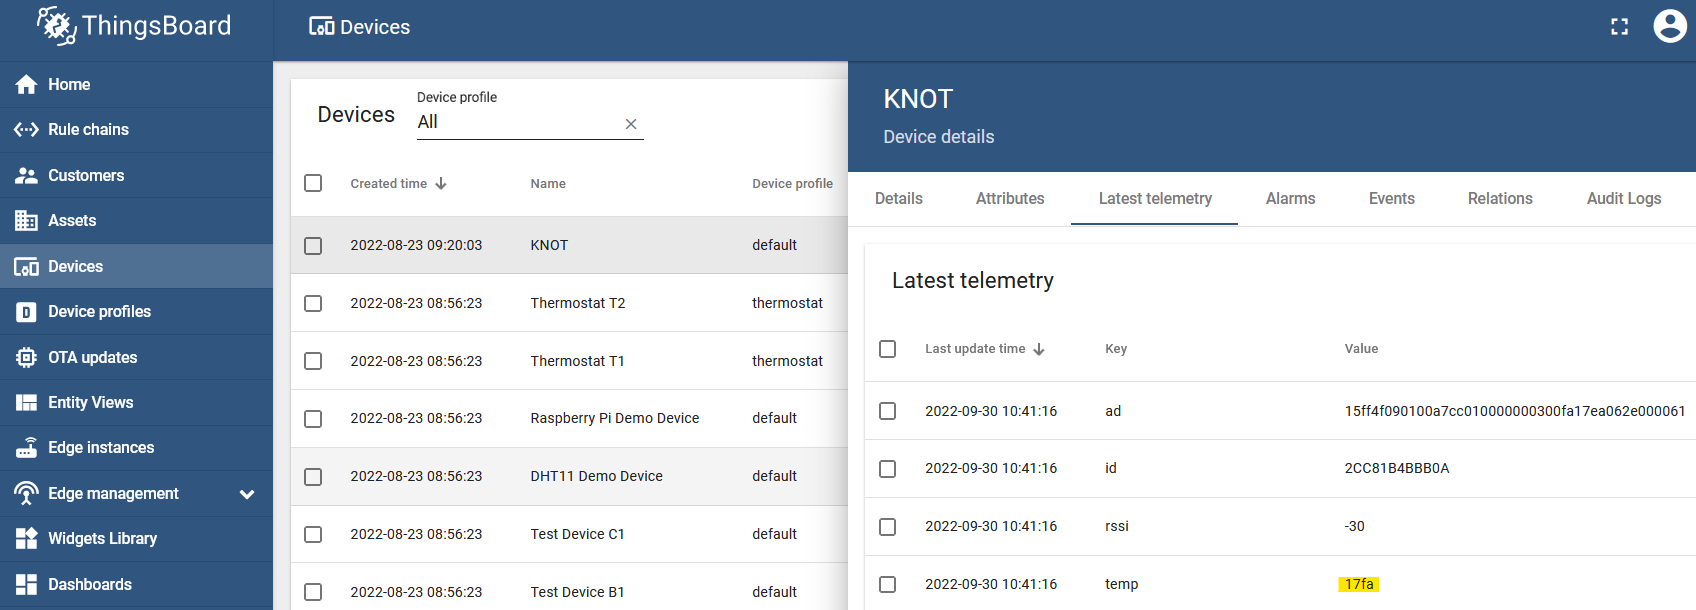
The result is a successful MQTT post! From the screenshot above, we can see that the temp parameter is in hexadecimal format.
But! we would like to display the temperature (temp parameter) in decimal format and we would also like to display the data easier to perceive.
And in case, we have posted the temperature in the decimal format, we would like to set up a decimal point.
This is where "Widgets" come into play.
ThingsBoard widgets
After you receive the value under the Latest telemetry section, you can show it on the "Widget".
The Javascripts used in the widgets should be able to convert the data from the hexadecimal format to the decimal format.
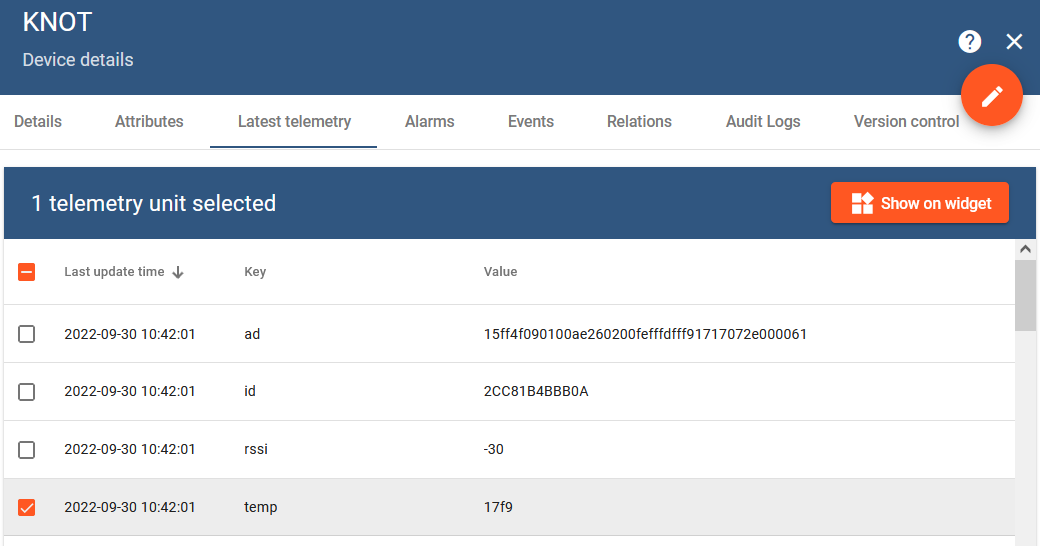
Select the value you wish to display in the widget (in our example, temp) and click on the "Show on widget" button:
You will be able to browse the widgets in the window that pops up:
Click on the "Add to dashboard" button:
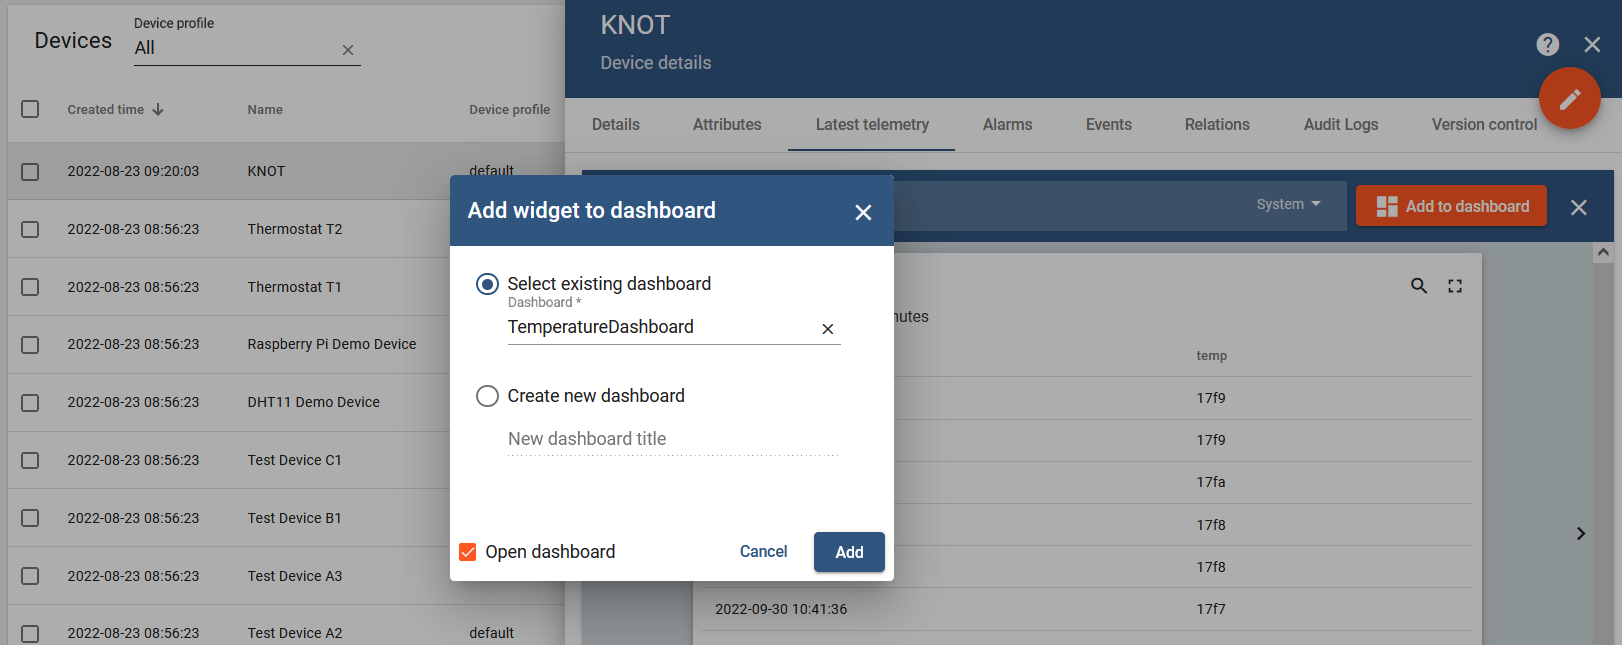
Select a new dashboard to be created or choose an existing dashboard that you already have pre-installed/pre-made. Click on "Add".
By applying the checkbox "Open dashboard" you will be redirected to the dashboard menu or you can go there manually.
We have also added a second table and, as a result, our test dashboard looks like this:
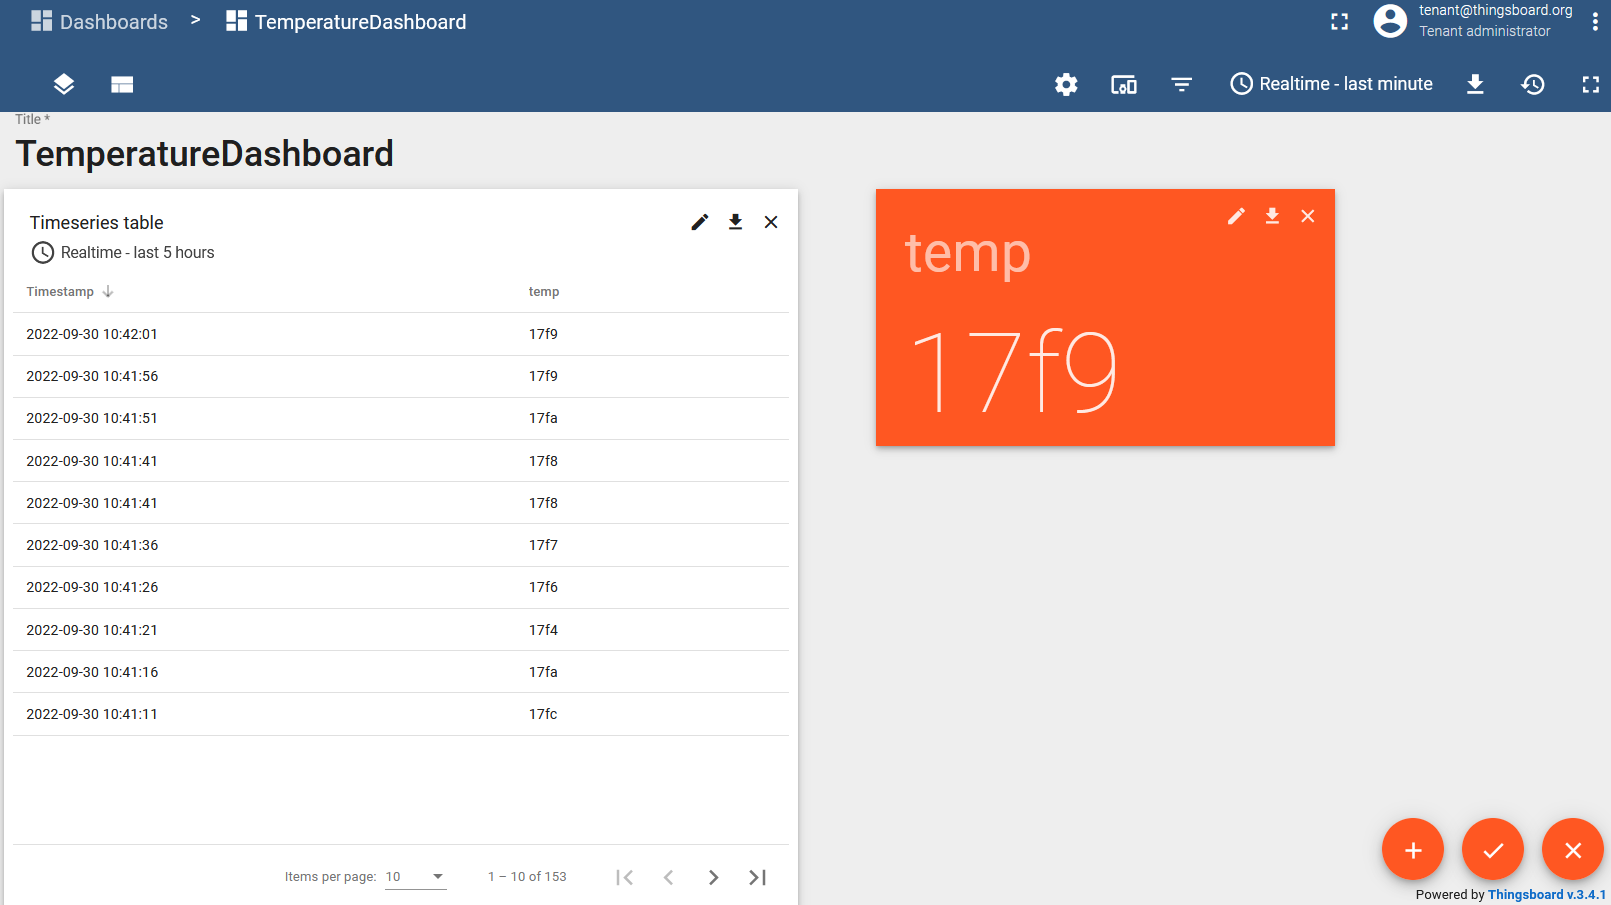
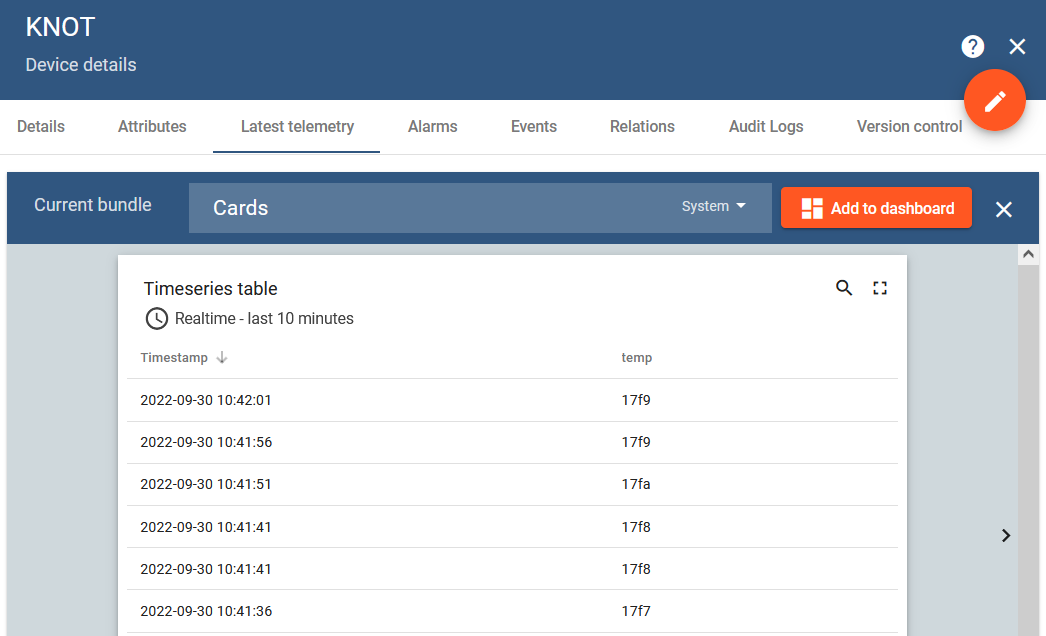
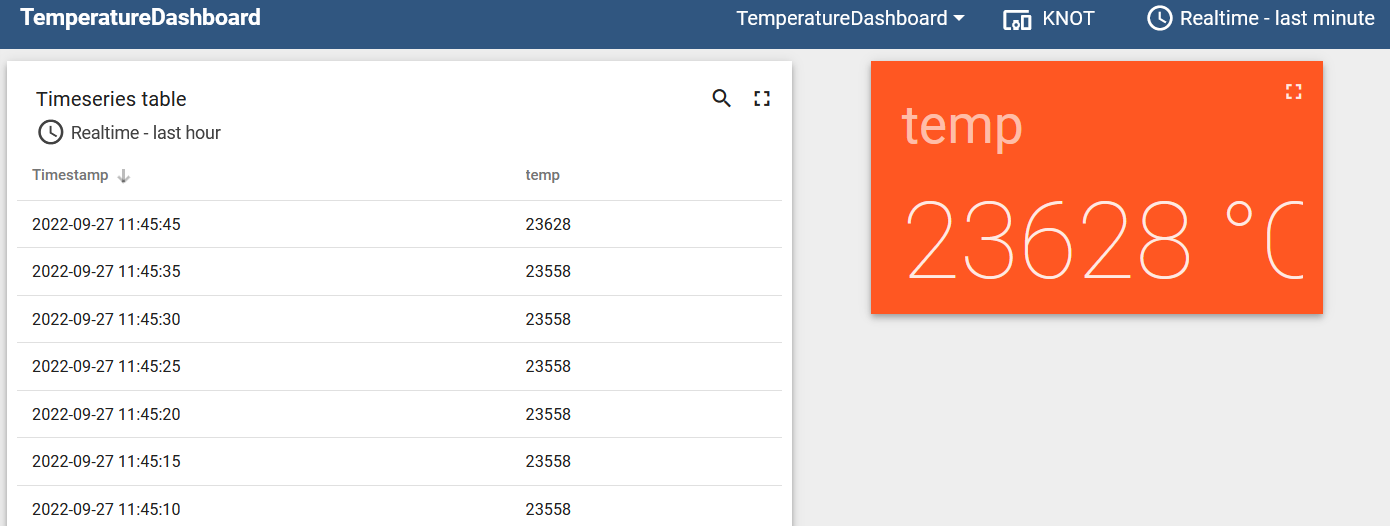
In case we post the date in hexadecimal format
Both tables will display the value in the hexadecimal format as "17f9" (raw value as we've sent it from the KNOT → the javascript for the table did not convert it to a decimal value yet).
Because of the fact that the values in our tag's payload are in signed 8.8 fixed point format (keeping in mind the twos-complement format), we will need to add additional javascript code to "convert" the data to the decimal value.
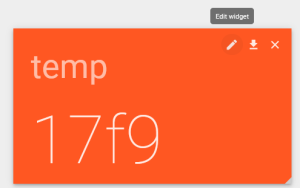
Enter the "Edit" mode and click on the "Edit widget" button:
Click on the "edit" button to edit the parameter temp:
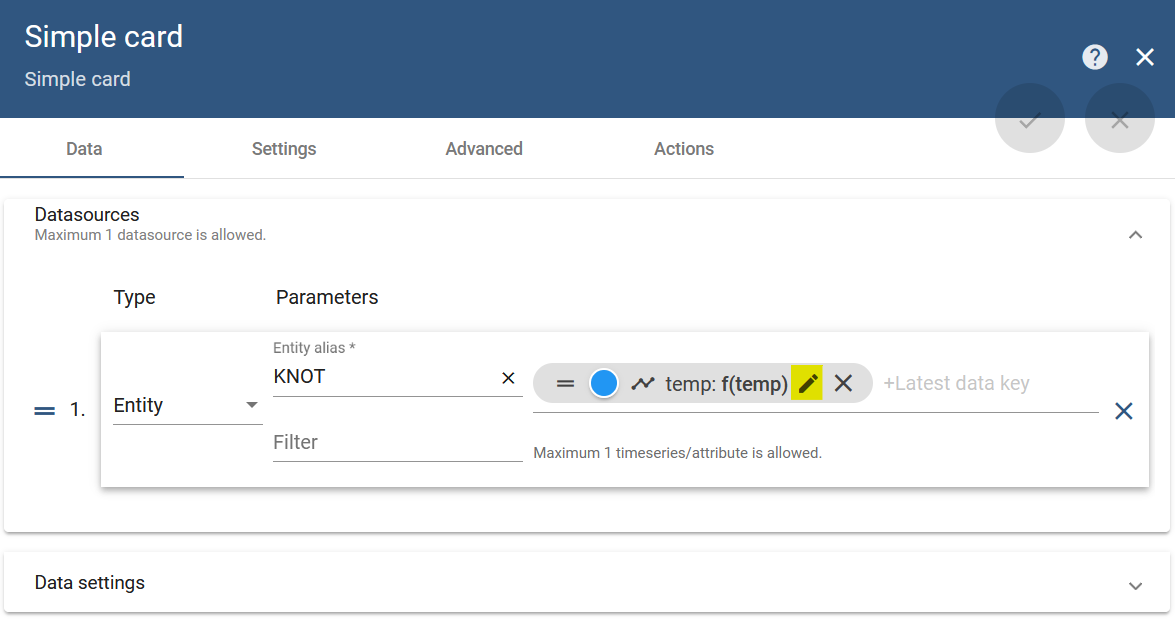
In the popup window "Data key configuration" enable the checkbox "Use data post-processing function" and input the code shown below:
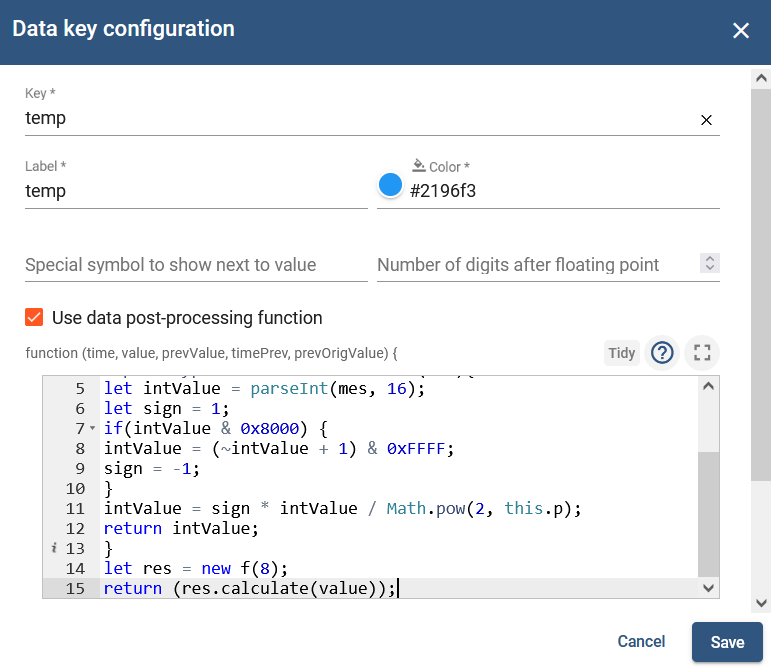
The code:
function f(p){
this.p = p;
}
f.prototype.calculate = function(mes){
let intValue = parseInt(mes, 16);
let sign = 1;
if(intValue & 0x8000) {
intValue = (~intValue + 1) & 0xFFFF;
sign = -1;
}
intValue = sign * intValue / Math.pow(2, this.p);
return intValue;
}
let res = new f(8);
return (res.calculate(value));
Save and apply the changes.
Do the same steps for the second/first table.
In case we post the date in decimal format
You will see the results as:
Do the exact same steps from the example above, but for this scenario, divide the result by "1000":
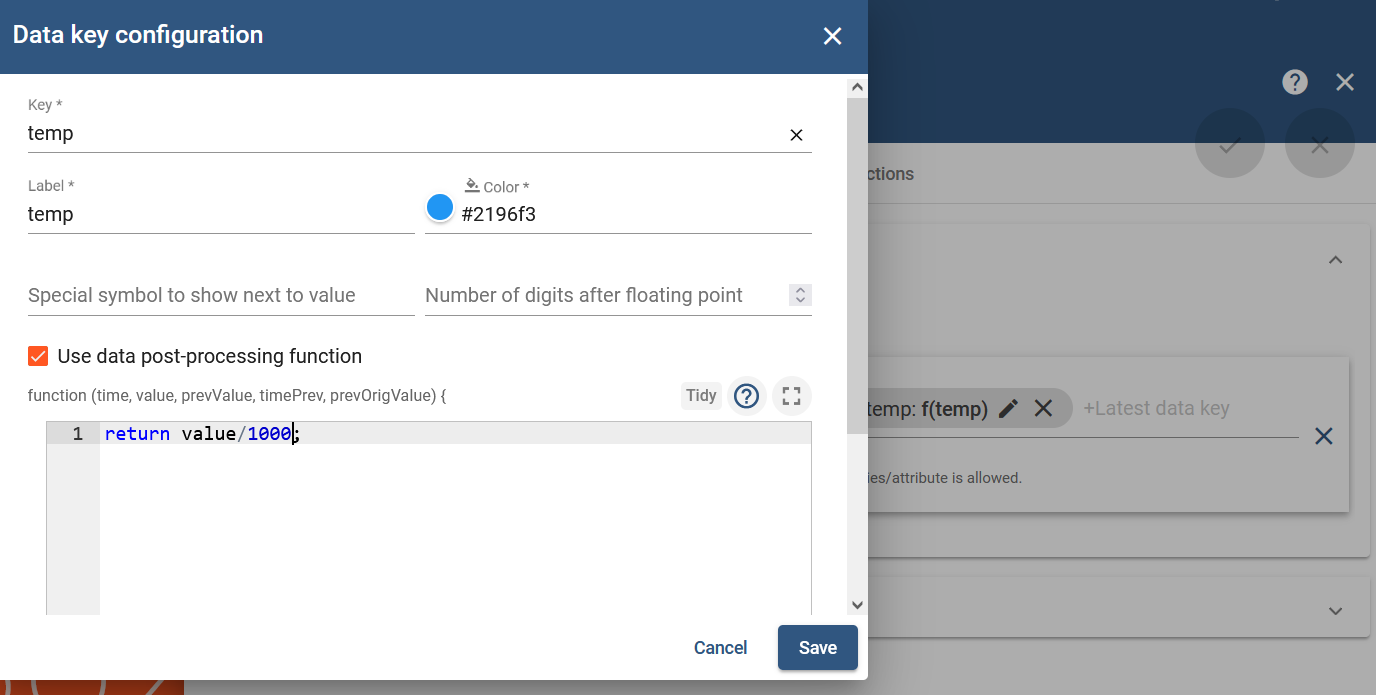
Save and apply the changes.
Verification
The end result should look like this:
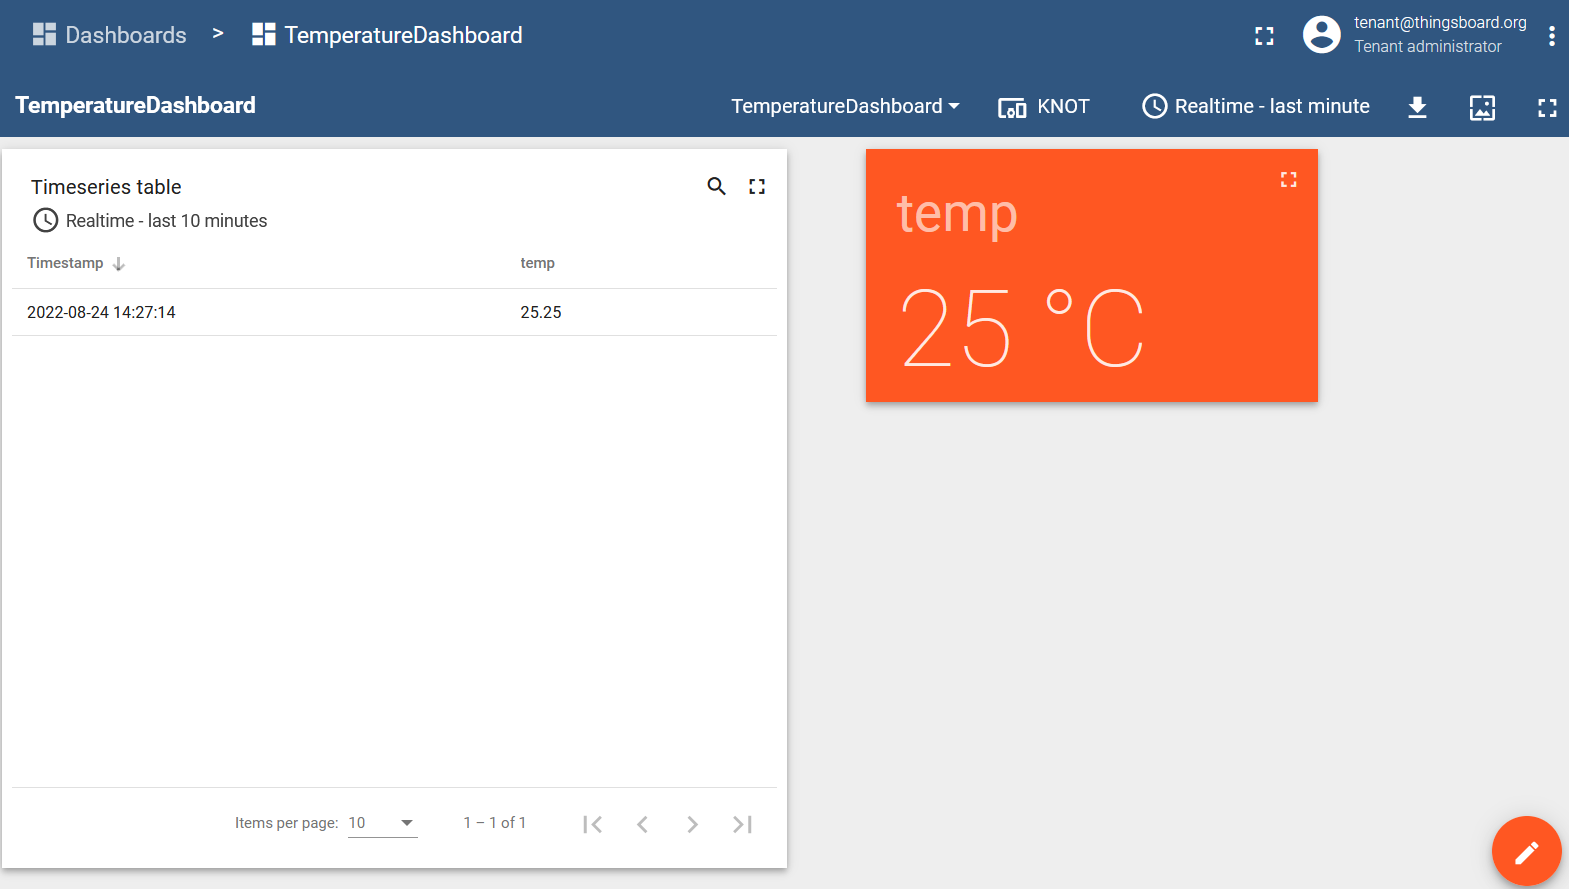
Now both tables show decimal temperature.