
A compact outdoor Wi-Fi 6 CPE with a powerful 16 dBi antenna, AP mode, and multiple mounting options — perfect for masts, poles, or rooftop deployments.
Safety Warnings
Before you work on any equipment, be aware of the hazards involved with electrical circuitry, and be familiar with standard practices for preventing accidents.
Ultimate disposal of this product should be handled according to all national laws and regulations.
All installation methods for mounting an access point on any wall surface is subject to the acceptance of local jurisdiction.
The Installation of the equipment must comply with local and national electrical codes.
This product is intended to be mounted outdoors on a pole. Please read the mounting instructions carefully before beginning installation. Failure to use the correct hardware and configuration or to follow the correct procedures could result in a hazardous situation for people and damage to the system.
Use only the power supply and accessories approved by the manufacturer, and which can be found in the original packaging of this product.
Read the installation instructions before connecting the system to the power source.
We cannot guarantee that no accidents or damage will occur due to the improper use of the device. Please use this product with care and operate at your own risk!
In the case of device failure, please disconnect it from power. The fastest way to do so is by unplugging the power plug from the power outlet.
It is the customer's responsibility to follow local country regulations, including operation within legal frequency channels, output power, cabling requirements, and Dynamic Frequency Selection (DFS) requirements. All Mikrotik radio devices must be professionally installed.
Exposure to Radio Frequency Radiation: This MikroTik equipment complies with the FCC, IC, and European Union radiation exposure limits set forth for an uncontrolled environment. This MikroTik device should be installed and operated no closer than 20 centimeters from your body, occupational user, or the general public.
Quickstart
- Open the Ethernet door.
- Connect the device to the included PoE injector with an Ethernet cable to the data+power end;
- Connect the data end of the PoE injector to the computer;
- Connect the power adapter to the PoE injector;
- Configure your device using a web browser through WebFig or the WinBox tool at https://mt.lv/WinBox;
- Access WebFig by opening http://192.168.88.1, and for WinBox, download the tool, navigate to the Neighbors tab, and click on the MAC address. The username is "admin" with no password (or, for some models, check user and wireless passwords on the sticker);
- For a manual update of the device, visit the products page at https://mikrotik.com/products to find your product. The required packages are accessible under the "Support&Downloads" menu;
- Upload downloaded packages to the WebFig or WinBox "Files" menu and reboot the device;
- Updating your RouterOS software to the latest version will ensure the best performance, stability, and security updates;
- In the "Quick Set" menu set up the following: Choose your country, to apply country regulation settings;
- Set up your wireless network password in the left field;
- Set up your router password in the bottom field.
MikroTik mobile app
Use the MikroTik smartphone app to configure your router in the field, or to apply the most basic initial settings for your MikroTik home access point.

- Scan QR code and choose your preferred OS.
- Install and open application.
- By default, the IP address and user name will be already entered.
- Click Connect to establish a connection to your device through a wireless network.
- Choose Quick setup and application will guide you through all basic configuration settings in a couple of easy steps.
- An advanced menu is available to fully configure all necessary settings.
Configuration
The device is preconfigured as a wireless client (CPE), and all you need to do is select the AP to connect to and change the default device password. You can do this in the "Quick Set" tab, which loads by default. If an IP connection is not available, you can use WinBox to connect via the device’s MAC address.
In case you wish to boot the device from the network, for example, to use MikroTik Netinstall, hold the RESET button of the device when starting it, until the LED light turns off, then the device will start to look for Netinstall servers.
More information about using RouterOS and connecting to this device in our documentation: https://mt.lv/help.
Mounting
The IP rating scale for this device is IP55. When mounting outdoors, please ensure that any cable openings are directed downwards. We recommend using POE injector and proper grounding. When using and installing this device please pay attention to Maximum Permissible Exposure (MPE) safety distance with a minimum of 20 cm between the radiator and your body.
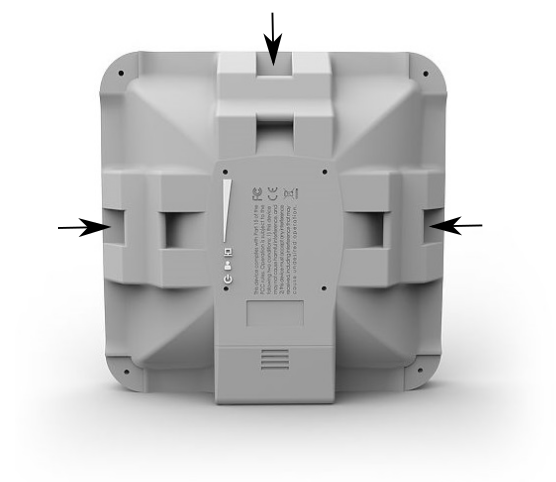
The device comes bundled with a metal mounting ring, which can be used on one of the three mounting slots on the backside of the device.
- Use a Phillips screwdriver to loosen the metal ring.
- Slide one end of it through the most convenient of the three mounting slots.
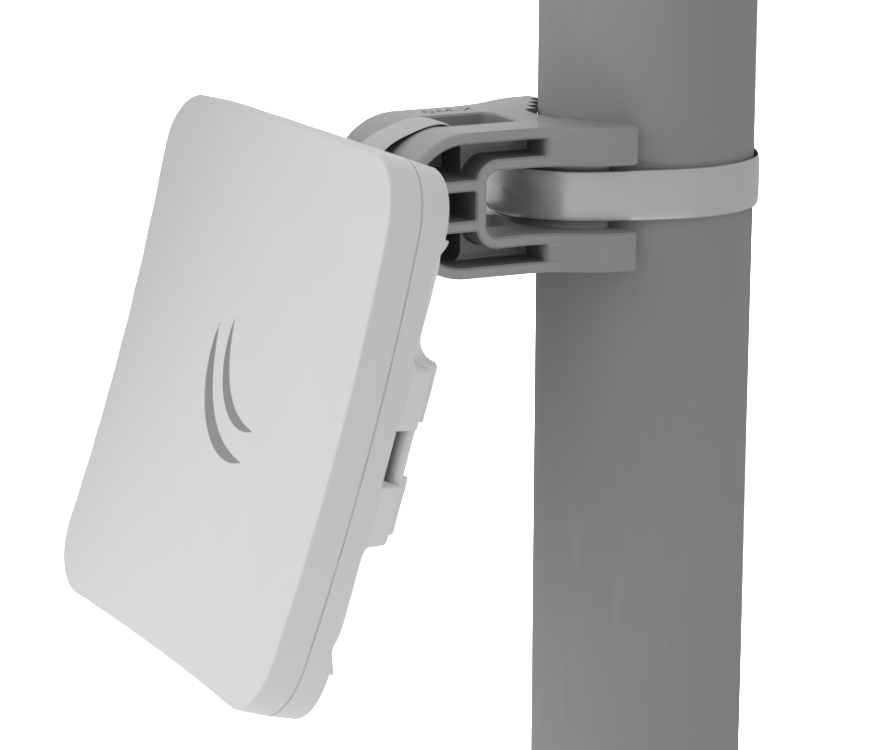
- Position the device on the pole where it will be mounted.
- Slide the loose end of the mounting ring back to its closing latch and use the screwdriver to tighten it.
- The included ring mount allows for mounting on 3-7 cm diameter poles.
It's recommended to secure Ethernet cable to the pole using zip ties. With the distance from the device approximately 30 cm.
As an additional option, you can use "quickMOUNT-X" – mounting bracket for easy adjustment that can be obtained separately. Product web page: https://mikrotik.com/product/qm_x

Specially designed for the SQ series enables vertical and horizontal adjustment on the pole.
Powering
The SXTsq-5axD accepts 12-28 V DC ⎓ power from Passive PoE injectors (one power supply and PoE injector are included) consuming at maximum load up to 6 W.
Connecting to a PoE Adapter:
- Connect the Ethernet cable from the device to the PoE+DATA port of the PoE adapter.
- Connect an Ethernet cable from your local network (LAN) to the PoE adapter.
- Connect the power cord to the adapter, and then plug the power cord into a power outlet.
Expansion Slots and Ports
- One Ethernet 10/100/1000 Mbit, supporting automatic cross/straight cable correction (Auto MDI/X), so you can use either straight or cross-over cables for connecting to other network devices.
- One integrated Wireless module operating at 5 GHz, supporting 802.11a/n/ac/ax protocols, with a 16 dBi antenna gain.
Reset button
The reset button has three functions:
- Hold this button during boot time until LED light starts flashing, release the button to reset RouterOS configuration (total 5 seconds).
- Keep holding for 5 more seconds, LED turns solid, release now to turn on CAP mode. The device will now look for a CAPsMAN server (total 10 seconds).
- Or hold this button during boot time until LED light starts flashing, keep holding the button until LED turns off, then release it to make the RouterBOARD look for Netinstall servers (~15-20 seconds).
Regardless of the above option used, the system will load the backup RouterBOOT loader if the button is pressed before power is applied to the device. Useful for RouterBOOT debugging and recovery.
Grounding
The device includes a grounding connection (marked ⏚) which you should connect to the grounding installation of the tower or building where the device will be used. This is to substantially reduce the risk of ESD and lightning damage.
Accessories
Package includes the following accessories that come with the device:
- EU/US Switching Power Supply 24V DC ⎓, 0.38 A, 9 W
- POE Injector with shielded connector/Gigabit POE injector.
- Hose Clamp SUS304 (Phillips type; clamping diameter range 30-70 mm).
Operating system support
The device supports RouterOS software with version 7.18 or above, which is indicated in the RouterOS menu /system resource. Other operating systems have not been tested.