Introduction
Tx power phone tag
-LTE example and - wifi example
Bluetooth interface implementation in RouterOS allows the device to capture Bluetooth advertising packets that are broadcasted over 37, 38, and 39 advertising channels. More information can be found in the guide here.
Bluetooth tags like, for example, TG-BT5-IN and TG-BT5-OUT, do exactly that. They broadcast advertising payloads over the mentioned channels. To understand what kind of information is stored in the payload, make sure to check the link. The tags can be configured (using the MikroTik Beacon Manager app) to broadcast the payloads automatically, with an interval or/and when a movement, tilt, or free-fall trigger is detected. In simple terms, the tag will "tell" (broadcast to) all the surrounding Bluetooth scanners (like the KNOT) information about itself periodically.
When the payload is broadcasted by the tag, and the tag is within the KNOT's Bluetooth operating range, the KNOT will capture and display the payload under its "scanner" Bluetooth interface section. It would look like this:
/iot bluetooth scanners advertisements print
Columns: DEVICE, PDU-TYPE, TIME, ADDRESS-TYPE, ADDRESS, RSSI, LENGTH, DATA
#  DEVICE  PDU-TYPE        TIME                  ADDRESS-TYPE  ADDRESS            RSSI    LENGTH  DATA
0  bt1     adv-noconn-ind  mar/07/2023 12:11:57  public        DC:2C:6E:0F:C0:3D  -51dBm      22  15ff4f09010079100000ffff0000cf188a6b2b000064
1  bt1     adv-noconn-ind  mar/07/2023 12:11:58  public        2C:C8:1B:4B:BB:0A  -49dBm      22  15ff4f090100168dfefffffffeffa51ae1362200005e
The example above shows us, that the KNOT sees two Bluetooth tags within its operating range with MAC addresses "DC:2C:6E:0F:C0:3D" and "2C:C8:1B:4B:BB:0A", their respective payloads ("DATA" field) and the signal strength ("RSSI" field).
With the help of RouterOS scripting and scheduling, we can make the KNOT automatically-periodically scan the payload list and, in case, a specific payload or a specific tag's MAC address is found on the list, we can make the KNOT structure an MQTT message (out of the printed information shown in the example above) and send it to the configured server via MQTT, e-mail or HTTP post. Script examples will be shown later on in the guide.
As the title suggests, the goal is to implement a Bluetooth tag-tracking solution and the idea is quite simple. When you have 2 KNOTs (KNOT-A and KNOT-B), running the same script on a scheduler, and the tag moves between their Bluetooth operating ranges, the data on the server will indicate whether it was KNOT-A or KNOT-B that have sent the tag's payload. That will help you figure out the proximity of the tag. Whether the tag is broadcasting payloads in the KNOT-A zone, or in the KNOT-B zone.
You will need a server where the data is going to be stored and visualized. In this guide, we will showcase a server called ThingsBoard and how to communicate with it using the MQTT protocol.
ThingsBoard has a cloud solution and different local installation options (on different OS). Since we've added a container feature, it became possible to also run the platform within RouterOS. In order to do that, you will need a RouterOS device that has at least 2 GB RAM to spare or 1 GB RAM to spare with minimal load, has the option to increase storage (for example, an additional USB port), and is either ARM64 or AMD64 architecture. Consider using CHR machine, as it could be a good fit.
Setup requirements:
- a running ThingsBoard server;
- 2+ KNOTs with access to the server's network via ethernet, Wi-Fi, or cellular connection (the amount of the units required depends on the size of the area that needs to be covered);
- 1+ Bluetooth TG-BT5-IN and/or TG-BT5-OUT tags (depending on how many assets you need to track - 1 tag per asset).
Scenario explanation
+++
The actual Bluetooth operating distance can vary from site to site because a lot of different factors can impact it, like 2.4 GHz interference or the surrounding materials used. For example, in line of sight, with no interference, the distance at which the KNOT is able to capture the tag's broadcasted payload, can be up to 180 meters (KNOT — ~180 meters — TG-BT5-OUT). But you also have to keep in mind that with further distance, more packets will be lost on the way. In the office environment, the range can go down to 30-100 meters.
Let's take a look at a basic-rough example first. We have two KNOTs (KNOT-A and KNOT-B). We've tested Bluetooth ranges in our environment and could verify that both KNOTs are able to capture the tag at a 70-meter distance. If we install KNOT-A and KNOT-B 140 meters apart, their Bluetooth ranges will not overlap or overlap just slightly. When the tag moves into the KNOT-A range, the payload from the monitored tag will appear under the Bluetooth scanner list, an MQTT message with a report will be sent to the server and the server will display that the tag is in the KNOT-A zone. When the tag moves into the KNOT-B range, the same happens, and the server will display that the tag is inside the KNOT-B zone.
Logically, if the Bluetooth operating ranges overlap and the tag is within the overlapped area (at the same time within KNOT-A and KNOT-B Bluetooth ranges), both KNOTs will send the data and the server is going to show that the tag is reported by both devices at the same time.
Surely, there will be zones where two or more KNOT's Bluetooth ranges overlap and you can use it to your advantage → basically, you will have information that the tag, right now, is on the edges of the Bluetooth ranges in-between specific KNOT zones. In other words, when the asset moves into the overlapped area, you will have information on the server that the asset is somewhere between the two KNOT operating ranges, which is useful information to have as it gives more precision.
+++
Additionally, the script we've prepared allows you to set up a filter (that will be shown later on), which will make the KNOT ignore the payloads that the scanner captures unless the signal strength (RSSI) is stronger than the specified value. In the Bluetooth scanner example print shown above under the "Introduction" section, we can see that the KNOT sees one of the tags with an RSSI signal strength of -51 dBm (tag with a MAC address "DC:2C:6E:0F:C0:3D") and the other one with an RSSI signal strength of -49 dBm (tag with a MAC address "2C:C8:1B:4B:BB:0A"). So, if we apply a filter to the script to ignore all payloads that are received with signal strength (RSSI) weaker than -50 dBm, our KNOT would report that only tag "2C:C8:1B:4B:BB:0A" is within the Bluetooth range, because its RSSI is -49 dBm, and the second tag (with RSSI -51 dBm) will be ignored. What this means, essentially, is that you can "tweak" the "range" of reception. The actual signal strength will vary between different locations (as mentioned before, because of interference and surrounding materials), so it needs to be tested on sight.
Scenario example
To understand the scenario and the idea behind it better, take a look at the topology shown below:
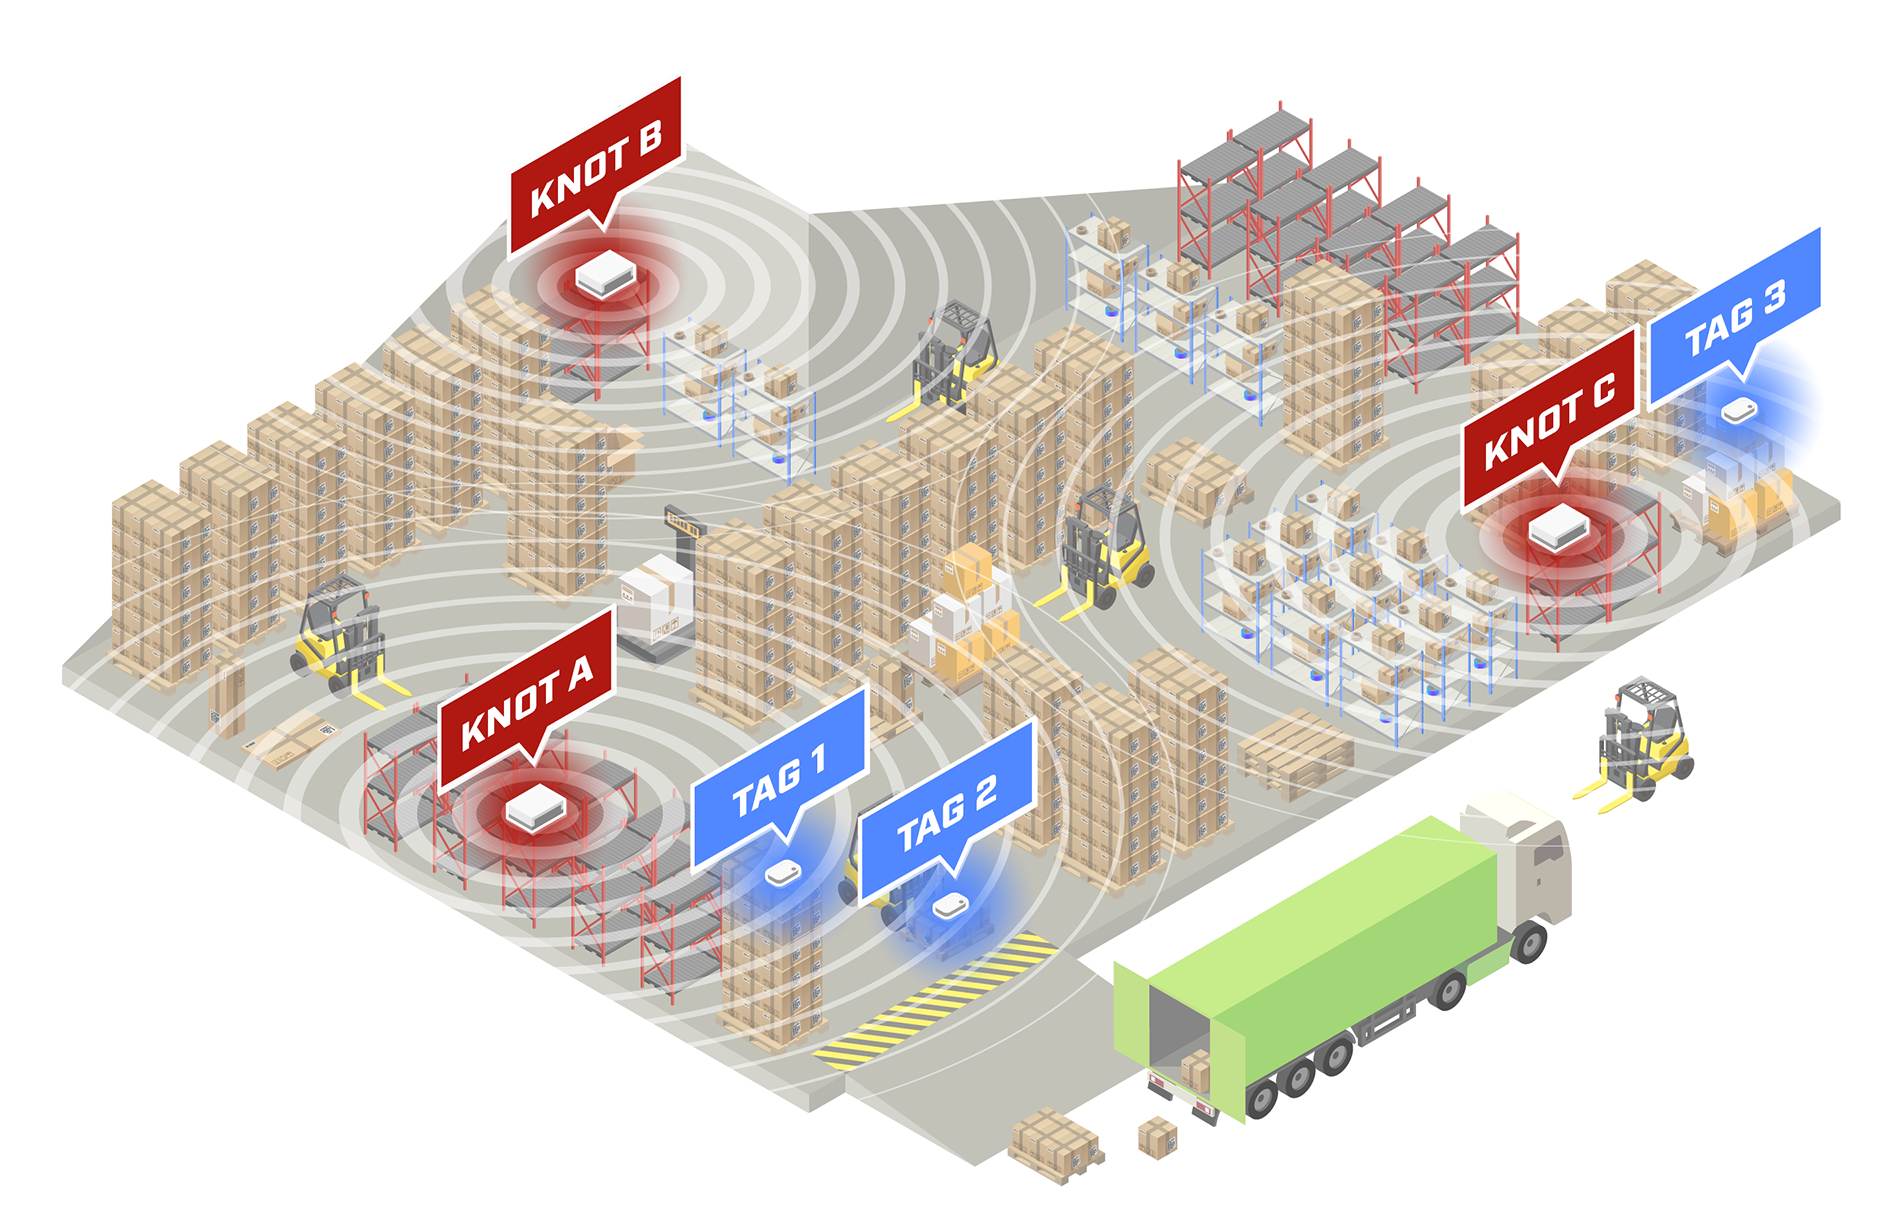
Bluetooth distances that you can see in the picture above, in real life will be much bigger (unless the signal-absorbing-reflecting materials are used inside the area, there is a lot of 2.4 GHz interference or the RSSI filter is used in the script to help reduce the range of reception)! The scale of objects and Bluetooth operating ranges are just shown as an example, to help visually understand and imagine the topology.
We have a warehouse area and we have 3 assets (pallets) that we are interested in tracking. We also have 3 zones: zone A, where newly arrived pallets are stored; zone B, where our assets are relocated to be inspected; and zone C, where assets are moved after inspection. To achieve Bluetooth asset-tracking, just install x1 KNOT per zone and x1 tag per asset.
If TAG 1 and TAG 2 (pallets) arrive in the "arrival" zone A, KNOT A will report to the server that both assets are within its Bluetooth range. If TAG 3 gets moved to zone C, the server will indicate it is within the KNOT C range. If TAG 1 and TAG 2 move toward the B zone, and stay on the edges between A and B zones, the server will show that it is in the overlapped area (at the same time within KNOT-A and KNOT-B ranges). If the tags move to the middle of the warehouse, the server will indicate that they are in all 3 zones at once, in the overlapping area.
Configuration
In this example, we will showcase a basic topology, when two KNOTs are used and we just want to know whether the tag/asset, is located in one part of the building or the other one (whether it is inside zone A or zone B).
ThingsBoard preparation
Check the guide over here to understand how the ThingsBoard and the RouterOS can be set up to utilize MQTT communication.
This example will showcase access-token scenario for simplicity reasons, but you can use other available options as well. For the production environment, it is suggested to use SSL-MQTT, as non-SSL-MQTT can be easily packet captured and inspected.
To understand how to implement SSL-MQTT communication on the instance that is run with the container. Check the guide linked here (Enabling HTTPS and SSL MQTT section).
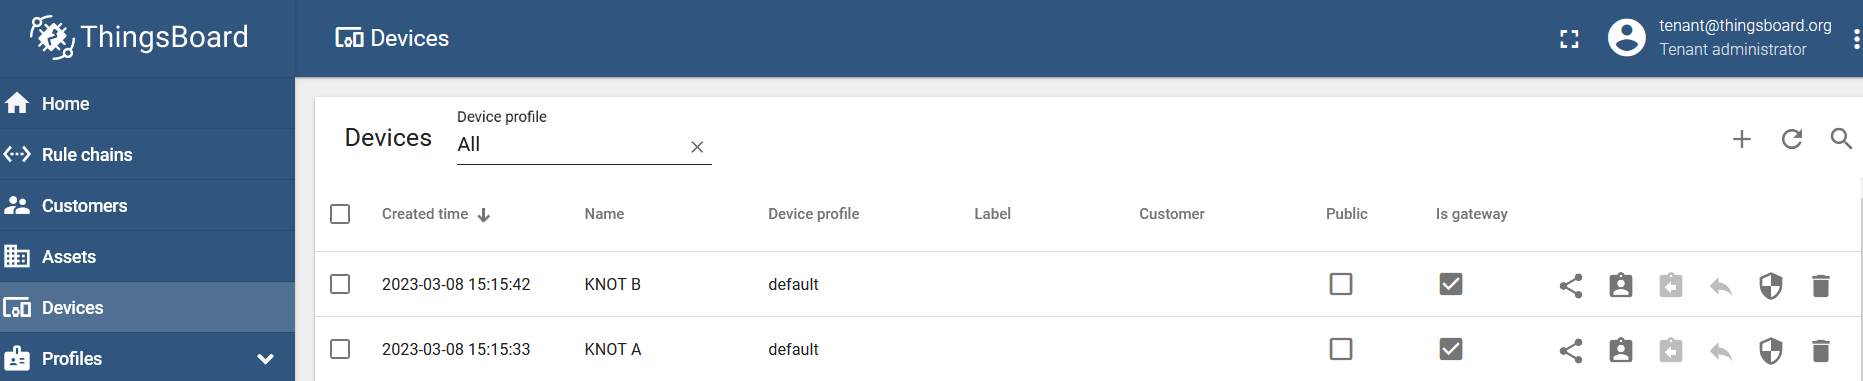
Create 2 KNOTs under the ThingsBoard GUI and make them "gateways".
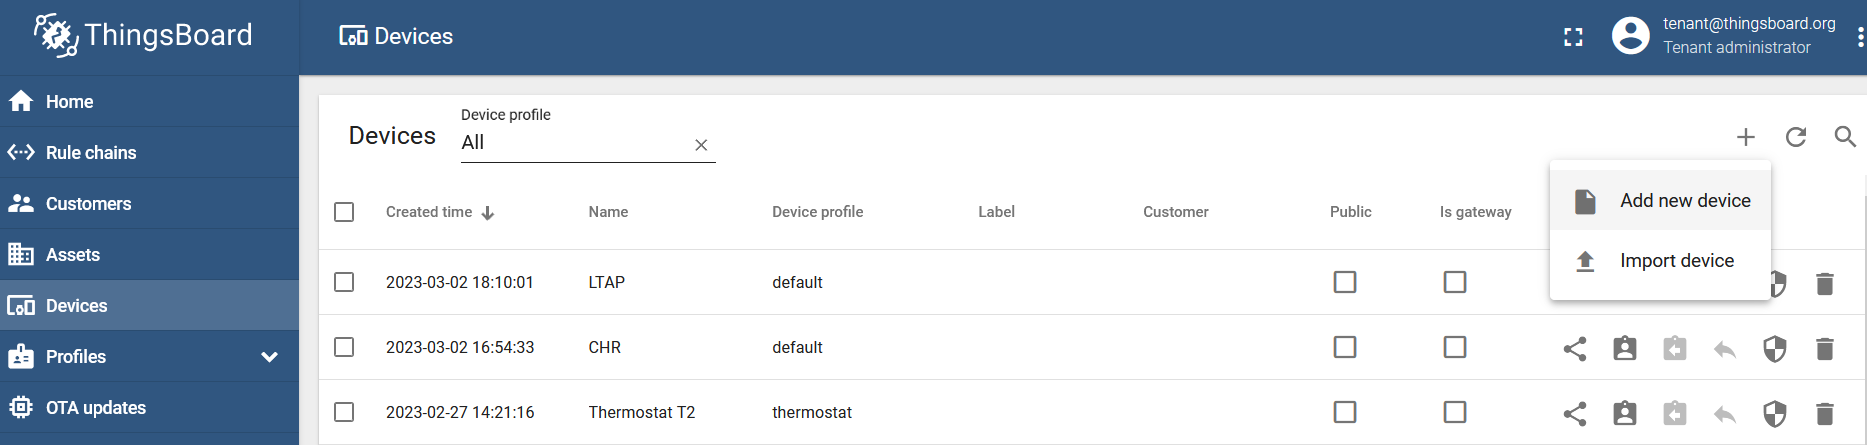
Go to the "Devices" section, click on "+" button and "Add new device":
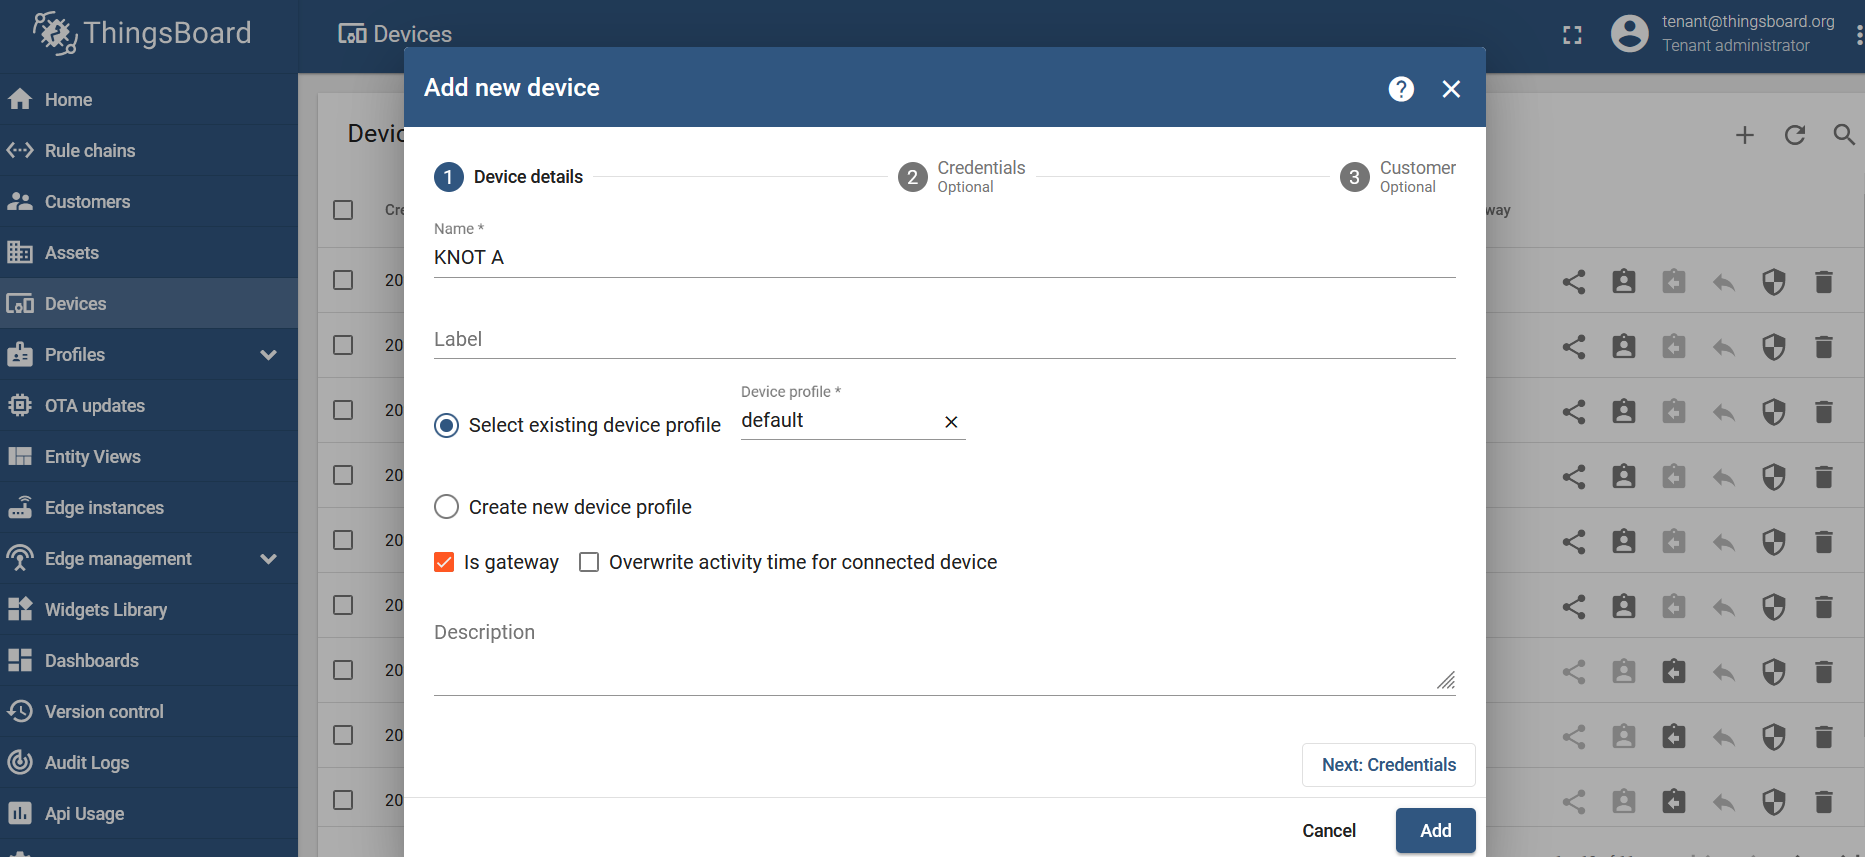
Name the device and checkbox the "Is gateway" option:
Do that for each KNOT that you have:
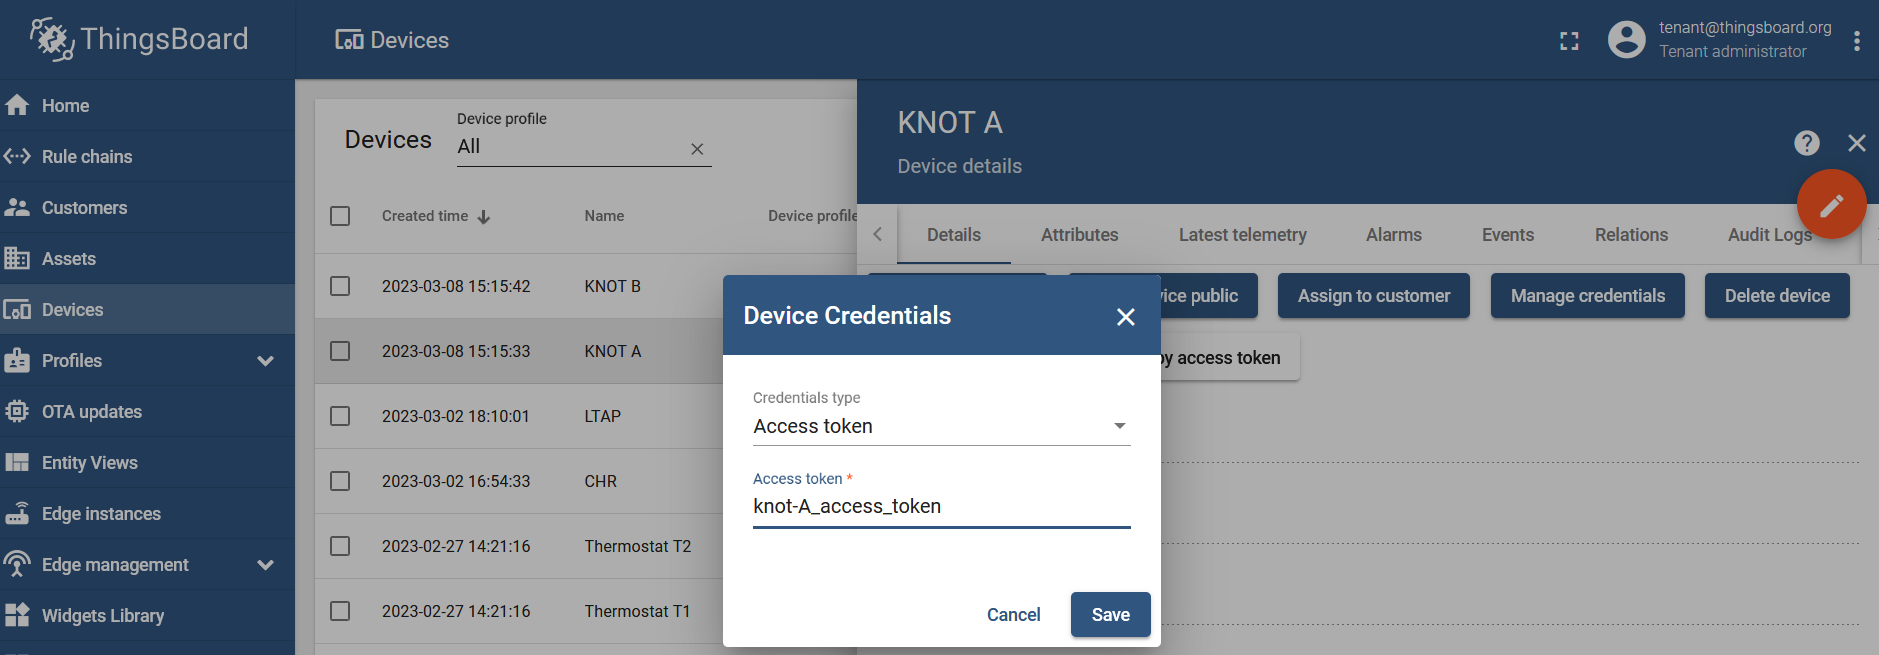
Set up a unique access token (unique credentials) for each KNOT under the device you've just created, under the "Manage credentials" tab:
RouterOS configuration
Preparation
Before we proceed, we need to confirm that our Bluetooth tag actually appears in the KNOT's Bluetooth range and that the KNOT detects them. To do that, you can issue the command "/iot bluetooth scanners advertisements print":
/iot bluetooth scanners advertisements print
 # DEVICE     PDU-TYPE        TIME                 ADDRESS-TYPE ADDRESS                    RSSI     LENGTH DATA
 0 bt1        adv-noconn-ind  mar/08/2023 12:35:15 public       2C:C8:1B:4B:BB:0A        -50dBm         22 15ff4f090100b0110100ffff00000019d68d2300005d
 1 bt1        adv-noconn-ind  mar/08/2023 12:35:16 public       DC:2C:6E:0F:C0:3D        -39dBm         22 15ff4f0901008f3cfcfffbfffaff301783c22c000064
 2 bt1        adv-noconn-ind  mar/08/2023 12:35:35 public       2C:C8:1B:4B:BB:0A        -50dBm         22 15ff4f09010084d500000400ffff0319ea8d2300005d
 3 bt1        adv-noconn-ind  mar/08/2023 12:35:45 public       2C:C8:1B:4B:BB:0A        -50dBm         22 15ff4f090100e607faffffff03000319f48d2300005d
Or you can check it using Webfig or Winbox under the IoT>Bluetooth>Advertising reports tab.
The list can be chaotic. Random payloads can appear on the list as the scanner captures everything around it. To help reduce the list, you can filter it using the tag's MAC address "/iot bluetooth scanners advertisements print where address=DC:2C:6E:0F:C0:3D":
/iot bluetooth scanners advertisements print where address=DC:2C:6E:0F:C0:3D
 # DEVICE    PDU-TYPE        TIME                 ADDRESS-TYPE ADDRESS                    RSSI     LENGTH DATA
 0 bt1       adv-noconn-ind  mar/08/2023 12:41:06 public       DC:2C:6E:0F:C0:3D        -49dBm         22 15ff4f0901005ab20100fdfffdff4017e1c32c000064
 1 bt1       adv-noconn-ind  mar/08/2023 12:41:26 public       DC:2C:6E:0F:C0:3D        -40dBm         22 15ff4f090100349704000000fcff4017f5c32c000064
 2 bt1       adv-noconn-ind  mar/08/2023 12:41:36 public       DC:2C:6E:0F:C0:3D        -49dBm         22 15ff4f09010073fb0000000000003017ffc32c000064
 3 bt1       adv-noconn-ind  mar/08/2023 12:41:46 public       DC:2C:6E:0F:C0:3D        -43dBm         22 15ff4f090100b88cffffffffffff401709c42c000064
This is also the step, where you can see how the tag's RSSI changes based on the distance from the KNOT.
MQTT broker
On each KNOT setup MQTT broker.
For KNOT A:
/iot/mqtt/brokers/add name=tb address=x.x.x.x port=1883 username=knot-A_access_token
Where:
nameis the name that you wish to give to the broker and this name will be used later in the script;addressis the IP address of the broker/ThingsBoard server;portis the TCP port that the broker is listening for → for non-SSL it is typically TCP 1883;usernameis dictated by the MQTT broker and, in our case, it is an "access token" that was generated in the ThingsBoard management portal.
For KNOT B → Do the same step. Just change username to the respective access token that was generated for the KNOT B device (gateway).
Script
Import the script shown below to each KNOT. To do that, just copy the below shown "code" and paste it into a new terminal window and press "ENTER":
/system script add dont-require-permissions=no name=tracking owner=admin policy=\
    ftp,reboot,read,write,policy,test,password,sniff,sensitive,romon source="# Requ\
    ired packages: iot\r\
    \n\r\
    \n################################ Configuration ##############################\
    ##\r\
    \n# Name of an existing MQTT broker that should be used for publishing\r\
    \n:local broker \"tb\"\r\
    \n\r\
    \n# MQTT topic where the message should be published\r\
    \n:local topic \"v1/gateway/telemetry\"\r\
    \n\r\
    \n# POSIX regex for filtering advertisement Bluetooth addresses. E.g. \"^BC:33:\
    AC\"\r\
    \n# would only include addresses which start with those 3 octets.\r\
    \n# To disable this filter, set it to \"\"\r\
    \n:local addressRegex \"\"\r\
    \n\r\
    \n# POSIX regex for filtering Bluetooth advertisements based on their data. Sam\
    e\r\
    \n# usage as with 'addressRegex'.\r\
    \n:local advertisingDataRegex \"\"\r\
    \n\r\
    \n# Signal strength filter. E.g. -40 would only include Bluetooth advertisement\
    s\r\
    \n# whose signal strength is stronger than -40dBm.\r\
    \n# To disable this filter, set it to \"\"\r\
    \n:local rssiThreshold \"\"\r\
    \n\r\
    \n#Name the KNOT. Identity of the unit that will be senting the message. This n\
    ame will be reported to the MQTT broker.\r\
    \n:local gwName \"KNOT_A\"\r\
    \n\r\
    \n################################## Bluetooth ################################\
    ##\r\
    \n:put (\"[*] Gathering Bluetooth info...\")\r\
    \n\r\
    \n:global makeRecord do={\r\
    \n    :local jsonStr \"{\\\"ts\\\":\$ts,\\\"values\\\":{\\\"reporter\\\":\\\"\$\
    gwName\\\",\\\"rssi\\\":\$rssi}}\"\r\
    \n    :return \$jsonStr\r\
    \n}   \r\
    \n\r\
    \n# array of record strings collected for each advertising MAC address\r\
    \n:global macRecords [:toarray \"\"]\r\
    \n\r\
    \n# process advertisements and update macRecords\r\
    \n:local advertisements [/iot bluetooth scanners advertisements print detail as\
    -value where \\\r\
    \naddress ~ \$addressRegex and \\\r\
    \ndata ~ \$advertisingDataRegex and \\\r\
    \nrssi > \$rssiThreshold]\r\
    \n\r\
    \n/iot/bluetooth/scanners/advertisements clear\r\
    \n\r\
    \n:foreach adv in=\$advertisements do={\r\
    \n:local address (\$adv->\"address\")\r\
    \n:local rssi (\$adv->\"rssi\")\r\
    \n:local epoch (\$adv->\"epoch\")\r\
    \n                \r\
    \n:local recordStr [\$makeRecord ts=\$epoch gwName=\$gwName rssi=\$rssi]\r\
    \n\r\
    \n:if ([:len (\$macRecords->\$address)] > 0) do={\r\
    \n:local str (\$macRecords->\$address)\r\
    \n:local newStr \"\$str,\$recordStr\"\r\
    \n:set (\$macRecords->\$address) \$newStr} else={:set (\$macRecords->\$address)\
    \_\$recordStr}}\r\
    \n\r\
    \n# TODO: add some logic to decide when we want to send data\r\
    \n:local sendData true\r\
    \n\r\
    \n:if (\$sendData) do={\r\
    \n:local jsonStr \"{\"\r\
    \n\r\
    \n:foreach addr,advRec in=\$macRecords do={\r\
    \n:set jsonStr \"\$jsonStr\\\"\$addr\\\":[\$advRec],\"}\r\
    \n\r\
    \n:local payloadlength\r\
    \n:set payloadlength [:len (\$jsonStr)]\r\
    \n:local remcom\r\
    \n:set remcom [:pick \$jsonStr 0 (\$payloadlength-1)]\r\
    \n:set jsonStr \"\$remcom}\"\r\
    \n:local message\r\
    \n:set message \"\$jsonStr\"\r\
    \n:log info \"\$message\";\r\
    \n:put (\"[*] Message structured: \$message\")\r\
    \n:put (\"[*] Total message size: \$[:len \$message] bytes\")\r\
    \n:put (\"[*] Sending message to MQTT broker...\")\r\
    \n/iot mqtt publish broker=\"\$broker\" topic=\"\$topic\" message=\$message}"
The script should appear under the "System>Scripts>Script List" tab with the name "tracking" or with the help of the command "/system script print".
There are certain script lines that you need to pay attention to.
Broker name configuration line, where you need to input the MQTT broker name that you have set:
:local broker "tb"
You need to input a correct topic, used by the MQTT broker. Check ThingsBoard documentation for more details and, by default, the topic should be:
:local topic "v1/gateway/telemetry"
MAC address filtering option inside the script itself. You can type in all 6 octets of the MAC address (to apply the filter to 1 specific tag), or you can filter the list using a few/couple of octets, like "^BC:33:AC" (to apply the filter, so that only MAC addresses that begin with "BC:33:AC:..." would be processed).
:local addressRegex "DC:2C:6E:0F:C0:3D"
Payload content/data line. Allows you to filter the list, per specific payload content, like "manufacturer data". For example, "15ff4f09" would discard all payloads that are not MikroTik format payloads:
:local advertisingDataRegex "15ff4f09"
RSSI signal strength filtering option. This filtering option was mentioned in the "Scenario explanation" section. This filter allows you to ignore any payload that has RSSI weaker than the configured value. For example. "-40" would only include Bluetooth advertisements that have signal strength stronger than -40dBm:
:local rssiThreshold "-40"
KNOT identifier line. You will need to change it for each unique KNOT. For example, name your first KNOT → KNOT_A and your second KNOT → KNOT_B:
:local gwName "KNOT_A"
The rest of the script does not need to be changed/altered
How does the script work when you run it? The script "inspects" the "Advertising reports" tab (payload list tab) using the filters applied and structures a JSON message. An example of the JSON message would be:
{
  "2C:C8:1B:4B:BB:0A": [
    {
      "ts": 1678967250600,
      "values": {
        "reporter": "KNOT_A",
        "rssi": -47
      }
    }
  ],
  "DC:2C:6E:0F:C0:3D": [
    {
      "ts": 1678967247850,
      "values": {
        "reporter": "KNOT_A",
        "rssi": -59
      }
    },
    {
      "ts": 1678967257849,
      "values": {
        "reporter": "KNOT_A",
        "rssi": -67
      }
    }
  ]
}
The data is structured per the ThingsBoard guide, where "2C:C8:1B:4B:BB:0A" and "DC:2C:6E:0F:C0:3D" are MAC addresses of tags that appeared in the KNOT's range, "ts" is unix timestamp of each payload broadcasted by the tag in milliseconds, "reporter" indicates which specific KNOT has sent the message and "rssi" is the signal strength of each payload broadcasted by the tag in dBm.
After the payload list is "searched" and the JSON message is structured, the Bluetooth interface payload list gets "cleaned" (or "flashed"), and the previously structured JSON message is sent to the ThingsBoard MQTT broker.
To run the script, use the command:
/system script run tracking
Scheduler
Apply a scheduler to the script, so that RouterOS periodically initiates the script by itself:
/system/scheduler/add name=bluetoothscheduler interval=30s on-event="/system/script/run tracking"
You can set up shorter and longer intervals. If you want to send data more often, so that the data is "fresher" → set up shorter time intervals (10-15 seconds). If you want to send fewer messages, less often → you can set up longer time intervals (30min+).
The JSON message structured using the script has a "ts" value (timestamp) assigned for each payload received. Meaning that when the script is run, for example, every minute, 1 tag is used and the tag broadcasts 1 payload every 10 seconds (that is 6 payloads per minute) → ThingsBoard data (GUI) will be updated every minute, and every minute, 6 new entries will appear (each entry will indicate that it was received 10 seconds after the previous one). And if you send the message every 15 minutes when using 1 tag that is broadcasting a payload every 10 seconds (that is 6*15=90 payloads per 15 minutes) → ThingsBoard data (GUI) will be updated every 15 minutes but 90 entries will appear.
ThingsBoard data visualization and result verification
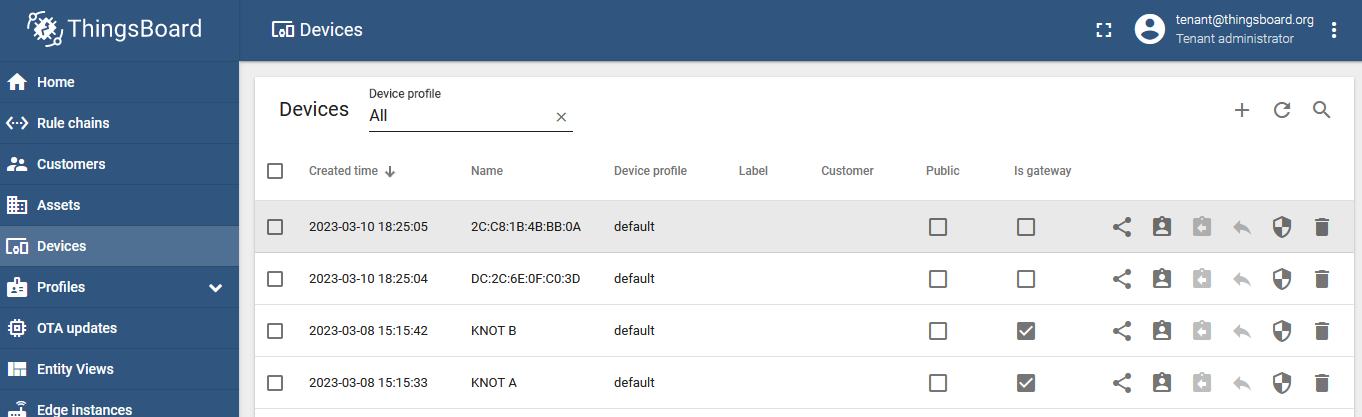
After you run the script with /system script run tracking or via a scheduler and refresh the GUI portal → all MAC addresses (tags) that are found in the JSON message, will be made into new devices under the ThingsBoard GUI:
To help you visualize the data, you can use the built-in widgets or create your own one.
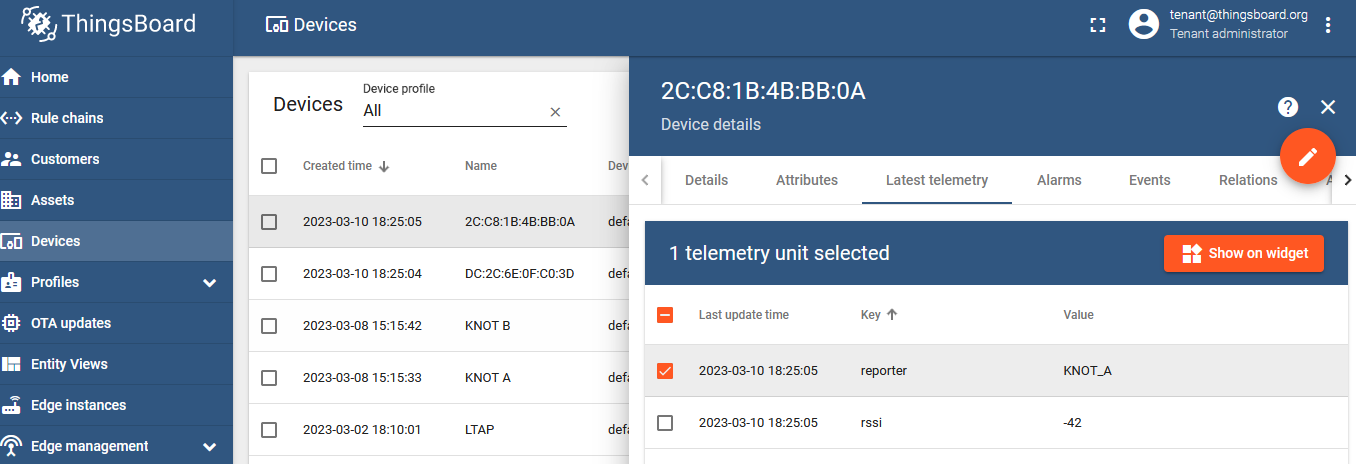
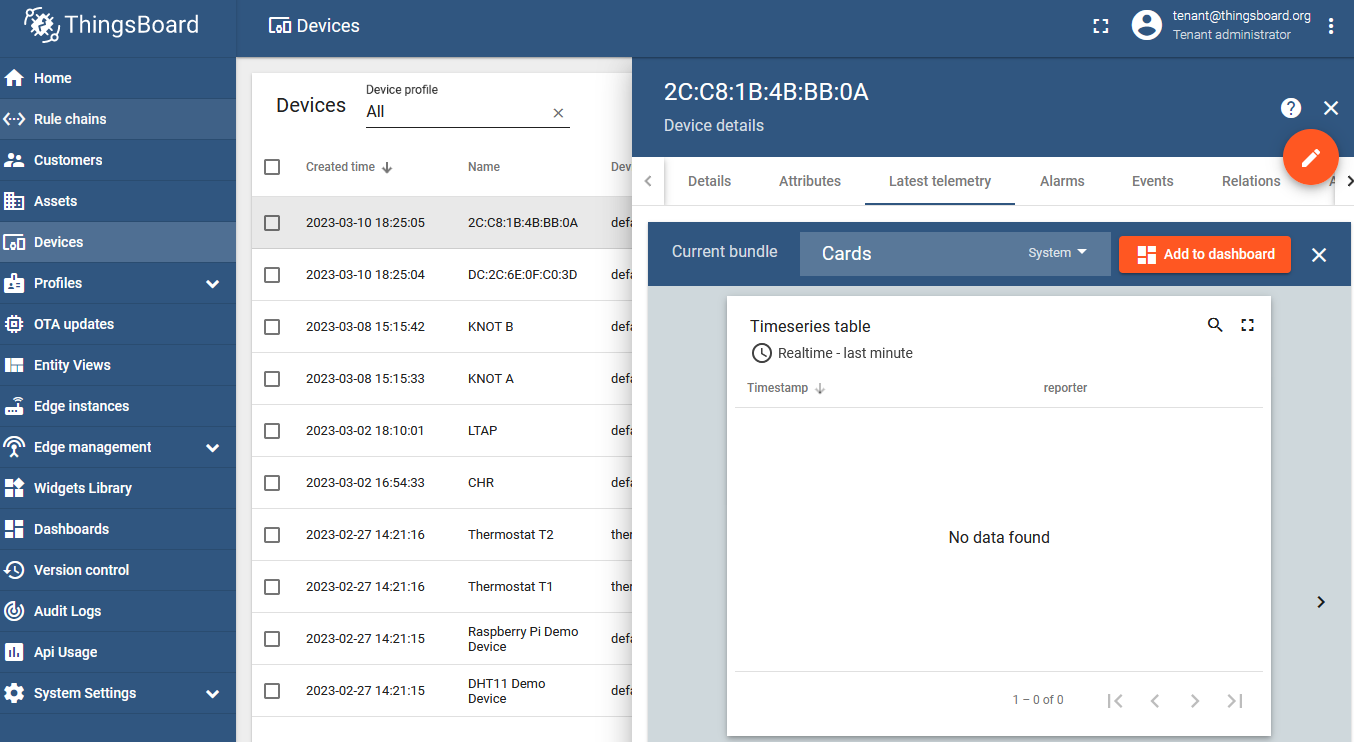
Select the tag's MAC address from the list of devices, go to the "Latest telemetry" section, checkbox the "reporter" parameter, and click on the "Show on widget" button:
Select a widget that you wish to use, for example under the "Cards" bundle, "Timeseries table" and click on "Add to dashboard":
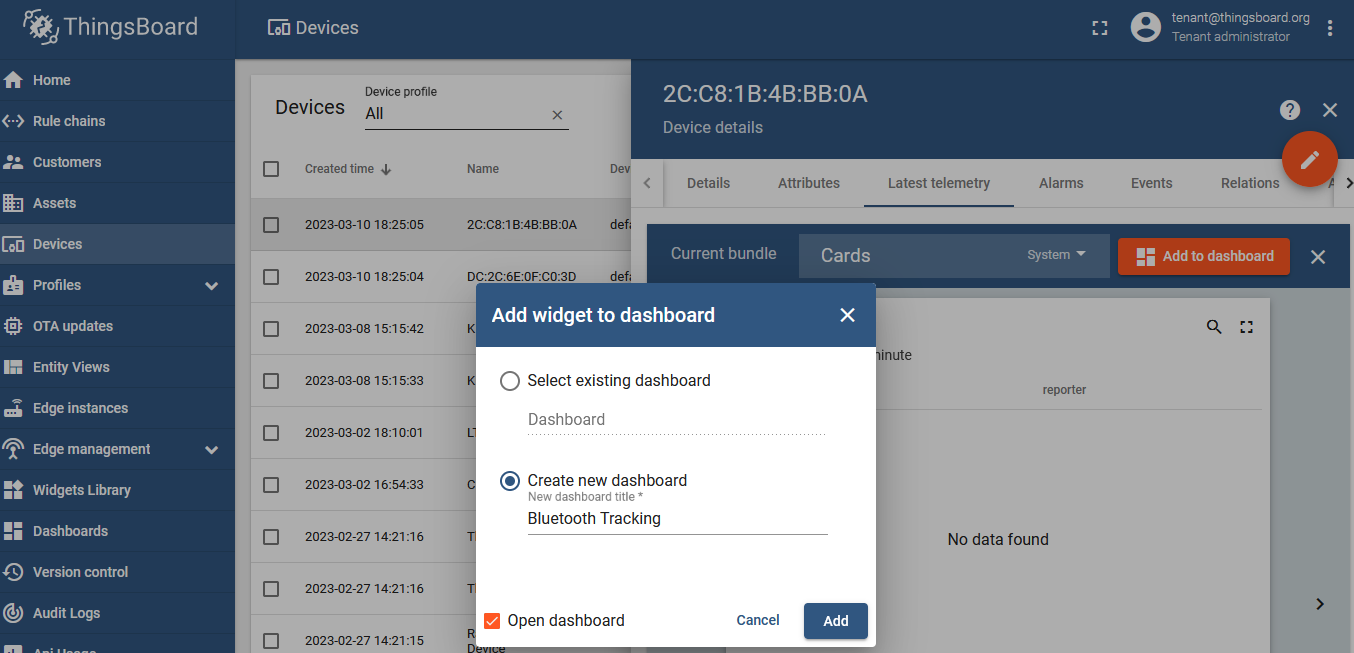
Create a new dashboard and name it, however, you like. Click on "Add":
Do the same steps for your other tags that appeared under the "Devices" tab. Create a new widget for each unique tag under the same dashboard.
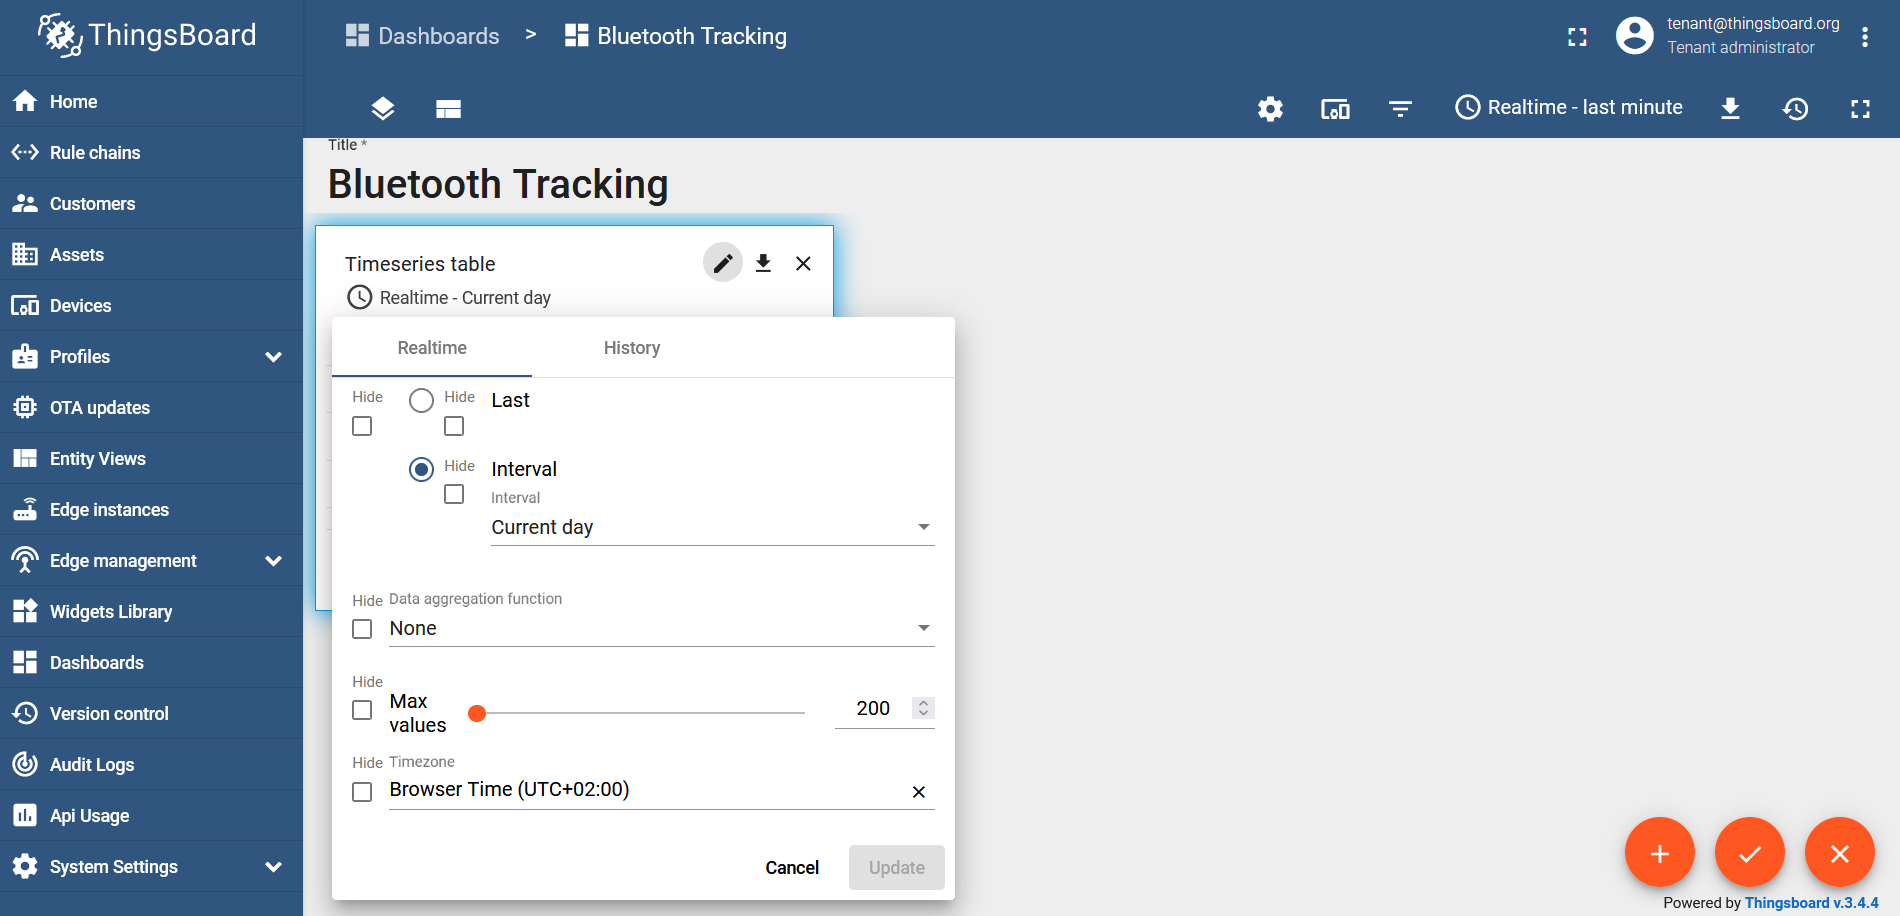
Change the widget's "Timewindow" from "Realtime-last minute" (which is used by default) to "Realtime-current day":
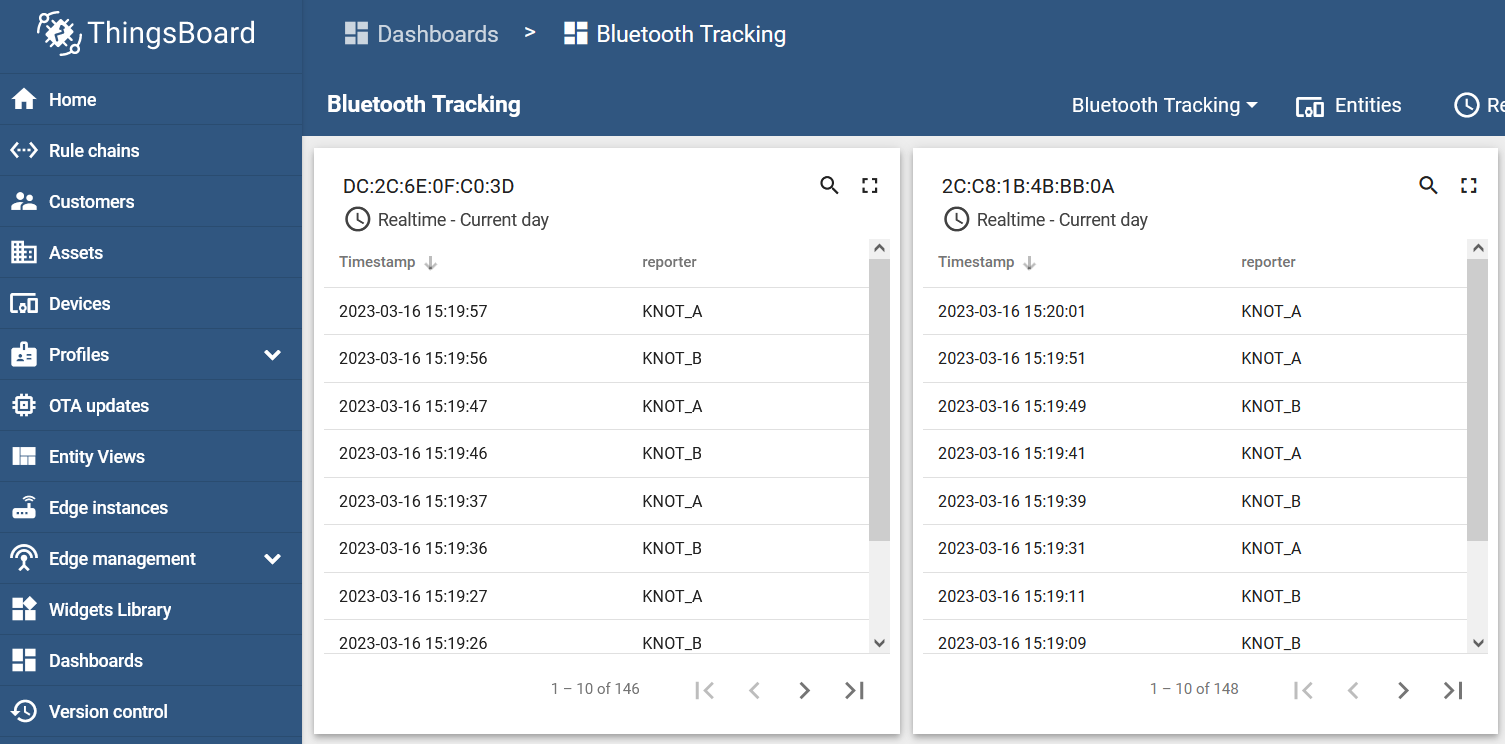
As a result, if both tags are inside the KNOT A range, the dashboard would show:

If they move to the KNOT B range, it would show:

If the tags move to the overlapped area, inside both ranges, both reporters (KNOT_A and KNOT_B) should show up within a few seconds after each other, depending on the interval used in the scheduler: