Introduction
One of the many cloud services that you can use to monitor information that is sent by an MQTT publisher is Thingsboard. This article will demonstrate how to configure both Thingsboard and RouterOS to publish the data using the MQTT protocol. RouterOS, in this scenario, is going to act as a gateway and publish the data from the RouterBoard to the Thingsboard's server. Thingsboard, in this scenario, will act as an MQTT broker (server, where data will be posted).
Before we proceed with the settings, you need to either:
- a) Create an account in the Thingsboard's system. You can do so by following this link. This will allow you to use the ThingsBoard cloud solution for free for a limited/test time period.
- b) Set up your own server by following the guide. There is a community edition that can be installed and used free of charge.
Please consider using SSL MQTT (TCP port 8883 and certificates), instead of non-SSL MQTT (TCP port 1883). If you use non-SSL MQTT, the communication between the client (MQTT publisher) and the server (MQTT broker) can be easily sniffed/packet captured, and that will compromise authentication data (such as client-ids, usernames and passwords).
Thingsboard configuration
In this guide, we will showcase local instance/server installation configuration, but the same principles apply to the cloud option.
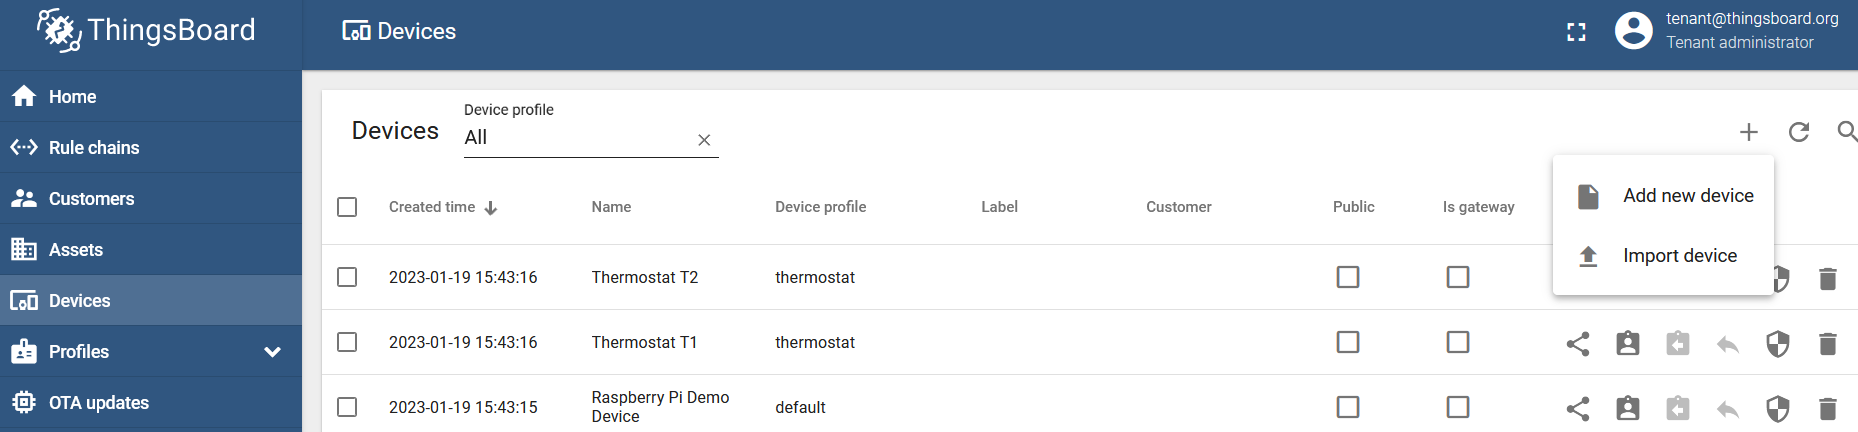
Access the login page via your browser and log in. Go to the "Devices" menu.
Create a new device by clicking on the add button "+" and "Add new device":
Enter the name of the device and click on "Add":
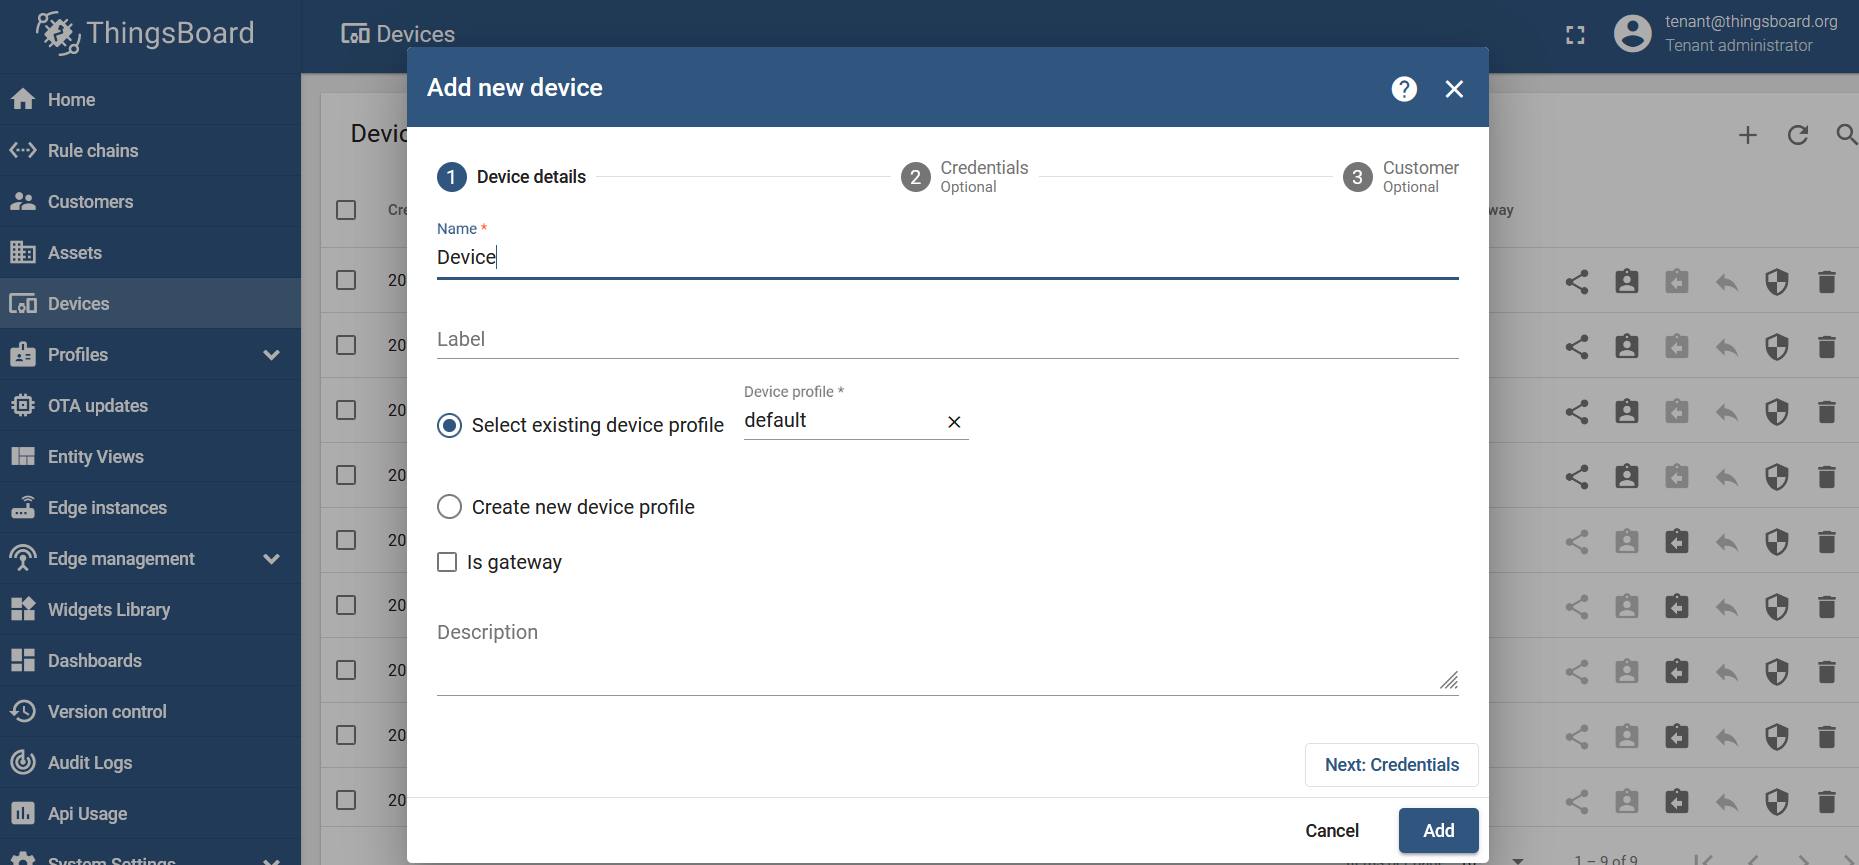
By default, access token authentication is selected for the newly created device.
Access token scenario
You can change the token by clicking on the created device and entering the "Manage Credentials" settings (in the "Details" section):
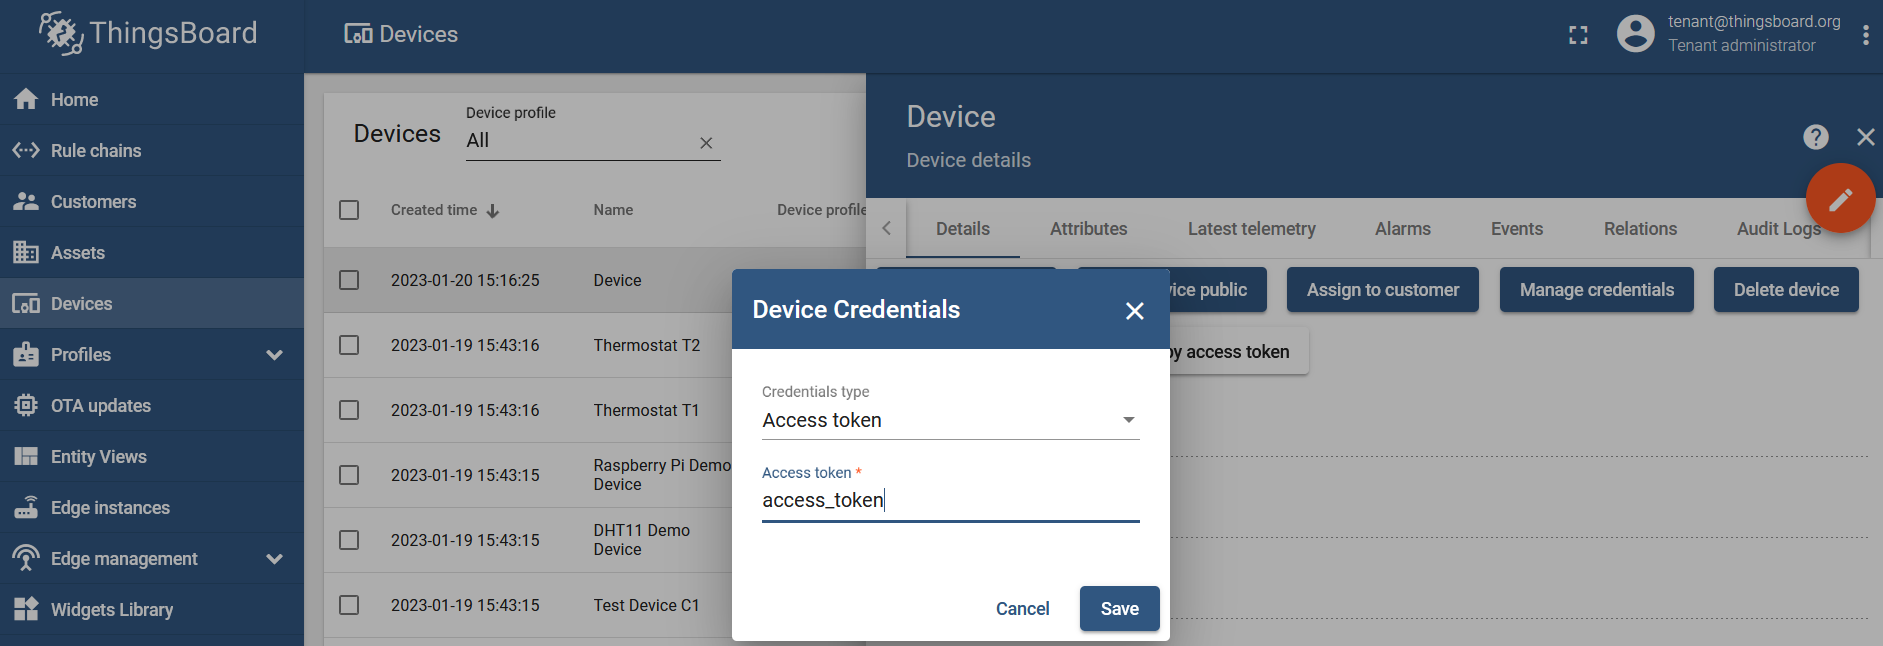
This token will be used as a "username" for the MQTT publisher (in RouterOS settings).
You can find more information by following the link.
MQTT Basic scenario
You can change the credentials type in the "Device Credentials" section for the specific device:
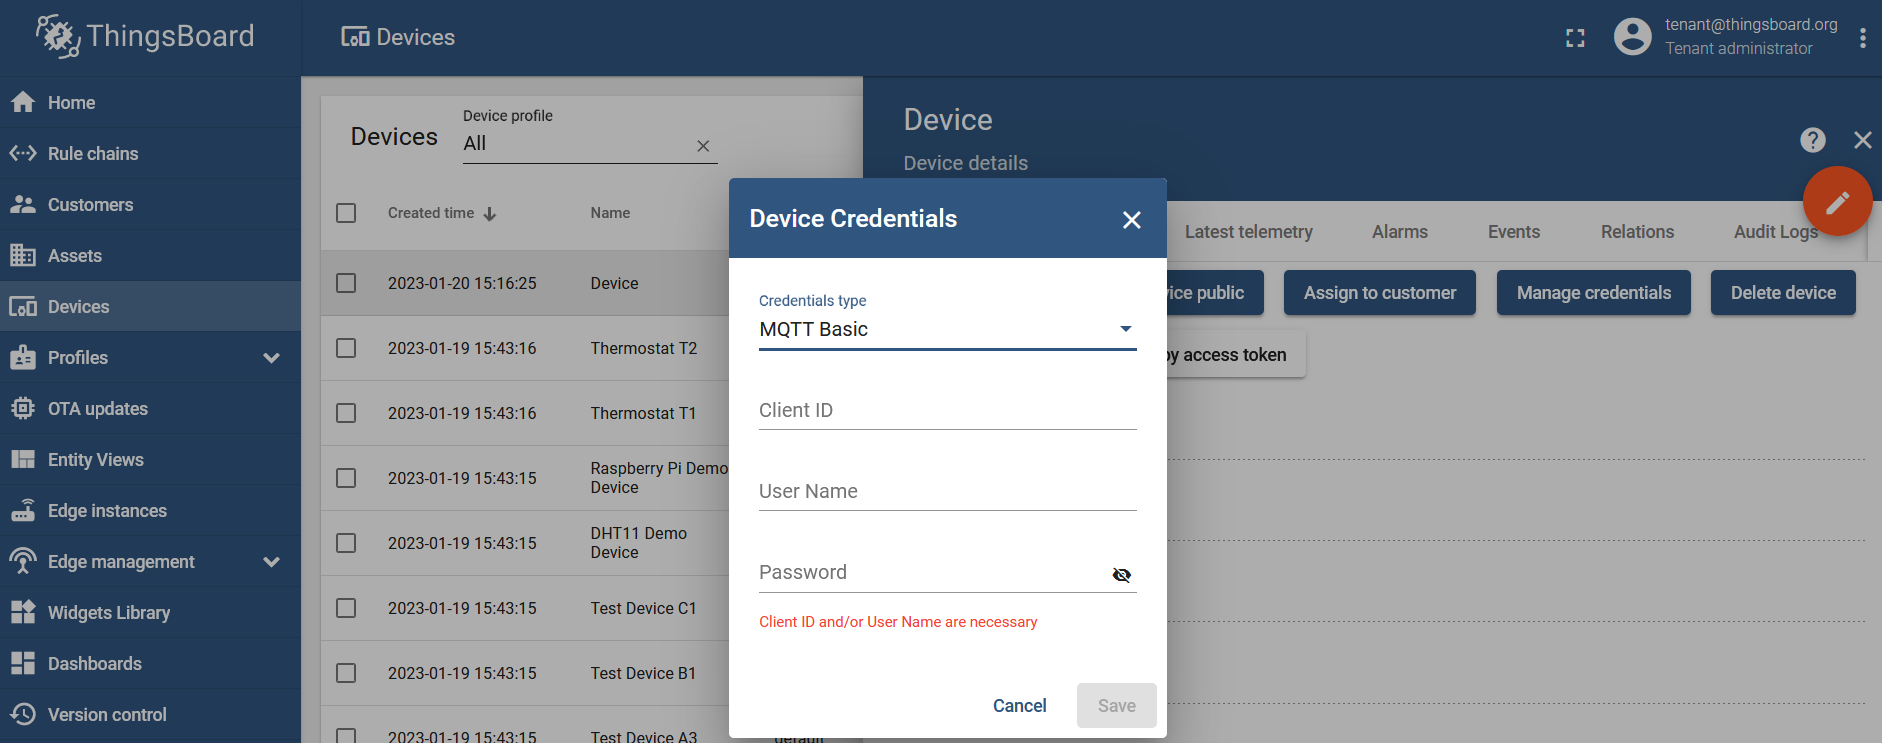
MQTT Basic scenario allows you to specify the Client ID, Username, and Password for the MQTT authentication.
You can find more information by following the link.
One-way SSL communication scenario
Recommended scenario to use!
This type of authentication requires you to use a server certificate for SSL communication. A server certificate must be generated and uploaded to the ThingsBoard instance.
To generate a server certificate, use this guide as a reference → generate the certificate (for example, using OPENSSL tool), install/upload it into the correct folder, and enable MQTT SSL in the ThingsBoard configuration file.
The configuration will be the same as shown in the Access token and MQTT Basic scenarios shown above. So choose either one.
The only difference, in this case, is the communication between the device and the server (you will only have to slightly change MQTT broker configuration in RouterOS settings which will be shown later on).
When using this scenario, the communication is going to be encrypted (using SSL).
X.509 (two-way SSL communication) scenario
This type of authentication requires you to use a server certificate and a client certificate for SSL communication. A server certificate must be generated and uploaded to the ThingsBoard instance.
To generate a server certificate, use this guide as a reference → generate the certificate (for example, using OPENSSL tool), install/upload it into the correct folder, and enable MQTT SSL in the ThingsBoard configuration file.
To generate a client certificate, use this guide as a reference.
You can change the credentials type in the "Device Credentials" section for the specific device:
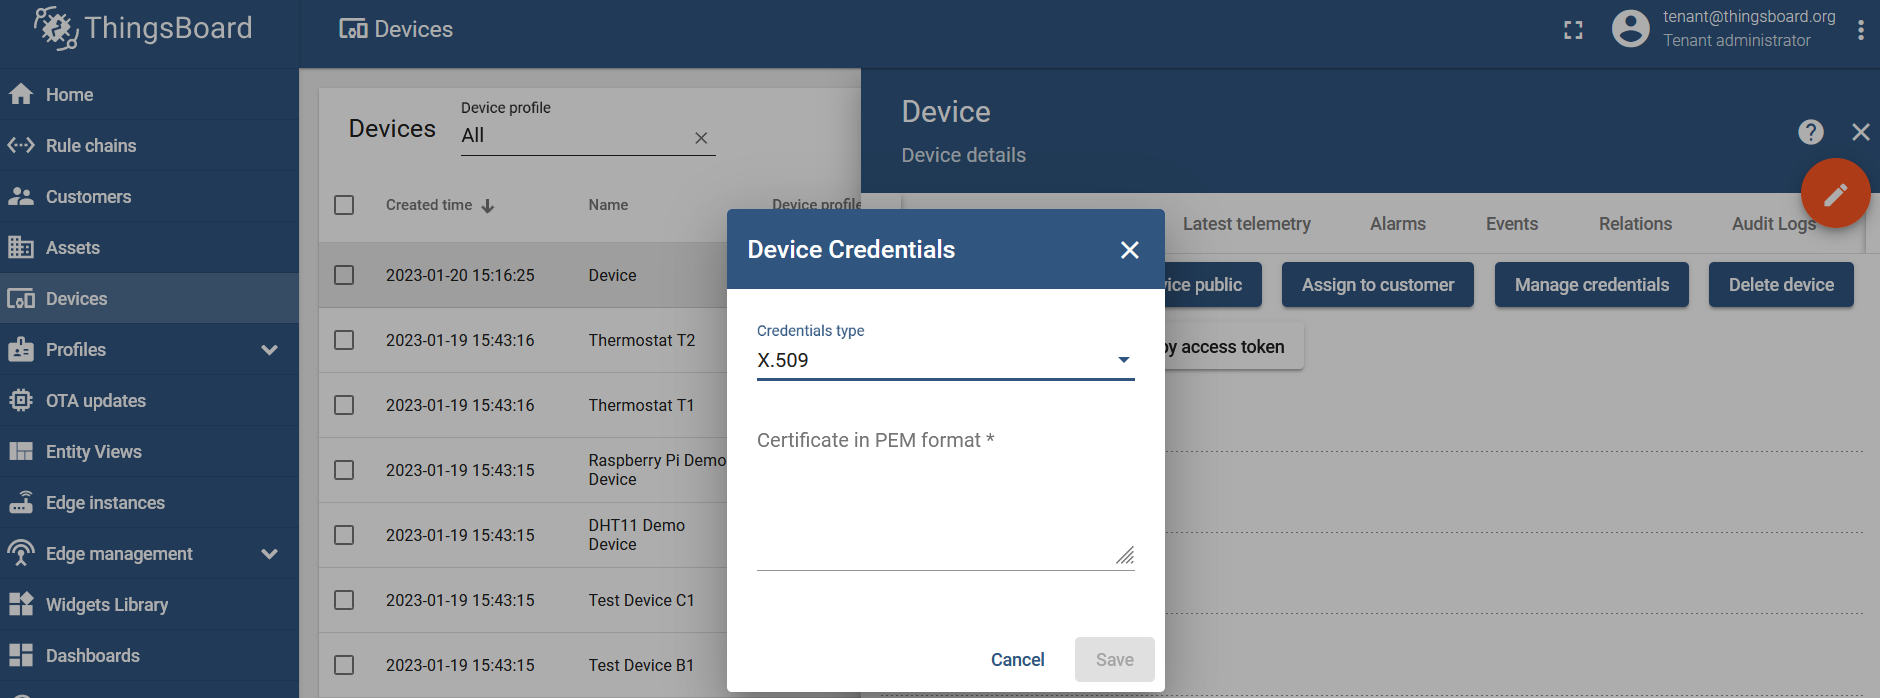
X.509 scenario uses a client certificate for authentication.
Once the certificate is generated (for example, using OPEN SSL), copy the RSA public key into the field and click on the "Save" button.
RouterOS configuration
note: In order to configure MQTT, make sure that iot package is installed beforehand.
MQTT Broker
Access token scenario
Add an MQTT broker as shown below:
/iot/mqtt/brokers/add name=tb address=x.x.x.x port=1883 username=access_token
- Change the "
address" to the actual IP/domain address of your ThingsBoard server; - Change the "
username" to the access token that you've used in the ThingsBoard settings.
MQTT Basic scenario
Add an MQTT broker as shown below:
/iot/mqtt/brokers/add name=tb address=x.x.x.x client-id=clientid password=password username=username
- Change "
address" to the actual IP/domain address of your ThingsBoard server; - Change the "
username", "password" and "client-id" to the actual values that you've used in the ThingsBoard settings.
One-way SSL communication scenario
Recommended scenario to use!
In this scenario, RouterOS needs to have a server certificate imported into its system.
Drag-and-drop server certificate, that was installed into the ThingsBoard, into the router's "File List" menu:
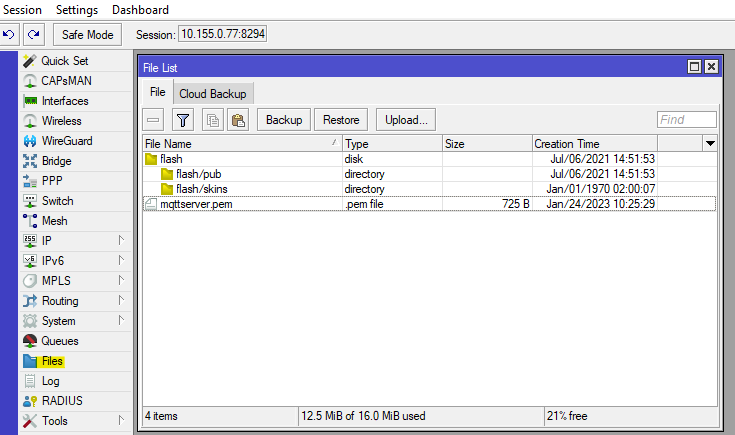
Import server certificate:
/certificate/import file-name=mqttserver.pem passphrase=""
When using SSL one-way communication and an access token scenario, add an MQTT broker as shown below:
/iot/mqtt/brokers/add name=tb address=x.x.x.x port=8883 username=access_token ssl=yes
- Change the "
address" to the actual IP/domain address of your ThingsBoard server; - Change the "
username" to the access token that you've used in the ThingsBoard settings; - Make sure to use "
port=8883" (the MQTT SSL port that the server is listening to); - Make sure to enable "
ssl=yes".
When using SSL one-way communication and an MQTT Basic scenario, add an MQTT broker as shown below:
/iot/mqtt/brokers/add name=tb address=x.x.x.x port=8883 client-id=clientid password=password username=username ssl=yes
- Change the "
address" to the actual IP/domain address of your ThingsBoard server; - Change the "
username", "password" and "client-id" to the actual values that you've used in the ThingsBoard settings; - Make sure to use "
port=8883" (the MQTT SSL port that the server is listening to); - Make sure to enable "
ssl=yes".
X.509 (two-way SSL communication) scenario
Drag-and-drop the certificates into the router's "Files/File List" menu → server certificate, client certificate, and its private key.
/certificate/import file-name=mqttserver.pem passphrase=""
/certificate/import file-name=cert.pem passphrase=""
/certificate/import file-name=key.pem passphrase=""
Add an MQTT broker as shown below:
/iot/mqtt/brokers/add name=tb address=x.x.x.x port=8883 certificate=cert.pem_0 ssl=yes
- Change the "
address" to the actual IP/domain address of your ThingsBoard server; - Change the "
certificate" selected to the actual client certificate name that you've imported; - Make sure to use "
port=8883" (the MQTT SSL port that the server is listening to); - Make sure to enable "
ssl=yes".
MQTT Publish
a) A quick MQTT publish test with a static value:
/iot/mqtt/publish broker="tb" topic="v1/devices/me/telemetry" message="{\"cpu\":\"7\"}"
b) In order to publish relevant data from the RouterOS to the Thingsboard, you can use the script shown below as a reference. The script collects the data from the RouterOS device (model name, serial number, RouterOS version, current CPU, used memory, free memory, and uptime) and publishes the message (the data) to the broker in the JSON format:
# Required packages: iot
################################ Configuration ################################
# Name of an existing MQTT broker that should be used for publishing
:local broker "tb"# MQTT topic where the message should be published
:local topic "v1/devices/me/telemetry"#################################### System ###################################
:put ("[*] Gathering system info...")
:local cpuLoad [/system resource get cpu-load]
:local freeMemory [/system resource get free-memory]
:local usedMemory ([/system resource get total-memory] - $freeMemory)
:local rosVersion [/system package get value-name=version \
[/system package find where name ~ "^routeros"]]
:local model [/system routerboard get value-name=model]
:local serialNumber [/system routerboard get value-name=serial-number]
:local upTime [/system resource get uptime]#################################### MQTT #####################################
:local message \
"{\"model\":\"$model\",\
\"sn\":\"$serialNumber\",\
\"ros\":\"$rosVersion\",\
\"cpu\":$cpuLoad,\
\"umem\":$usedMemory,\
\"fmem\":$freeMemory,\
\"uptime\":\"$upTime\"}":log info "$message";
:put ("[*] Total message size: $[:len $message] bytes")
:put ("[*] Sending message to MQTT broker...")
/iot mqtt publish broker=$broker topic=$topic message=$message
:put ("[*] Done")
2 script lines should be taken into account.
:local broker "tb"
line, where you should specify the broker's name within the quotation marks "".
:local topic "v1/devices/me/telemetry"
line, where you should specify the correct topic within the quotation marks "" (check Thingsboard's documentation for the exact topic that needs to be used).
The rest of the script configuration depends on the overall requirements.
Copy and paste the above script into a notepad, and re-copy it again. Navigate to System>Scripts menu, add a new script there, and paste the script that is shown above. Name it, for example, script1.
To run the script, you can use the command line:
/system script run script1
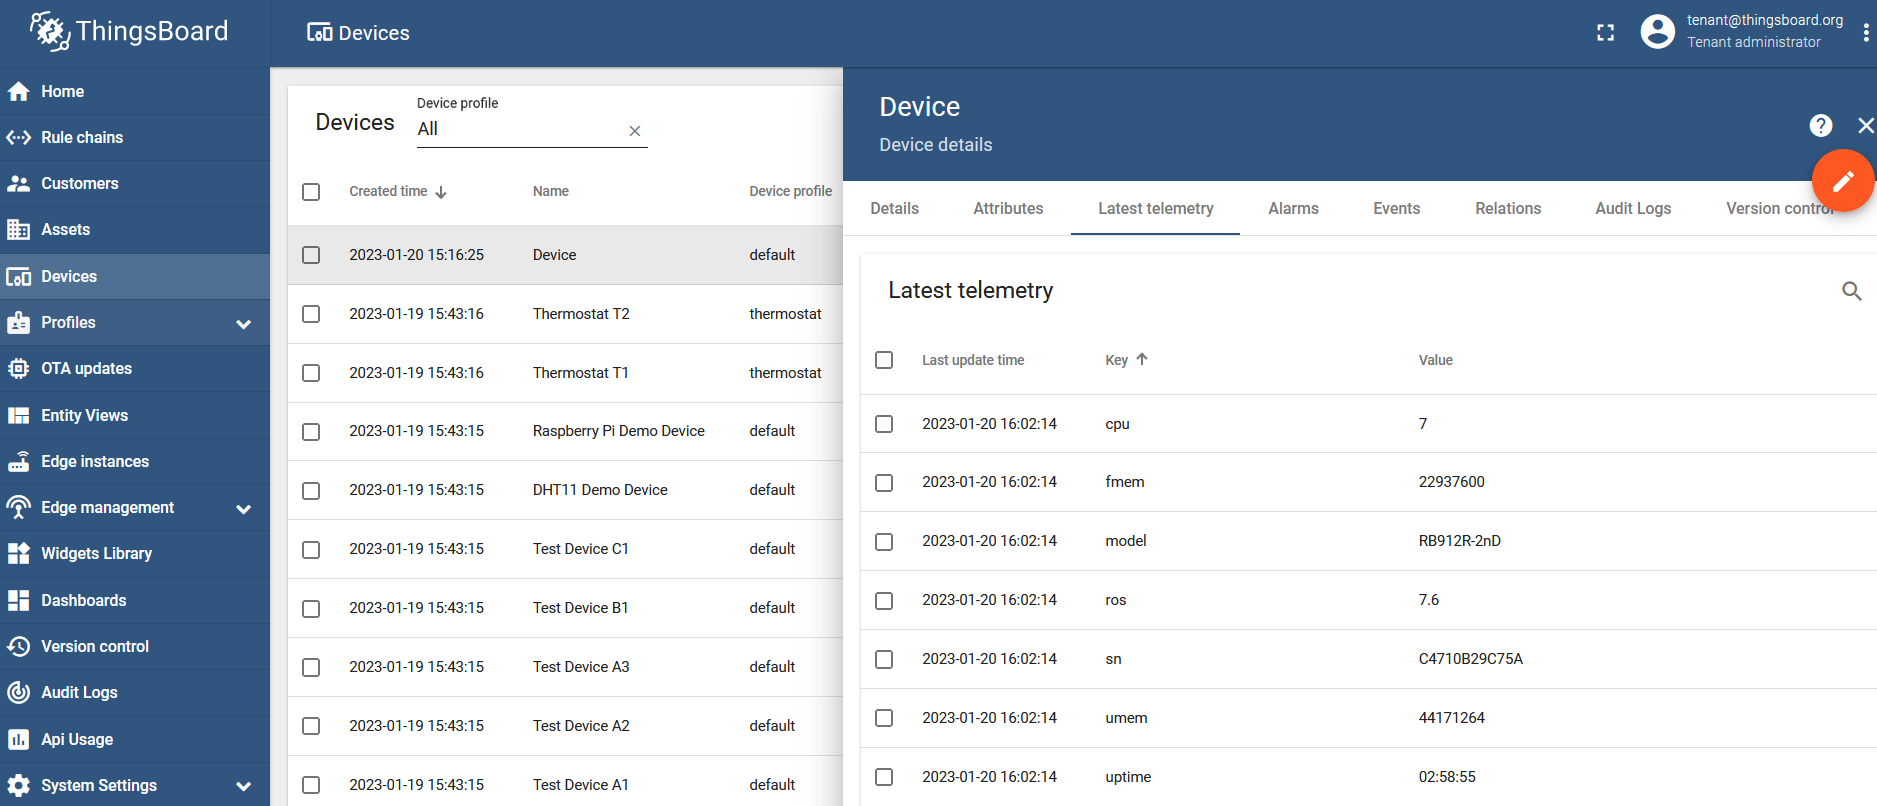
Verification
You can check the received/published data for the device under the "Latest telemetry" section: