Introduction
Bluetooth interface implementation in RouterOS allows the device to capture Bluetooth advertising packets that are broadcasted over 37, 38, and 39 advertising channels. More information can be found in the guide here.
Bluetooth tags like, for example, TG-BT5-IN and TG-BT5-OUT, do exactly that. They broadcast advertising payloads over the mentioned channels. To understand what kind of information is stored in the payload, make sure to check the link.
After the Bluetooth packet is broadcasted by the tag and the KNOT captures it, you can utilize scripting and scheduling to structure messages out of the payloads that the KNOT receives and automate the KNOT to send those messages periodically via MQTT, e-mail or HTTP post. That means you will need a server where the data is going to be stored and visualized. In this guide, we will showcase a server called ThingsBoard and how to communicate with it using the MQTT protocol.
ThingsBoard has a cloud solution and different local installation options (on different OS). Since we've added a container feature, it became possible to also run the platform within RouterOS. In order to do that, you will need a RouterOS device that has at least 2 GB RAM, has an option to increase storage (for example, an additional USB port), and is either ARM64 or AMD64 architecture. CHR machine or CCR2004-16G-2S+ could be a good fit.
Setup requirements:
- a running ThingsBoard server;
- 2+ KNOTs with access to the server's network via ethernet, Wi-Fi, or cellular connection (the amount of the units required depends on the size of the area that needs to be covered);
- 1+ Bluetooth TG-BT5-IN and/or TG-BT5-OUT tags (depending on how many assets you need to track - 1 tag per asset);
Just attach the tag to the asset and, after a few additional steps explained below in this guide, you will be able to track its approximate location.
Scenario explanation
We can script and automate the KNOT so that as soon as the tag appears within the KNOT's Bluetooth range, RouterOS would structure a message (which would have the tag's MAC address in it), and would send it to the server.
How is it going to work?
The tags can be configured (using the MikroTik Beacon Manager app) to broadcast the payloads automatically, with an interval or/and when a movement, tilt, or free-fall trigger is detected. That means the tag will "tell" (broadcast to) all the surrounding "scanners" (like the KNOT) information about itself periodically. When the payload is broadcasted by the tag, and the tag is within the KNOT's operating range, the KNOT will see the payload under its "scanner" Bluetooth section. It would look like this:
/iot bluetooth scanners advertisements print
Columns: DEVICE, PDU-TYPE, TIME, ADDRESS-TYPE, ADDRESS, RSSI, LENGTH, DATA
#  DEVICE  PDU-TYPE        TIME                  ADDRESS-TYPE  ADDRESS            RSSI    LENGTH  DATA
0  bt1     adv-noconn-ind  mar/07/2023 12:11:57  public        DC:2C:6E:0F:C0:3D  -51dBm      22  15ff4f09010079100000ffff0000cf188a6b2b000064
1  bt1     adv-noconn-ind  mar/07/2023 12:11:58  public        2C:C8:1B:4B:BB:0A  -49dBm      22  15ff4f090100168dfefffffffeffa51ae1362200005e
The example above shows us, that the KNOT sees two Bluetooth tags with MAC addresses "DC:2C:6E:0F:C0:3D" and "2C:C8:1B:4B:BB:0A", their respective payloads ("DATA" field) and the signal strength ("RSSI" field).
When using RouterOS scripting, with the scheduler feature combination, we can make the KNOT automatically-periodically scan the payload list and, in case, a specific payload or a specific tag's MAC address is found on the list, we can make the KNOT structure an MQTT message (out of the information shown in the example above) and send it to the configured server. The actual script example will be shown later on in the guide.
As a result, when you have 2 KNOTs (KNOT-A and KNOT-B), running the same script on a scheduler, and the tag moves between their Bluetooth operating ranges, you will have the data on the server indicating whether it was KNOT-A or KNOT-B that have sent the tag's payload. That will help you figure out the proximity of the tag. Whether the tag is broadcasting payloads in the KNOT-A zone, or in the KNOT-B zone.
Logically, if the Bluetooth operating ranges overlap and the tag is within the overlapped area (at the same time within KNOT-A and KNOT-B Bluetooth ranges), both KNOTs will send the data and the server is going to show that the tag is reported by both devices at the same time.
Keeping the above mentioned in mind, you can position the KNOTs across your environment so that the KNOT's Bluetooth ranges do not overlap with each other but cover the whole area. The actual Bluetooth operating distance can vary from site to site because a lot of different factors can impact it, like 2.4 GHz interference or the surrounding materials used. For example, in line of sight, with no interference, the distance at which the KNOT is able to capture the tag's broadcasted payload, can be up to 180 meters (KNOT — ~180 meters — TG-BT5-OUT). But you also have to keep in mind that with more distance, more packets will be lost on the way. In the office environment, the range can go down to much less than 100 meters.
Surely, there will be zones where two or more KNOT's Bluetooth ranges overlap:
- You can either use it to your advantage → basically, you will have information that the tag, right now, is on the edges of the Bluetooth ranges in-between specific KNOT zones. In other words, when the asset moves into the overlapped area, you will have information on the server that the asset is somewhere between the two KNOT operating ranges, which is also useful information to have.
To understand the scenario and the idea behind it better, take a look at the topology shown below:
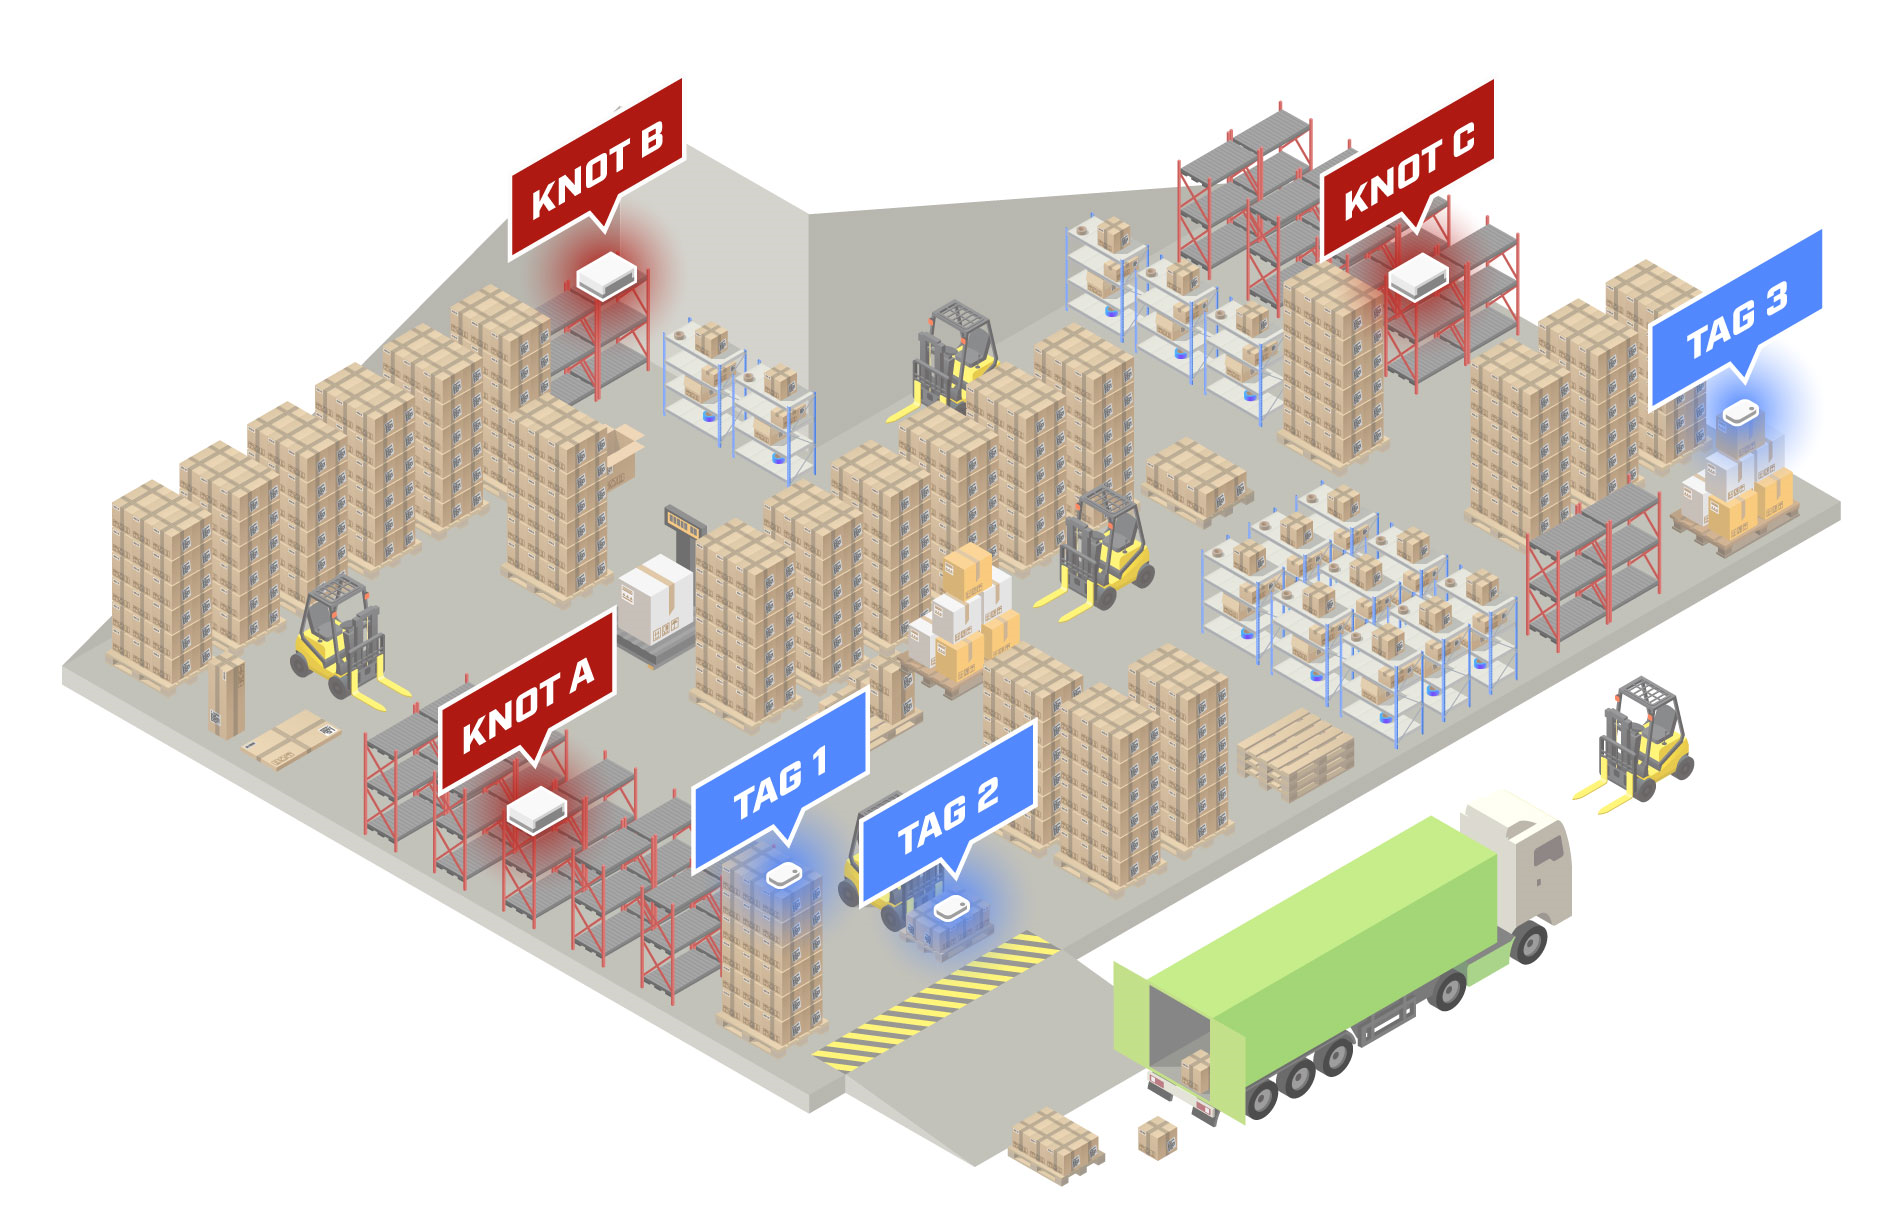
Let's say you have a warehouse and you wish to track pallets. Just install the KNOTs in different locations
Configuration
This example will showcase access-token and one-way SSL communication via access-token scenarios for simplicity reasons, but you can use other available options as well.
/iot/mqtt/brokers/add name=tb address=x.x.x.x port=1883 username=access_token