Introduction
In this guide, we will show a quick step-by-step on how you can set up your KNOT to send an e-mail notification, whenever it detects a "triggered" condition reported by the TG-BT5-IN or TG-BT5-OUT tag.
As per tag's guides for iOS and Android, the tags have a built-in accelerometer that is able to detect free-falling, wakeup/movement, and tilted states. When the tag is set up to broadcast MikroTik format payloads and accelerometer triggers are enabled (using the MikroTik Beacon Manager app) → the tag will instantly broadcast an advertising payload/report whenever the trigger is going to be detected.
For iOS, the trigger setting looks like this (in a disabled state/default settings):
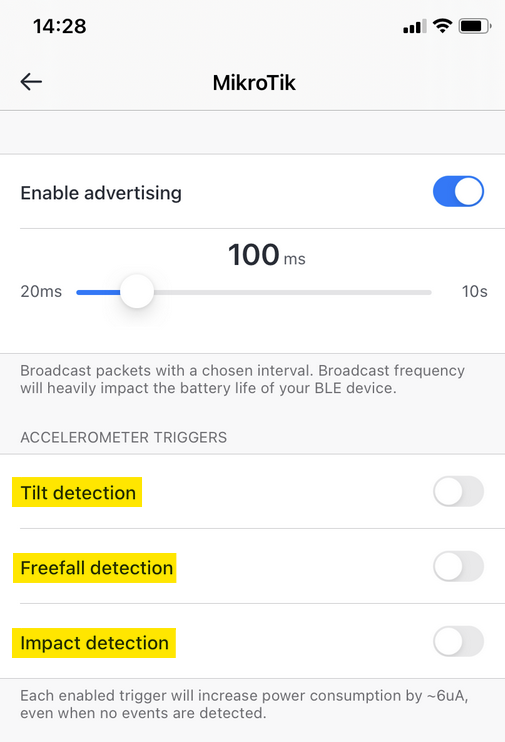
To active trigger detection, just enable the corresponding "checkbox".
After the Bluetooth payload is broadcasted by the tag → the payload's 21st octet will indicate which exact trigger was detected. You can view the payloads under the IoT>Bluetooth>Advertisng reports tab:

As per the screenshot above, the 21st octet is "04", which indicates, that the payload was sent when a freefalling condition was detected by the tag (these payloads were broadcasted when we "accidentally" dropped or threw the tag).
You can find more information about MikroTik format octet values by following the link.
Once everything is configured the following is going to happen:
- The KNOT will run a script on a schedule.
- The script will "read/scan" the payloads that are shown in the IoT>Bluetooth>Advertising reports tab.
- If the stored/captured payload's 21st octet value equals the configured trigger value (which is set up in the script) → email notification is going to be sent.
In other words, when the KNOT scans through the payloads and finds one where the 21st octet equals the configured trigger value → you will get an email notification that the trigger was detected.
TG-BT5 tag configuration
In this specific example, we need to set up our tags to work in the MikroTik format. In the MikroTik format, the 21st octet of each payload will indicate the reason it was triggered.
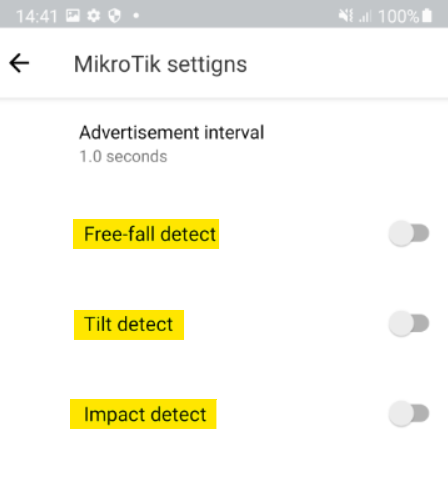
You can find a manual on how to enable the triggers by following the iOS and/or Android guides ("Advertisement"/Beacon settings sections).
In our example, we would like to monitor "freefalling" state detection, so just enable the checkbox for the "Freefall trigger/detection". You can use other triggers instead but you will need to alter a couple of lines in the script that will be shown later.
To easier "activate" the trigger, we can also alter the trigger's settings as per the iOS and/or Android guides (Free Fall Threshold and Duration sections). For the purpose of the test and to, basically, just "trigger" the detection "easier", we can change the "Free Fall Threshold" to the maximally available value (this will result in any acceleration within this threshold on all axis to be considered a "trigger"). We can also change the "Free Fall Duration" parameter to "0" seconds, for the purpose of the test (this will make sure that any acceleration that is within the threshold on all axis will be instantly detected as a "freefalling" event).
RouterOS configuration
note: iot package is required. You can get it from our download page - under "Extra packages".
The configuration can be completed in 4 steps:
- enable scanner (and, preferably, confirm that the tag is broadcasting payloads when the trigger is detected);
- set up an email server;
- import the script (and alter a few script lines depending on the requirement);
- set up the scheduler.
IoT>Bluetooth>Scanners
Go to the IoT>Bluetooth>Scanners tab and make sure that it is enabled:

Go to the Advertising reports tab and filter the list using the MAC address filtering option (you can find the MAC address of the MikroTik tag printed on the label on the tag itself).
Try to "trigger" the configured detection and confirm it by checking the 21 octet's value.
In our example, we configured the "freefalling" detection for our tag and we dropped it. We got reports from the tag indicating the "falling" state (21st octet = 04):

We have confirmed, that the tag is reporting the trigger properly.
Tools>Email
Navigate to the Tools>Email section and set up an email server of your choice.
You can find our Email configuration example by following the link. We will be using shown GMAIL example in this guide.
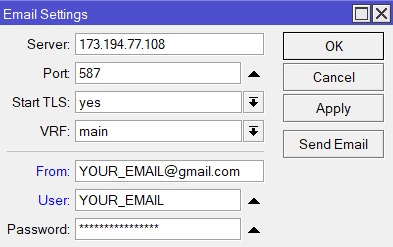
Try sending a test email to make sure that it is set up correctly.
System>Scripts
Monitoring a single trigger
Navigate to System>Scripts menu and add a new script there.
You can copy the script below. Copy the script below into a "notepad" and copy it again into the script "Source:" field.
#User configuration:
#input the tag's mac address that you wish to monitor within the ""
:local addressRegex "2C:C8:1B:4B:BC:4E"#enter trigger value, for example "04" for freefalling trigger and "02" for tilt trigger detection
:local triggervalue "04"#name the trigger accordingly
:local triggername "freefalling"#enter the message for the email body that you wish to receive within the ""
:local emailmessage "Our tag fell down!"#enter the subject for the email within the ""
:local emailsubject "RouterOS report!"#enter the email address wthin the ""
:local emailaddress "YOUR_EMAIL@gmail.com"
###Bluetooth scanner:
:local trigger
:put ("[*] Gathering Bluetooth info...")
:global btOldestAdvertisementTimestamp
:if ([:typeof $btOldestAdvertisementTimestamp] = "nothing") do={:set $btOldestAdvertisementTimestamp 0}
:local btProcessingStart [/system clock get time]
:local advertisements [/iot bluetooth scanners advertisements print detail \
as-value where \
epoch > $btOldestAdvertisementTimestamp and \
address ~ $addressRegex]
:local advCount 0
:local lastAdvTimestamp 0:foreach adv in=$advertisements do={
:local address ($adv->"address")
:local ad ($adv->"data")
:local ts ($adv->"epoch")
:local trig [:pick ($adv->"data") 40 42]
:set $advCount ($advCount + 1)
:set $lastAdvTimestamp $ts
:if ($trig="$triggervalue") do={:set trigger "$triggername"}
:if ($advCount > 0) do={:set $btOldestAdvertisementTimestamp $lastAdvTimestamp}}:put ("[*] Found $advCount new advertisements \
(processing time: $[([/system clock get time] - $btProcessingStart)])")###Result
:if ($trigger="$triggername") do={/tool e-mail send to=$emailaddress subject="$emailsubject" body="$emailmessage"}
The following 6 lines need to be taken into account:
:local addressRegex "2C:C8:1B:4B:BC:4E"
line, where you need to input the MAC address of the tag that you wish to monitor.
:local triggervalue "04"
line, where you need to input the value of the 21st payload's octet that you wish to scan for. In this example, we want to scan for the "freefalling" trigger and that means scanning for the "04" value.
If we want to scan for a "tilt" trigger → we will need to change the trigger value to "02" instead.
If we want to scan for the "movement/wakeup" trigger → please note, that movement against different axis (x,y,z) will have its own different "value" triggered. So, for example, impact only on the x-axis will be "08", impact on the y-axis will be "10", impact on the z-axis will be "20", impact on the x-axis and y-axis will be "18" and impact on all axis at the same time will be "38".
The script example for scanning multiple triggers with 1 script will be shown later in the guide.
:local triggername "freefalling"
line, where you just need to name the trigger (however you like). So if you choose "04" in the previously mentioned → :local triggervalue "04" ← line, you can name it "freefalling".
If you want to monitor "tilting" and you've set up → :local triggervalue "02", name it "tilting" or something similar.
:local emailmessage "Our tag fell down!"
line, where you can alter the e-mail message/content within the quotation marks. Type in any message that you wish to send in case the trigger was detected.
:local emailsubject "RouterOS report!"
line, where can alter the subject for the email.
:local emailaddress "YOUR_EMAIL@gmail.com"
and, lastly, the email address line, where you need to input the email address. To where do you want to send the report?
The rest of the script does not need to be changed.
Name the script however you like, for example, triggernotification. Click on Apply and OK.
Additionally
In this example, we are specifically showcasing an e-mail notification scenario. But! in case you want to use other methods for sending a notification, you can just alter the line below:
:if ($trigger="$triggername") do={/tool e-mail send to=$emailaddress subject="$emailsubject" body="$emailmessage"}
You can change the "do={/tool e-mail..." part of the line to, for example, "do={/tool fetch..." or "do={/iot mqtt publish...". That way, you can send out an HTTP post or MQTT publish message instead.
If you would like to get a phone notification when the trigger is detected, you can also utilize IFTTT services (HTTP post to IFTTT webhook) as described in our other guide over here.
You can run the script manually via the command "/system script run triggernotification" or by clicking on the "Run Script" button under the Script List section.
You should make sure that the e-mail notification was received after manually initiating the script.
Monitoring multiple triggers
#User configuration:
#input the tag's mac address that you wish to monitor within the ""
:local addressRegex "2C:C8:1B:4B:BC:4E"
#enter trigger value, for example "04" for freefalling trigger and "02" for tilt trigger detection
:local triggervalueA "04"
:local triggervalueB "02"#name the trigger accordingly
:local triggernameA "freefalling"
:local triggernameB "tilt"#enter the message for the email body that you wish to receive within the ""
:local emailmessageA "Our tag fell down!"
:local emailmessageB "Our tag tilted!"#enter the subject for the email within the ""
:local emailsubject "RouterOS report!"#enter the email address wthin the ""
:local emailaddress "YOUR_EMAIL@gmail.com"###Bluetooth scanner
:local triggerA
:local triggerB
:put ("[*] Gathering Bluetooth info...")
:global btOldestAdvertisementTimestamp
:if ([:typeof $btOldestAdvertisementTimestamp] = "nothing") do={:set $btOldestAdvertisementTimestamp 0}
:local btProcessingStart [/system clock get time]
:local advertisements [/iot bluetooth scanners advertisements print detail \
as-value where \
epoch > $btOldestAdvertisementTimestamp and \
address ~ $addressRegex]
:local advCount 0
:local lastAdvTimestamp 0:foreach adv in=$advertisements do={
:local address ($adv->"address")
:local ad ($adv->"data")
:local ts ($adv->"epoch")
:local trig [:pick ($adv->"data") 40 42]
:set $advCount ($advCount + 1)
:set $lastAdvTimestamp $ts
:if ($trig="$triggervalueA") do={:set triggerA "$triggernameA"}
:if ($trig="$triggervalueB") do={:set triggerB "$triggernameB"}
:if ($advCount > 0) do={:set $btOldestAdvertisementTimestamp $lastAdvTimestamp}}:put ("[*] Found $advCount new advertisements \
(processing time: $[([/system clock get time] - $btProcessingStart)])")###Result
:if ($triggerA="$triggernameA") do={/tool e-mail send to=$emailaddress subject="$emailsubject" body="$emailmessageA"}
:if ($triggerB="$triggernameB") do={/tool e-mail send to=$emailaddress subject="$emailsubject" body="$emailmessageB"}
Use the script above as a reference. The script above scans for "tilt" and "freefall" triggers.
System>Scheduler
To automate the process add a new scheduler under the System>Scheduler tab:
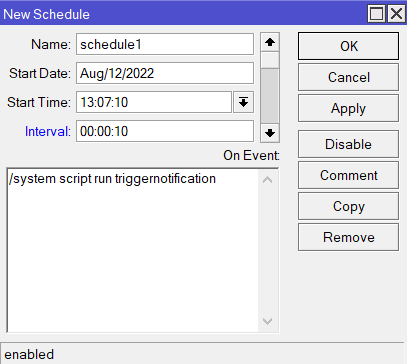
Type in "/system script run triggernotification" under the "On Event:" field and set up an interval with which you wish to run the script to check/scan advertising reports (to, for example, 10 seconds).
Click on Apply and OK.
Result verification
a) Confirm that the tag broadcasts advertising reports and that the tag's triggers get detected:
b) Confirm that your email server is set up correctly and that you are able to send emails from the KNOT (RouterOS).
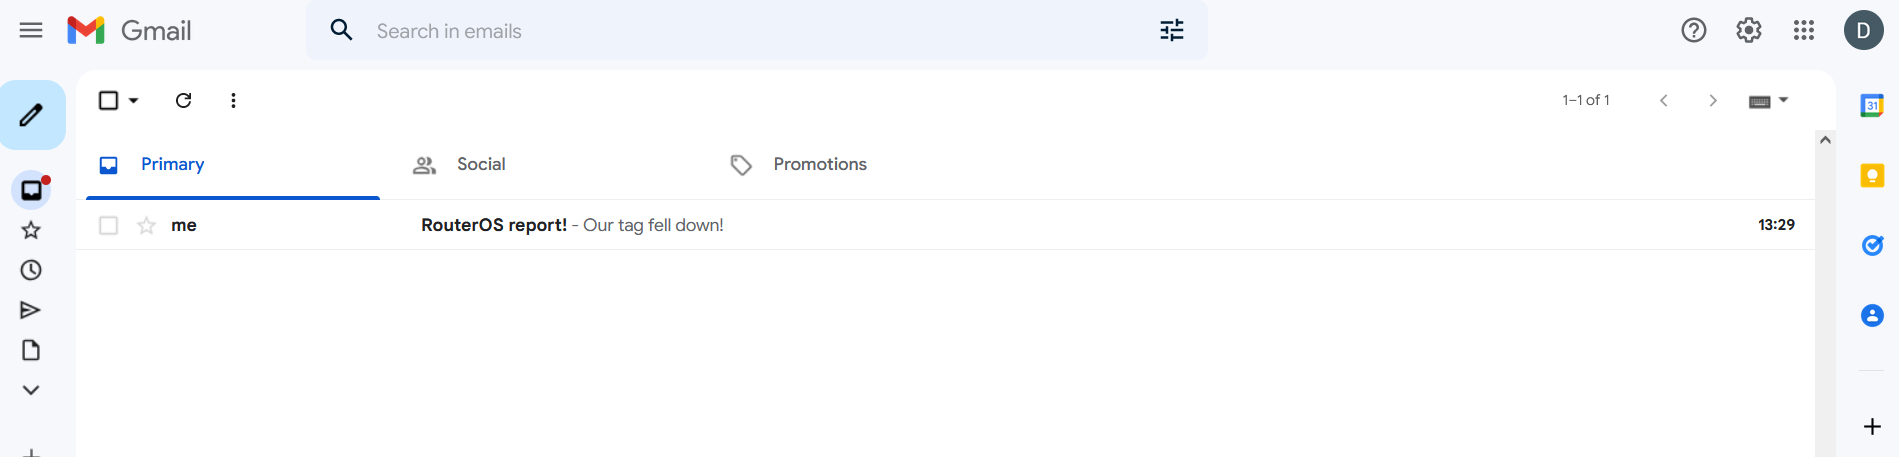
c) After you manually run the script or apply a scheduler to the script, an email notification should go through, like so: