...
| Property | Description |
|---|
| allow-default (string; yes | no) | A network can override the systems default route (force VPN mode). |
| allow-global (string; yes | no) | ZeroTier IP addresses and routes can overlap public IP space. |
| allow-managed (string; yes | no) | ZeroTier managed IP addresses and routes are assigned. |
| arp-timeout ( number; default: auto) | ARP timeouts value. |
| comment (string; Default: ) | Descriptive comment for the interfaces. |
| copy-from | Allows copying existing interfaces configuration. |
| disable-running-check (string; yes | no) | Force interface in "running" state. |
| instance (string; Default: zt1) | ZeroTier instance name. |
| name (string; default: zerotier1) | A short name. |
| network (string; Default) | 16-digit network ID. |
Controller
RouterOS implements ZeroTier functionality in the role of a node where most of the network configuration must be done on the ZeroTier webpage dashboard. However, in situations where you would prefer to do all the configuration on your own device, RouterOS offers to host your own controller
A common misunderstanding is to conflate network controllers with root servers (planet and moons). Root servers are connection facilitators that operate at the VL1 level. Network controllers are configuration managers and certificate authorities that belong to the VL2 level. Generally, root servers don’t join or control virtual networks and network controllers are not root servers, though it is possible to have a node do both.
| Code Block |
|---|
|
/zerotier/controller/ |
Every ZeroTier instance has a self-hosting network controller that can be used to host virtual networks. A controller is responsible for admitting members to the network, and issuing default configuration information including certificates. Controllers can in theory host up to 2^24 networks and serve many millions of devices (or more), but we recommend spreading large numbers of networks across many controllers for load balancing and fault tolerance reasons.
Parameters
| Property | Description |
|---|
| broadcast ( yes | no; Default: yes) | Allow receiving broadcast (FF:FF:FF:FF:FF:FF) packets. |
| comment (string; Default: ) | Descriptive comment for the controller. |
copy-from (string; Default: ) | Copies an existing item. It takes default values of a new item's properties from another item. If you do not want to make an exact copy, you can specify new values for some properties. When copying items that have names, you will usually have to give a new name to a copy. |
| instance (string; Default: zt1) | ZeroTier instance name.
|
| ip-range (IP; Default: ) | IP range, for example, 172.16.16.1-172.16.16.254. |
| ip6-6plane ( yes | no; Default: no) | An option gives every member a /80 within a /40 network but uses NDP emulation to route all IPs under that /80 to their owner. The 6plane mode is great for use cases like Docker since it allows every member to assign IPv6 addresses within its /80 that just work instantly and globally across the network. |
| ip6-rfc4193 ( yes | no; Default: no) | The rfc4193 mode gives every member a /128 on a /88 network. |
| ip6-range (IPv6; Default: ) | IPv6 range, for example fd00:feed:feed:beef::-fd00:feed:feed:beef:ffff:ffff:ffff:ffff. |
| mtu (integer; Default: 2800) | Network MTU. |
| multicast-limit (integer: Default: 32) | Maximum recipients for a multicast packet. |
| name (string; Default: ) | A short name for this controller. |
| network (string; Default) | 16-digit network ID. |
| private ( yes | no; Default: yes) | Enables access control. |
| routes (IP@GW; Default: ) | Push routes in the following format:
Routes ::= Route[,Routes]
Route ::= Dst[@Gw] |
Configuration example
In the following example, we will use RouterOS built-in ZeroTier controller to send our new network hosts appropriate certificates, credentials, and configuration information. The controller will operate from the "RouterOS Home" device and we will join in our network 3 units: mobile phone, laptop, RouterOS Office device, but theoretically, you can join up to 100 devices in one network.
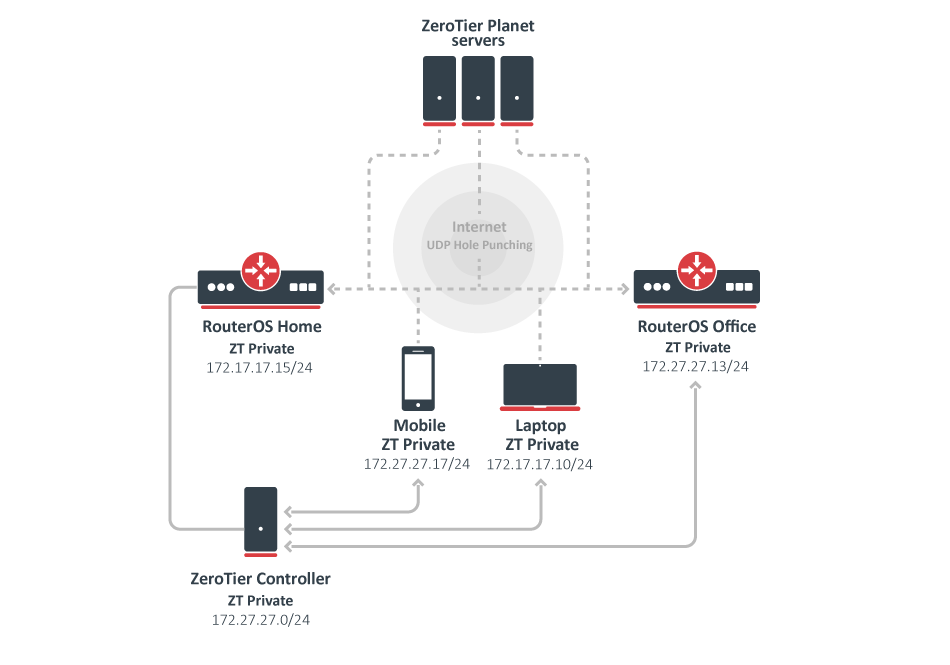 Image Added
RouterOS Home
First, we enable the default instance which operates at the VL1 level :
| Code Block |
|---|
|
[admin@Home] /zerotier> print
Columns: NAME, PORT, IDENTITY.PUBLIC
# NAME  PORT  IDENTITY.PUBLIC
;;; ZeroTier Central controller - https://my.zerotier.com/
0 zt1 9993 879c0b5265:0:d5fd2d17805e011d9b93ce8779385e427c8f405e520eea9284809d8444de0335a817xxb21aa4ba153bfbc229ca34d94e08de96d925a4aaa19b252da546693a28 |
Now we create a new network via the controller section which will operate at the VL2 level. Each network has its own controller and each network ID is generated from the controller address and controller ID combination.
Note that we use the private=yes option for a more secure network:
| Code Block |
|---|
|
[admin@Home] /zerotier> controller/add name=ZT-private instance=zt1 ip-range=172.27.27.10-172.27.27.20 private=yes routes=172.27.27.0/24
[admin@Home] /zerotier> controller/print
Columns: INSTANCE, NAME, NETWORK, PRIVATE
# INSTANCE  NAME        NETWORK           PRIVATE
0 zt1 ZT-private 879c0b5265a99e4b yes |
Add our new network under the interface section:
| Code Block |
|---|
|
[admin@Home] /zerotier> interface/add network=879c0b5265a99e4b name=myZeroTier instance=zt1
[admin@Home] /zerotier> interface/print interval=1
Columns: NAME, MAC-ADDRESS, NETWORK, STATUS
# NAME        MAC-ADDRESS        NETWORK           STATUS
0 myZeroTier 4A:19:35:6E:00:6E 879c0b5265a99e4b ACCESS_DENIED |
Each new peer asks for a controller to join the network, in this situation, we have ACCESS_DENIED status and we have to authorize a new peer, that is because we used the private=yes option.
After authorization, each member in the network receives information from the controller about new peers and approval they can exchange packets with them:
| Code Block |
|---|
|
[admin@Home] /zerotier> controller/member/print
Columns: NETWORK, ZT-ADDRESS
#  NETWORK     ZT-ADDRESS
0  ZT-private  879a0b5265
[admin@Home] /zerotier> controller/member/set 0 authorized=yes |
Verify newly configured IP address and route:
| Code Block |
|---|
|
[admin@Home] /zerotier> /ip/address/print where interface~"Zero"
Flags: D - DYNAMIC
Columns: ADDRESS, NETWORK, INTERFACE
#   ADDRESS          NETWORK      INTERFACE
4 D 172.27.27.15/24  172.27.27.0  myZeroTier

[admin@Home] /zerotier> /ip/route/pr where gateway~"Zero"
Flags: D - DYNAMIC; A - ACTIVE; c, y - COPY
Columns: DST-ADDRESS, GATEWAY, DISTANCE
    DST-ADDRESS     GATEWAY     DISTANCE
DAc 172.27.27.0/24 myZeroTier 0 |
RouterOS Office
Configuration on the Office device. We will enable the default instance and ask a controller to join the 879c0b5265a99e4b network:
| Code Block |
|---|
|
[admin@office] /zerotier> interface/add network=879c0b5265a99e4b instance=zt1 name=ZT-interface
[admin@office] /zerotier> interface/print interval=1
Columns: NAME, MAC-ADDRESS, NETWORK, STATUS
# NAME          MAC-ADDRESS        NETWORK           STATUS
0 ZT-interface 4A:40:1C:38:97:BA 879c0b5265a99e4b ACCESS_DENIED |
As previously, because our network is private, we have to authorize a new peer via "RouterOS home device". After that verify from controller received IP address and route:
| Code Block |
|---|
|
[admin@Home] /zerotier> controller/member/print
Flags: A - AUTHORIZED
Columns: NETWORK, ZT-ADDRESS, IP-ADDRESS, LAST-SEEN
#    NETWORK     ZT-ADDRESS  IP-ADDRESS    LAST-SEEN
0 A  ZT-private  879a0b5265  172.27.27.15
1 A  ZT-private  554a914c7f  172.27.27.17
2 A  ZT-private  a83ac6032a  172.27.27.10
3    ZT-private  deba5dc5b1  172.27.27.13  3s348ms
[admin@Home] /zerotier> controller/member/set 3 authorized=yes
[admin@Home] /zerotier> controller/member/print
Flags: A - AUTHORIZED
Columns: NETWORK, ZT-ADDRESS, IP-ADDRESS, LAST-SEEN
#    NETWORK     ZT-ADDRESS  IP-ADDRESS    LAST-SEEN
0 A  ZT-private  879a0b5265  172.27.27.15
1 A  ZT-private  554a914c7f  172.27.27.17
2 A  ZT-private  a83ac6032a  172.27.27.10
3 A ZT-private deba5dc5b1 172.27.27.13 4s55ms |
Verify via ZeroTier obtained IP address and route:
| Code Block |
|---|
|
[admin@office] /zerotier> /ip/address/print where interface~"ZT"
Flags: D - DYNAMIC
Columns: ADDRESS, NETWORK, INTERFACE
#   ADDRESS          NETWORK      INTERFACE
0 D 172.27.27.13/24  172.27.27.0  ZT-interface

[admin@office] /zerotier> /ip/route/print where gateway~"ZT"
Flags: D - DYNAMIC; A - ACTIVE; c, y - COPY
Columns: DST-ADDRESS, GATEWAY, DISTANCE
    DST-ADDRESS     GATEWAY       DISTANCE
DAc 172.27.27.0/24 ZT-interface 0 |
Other devices
Download the ZeroTier app for your mobile phone or computer and join your newly created network:
1) Via our Laptop ZeroTier application we join the 879c0b5265a99e4b network;
2) User Zerotier mobile app to join the 879c0b5265a99e4b network;
| Note |
|---|
Also all other new hosts you have to authorize under the /zerotier/controller/member/ section. |
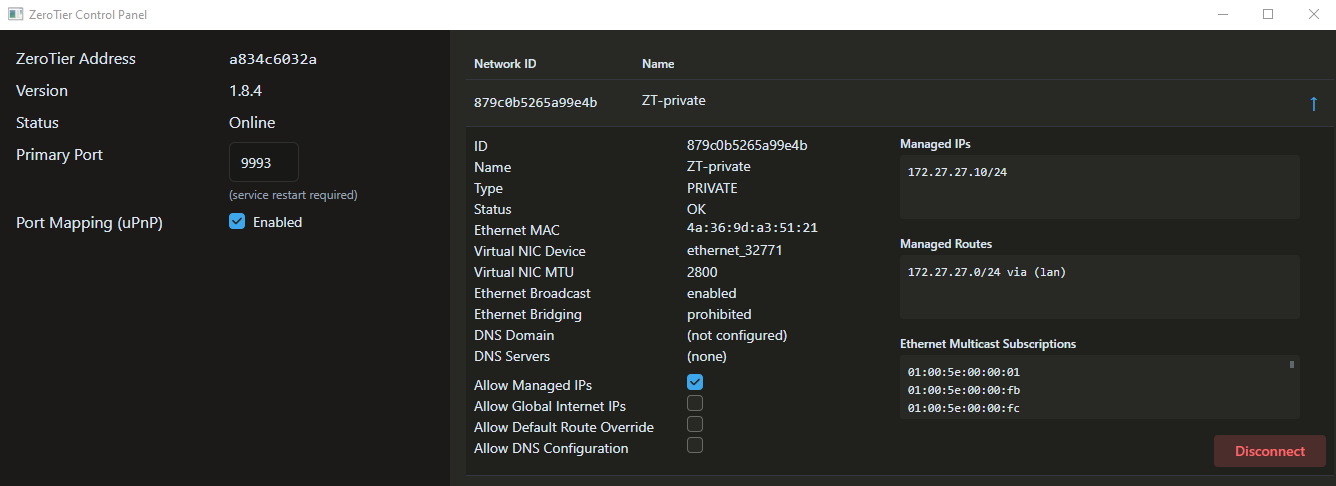 Image Added
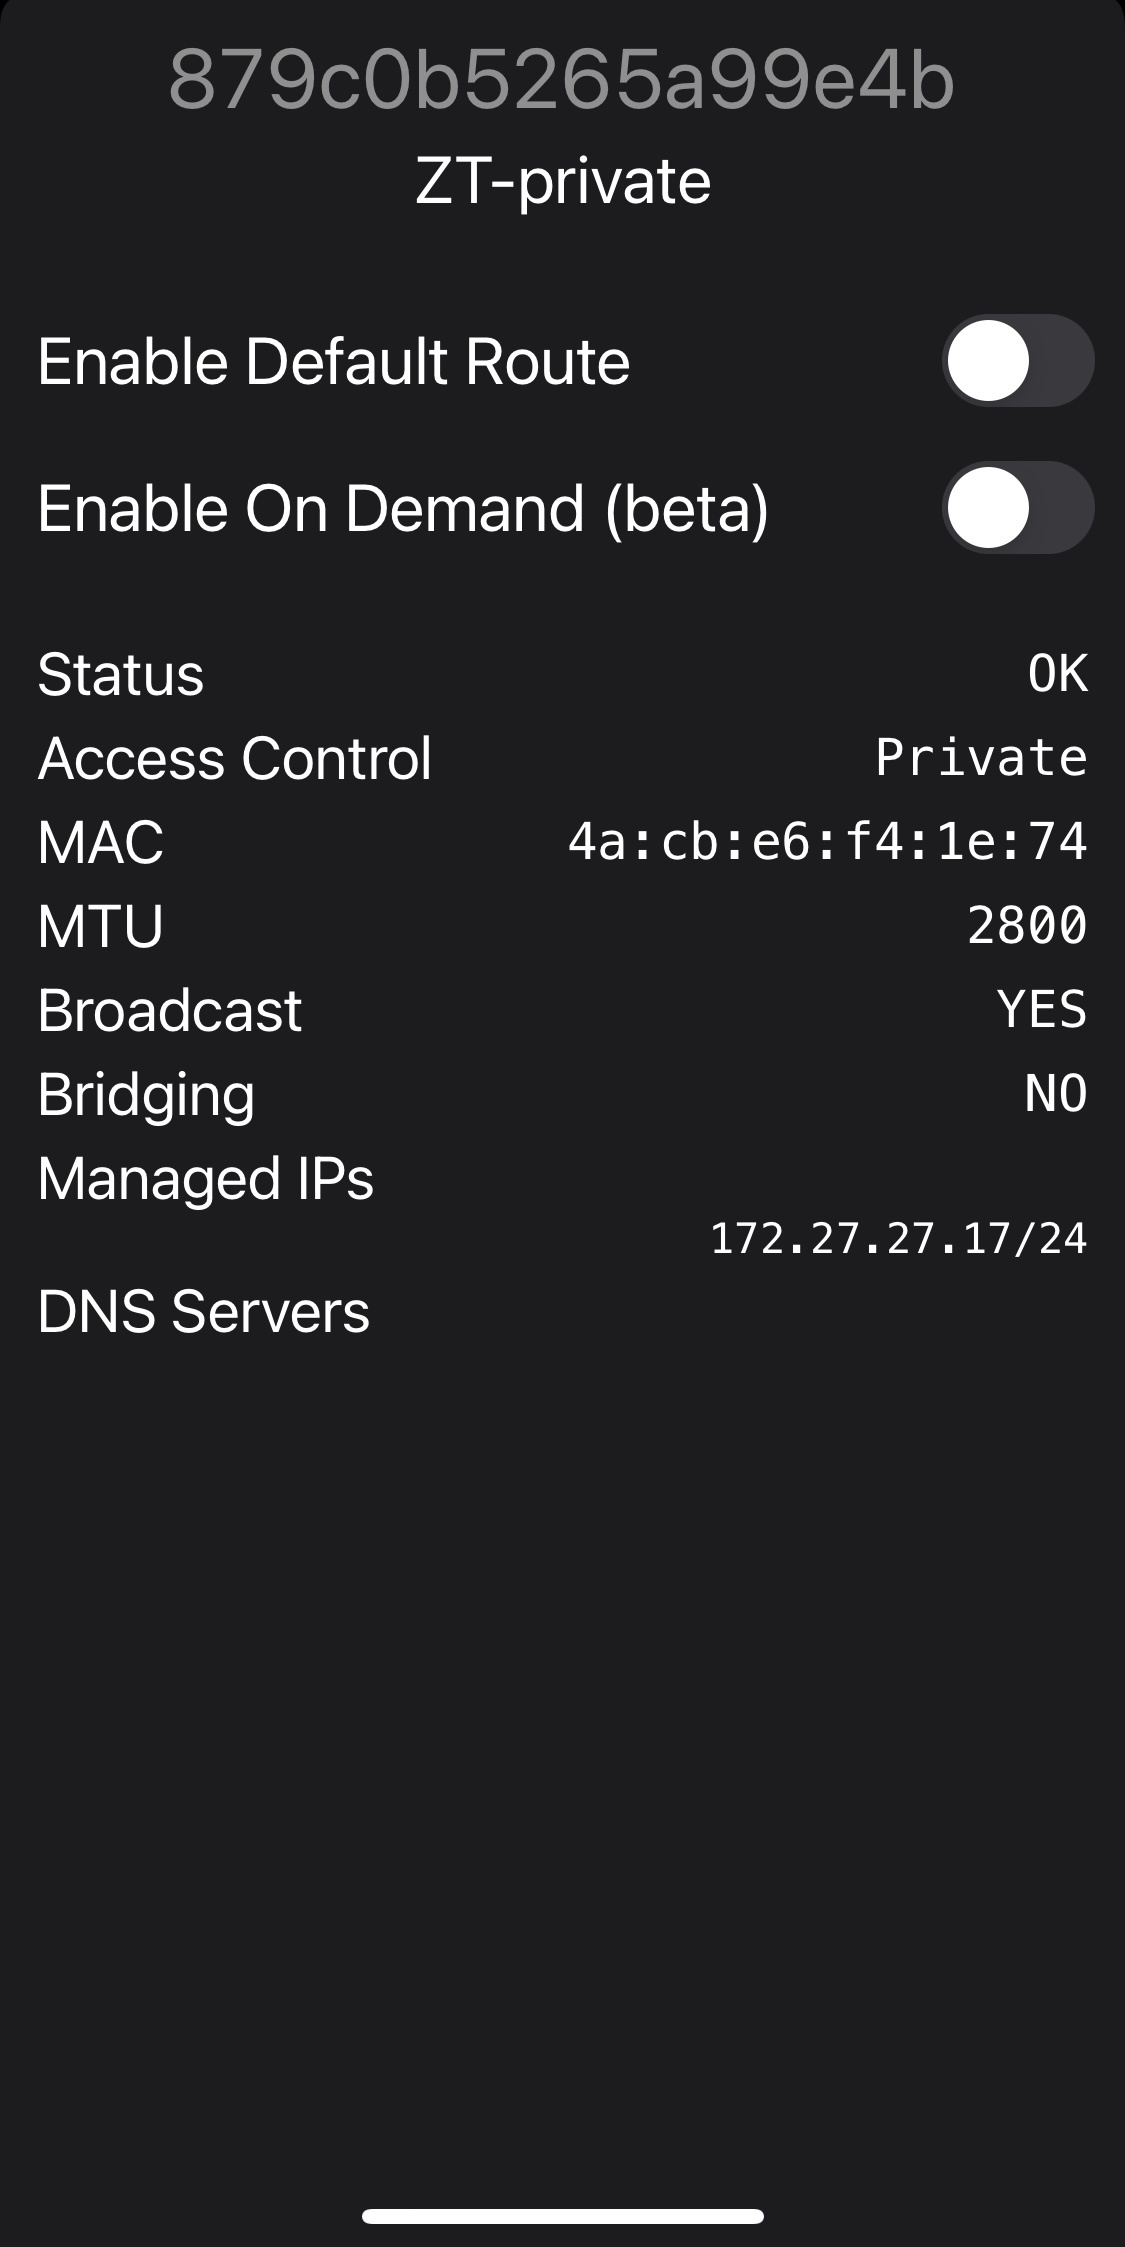 Image Added
Moons
All ZeroTier nodes on a planet effectively inhabit a single data center. This makes it easy to directly connect devices anywhere, but it has the disadvantage of not working without an Internet connection. A user-defined set of roots is called a moon. When a node “orbits” a moon, it adds the moon’s roots to its root server set. Nodes orbiting moons will still use planetary roots, but they’ll use the moon’s roots if they look faster or if nothing else is available.
More information you can find here, but further in this article, we will take a more detailed overview of very basic operations with moons in RouterOS.
Generate a moon
In the following example with the update-moon-json configuration command we generate a .json type file and its corresponding .moon file:
| Code Block |
|---|
|
[admin@office] /zerotier> update-moon-json identity=zt1 address=172.17.17.15
[admin@office] /zerotier> /file pr
Columns: NAME, TYPE, SIZE, CREATION-TIME
#  NAME                        TYPE        SIZE  CREATION-TIME
0  000000879c0b5265.moon       .moon file   259  jan/12/2022 16:10:06
1  000000879c0b5265.moon.json  .json file   757  jan/12/2022 16:10:06
2  flash                       disk              jan/12/2022 16:08:20
3 flash/skins directory jan/12/2022 02:00:20 |
The .json will contain something like:
| Code Block |
|---|
{
 "id": "879c0b5265",
 "objtype": "world",
 "roots": [
  {
   "identity": "879c0b5265:0:d5fd2d17805e011d9b93ce8779385e427c8f405e520eea9284809d8444de0335a817xxb21aa4ba153bfbc229ca34d94e08de96d925a4aaa19b252da546693a28",
   "stableEndpoints": [
    "172.17.17.15"
   ]
  }
 ],
 "signingKey": "ed0cc50bda211da1fdb383629164f5411e74f954b8bb9db58369cb0749c3575a141a04b82ab0350e38f325fac5f87671ed1d7f171c5a7e9a238b097643a3612a",
 "signingKey_SECRET": "f7963c501d8c254c8719ae9d1d6f9f442612aa888b63d668d1a78296a9b3463b09736014be27f561e85de3d4beaf57d3d3a859773110a5885d3fda9947062927",
 "updatesMustBeSignedBy": "ed0cc50bda211da1fdb383629164f5411e74f954b8bb9db58369cb0794c3411a575a04b82ab0350e38f325fac5f87671ed1d7f171c5a7e9a238b097643a3612a",
 "worldType": "moon"
} |
Add moon
If you configure update-moon-json with moon-json and existing .json file:
| Code Block |
|---|
|
[admin@Home] /zerotier> update-moon-json moon-json=000000879c0b5265.moon.json address=172.17.17.13 identity="deb55dc5b1:0:705c7afebc91bbed3ef81a754b0be4256c9edac702d2c7befd7da8f9c4ec2850a95fd3a863a4249f81c57a91ed784ab145bb915cf4b67abda2665e8775565307" |
First, we notice that the file size increases from 757 to 974:
| Code Block |
|---|
|
[admin@Home]  /zerotier> /file print
Columns: NAME, TYPE, SIZE, CREATION-TIME
#  NAME                        TYPE        SIZE  CREATION-TIME
0  000000879c0b5265.moon       .moon file   338  jan/12/2022 16:30:56
1  000000879c0b5265.moon.json  .json file   974  jan/12/2022 16:30:56
2  flash                       disk              jan/12/2022 16:08:20
3 flash/skins directory jan/12/2022 02:00:20 |
By opening the updated .json file we can find an additional root:
| Code Block |
|---|
{
 "id": "879c0b5265",
 "objtype": "world",
 "roots": [
  {
   "identity": "879c0b5265:0:d5fd2d17805e011d9b93ce8779385e427c8f405e520eea9284809d8444de0335a817ccb21aa4ba153bfbc229ca34d94e08de96d925a4aaa19b252da546693a28",
   "stableEndpoints": [
    "172.17.17.15"
   ]
  },
  {
   "identity": "deb55dc5b1:0:705c7fmarc91bbed3ef81a754b0be4256c9edac702d2c7befd7da8f9c4ec2850a95fd3a863a4249f81c57a91ed784ab145bb915cf4b67abda2665e8775565307",
   "stableEndpoints": [
    "172.17.17.13"
   ]
  }
 ],
  "signingKey": "ed0cc50bda211da1fdb383629164f5411e74f954b8bb9db58369cb0749c3575a141a04b82ab0350e38f325fac5f87671ed1d7f171c5a7e9a238b097643a3612a",
 "signingKey_SECRET": "f7963c501d8c254c8719ae9d1d6f9f442612aa888b63d668d1a78296a9b3463b09736014be27f561e85de3d4beaf57d3d3a859773110a5885d3fda9947062927",
 "updatesMustBeSignedBy": "ed0cc50bda211da1fdb383629164f5411e74f954b8bb9db58369cb0794c3411a575a04b82ab0350e38f325fac5f87671ed1d7f171c5a7e9a238b097643a3612a",
 "worldType": "moon"
} |
Export moon
As the self-explained export-moon command indicates, you can export the moon from the working ZeroTier instance:
| Code Block |
|---|
|
[admin@office] > zerotier/export-moon zt1 moon=000000deb55dc5b1
[admin@office] > file pr where name~"moon"
Columns: NAME, TYPE, SIZE, CREATION-TIME
#  NAME                   TYPE        SIZE  CREATION-TIME
0 000000879c0b5265.moon .moon file 259 jan/12/2022 16:18:10 |
Import moon
To import a moon you have to select an instance and the moon file for import, in the following example we will import the moon from "RouterOS Office" to the "RouterOS Home" device:
| Code Block |
|---|
|
[admin@Home]  /zerotier> peer/pr
Columns: INSTANCE, ZT-ADDRESS, LATENCY, ROLE, PATH
4 zt1       deb55dc5b1  29ms     LEAF    active,preferred,159.148.172.243/9993,recvd:3s962ms,sent:3s962ms

[admin@Home]  /zerotier> import-moon moon=000000deb55dc5b1.moon zt1

[admin@Home]  /zerotier> peer/pr
Columns: INSTANCE, ZT-ADDRESS, LATENCY, ROLE, PATH
4 zt1 deb55dc5b1 MOON |
Drop moon
To remove the moon from the instance, use the drop-moon command as follows:
| Code Block |
|---|
|
[admin@office] > /zerotier> drop-moon moon=000000deb55dc5b1 zt1 |
Orbit moon
The orbit-moon feature allows you to fetch moon configurations from the moon itself with a pointing IP address:
| Code Block |
|---|
|
[admin@office] > zerotier/orbit-moon zt1 moon=000000879c0b5265 |