Introduction
Many RouterOS devices have GPS support. It allows RouterOS to determine the precise location of its GPS receiver. GPS coordinates will indicate the latitude and the longitude values (among other parameters) of the current position.
Let's say, you have LTAP (or any other RouterOS device with GPS support) and you wish to track its location. You want the router to send this data to a server, where the data will be stored and integrated into a map, as it is more convenient to monitor. In this guide, we will showcase how you can do that. This scenario will utilize MQTT protocol communication with a platform called ThingsBoard.
ThingsBoard has a cloud solution and different local installation options (on different OS).
Since we've added a container feature, it became possible to also run the platform within the RouterOS. Meaning, you can build this scenario, solely on RouterOS units → devices with GPS support that you wish to track (for example, cars equipped with LTAPs → RouterOS devices that act as MQTT publishers), and a ThingsBoard server run within a more powerful RouterOS device (like a CHR machine → RouterOS device that acts as an MQTT broker).
If you want to choose this route (container route), make sure to pick the devices that you plan on using as a "server" carefully, because this implementation can be heavy on RAM usage (it is suggested to have a device that has at least 2 GB RAM or 1 GB RAM with minimal load and is either ARM64 or AMD64 architecture).
Configuration
In this guide, we will demonstrate how to configure a GPS receiver (MQTT publisher) and how to set up ThingsBoard.
In case you want to use the container feature to run the ThingsBoard instance (MQTT broker), check the guide over here. General guidelines on ThingsBoard and MQTT configuration can be found in the guide over here. Make sure to explore both guides as they will have additional useful information.
Before proceeding, make sure that the ThingsBoard is up and running and that you can access its WEB management portal. Confirm that the MQTT port is open and/or port-forwarded properly.
Package requirement: gps, iot
ThingsBoard preparation
This example will showcase access-token and one-way SSL communication via access-token scenarios for simplicity reasons, but you can use other available options as well.
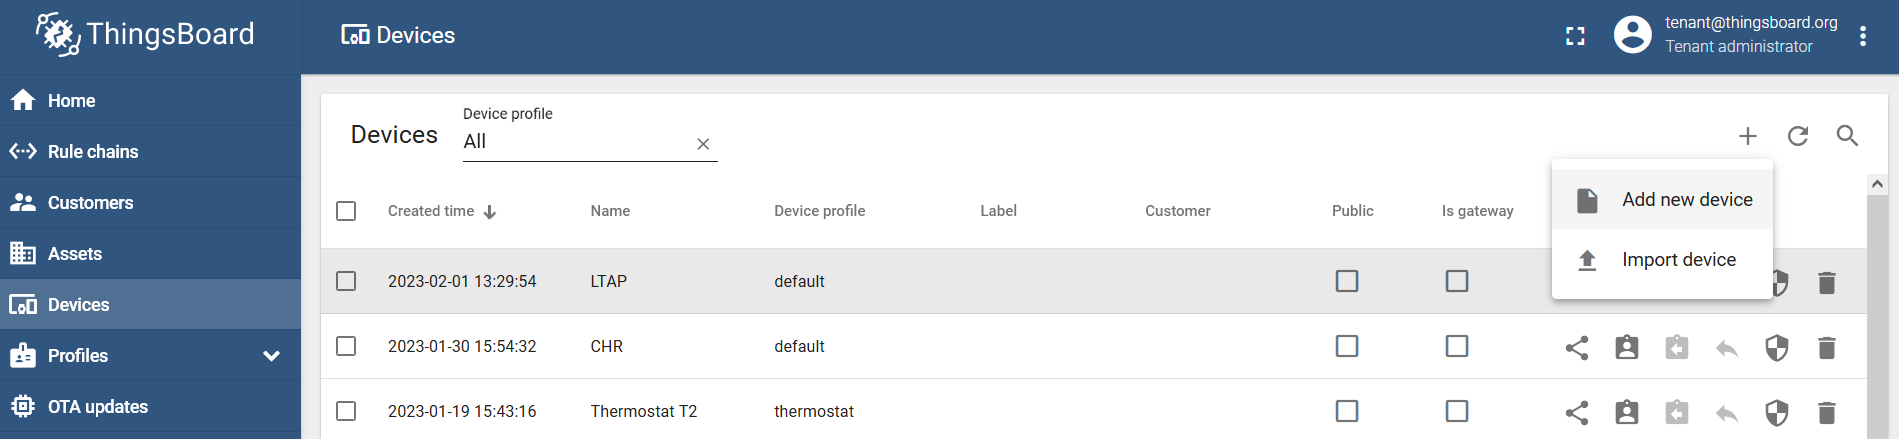
Navigate to the "Devices" menu and add a new device via the "Add new device" button → name it and create it (for example, LTAP):
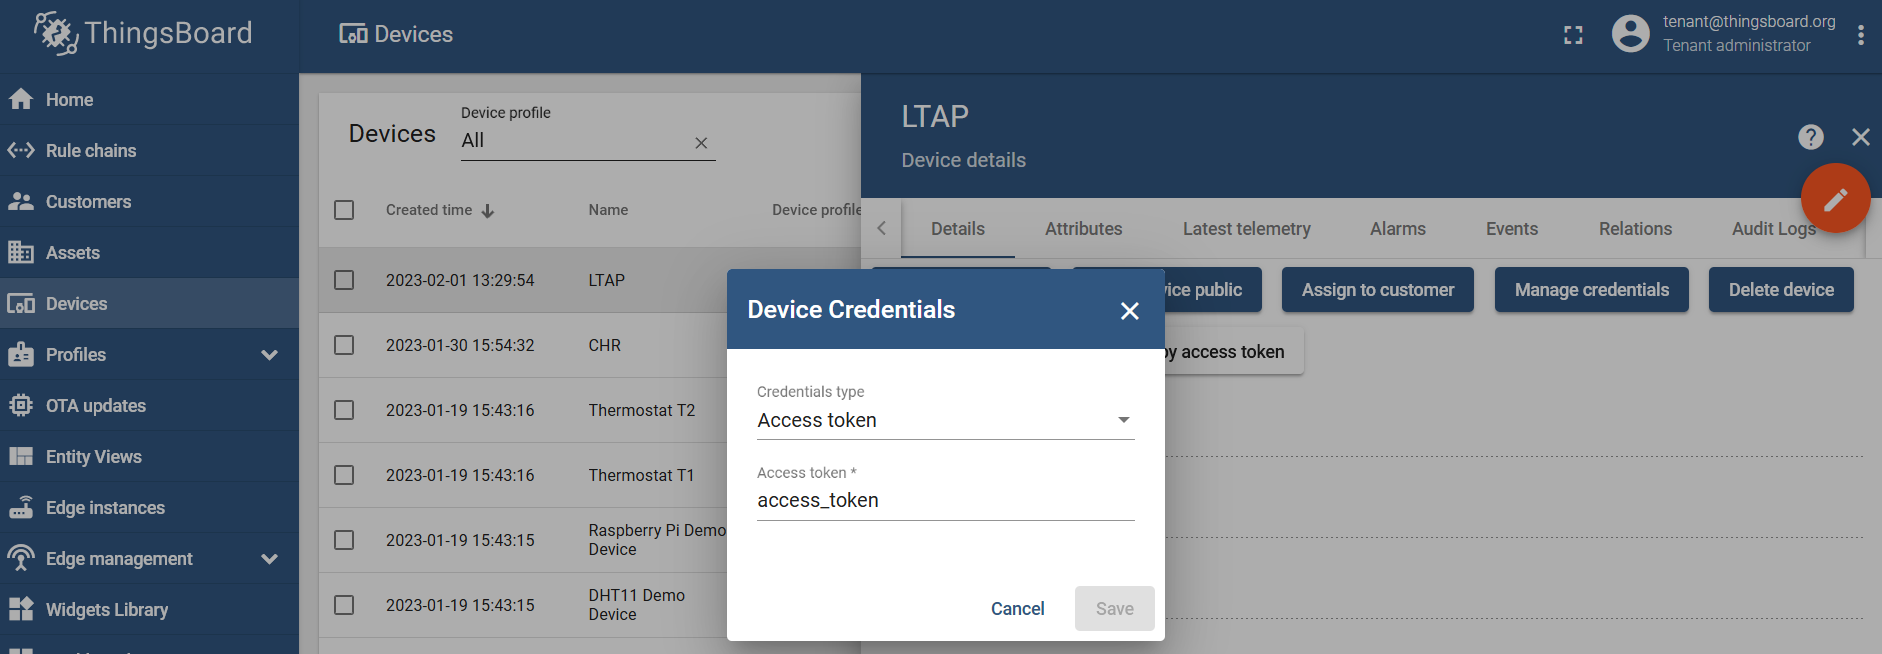
Click on the device you've just added, go to the "Details" section, and generate an access token under the "Manage credentials/Device Credentials" setting:
MQTT broker configuration
In case it is a local test or the broker is available through the VPN, you can use non-SSL MQTT:
/iot/mqtt/brokers/add name=tb address=x.x.x.x port=1883 username=access_token
Where:
nameis the name that you wish to give to the broker and this name will be used later in the script;addressis the IP address of the broker;portis the TCP port that the broker is listening for → for non-SSL it is typically TCP 1883;usernameis dictated by the MQTT broker and, in our case, it is an "access token" that was generated in the ThingsBoard management portal.
In case it is public access (when you want to access the broker via its public IP address), we advise you to use SSL MQTT:
/iot/mqtt/brokers/add name=tb address=x.x.x.x port=8883 username=access_token ssl=yes
Where:
nameis the name that you wish to give to the broker and this name will be used later in the script;addressis the IP address of the broker;portis the TCP port that the broker is listening for → for SSL it is typically TCP 8883;usernameis dictated by the MQTT broker, and, in our case, it is an "access token" that was generated in the ThingsBoard management portal;sslenables SSL MQTT communication.
MQTT publish
You can test MQTT publish with a static message by using the command:
/iot/mqtt/publish broker="tb" topic="v1/devices/me/telemetry" message="{\"test\":\"123\"}"
To post GPS coordinates, import the script shown below:
/system/script/add dont-require-permissions=no name=mqttgps owner=admin policy="ftp,re\
    boot,read,write,policy,test,password,sniff,sensitive,romon" \
    source="    ###Configuration###\r\
    \n    #Enter pre-configured broker's name within \"\":\r\
    \n    :local broker \"tb\"\r\
    \n    #Enter the topic name within \"\", per the broker's config\
    uration:\r\
    \n    :local topic \"v1/devices/me/telemetry\"\r\
    \n\r\
    \n    ###Variables####\r\
    \n    :global lat\r\
    \n    :global lon\r\
    \n    :global alt1\r\
    \n    :global alt2\r\
    \n\r\
    \n    ###GPS####\r\
    \n    :put (\"[*] Capturing GPS coordinates...\")\r\
    \n    /system gps monitor once do={\r\
    \n    :set \$lat \$(\"latitude\");\r\
    \n    :set \$lon \$(\"longitude\");\r\
    \n    :set \$alt1 \$(\"altitude\")}\r\
    \n    ###remove \"meters\" from the value because JSON format wi\
    ll not understand it###\r\
    \n    :set \$alt2 [:pick \$alt1 0 [find \$alt1 \" m\"]]\r\
    \n\r\
    \n    :local message \\\r\
    \n    \"{\\\"latitude\\\":\$lat,\\\r\
    \n    \\\"longitude\\\":\$lon,\\\r\
    \n    \\\"altitude\\\":\$alt2}\"\r\
    \n\r\
    \n    ###MQTT###\r\
    \n    :if (\$lat != \"none\") do={\\\r\
    \n    :put (\"[*] Sending message to MQTT broker...\");\r\
    \n    /iot mqtt publish broker=\$broker topic=\$topic message=\$\
    message} else={:put (\"[*] Lattitude=none, not posting anything!\
    \");:log info \"Latitude=none, not posting anything!\"}"
In short, the script captures GPS information, specifically the latitude, longitude, and altitude values. Then it structures a JSON message out of them. In case, at the moment when the script is initiated, the latitude value equals anything other than "none" (equals any actual value-number) → it sends the JSON message via MQTT to the broker named "tb". In case, the GPS data can not be captured → "latitude" is recognized as "none" → the script just logs that nothing could be captured and does nothing else.
This is a very basic example. Feel free to alter the script and add your own "if" (maybe an email notification if there is no GPS signal) and additional parameters (any other RouterOS captured value, like, maybe, its firmware version) per your requirements.
Run the script with the command:
/system/script/run mqttgps
[*] Capturing GPS coordinates...
        date-and-time: feb/01/2023 10:39:37
             latitude: 56.969862
            longitude: 24.162425
             altitude: 31.799999 m
                speed: 1.000080 km/h
  destination-bearing: none
         true-bearing: 153.089996 deg. True
     magnetic-bearing: 0.000000 deg. Mag
                valid: yes
           satellites: 6
          fix-quality: 1
  horizontal-dilution: 1.42
             data-age: 0s
[*] Sending message to MQTT broker...
To automate the process, add a scheduler (to run the script, for example, every 30 seconds):
/system/scheduler/add name=mqttgpsscheduler interval=30s on-event="/system/script/run mqttgps"
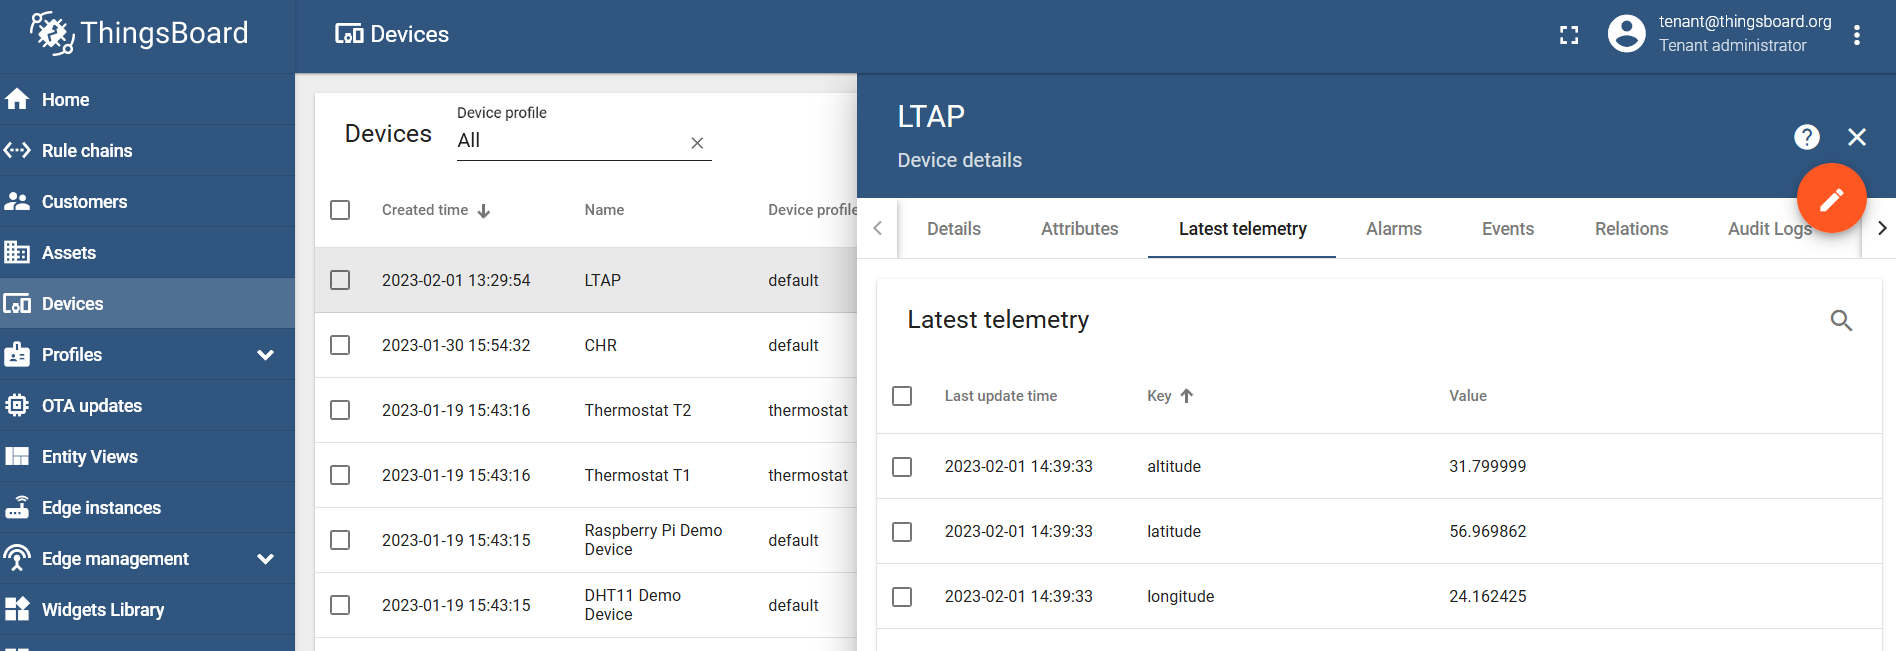
Result verification
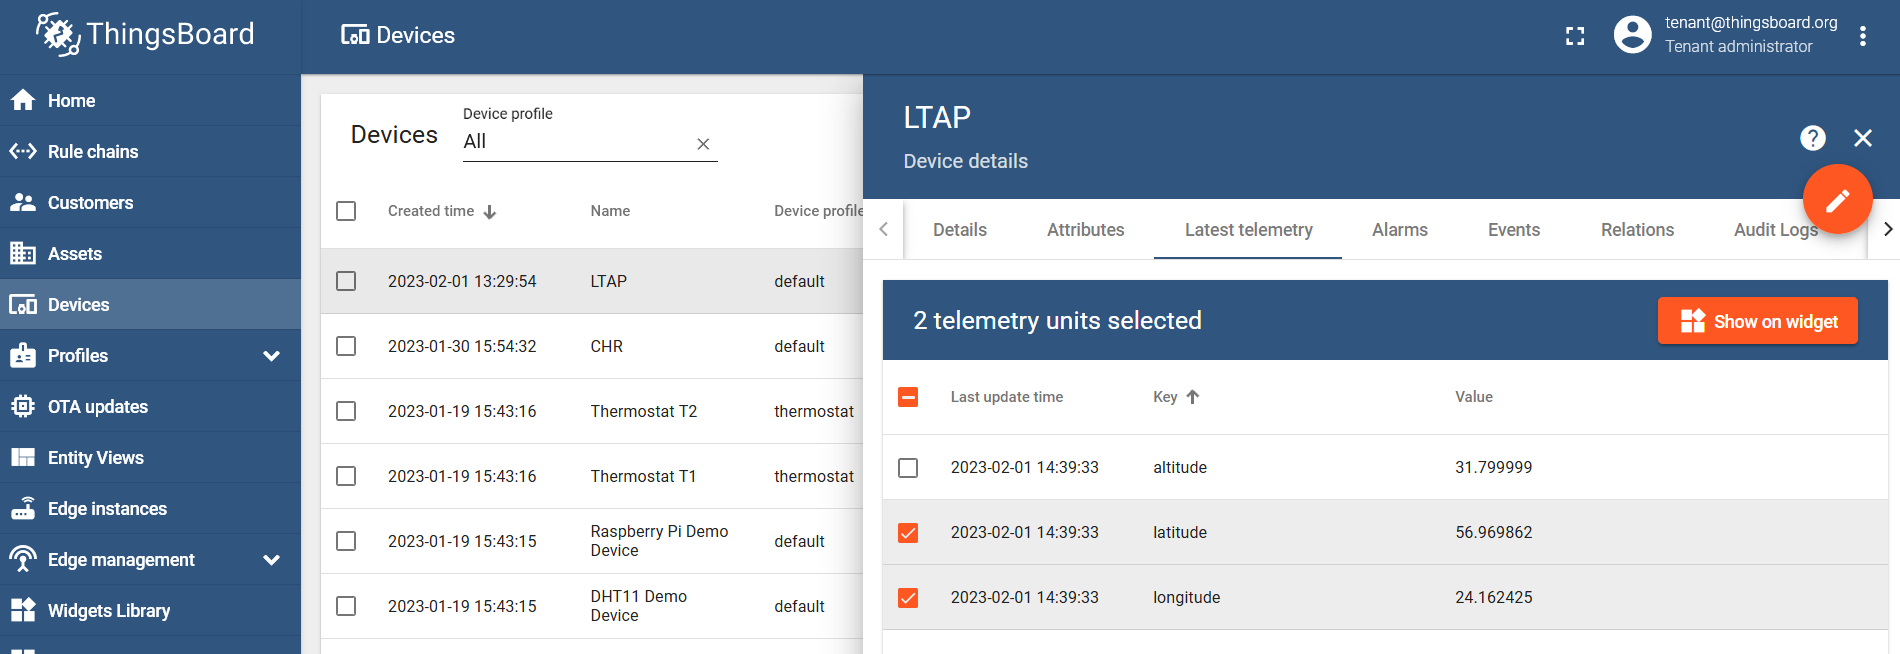
Go the the "Latest telemetry" section under your created device and confirm that the data was posted:
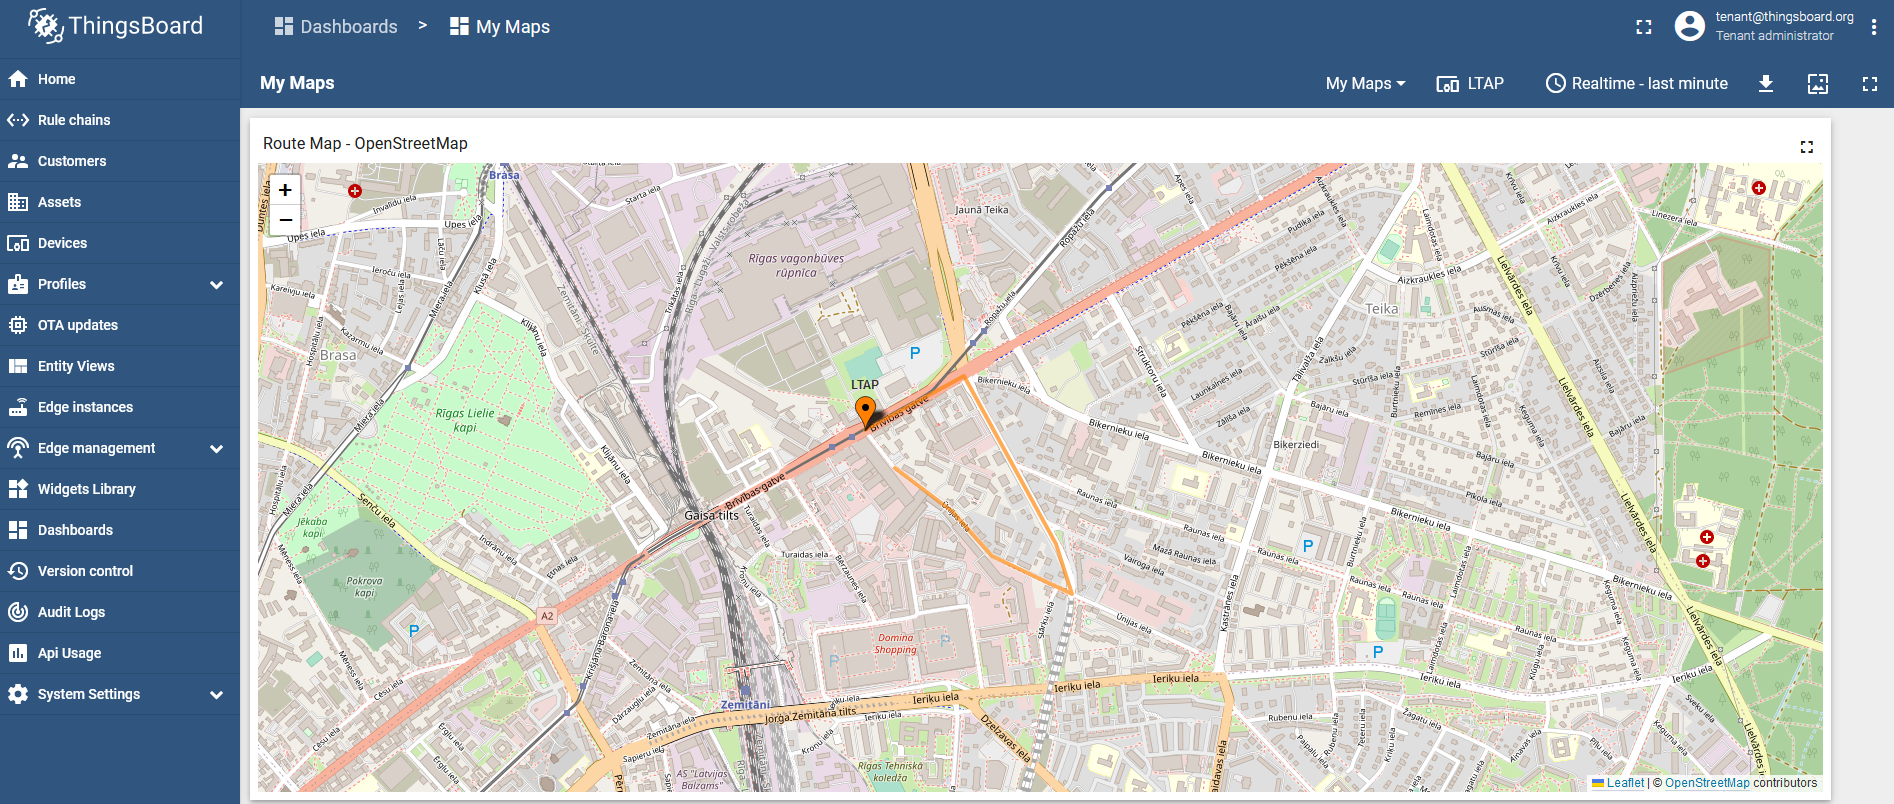
Data visualization using maps
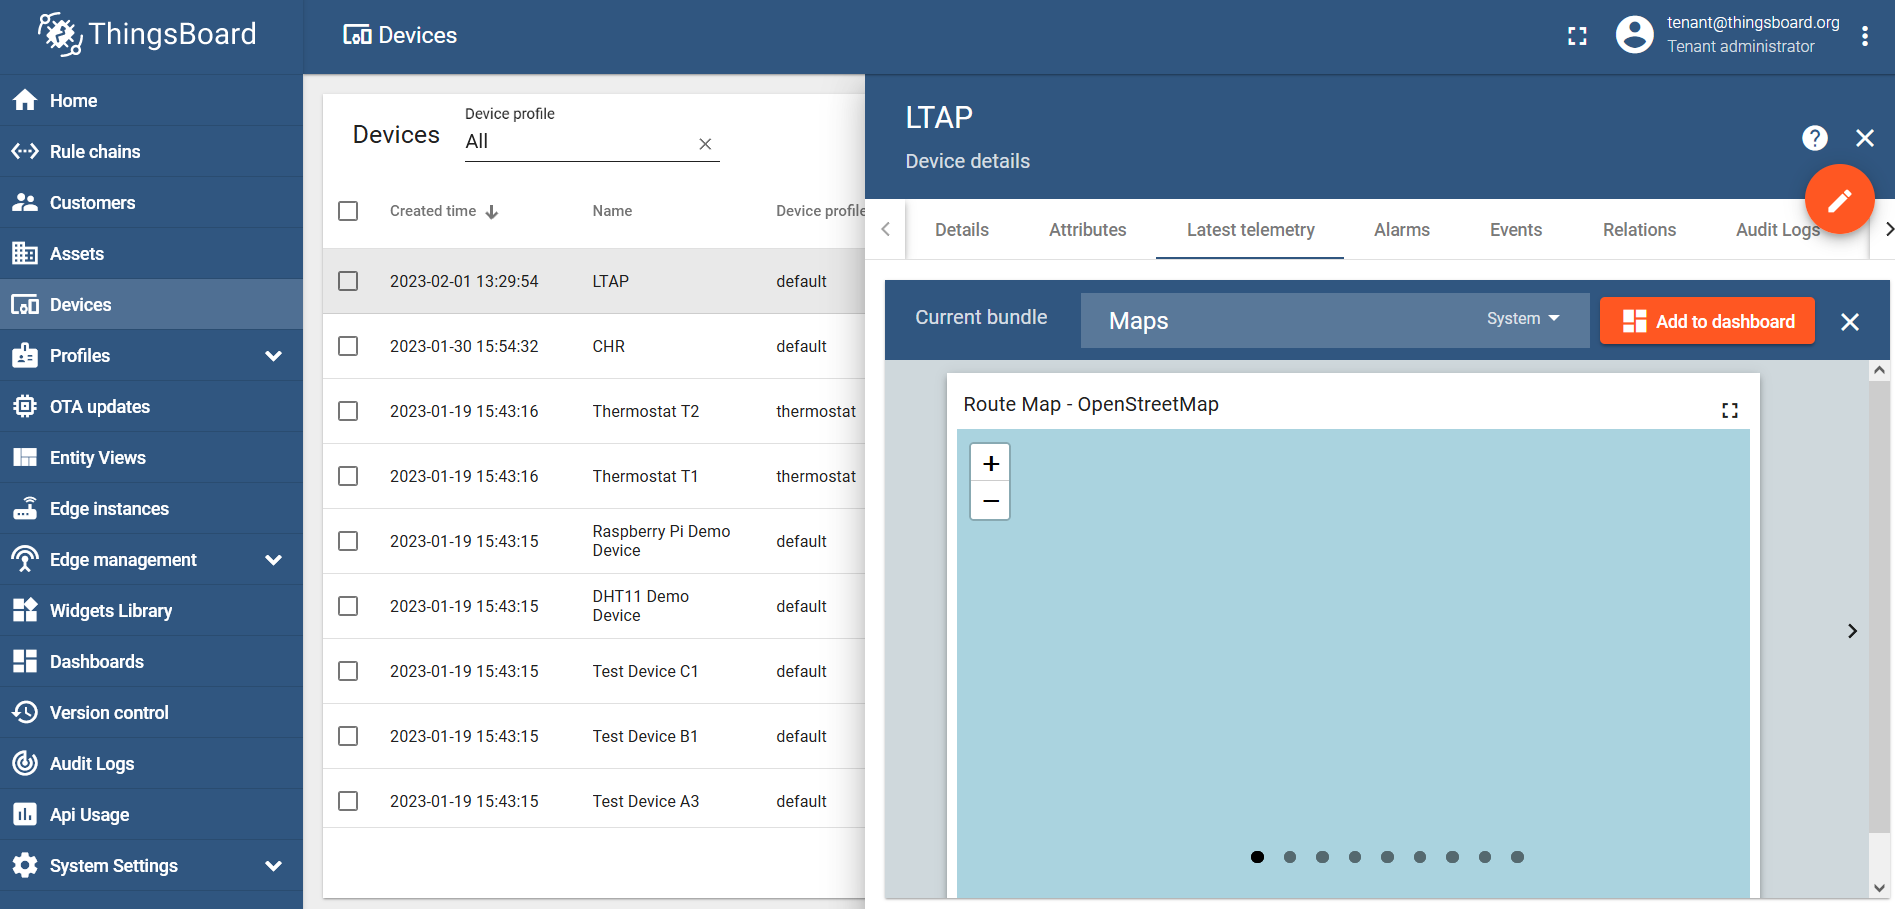
ThingsBoard allows you to use Widgets to create visually appealing dashboards. In our case, we want to track our LTAP GPS coordinates, so we will need a map widget.
Select the latitude and longitude values and click on the "Show on widget" button:
Find the "Maps" bundle and click on the "Add to dashboard":
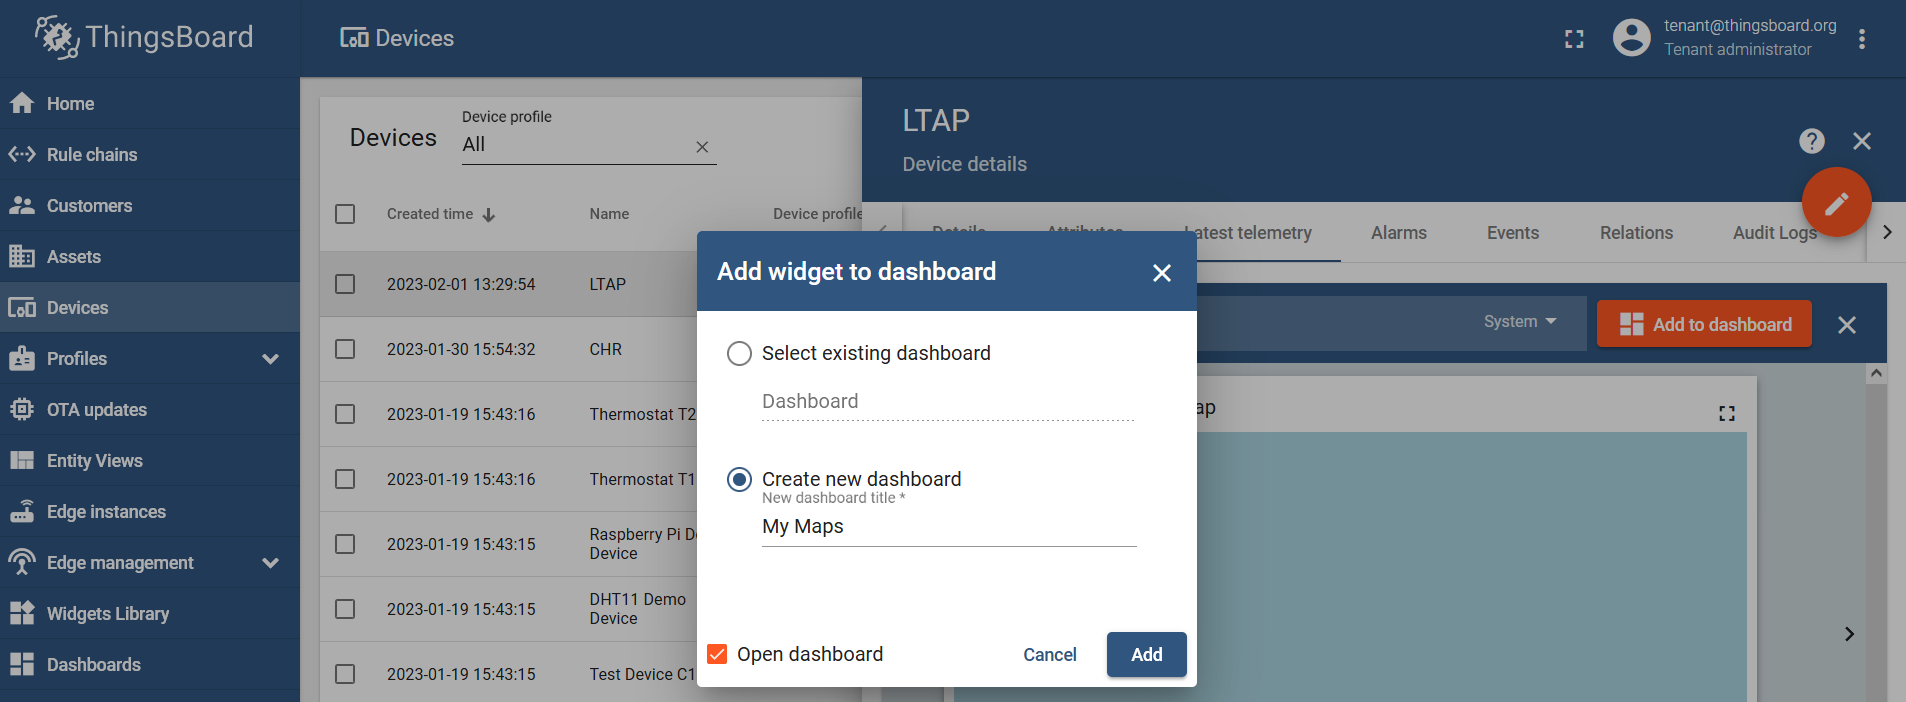
Select an existing dashboard or create a new one and name it however you like:
Run the script via the scheduler or manually and check the result:
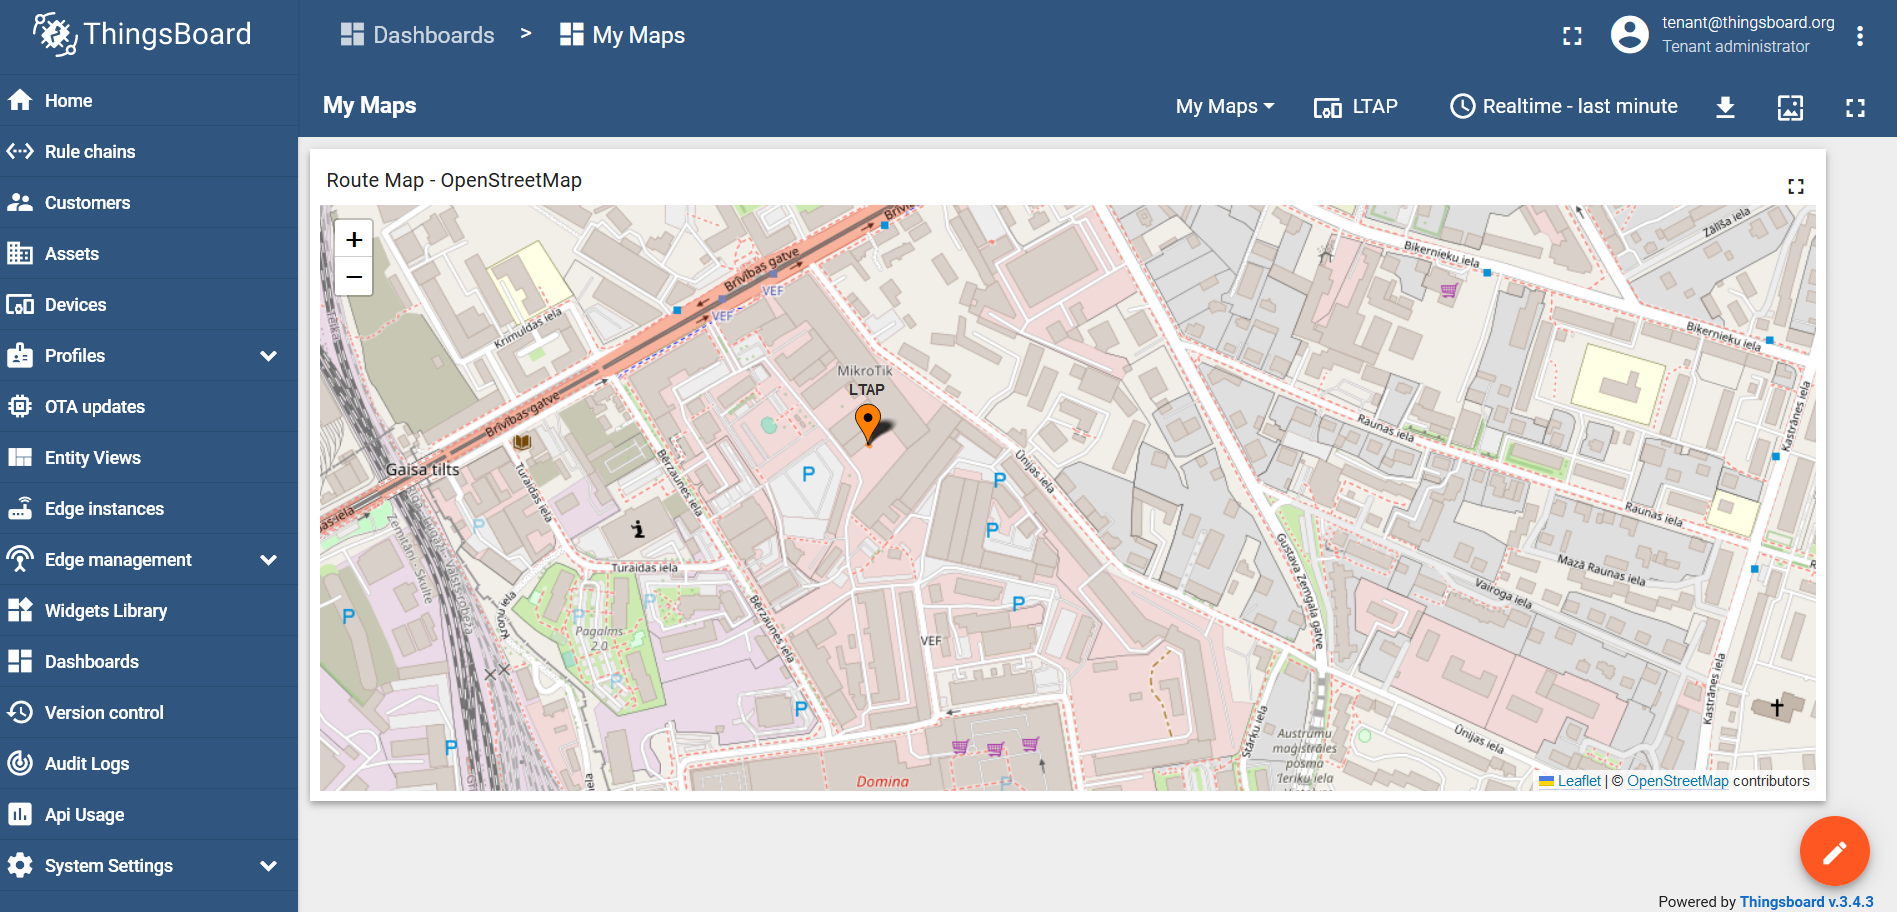
Now, we can install it on a moving target and track its location: