Cloud Hosted Router (CHR) is a RouterOS version intended for running as a virtual machine. It supports the x86 64-bit architecture and can be used on most of the popular hypervisors such as VMWare, Hyper-V, VirtualBox, KVM, and others. CHR has full RouterOS features enabled by default but has a different licensing model than other RouterOS versions.
System Requirements
- Package version: RouterOS v6.34 or newer
- Host CPU: 64-bit with virtualization support
- RAM: 256MB or more
- Disk: 128MB or more
- RouterOS version 6: The maximum supported CHR virtual hard drive size is 16GB
- RouterOS version 7: The maximum amount of RAM and disk space is limited by the Linux kernel 5.6.3 and depends on the specific hardware.
The minimum required RAM depends on interface count and CPU count. You can get an approximate number by using the following formula:
- RouterOS v6 - RAM = 128 + [ 8 × (CPU_COUNT) × (INTERFACE_COUNT - 1) ]
- RouterOS v7 - RAM = 256 + [ 8 × (CPU_COUNT) × (INTERFACE_COUNT - 1) ]
Note: We recommend allocating at least 1024MiB of RAM for CHR instances.
CHR has been tested on the following platforms:
- VirtualBox 6 on Linux and OS X
- VMWare Fusion 7 and 8 on OS X
- VMWare ESXi 6.5 and higher
- Qemu 2.4.0.1 on Linux and OS X
- Hyper-V on Windows Server 2008r2, 2012 and Windows 10 (Only Generation 1 Hyper-V virtual machine is supported at the moment)
- Xen Server 7.1
Warning: Hypervisors that provide paravirtualization are not supported.
Usable Network and Disk interfaces on various hypervisors:
- ESX:
- Network: vmxnet3, E1000
- Disk: IDE, VMware paravirtual SCSI, LSI Logic SAS, LSI Logic Parallel
- Hyper-V:
- Network: Network adapter, Legacy Network adapter
- Disk: IDE, SCSI
- Qemu/KVM:
- Network: Virtio, E1000, vmxnet3 (optional)
- Disk: IDE, Sata, Virtio
- VirtualBox
- Network: E1000, rtl8193
- Disk: IDE, Sata, SCSI, SAS
Note: SCSI controller Hyper-V and ESX are usable just for secondary disks, system image must be used with IDE controller!
Warning: We do not recommend using the E1000 network interface if better synthetic interface options are available on a specific Hypervisor!
How to Install a virtual RouterOS system with CHR images
We provide 4 different virtual disk images to choose from. Note that they are only disk images, and you can't simply run them.
- RAW disk image (.img file)
- VMWare disk image (.vmdk file)
- Hyper-V disk image (.vhdx file)
- VirtualBox disk image (.vdi file)
Steps to install CHR
- Download the virtual disk image for your hypervisor from the Cloud Hosted Router section.

- Create a guest virtual machine
- Use the previously downloaded image file as a virtual disk drive
- Start the guest CHR virtual machine
- Log in to your new CHR. The default user is 'admin', without a password
Please note that running CHR systems can be cloned and copied, but the copy will be aware of the previous trial period, so you cannot extend your trial time by making a copy of your CHR. However, you are allowed to license both systems individually. To make a new trial system, you need to make a fresh installation and reconfigure RouterOS.
Installing CHR guides
- VMWare Fusion/Workstation, ESXi 6.5 and higher
- VirtualBox
- Hyper-V
- Amazon Web Services (AWS)
- Hetzner Cloud Installation
- Linode
- Google Compute Engine
- ProxMox
- Vultr
CHR Licensing
The CHR (Cloud Hosted Router) has 4 license levels:
- free
- p1 perpetual-1 ($45)
- p10 perpetual-10 ($95)
- p-unlimited perpetual-unlimited ($250)
The 60-day free trial license is available for all paid license levels. To get the free trial license, you have to have an account on MikroTik.com as all license management is done there.
Perpetual is a lifetime license (buy once, use forever). It is possible to transfer a perpetual license to another CHR instance. A running CHR instance will indicate the time when it has to access the account server to renew its license. If the CHR instance will not be able to renew the license it will behave as if the trial period has run out and will not allow an upgrade of RouterOS to a newer version, or package changes (such as disabling or enabling packages).
After licensing a running trial system, you must manually run the /system license renew function from the CHR to make it active. Otherwise, the system will not know you have licensed it in your account. If you do not do this before the system deadline time, the trial will end and you will have to do a complete fresh CHR installation, request a new trial, and then license it with the license you had obtained.
| License | Speed limit | Price |
|---|---|---|
| Free | 1Mbit | FREE |
| P1 | 1Gbit | $45 |
| P10 | 10Gbit | $95 |
| P-Unlimited | Unlimited | $250 |
Paid licenses
p1
p1 (perpetual-1) license level allows CHR to run indefinitely. It is limited to 1Gbps upload per interface. All the rest of the features provided by CHR are available without restrictions. It is possible to upgrade from P1 to P10 or P-Unlimited. Once the upgrade is purchased at the full price, the former license will become available for later use on your account.
p10
p10 (perpetual-10) license level allows CHR to run indefinitely. It is limited to 10Gbps upload per interface. All the rest of the features provided by CHR are available without restrictions. It is possible to upgrade from P10 to P-Unlimited. Once the upgrade is purchased at the full price, the former license will become available for later use on your account.
p-unlimited
The p-unlimited (perpetual-unlimited) license level allows CHR to run indefinitely. It is the highest-tier license and it has no enforced limitations.
Free licenses
There are several options to use and try CHR free of charge.
free
The free license level allows CHR to run indefinitely. It is limited to 1Mbps upload per interface. All the rest of the features provided by CHR are available without restrictions. To use this, all you have to do is download the disk image file from our download page and create a virtual guest.
60-day trial
In addition to the limited Free installation, you can also test the increased speed of P1/P10/PU licenses with a 60 trial.
You will have to have an account registered on MikroTik.com. Then you can request the desired license level for trial from your router that will assign your router ID to your account and enable the purchase of the license from your account. All the paid license equivalents are available for trial. A trial period is 60 days from the day of acquisition after this time passes, your license menu will start to show "Limited upgrades", which means that RouterOS can no longer be upgraded or change packages (disabling or enabling packages).
If you plan to purchase the selected license, you should do it within 60 days of the trial end date. If your trial ends, and there are no purchases within 2 months after it ended, the device will no longer appear in your MikroTik account. You will have to make a new CHR installation to make a purchase within the required time frame.
To request a trial license, you must run the command "/system license renew" from the CHR device command line. You will be asked for the username and password of your mikrotik.com account.
An expired CHR license means the CHR instance failed to renew its license before the "deadline-at" date by contacting the MikroTik server or that the 60-day trial period has ended. While the router continues operating at the same tier, software updates and package changes are disabled.
It is only possible to license an expired CHR instance using a Prepaid key.
Prepaid Key
A Prepaid Key is a type of license key you can purchase in advance for MikroTik products, such as the CHR, or convert into a license key to apply to an x86 system's Software ID. It allows you to buy a license without immediately assigning it to a specific device. Once you have a Prepaid Key, you can use it to upgrade a CHR or later convert it into a license key by providing the device's Software ID.
How to Purchase a Prepaid Key to License a CHR
Go to mikrotik.com and log in to your account.
Access the "Purchase a RouterOS License Key" Section.
- Choose the desired license Key Level;
- Select Key Type.
- Select the key type: "Prepaid key";
Input the quantity of prepaid keys you wish to purchase;
- Select Optional Key Features:
- Choose any additional features you might need for your key.
- Press the "Place key in the cart" button.
- Click "Proceed to checkout" to complete your purchase.

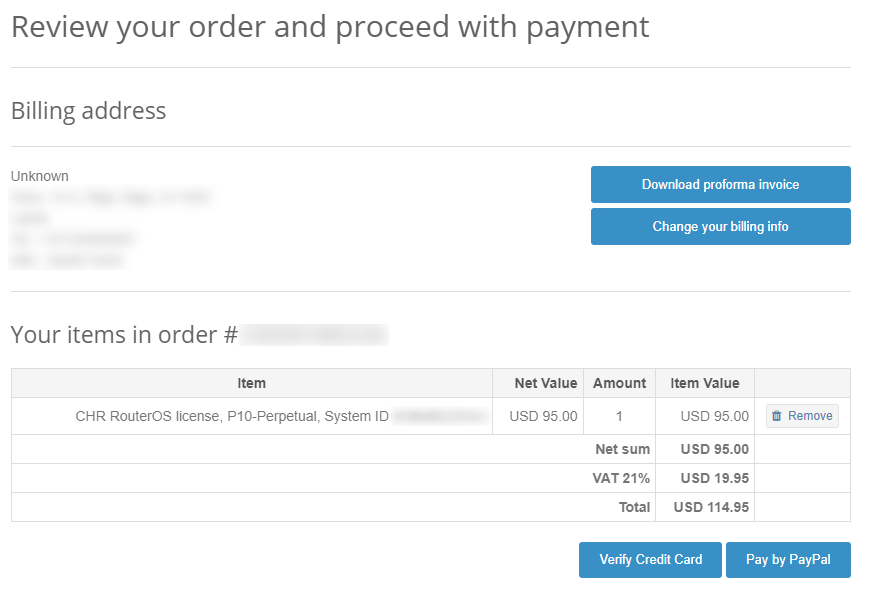
Review and Complete Your Purchase
- Review your order details.
- Proceed with payment using Credit Card (CC) or PayPal.

Congratulations! You have successfully purchased a Prepaid Key.
Getting and Upgrading the License
After the initial setup, a CHR instance will be assigned a free trial license. You can upgrade this license to a higher tier through your MikroTik account. All license management, including upgrades, is handled on the account server.
Note that you can upgrade to any tier except for p-unlimited, which is already the highest tier.
Initial Upgrade from Free to P1 License Level or Higher
Initial upgrade from the free tier to anything higher than that incurs CHR instance registration on the account server.
To do that you have to enter your MikroTik.com username and password and the desired license level you want to acquire.
To upgrade from the free tier to a higher license level, you need to register the CHR instance on the account server. Enter your MikroTik username and password, then select the desired license level to complete the upgrade.
As a result, a CHR System ID will be assigned to your account on the account server, and a 60-day trial will be created for that System ID. There are two ways to obtain a license: using WinBox or the RouterOS command-line interface.
Upgrade license level using WinBox
(System -> License menu):


Upgrade license level using the command-line interface
[admin@MikroTik] > /system license print
  system-id: 6lR1ZP/utuJ
      level: free

[admin@MikroTik] > /system/license/renew
account: mymikrotikcomaccount
password: *********************
level: p1
  status: done

[admin@MikroTik] > /system/license/print
         system-id: 6lR1ZP/utuJ
             level: p1
  limited-upgrades: no
   next-renewal-at: 2024-08-25 13:18:06
       deadline-at: 2024-09-24 13:18:06
Payment
To acquire a higher-level trial, set up a new CHR instance, renew the license, and select the desired level.
To upgrade from a Trial license to a Paid one, go to the MikroTik account server and choose "All CHR keys" in the "CHR LICENCES" section.

The list of your CHR instances and their corresponding licenses will be displayed.

To upgrade from a Trial to a Paid license, click "Upgrade", select the desired license level (which can differ from the trial license level), and click "Upgrade" button.
If there are Prepaid keys available, it is possible to use it for CHR - press "Pay using Prepaid key". If there are no Prepaid keys or you do not want to use them, press "Proceed to checkout".
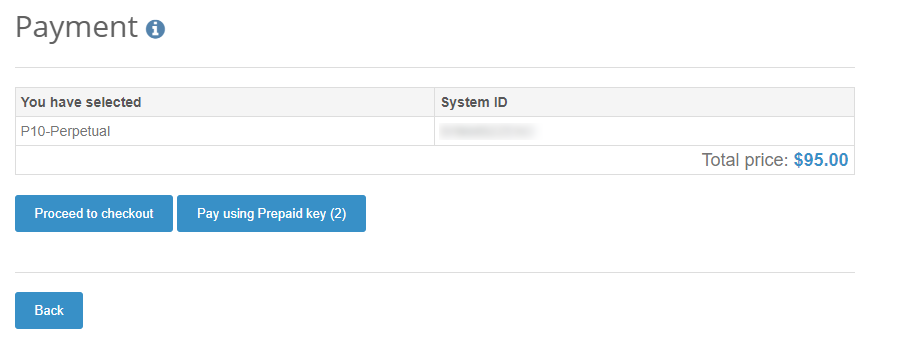
Choose the payment method: It is possible to pay using a credit card (CC) or PayPal.
License Update
In the System-License menu, the router will indicate "next-renewal-at" - the time when it will reattempt to contact the server located on licence.mikrotik.com.
Communication attempts will be performed once an hour after the date on "next-renewal-at" and will not cease until the server responds with an error.
If the "deadline-at" date is reached without successfully contacting the account server, the router will consider that the license has expired and will disallow further software updates or package changes. However, the router will continue to work with the same license tier as before.
After successful communication with the license server, the dates will be updated.
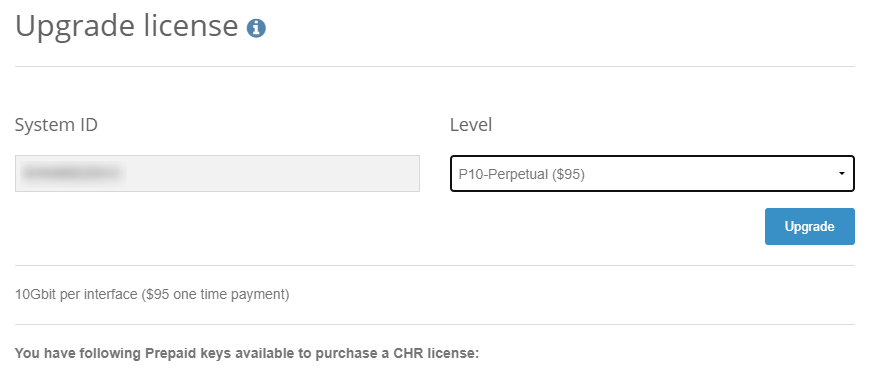
Upgrading the Level of Perpetual License
It is possible to upgrade the Level of Perpetual License from P1 to P10 or P-Unlimited. Once the upgrade is purchased at the full price, the former license will become available for later use on your account.
It is also possible to upgrade the Level of Perpetual License from P10 to P-Unlimited. Once the upgrade is purchased at the full price, the former license will become available for later use on your account.
The P-Unlimited (perpetual-unlimited) license level allows CHR to run indefinitely. It is the highest-tier license and it has no enforced limitations.
To upgrade the license level, follow these steps:
- Go to the "All CHR keys" section on your mikrotik.com account.
- Choose the CHR instance you want to upgrade and press "Upgrade".
If you want to upgrade a perpetual license to a higher level, please transfer the previous perpetual license to another CHR first. This will prevent the previous perpetual license from being lost during the upgrade process.

- Select the desired license level to upgrade to (P10 or P-Unlimited) and press "Upgrade".

Payment Options:
- If you have prepaid keys available, you can use them for the upgrade by pressing "Pay using Prepaid key".
- If you do not have prepaid keys or prefer not to use them, press "Proceed to checkout".
Choose Payment Method:
- Choose your preferred payment method. You can pay using a credit card (CC) or PayPal.
After completing these steps, your CHR license will be upgraded to the selected level, and the previous license will be available for later use on your account.
License Transfer
CHR installations are tied directly to the account on our website. It is possible to transfer a perpetual license to another CHR instance registered under the same account.
Licenses cannot be transferred to another account. The license transfer process requires that both the old and new CHR instances are registered under the same MikroTik account. If you need to use the CHR on a different account, a new license must be purchased for that account.
The only kind of licenses, that could be transferred to another Account is a Prepaid key. Prepaid keys got as a gift from the Training are not transferable.
To transfer purchased prepaid key navigate to "Transfer prepaid keys" in the section "ROUTEROS KEYS" on your MikroTik Account.
It is not possible to transfer the Perpetual license to an expired instance.
If you see the error: "This key is not eligible for transfer as there is no other valid CHR key that could be upgraded to the license level of this key.", it means you don't have any CHR instances in Trial mode to which the current license can be transferred.
You need to create a new CHR instance and add it to your account. Once added, you will be able to transfer the existing license to the new CHR instance.
First, register the new machine under the same MikroTik account where the old CHR is registered using the CLI command "/system license renew".
Once both the old and new CHR machines are visible in the "All CHR keys" section of your account, use the "Transfer" button to transfer the license.
- Press the "Transfer" button for the System ID you need to transfer.
![]()
- Select the System ID you are transferring to from the list.
![]()
- Press "Transfer subscription".
![]()
Virtual Network Adapters
Fast Path is supported in RouterOS v7 for "vmxnet3" and "virtio-net" adapters.
RouterOS v6 does not support Fast Path.
Troubleshooting
Running on VMware ESXi
Changing MTU
VMware ESXi supports MTU of up to 9000 bytes. To get the benefit of that, you have to adjust your ESXi installation to allow a higher MTU. Virtual Ethernet interface added after the MTU change will be properly allowed by the ESXi server to pass jumbo frames. Interfaces added prior to MTU change on the ESXi server will be barred by the ESXi server (it will still report the old MTU as the maximum possible size). If you have this, you have to re-add interfaces to the virtual guests.
Example. There are 2 interfaces added to the ESXi guest, auto-detected MTU on the interfaces show MTU size as it was at the time when the interface was added:
[admin@chr-vm] > interface ethernet print
Flags: X - disabled, R - running, S - slave
 #    NAME           MTU MAC-ADDRESS       ARP
 0 R  ether1        9000 00:0C:29:35:37:5C enabled
 1 R  ether2        1500 00:0C:29:35:37:66 enabled
Using bridge on Linux
If Linux bridge supports IGMP snooping, and there are problems with IPv6 traffic it is required to disable that feature as it interacts with MLD packets (multicast) and is not passing them through.
echo -n 0 > /sys/class/net/vmbr0/bridge/multicast_snooping
Packets not passing from guests
The problem: after configuring a software interface (VLAN, EoIP, bridge, etc.) on the guest CHR it stops passing data to the outside world beyond the router.
The solution: check your VMS (Virtualization Management System) security settings, if other MAC addresses are allowed to pass and if packets with VLAN tags are allowed to pass through. Adjust the security settings according to your needs like allowing MAC spoofing or a certain MAC address range. For VLAN interfaces, it is usually possible to define allowed VLAN tags or VLAN tag range.
Using VLANs on CHR in various Hypervisors
In some hypervisors, before VLAN can be used on VMs, they need to first be configured on the hypervisor itself.
ESXI
Enable Promiscuous mode in a port group or virtual switch that you will use for a specific VM.
ESX documentation:
Hyper-V
Hyper-V documentation:
bhyve hypervisor
It won't be possible to run CHR on this hypervisor. CHR cannot be run as a para-virtualized platform.
Linode
When creating multiple Linodes with the same disk size, new Linodes will have the same systemID. This will cause issues to get a Trial/Paid license. To avoid this, run the command /system license generate-new-id after the first boot and before you request a trial or paid license. This will make sure the ID is unique.
Some useful articles:
Specific VLAN is untagged by NIC interface:
- https://blogs.msdn.microsoft.com/adamfazio/2008/11/14/understanding-hyper-v-vlans/
- https://www.aidanfinn.com/?p=10164
Allow passing other VLANs:
Guest tools
VMWare
Time synchronization
Must be enabled from GUI ('Synchronize guest time with host'). Backward synchronization is disabled by default - if the guest is ahead of the host by more than ~5 seconds, synchronization is not performed
Power operations
- poweron and resume scripts are executed (if present and enabled) after power on and resume operations respectively.
- poweroff and suspend scripts are executed before power off and suspend operations respectively.
- If scripts take longer than 30 seconds or contain errors, the operation fails
- In case of failure, retrying the same operation will ignore any errors and complete it successfully
- Failed script output is saved to a file (e. g. 'poweroff-script.log', 'resume-script.log' etc)
- Scripts can be enabled/disabled from hypervisor GUI ('run VMware Tools Scripts') or by enabling/disabling scripts from the console
Quiescing/backup
Guest filesystem quiescing is performed only if requested.
- freeze script is executed before freezing the filesystem
- freeze-fail script is executed if the hypervisor failed to prepare for a snapshot or if freeze script failed
- thaw script is executed after the snapshot has been taken
- Script run time is limited to 60 seconds
- freeze script timeouts and errors result in the backup operation being aborted
- FAT32 disks are not quiesced
- Failed script output is saved to a file (e. g. 'freeze-script.log', 'freeze-fail-script.log', 'thaw-script.log')
Guest info
Networking, disk, and OS info are reported to the hypervisor every 30 seconds (GuestStats (memory) are disabled by default, and can be enabled by setting 'guestinfo.disable-perfmon = "FALSE"' in VM config).
- The order, in which network interfaces are reported, can be controlled by setting 'guestinfo.exclude-nics', 'guestinfo.primary-nics' and 'guestinfo.low-priority-nics' options. Standard wildcard patterns can be used.
Provisioning
You can use the ProcessManager from Vim API to execute scripts. Python bindings are available
- Main data structure: GuestProgramSpec
- The workingDirectory and envVariables members are ignored
- programPath must be set to either 'inline' or 'import'
- If programPath is 'inline', arguments are interpreted as script text
- If programPath is 'import', arguments are interpreted as file path
After using GuestProgramSpec together with an instance of GuestAuthentication as arguments to StartProgramInGuest unique JobID is obtained.
Script progress can be tracked by using the ListProcessesInGuest command. ListProcessesInGuest accepts an array of job id's; passing an empty array will report on all jobs started from the API
- ListProcessesInGuest returns an array of GuestProcessInfo instances:
- pid field is set to JobID
- endTime is only set after completion
- exitCode is set to 0 on success and -1 on error
- name is set to 'inline' or 'import' (same as programPath in GuestProgramSpec)
Information about completed jobs is kept around for ~1 minute, or until ListProcessesInGuest (with the corresponding JobID) is called. If the script fails, a file named 'vix_job_$JobID$ .txt' containing the script output is created. Script run time is limited to 120 seconds and script output is not saved on timeout,
- The vmrun command runScriptInGuest can also be used
- The PowerCLI cmdlet Invoke-VMScript is not supported
- Host/guest file transfer is not supported
Python example
#!/usr/bin/env python
# -*- coding: utf-8 -*-

import sys,time
from pyVim import connect
from pyVmomi import vmodl,vim


def runInline(content,vm,creds,source):
    ''' Execute script source on vm '''
    if isinstance(source, list):
        source = '\n'.join(source)
    ps = vim.vm.guest.ProcessManager.ProgramSpec(
                programPath = 'console',
                arguments = source
        )
    return content.guestOperationsManager.processManager.StartProgramInGuest(vm,creds,ps)

def runFromFile(content,vm,creds,fileName):
    ''' Execute script file located on CHR '''
    ps = vim.vm.guest.ProcessManager.ProgramSpec(
                programPath = 'import',
                arguments = fileName
    )
    return content.guestOperationsManager.processManager.StartProgramInGuest(vm,creds,ps)


def findDatastore(content,name):
    sessionManager = content.sessionManager

    dcenterObjView = content.viewManager.CreateContainerView(content.rootFolder, [vim.Datacenter], True)

    datacenter = None
    datastore = None
    for dc in dcenterObjView.view:
        dstoreObjView = content.viewManager.CreateContainerView(dc, [vim.Datastore], True)
        for ds in dstoreObjView:
            if ds.info.name == name:
                datacenter = dc
                datastore = ds
                break
        dstoreObjView.Destroy()

    dcenterObjView.Destroy()

    return datacenter,datastore

def _FAILURE(s,*a):
    print(s.format(*a))
    sys.exit(-1)

#------------------------------------------------------------------------------#

if __name__ == '__main__':
    host = sys.argv[1] # ip or something
    user = 'root'
    pwd = 'MikroTik'
    vmName = 'chr-test'
    dataStoreName = 'datastore1'


    service = connect.SmartConnectNoSSL(host=host,user=user,pwd=pwd)
    if not service:
        _FAILURE("Could not connect to the specified host using specified username and password")

    content = service.RetrieveContent()


    #---------------------------------------------------------------------------
    # Find datacenter and datastore


    datacenter,datastore = findDatastore(content,dataStoreName)

    if not datacenter or not datastore:
        connect.Disconnect(service)
        _FAILURE('Could not find datastore \'{}\'',dataStorename)


    #---------------------------------------------------------------------------
    # Locate vm


    vmxPath = '[{0}] {1}/{1}.vmx'.format(dataStoreName, vmName)
    vm = content.searchIndex.FindByDatastorePath(datacenter, vmxPath)

    if not vm:
        connect.Disconnect(service)
        _FAILURE("Could not locate vm")


    #---------------------------------------------------------------------------
    # Setup credentials from user name and pasword

    creds = vim.vm.guest.NamePasswordAuthentication(username = 'admin', password = '')


    #---------------------------------------------------------------------------
    # Run script

    pm = content.guestOperationsManager.processManager

    try:
        # Run script
        src = [':ip address add address=192.168.0.1/24 interface=ether1;']
        jobID = runInline(content, vm, creds, src)

        # Or run file (from FTP root)
        # jobID = runFromFile(content,vm,creds, 'scripts/provision.rsc')


        #---------------------------------------------------------------------------
        # Wait for job to finish

        pm = content.guestOperationsManager.processManager
        jobInfo = pm.ListProcessesInGuest(vm, creds, [jobID])[0]
        while jobInfo.endTime is None:
            time.sleep(1.0)
            jobInfo = pm.ListProcessesInGuest(vm, creds, [jobID])[0]

        if jobInfo.exitCode != 0:
            _FAILURE('Script failed!')
    except:
        raise
    else:
        connect.Disconnect(service)
KVM
QEMU guest agent is available. Supported agent commands can be retrieved by using the guest-info command. Host-guest file transfer can be performed by using guest-file-* commands. Guest networking information can be retrieved by using the guest-network-get-interfaces command.
- Scripts can be executed by using the guest-exec command together with the GuestExec data structure:
- If the path member is provided, the corresponding file is executed
- If the path member is not set and input-data member is provided, input-data value is used as script input
- If capture-output is set, script output is reported back
- args and env members are not used
- Script job progress can be monitored with guest-exec-status command. The GuestExecStatus data structure is populated as follows:
- On success, exitcode member is set to 0
- If the script timed out exitcode is set to 1
- If the script contained errors exitcode is set to -1
- signal member is not set
- The err-data member is not used
- If capture-output was true, Base64 encoded script output is stored in out-data
- An additional agent channel ('chr.provision_channel') is also available