CSS326-24G-2S+RM

The CSS is a switch with 24 Gigabit Ethernet ports and two SFP+ ports. All ports are connected through a switch chip. The device runs SwOS operating system, specifically made for Switches.
Safety Warnings
Before you work on any equipment, be aware of the hazards involved with electrical circuitry, and be familiar with standard practices for preventing accidents.
Ultimate disposal of this product should be handled according to all national laws and regulations.
The Installation of the equipment must comply with local and national electrical codes.
This unit is intended to be installed in the rackmount. Please read the mounting instructions carefully before beginning installation. Failure to use the correct hardware or to follow the correct procedures could result in a hazardous situation to people and damage to the system.
This product is intended to be installed indoors. Keep this product away from water, fire, humidity or hot environments.
Use only the power supply and accessories approved by the manufacturer, and which can be found in the original packaging of this product.
Read the installation instructions before connecting the system to the power source.
We cannot guarantee that no accidents or damage will occur due to the improper use of the device. Please use this product with care and operate at your own risk!
In the case of device failure, please disconnect it from power. The fastest way to do so is by unplugging the power plug from the power outlet.
It is the customer's responsibility to follow local country regulations, including operation within legal frequency channels, output power, cabling requirements, and Dynamic Frequency Selection (DFS) requirements. All Mikrotik devices must be professionally installed.
Quick start
- Download the latest version of SwitchOS software from https://mikrotik.com/download;
- Connect your computer to one of the Ethernet ports;
- Connect the device to the power supply;
- Set the IP address of your computer to 192.168.88.2;
- Open your web browser, the default IP management address is 192.168.88.1, with username: admin and no password (or, for some models, check user and wireless passwords on the sticker);
- Upload a file with the web browser in the Upgrade tab, the device will reboot after the upgrade;
- Set your password to secure your device.
Powering
The device accepts power from the power jack or from the first Ethernet port (Passive PoE).
- Direct-input power jack (5.5mm outside and 2mm inside, female, pin positive plug) accepts 11-30V DC.
- The first Ethernet port accepts passive PoE input 11-30V DC.
- Power consumption 19 W.
Connecting to a PoE Adapter:
- Connect the Ethernet cable from the device to the PoE+DATA port of the PoE adapter.
- Connect an Ethernet cable from your local network (LAN) to the PoE adapter.
- Connect the power cord to the adapter, and then plug the power cord into a power outlet.
Extension slots and ports
- 24 individual Gigabit Ethernet ports, supporting automatic cross/straight cable connection (Auto MDI/X), so you can use either straight or cross-over cables for connecting to other network devices.
- 2 SFP+ ports for using 10G SFP+, 1.25G Optical fiber or copper Ethernet modules
Specifications
Please visit wiki pages for MikroTik SFP module compatibility table: MikroTik wired interface compatibility
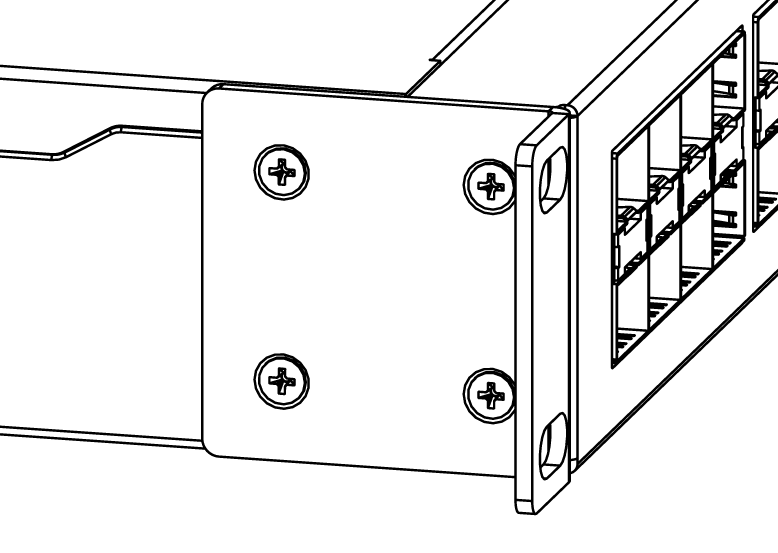
Mounting
The device is designed to use indoors and it can be mounted in a rackmount enclosure using provided rack mounts, or it can be placed on the desktop. Use a Phillips screwdriver to attach rackmount ears on both sides of the device if designated use is for rackmount enclosure:
- Attach rack ears to both sides of the device and tighten four screws to secure them in place, as shown in the picture.
- Place the device in a rackmount enclosure and align with the holes so that the device fits conveniently.
- Tighten screws to secure it in place.
The IP rating scale for this device is IPX0. The device has no protection from water contamination, please ensure the placement of the device in a dry and ventilated environment.
Mounting and configuration of this device should be done by a qualified person. We recommend using Cat6 cables for our devices.
Reset button
Hold this button during boot time until LED light starts to flash. Release the button to reset SwOS configuration and load backup software for reinstallation and upgrade.
Operating system support
This device runs SwOS, which is the only supported OS for this device. Information about SwOS: CRS3xx and CSS3xx series Manual