Every RouterBOARD with a miniPCI-e slot which supports LTE modems can also be used as a LoRaWAN gateway by installing R11e-LoRa8 or R11e-LoRa9 card. Both UDP and LNS (starting with v7.12rc1 testing version) protocols are supported.
Starting with v7.11 (stable), LoRa functionality is moved into the IoT package that is available on the download page under extra packages. A separate Lora package is still available for download.
When using IoT package, LoRa functionality will move to a /iot lora sub-menu. When using LoRa package, LoRa functionality will be possible via /lora sub-menu.
LoRa package is not obligatory anymore and is left only for compatibility reasons.
Properties
This menu is used to apply settings to the LoRa interface.
Sub-menu: /iot lora
| Property | Description |
|---|---|
| antenna-gain (integer [-128..127]; Default: 0) | Antenna gain in dBi. This value should be equal to Output power of the gateway is dictated by the server. The gateway will calculate its actual output power by subtracting |
| channel-plan (as-923 | au-915 | custom | eu-868 | in-865 | kr-920 | ru-864 | ru-864-mid | us-915-1 | us-915-2; Default: eu-868) | Frequency plans for various regions. |
| disabled (yes | no; Default: yes) | Whether LoRaWAN gateway is disabled. |
| forward (ccrc-validtaion | dev-addr-validtaion | proprietary-traffic; Default: crc-validtaion) | Defines what kind of packets should be forwarded to Network server:
|
| gateway-id (string) | Gateway ID or Gateway EUI, is used when registering the gateway with the server. |
| lbt-enabled (yes | no; Default: no) | Whether gateway should use LBT (Listen Before Talk) protocol. |
| listen-time (integer [0us..4294967295us]; Default: 5000us) | Time in microseconds to track RSSI before TX (used when lbt-enabled=yes). |
| name (string; Default: ) | Name of LoRaWAN gateway. |
| network (private | public; Default: public) | Whether sync word should (network=private) or should not (network=public) be used. |
| rssi-threshold (integer [-32,768 .. 32,767]; Default: -65dB) | RSSI value to determine whether forwarder may use specific channel to talk. If RSSI value is below rssi-threshold, channel could be used (used when lbt-enabled=yes). |
| servers (list of string; Default: ) | Name of the server from the /iot lora servers section. |
| src-address (IP; Default: ) | Specifies uplink packet source address if necessary (address should match an address configured on the RB). |
| spoof-gps (string; Default: ) | Set custom GPS location:
|
Once the server is selected and LoRa interface is enabled using /iot lora enable [find] command, the device will start operating as a LoRaWAN gateway. It will start forwarding LoRa payloads from the /iot lora traffic tab to the configured server.
Channels
This section is used to alter channel/frequency related settings.
Sub-menu: /iot lora channels
| Property | Description |
|---|---|
| bandwidth (7.8_kHz | 15.6_kHz | 31.2_kHz | 62.5_kHz | 125_kHz | 250_kHz | 500_kHz; Default: 125_kHz) | Bandwidth of specific channel, predefined when any of channel-plan preset is used, but could be manually changed when channel-plan is set to custom. |
| disabled (yes | no; Default: no) | Disable or enable the channel. |
| freq-off (integer [-400000..400000]; Default: ) | Channel frequency offset against radio central frequency, it makes possible to adjust channel frequencies so that channels does not overlap. |
| radio (radio0 | radio1; Default: ) | Defines which radio uses selected channel. |
| spread-factor (SF7 | SF8 | SF9 | SF10 | SF11 | SF12; Default: ) | Defines the Spread Factor for a channel with type=LoRa. Lower Spread Factor means higher data rate. |
To view current channels, issue the command /iot lora cannels print:
/iot lora channels print
Columns: NAME, TYPE, RADIO, FREQ-OFF, BANDWIDTH, FREQ, SPREAD-FACTOR, DATARATE
# NAME       TYPE  RADIO   FREQ-OFF  BANDWIDTH  FREQ   SPREAD-FACTOR  DATARATE
0 gateway-0  MSF   radio1  -400000   125_kHz    868.1
1 gateway-0  MSF   radio1  -200000   125_kHz    868.3
2 gateway-0  MSF   radio1  0         125_kHz    868.5
3 gateway-0  MSF   radio0  -400000   125_kHz    867.1
4 gateway-0  MSF   radio0  -200000   125_kHz    867.3
5 gateway-0  MSF   radio0  0         125_kHz    867.5
6 gateway-0  MSF   radio0  200000    125_kHz    867.7
7 gateway-0  MSF   radio0  400000    125_kHz    867.9
8 gateway-0  LoRa  radio1  -200000   250_kHz    868.3  SF7
9 gateway-0  FSK   radio1  300000    125_kHz    868.8                    50000
Channels are created using freq-off and radio's center-freq frequencies. To view radios center frequencies use the command /iot lora radios print.
To understand how each channel's frequency is calculated, check the example below:
# NAME       TYPE  RADIO   FREQ-OFF  BANDWIDTH  FREQ   SPREAD-FACTOR  DATARATE
0 gateway-0  MSF   radio1  -400000   125_kHz    868.1
radio1 is selected to be used for channel #0 and it is configured with center-freq=868500000 (868500000 Hz or 868.5 MHz).
By using frequency offset, freq-off=-400000 (-400000 Hz or -0.4 MHz), we define channel #0 to be 868500000-400000=868100000 Hz or 868.1 MHz.
To configure custom channels, select "custom" channel profle with the help of the command:
/iot lora set [find] channel-plan=custom
Join EUI
The gateway will forward to the server every single LoRaWAN payload it receives. That includes neighboring LoRaWAN node's payloads as well. It might not be ideal to forward everything, as, for example, it can increase the data amount used (and directly impact ISP plan cost).
The Join EUI menu allows you to specify a balcklisted or a whitelisted range of JOIN EUI's that the gateway should forward (if it is "whitelisted") or should block (if it is "blacklisted"). After adding the range, make sure to apply it to the server settings.
The filter's work using the following pricniple:
1) By default, everything is allowed (unless whitelist/blacklist filters are added);
2) If "blacklist" filter range is added, and then a JOIN EUI packet that matches the blacklisted range appears nearby → it is droped;
3) If "whitelist" filter range is added, it has prioirty over the "blacklisted" filters. Meaning that if both "blacklist" and "whitelist" match the same JOIN EUI, "whitelist" takes prioirty and the packet is forwarded.
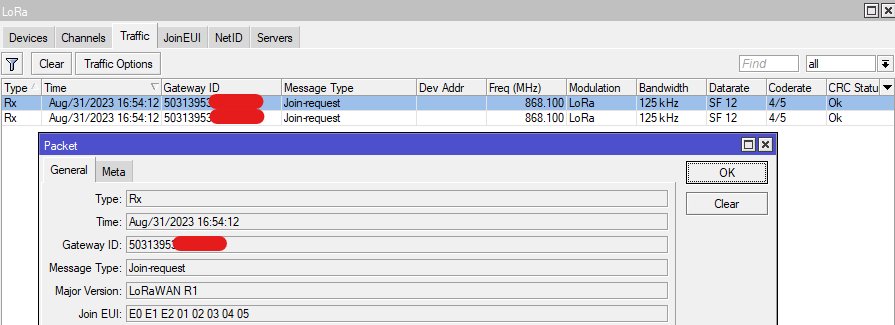
You can find the Join EUI used by your node with the help of RouterOS GUI. Go to the "LoRa" section and to the "Traffic" sub-menu (which is only available using the graphical interface). After you power your LoRaWAN node, the node should send a "Join-request" packet. Double-click on it to inspect it:
Sub-menu: /iot lora joineui
| Property | Description |
|---|---|
| joineui (string; Default: ) | Define a range of Join EUI's. |
| logging (yes | no; Default: no) | Enables additional logging for the filter feature. |
| name (string; Default: ) | Define the name for the range. |
| type (blacklist | whitelist; Default: whitelist) | Define the type for the filter:
|
An example of Join EUI would look like this E0 E1 E2 01 02 03 04 05. It consists of 8 octets in HEX format.
To add a range that blocks everything, add a filter like this:
/iot lora joineui add name=block_all joineuis=0000000000000000-ffffffffffffffff type=blacklist logging=yes
To allow a specific single Join EUI, add a filter like this:
/iot lora joineui add name=allow_my_node joineuis=E0E1E20102030405-E0E1E20102030405 type=whitelist logging=yes
Disable LoRa interface:
/iot/lora/disable [find where ]
Apply both ranges to the LoRa server you are using and enable the interface again:
/iot/lora/servers/set joineui=block_all,allow_my_node [find where address ~ "eu1.cloud.thethings.network"]
/iot/lora/enable [find where ]
As a result, we will only allow "JOIN EUI=E0 E1 E2 01 02 03 04 05" node payloads to be forwraded, while every single possible other JOIN EUI will be dropped by the blacklist rule.
Network ID
The gateway will forward to the server every single LoRaWAN payload it receives. That includes neighboring LoRaWAN node's payloads as well. It might not be ideal to forward everything, as, for example, it can increase the data amount used (and directly impact ISP plan cost).
The NetID menu allows you to specify a balcklisted or a whitelisted range of NetIDs that the gateway should forward (if it is "whitelisted") or should block (if it is "blacklisted"). After adding the list, make sure to apply it to the server settings.
The filter's work using the following pricniple:
1) By default, everything is allowed (unless whitelist/blacklist filters are added);
2) If "blacklist" filter range is added, and then a NetID of the packet matches the blacklisted range → it is droped;
3) If "whitelist" filter range is added, it has prioirty over the "blacklisted" filters. Meaning that if both "blacklist" and "whitelist" match the same NetID, "whitelist" takes prioirty and the packet is forwarded.
NetIDs define the ranges of Device Addresses (DevAddr) that were assigned to different operators/servers by the LoRaWAN Alliance. A list with most ranges can be found in the TTN guide.
DevAddr is assigned to the LoRaWAN node by the LoRaWAN server after the communication with the server takes place. For example, TTN will assign your node an address from within the range 26000000 - 27FFFFFF. You can find it under the LoRaWAN server dashboard or using RouterOS GUI, under the "Traffic" sub-menu (after "join-request" and "join-accept" communication takes place) in the Dev Addr column/field.
Let's say TTN assigned 26 1B D8 D1 Dev Addr to your node. Based on the TTN guide, it falls under the 26000000 - 27FFFFFF DevAddr range and it belongs to the 000013 NetID.
Sub-menu: /iot lora netid
| Property | Description |
|---|---|
| netids (string; Default: ) | Define the NetIDs |
| logging (yes | no; Default: no) | Enables additional logging for the filter feature. |
| name (string; Default: ) | Define the name for the ID. |
| type (blacklist | whitelist; Default: whitelist) | Define the type for the filter:
|
To add a filter that allows a specific NetID (in this example, 000013 NetID, which belongs to TTN), use the command:
/iot lora netid add name=allow_TTN netids=000013-000013 type=whitelist
To block all other NetIDs use "type=blacklist":
/iot lora netid add name=block_all netids=000000-ffffff type=blacklist
Disable LoRa interface:
/iot/lora/disable [find where ]
Apply both ranges to the LoRa server you are using and enable the interface again:
/iot/lora/servers/set netid=block_all,allow_TTN [find where address ~ "eu1.cloud.thethings.network"]
/iot/lora/enable [find where ]
Servers
This section is used to add new or alter current server settings.
Sub-menu: /iot lora servers
There are a few predefined servers that can be used (it requires to make an The Things Network account to use them):
[admin@MikroTik] /iot/lora/servers/print
Columns: NAME, UP-PORT, DOWN-PORT, ADDRESS
#  NAME              UP-PORT  DOWN-PORT  ADDRESS
0  TTS Cloud (eu1)      1700       1700  eu1.cloud.thethings.industries
1  TTS Cloud (nam1)     1700       1700  nam1.cloud.thethings.industries
2  TTS Cloud (au1)      1700       1700  au1.cloud.thethings.industries
3  TTN V3 (eu1)         1700       1700  eu1.cloud.thethings.network
4  TTN V3 (nam1)        1700       1700  nam1.cloud.thethings.network
5  TTN V3 (au1)         1700       1700  au1.cloud.thethings.network
Custom servers can be added as well. Data forwarding to multiple servers can work simultaneously if the first server does not change "DevAdress" part of the packet and under the condition that all servers are able to decode the packet.
| Property | Description |
|---|---|
| address (domain name or IP address; Default: ) | Defines LoRaWAN Network server address. |
| name (string; Default: ) | Defines server name. |
| protocol (UDP | LNS | CUPS; Default: UDP) | Specify whether to use UDP, LNS or CUPS protocol for the communication with the LoRaWAN server. |
down-port (integer [0..65535]; Default: 1700) | Parameter that is used when UDP protocol is selected. Defines port for down-link communication (from server to node) with LoRaWAN Network server. Most of known open source servers uses port 1700 as default, but it can change if multiple servers are configured on the same machine. |
| up-port (integer [0..65535]; Default: 1700) | Parameter that is used when UDP protocol is selected. Defines port for up-link communication (from node to server) with LoRaWAN Network server. Most of known open source servers uses port 1700 as default, but it can change if multiple servers are configured on the same machine. |
| netid (list of string; Default: ) | Parameter that is used when UDP protocol is selected. Applies a filter to only send LoRaWAN payloads that match the Network ID (Net ID) filter configured. |
| joineui (list of string; Default: ) | Parameter that is used when UDP protocol is selected. Applies a filter to only send LoRaWAN payloads that match the Join EUI filter configured. |
| port (integer [0..65535]; Default: 8887) | Parameter that is used when LNS or CUPS protocol is selected. For LNS, defines the WSS (WebSocket) port and, for CUPS, defines HTTPS port. |
| key (string; Default: ) sensitive | Parameter that is used when LNS or CUPS protocol is selected. Specify the LoRa Basics Station LNS Authentication Key or CUPS API KEY (both generated on the server). |
| ssl (yes or no; Default: no) | Parameter that is used when LNS or CUPS protocol is selected. Specify whether to use or not to use SSL (if the server supports TLS server authentication). When this option is choosen, root SSL certificate(s) must be uploaded under the certificates menu. |
| certificate (list of string; Default: none) | Parameter that is used when LNS or CUPS protocol is selected. Select an uploaded client certificate (if the server awaits TLS client authentication). If TLS client authentication is not required by the server, use the default "none" setting. |
| interval (integer [0..65535]; Default: ) | Parameter that is used when CUPS protocol is selected. Specify the interval with which the LoRa Basics Station will query CUPS server for configuration updates/changes. |
There are a few pre-configued The Things default servers. If you deleted one and want to recover default servers, you can use the command:
/iot lora server reset-servers
Please be warned that resetting servers will delete all previously configured servers as well, so make sure to "save" them beforehand.
Traffic
This section displays LoRa payloads that were broadcasted by the surrounding nodes.
Sub-menu: /iot lora traffic
| Property | Description |
|---|---|
| options | Allows to configure additional options for the traffic tab:
|
| clear | To clear the list (to remove all entries). |
To view the list, use the print command:
[admin@MikroTik] /iot/lora/traffic/print
Columns: TIME, GWID, MSGTYPE, DEVADDR, MVER, FCNT, CRC, TYPE, JOINEUI, DEVEUI
 #  TIME                             GWID  MSGTYPE                DEVADDR      MVER         FCNT  CRC    TY  JOINEUI                  DEVEUI
 0  2024-11-08 13:33:28  xxxxxxxxxxxxxxxx  Unconfirmed Data Up    6C B9 XX XX  LoRaWAN R1  59434  Error  Rx
 1  2024-11-08 13:33:50  xxxxxxxxxxxxxxxx  Rejoin-request                      LoRaWAN R1         Error  Rx                           50 62 9F FE XX XX XX XX
 2  2024-11-08 13:34:09  xxxxxxxxxxxxxxxx  Unconfirmed Data Down  5E 00 XX XX  RFU         41736  Error  Rx
 3  2024-11-08 13:34:15  xxxxxxxxxxxxxxxx  Rejoin-request                      RFU                Error  Rx                           D9 C2 BD 4B XX XX XX XX
 4  2024-11-08 13:34:55  xxxxxxxxxxxxxxxx  Join-request                        LoRaWAN R1         Error  Rx  A1 AE B1 8A XX XX XX XX  F4 62 81 BE XX XX XX XX
To clear the list (to remove all entries), issue the clear command:
[admin@MikroTik] /iot/lora/traffic/clear
Traffic tab displays "LoRa" payloads. As soon as the LoRa interface is enabled with the /iot lora enable [find] command, all the payloads from the list will be converted into TCP/UDP packets (depending on whether you use UDP 1700 or LNS/CUPS protocol) and forwarded to the configured server.
If you do not wish to use LoRaWAN topology, and if you wish to forward "raw" LoRa payloads to your own server, you have an option to do so, using MQTT or Fetch post (HTTP post). To do that, remove the LoRa server configuration (so that no server is selected by the LoRa interface, thus the payloads are not forwarded anywhere) and then you will have to create a script. The script will have to store the traffic as variables, structure MQTT/HTTP messages out of them (in a format that your server expects to receive the data) and then send it. After that, you can apply a scheduler, to run the script with an interval of your choice to constantly send the data.
A basic example (first step in the script) on how to convert traffic payloads into a varible called "traffic":
[admin@MikroTik] > :global traffic;:set traffic [/iot lora traffic print as-value ];put $traffic
.id=*4f;band=125 kHz;coderate=?/?;counter=890652548;crc=Error;datarate=SF 7;freqhz=868300;gwid=50313xxxxxx;ifcha
in=1;mod=LoRa;msgtype=Proprietary;mver=RFU;rfchain=1;rssi=-116.00;rxcrc=3809;size=213;snr=-12.00;snrmax=-8.25;snrmin=
-14.25;time=2024-11-08 14:39:45;type=Rx
Debugging
If you have issues with the connection, make sure to enable logs:
/system/logging/add topics=debug,lora
This will enable debug logging and help you pin point where the potential issue could be. Logs can be viewed using:
/log/print
A successful connection would look like this:
 13:50:33 lora,info gateway-0 forwarder started
 13:50:38 lora,info [LNS] connecting to wss://eu1.cloud.thethings.network:8887/router-info
 13:50:39 lora,info [LNS] eu1.cloud.thethings.network discovered
 13:50:39 lora,info [LNS] eu1.cloud.thethings.network disconnected
 13:50:39 lora,info [LNS] connecting to wss://eu1.cloud.thethings.network:8887/traffic/eui-xxxx
 13:50:39 lora,info [LNS] eu1.cloud.thethings.network configured
 13:50:52 lora,info gateway-0 forwarder is ready
More logging information can be found in our Log guide.