Introduction
WireGuard® is an extremely simple yet fast and modern VPN that utilizes state-of-the-art cryptography. It aims to be faster, simpler, leaner, and more useful than IPsec while avoiding massive headaches. It intends to be considerably more performant than OpenVPN. WireGuard is designed as a general-purpose VPN for running on embedded interfaces and super computers alike, fit for many different circumstances. Initially released for the Linux kernel, it is now cross-platform (Windows, macOS, BSD, iOS, Android) and widely deployable.
Properties
| Property | Description |
|---|---|
| comment (string; Default: ) | Short description of the tunnel. |
| disabled (yes | no; Default: no) | Enables/disables the tunnel. |
| listen-port (integer; Default: 13231) | Port for WireGuard service to listen on for incoming sessions. |
| mtu (integer [0..65536]; Default: 1420) | Layer3 Maximum transmission unit. |
| name (string; Default: ) | Name of the tunnel. |
| private-key (string; Default: ) | A base64 private key. If not specified, it will be automatically generated upon interface creation. |
Read-only properties
| Property | Description |
|---|---|
| public-key (string) | A base64 public key is calculated from the private key. |
| running (yes | no) | Whether the interface is running. |
Peers
| Property | Description |
|---|---|
| allowed-address (IP/IPv6 prefix; Default: ) | List of IP (v4 or v6) addresses with CIDR masks from which incoming traffic for this peer is allowed and to which outgoing traffic for this peer is directed. The catch-all 0.0.0.0/0 may be specified for matching all IPv4 addresses, and ::/0 may be specified for matching all IPv6 addresses. |
| comment (string; Default: ) | Short description of the peer. |
| disabled (yes | no; Default: no) | Enables/disables the peer. |
| endpoint-address (IP/Hostname; Default: ) | An endpoint IP or hostname can be left blank to allow remote connection from any address. |
| endpoint-port (integer:0..65535; Default: ) | An endpoint port can be left blank to allow remote connection from any port. |
| interface (string; Default: ) | Name of the WireGuard interface the peer belongs to. |
| persistent-keepalive (integer:0..65535; Default: 0) | A seconds interval, between 1 and 65535 inclusive, of how often to send an authenticated empty packet to the peer for the purpose of keeping a stateful firewall or NAT mapping valid persistently. For example, if the interface very rarely sends traffic, but it might at anytime receive traffic from a peer, and it is behind NAT, the interface might benefit from having a persistent keepalive interval of 25 seconds. |
| preshared-key (string; Default: ) | A base64 preshared key. Optional, and may be omitted. This option adds an additional layer of symmetric-key cryptography to be mixed into the already existing public-key cryptography, for post-quantum resistance. |
| public-key (string; Default: ) | The remote peer's calculated public key. |
Read-only properties
| Property | Description |
|---|---|
| current-endpoint-address (IP/IPv6) | The most recent source IP address of correctly authenticated packets from the peer. |
| current-endpoint-port (integer) | The most recent source IP port of correctly authenticated packets from the peer. |
| last-handshake (integer) | Time in seconds after the last successful handshake. |
| rx (integer) | The total amount of bytes received from the peer. |
| tx (integer) | The total amount of bytes transmitted to the peer. |
Application examples
Site to Site WireGuard tunnel
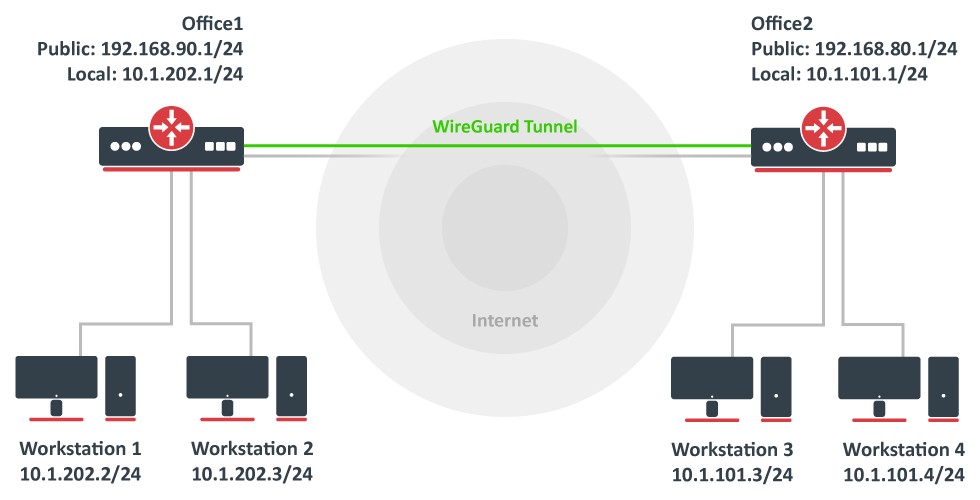
Consider setup as illustrated below. Two remote office routers are connected to the internet and office workstations are behind NAT. Each office has its own local subnet, 10.1.202.0/24 for Office1 and 10.1.101.0/24 for Office2. Both remote offices need secure tunnels to local networks behind routers.
WireGuard interface configuration
First of all, WireGuard interfaces must be configured on both sites to allow automatic private and public key generation. The command is the same for both routers:
/interface/wireguard
add listen-port=13231 name=wireguard1
Now when printing the interface details, both private and public keys should be visible to allow an exchange.
Any private key will never be needed on the remote side device - hence the name private.
Office1
/interface/wireguard print
Flags: X - disabled; R - running
 0  R name="wireguard1" mtu=1420 listen-port=13231 private-key="yKt9NJ4e5qlaSgh48WnPCDCEkDmq+VsBTt/DDEBWfEo="
      public-key="u7gYAg5tkioJDcm3hyS7pm79eADKPs/ZUGON6/fF3iI="
Office2
/interface/wireguard/print
Flags: X - disabled; R - running
 0  R name="wireguard1" mtu=1420 listen-port=13231 private-key="KMwxqe/iXAU8Jn9dd1o5pPdHep2blGxNWm9I944/I24="
      public-key="v/oIzPyFm1FPHrqhytZgsKjU7mUToQHLrW+Tb5e601M="
Peer configuration
Peer configuration defines who can use the WireGuard interface and what kind of traffic can be sent over it. To identify the remote peer, its public key must be specified together with the created WireGuard interface.
Office1
/interface/wireguard/peers
add allowed-address=10.1.101.0/24 endpoint-address=192.168.80.1 endpoint-port=13231 interface=wireguard1 \
public-key="v/oIzPyFm1FPHrqhytZgsKjU7mUToQHLrW+Tb5e601M="
Office2
/interface/wireguard/peers
add allowed-address=10.1.202.0/24 endpoint-address=192.168.90.1 endpoint-port=13231 interface=wireguard1 \
public-key="u7gYAg5tkioJDcm3hyS7pm79eADKPs/ZUGON6/fF3iI="
IP and routing configuration
Lastly, IP and routing information must be configured to allow traffic to be sent over the tunnel.
Office1
/ip/address
add address=10.255.255.1/30 interface=wireguard1
/ip/route
add dst-address=10.1.101.0/24 gateway=wireguard1
Office2
/ip/address
add address=10.255.255.2/30 interface=wireguard1
/ip/route
add dst-address=10.1.202.0/24 gateway=wireguard1
Firewall considerations
The default RouterOS firewall will block the tunnel from establishing properly. The traffic should be accepted in the "input" chain before any drop rules on both sites.
Office1
/ip/firewall/filter
add action=accept chain=input dst-port=13231 protocol=udp src-address=192.168.80.1
Office2
/ip/firewall/filter
add action=accept chain=input dst-port=13231 protocol=udp src-address=192.168.90.1
Additionally, it is possible that the "forward" chain restricts the communication between the subnets as well, so such traffic should be accepted before any drop rules as well.
Office1
/ip/firewall/filter
add action=accept chain=forward dst-address=10.1.202.0/24 src-address=10.1.101.0/24
add action=accept chain=forward dst-address=10.1.101.0/24 src-address=10.1.202.0/24
Office2
/ip/firewall/filter
add action=accept chain=forward dst-address=10.1.101.0/24 src-address=10.1.202.0/24
add action=accept chain=forward dst-address=10.1.202.0/24 src-address=10.1.101.0/24