| Table of Contents |
|---|
Introduction
Netinstall is a tool designed for Windows operating systems to reinstall for installing and reinstalling MikroTik devices running RouterOS. Always try using Netinstall if you suspect that your device is not working properly. The tool is available for Windows (with a graphical interface) and for Linux (as a command line tool).
In short, the Netinstall procedure goes like this: Connect your PC directly to the ETH1 boot port (Usually Ether1, the port labeled BOOT or as otherwise indicated in the product manual) of the device you will be reinstalling. Turn on the device while holding the reset button until it shows up in the Netinstall tool.
| Warning |
|---|
Careful. Netinstall re-formats the system's drive, all configuration and saved files will be lost. Netinstall does not erase the RouterOS license key, nor does it reset RouterBOOT related settings, for example, CPU frequency is not changed after reinstalling the device. |
...
Instructions for Windows
- Download Netinstall from the downloads page. If you are not sure which version you need, then you can always select the version that is marked as Current (stable);
Download the RouterOS Main package from the downloads page;
Tip You must choose a RouterOS version. You can always select the version that is marked as Current. You must also select the architecture (ARM, MIPS, SMIPS, TILE, etc...), but if you are not sure, then you can download the RouterOS package for ALL architectures, Netinstall will choose the right architecture for you.
Disconnect Disable all of your computer from network interfaces (WiFi, Ethernet, LTE, or any other type of connections! connection) besides the one that will be used for installation! Netinstall will only work on one active interface on your computer, it is highly recommended that you disconnect disable any other network interfaces in order to be sure that Netinstall will select the right network interface.
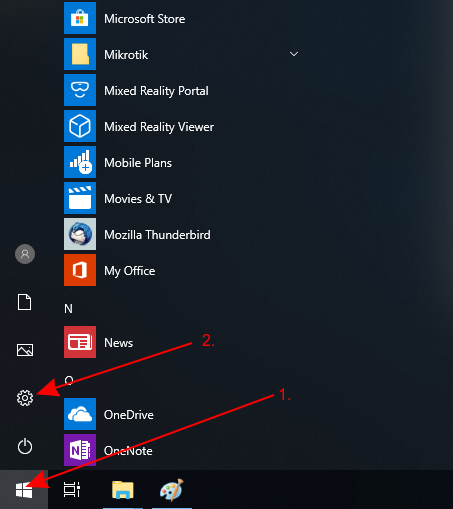
Configure a static IP address for your Ethernet interface, open Start, and select Settings:
| Tip |
|---|
Netinstall can run also on a local network, in such case, you could skip setting a static IP address, but it is highly recommended that you set a static IP address if you are not familiar with Netinstall. |
...
| Note |
|---|
If you have a working router, then you can use it and skip the setting up a static IP part of this tutorial, but it requires you to know your LAN address since you will need to specify an unused IP address in your network for the network boot server. For this reason, it is recommended to apply a static IP address and follow this guide precisely, if you are not sure how to get these parameters out of your network. |
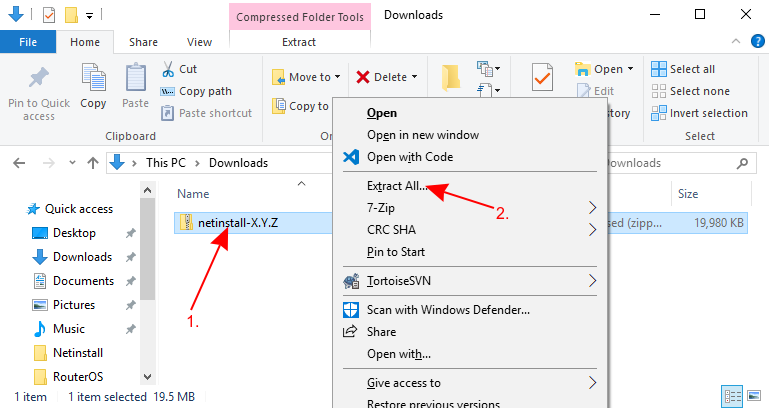
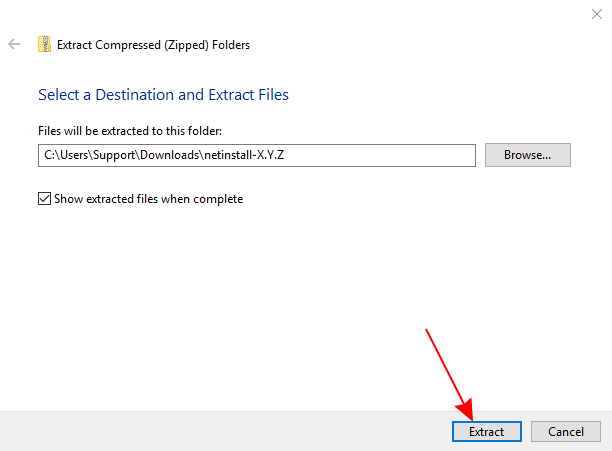
- Open your Downloads folder (or wherever you saved the downloaded files) and extract the Netinstall .zip file to a convenient place
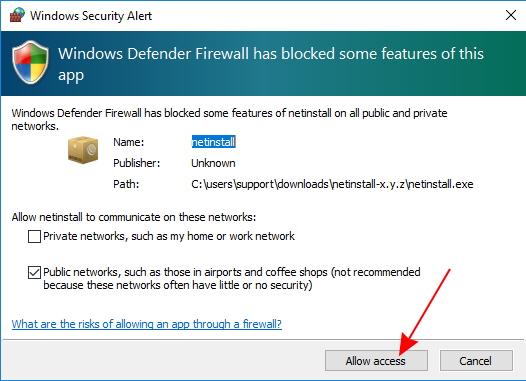
Run NetinstallMake sure that the Ethernet interface is running and launch Netinstall.exe. If If you followed the guide precisely, then you should not have any Internet connection on your computer, Windows 10 wants to verify all apps that it runs, but will not be able to do it since due to lack of the an Internet connection, for this reason, a warning might pop up, you should click Run.
...
| Warning |
|---|
Netinstall requires administrator rights, there should be a window asking for permissions to run Netinstall, you must accept these permissions in order for Netinstall to work properly. |
- Allow access for Netinstall in Public networks and configure Net booting settings and fill out the required fields as shown in the image below
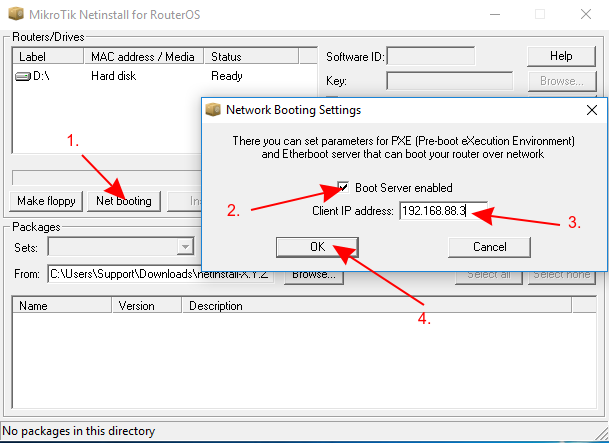
| Warning |
|---|
| The "Client IP address" must be unique! Don't use an existing IP address in your network, this also means that you should not use the computer's IP address as well. Use a completely different IP address from the same subnet. |
- Connect your device to your computer using an ethernet cable directly directly (without any other devices in-between), and plug the Ethernet cable into your device's Etherboot port.
- MikroTik devices are able to can use Netinstall from their first port (Ether1), or from the port marked with "BOOT".
...
| Warning |
|---|
Some computers have a network interface (especially USB Ethernet adapters) that tend to create an extra link flap, which is enough for Netinstall to fail to detect a device that is in Etherboot mode. In such a case you can use a switch between your device and your computer or a router in bridge mode to prevent this issue. Netinstall uses bootp packets, which use the same port numbers as DHCP packets. If you're using a switch between your PC and the device to be Netinstalled, ensure that the ports in the bridge are not blocked by other network devices. If you have dhcp-snooping enabled, make sure to enable "trusted" on the bridge ports facing the Netinstall PC. |
- Power up your device and put it into e Etherboot mode
| Tip |
|---|
There are multiple ways how to put your device into Etherboot mode. Make sure you read the Etherboot manual before trying to put the device into this mode. Methods vary between different MikroTik devices. |
- Wait for the device to show up in Netinstall, select it, and press Browse. Navigate to your Downloads folder (or wherever you saved your RouterOS packages) and press OK
...
If the installation does not start (the progress bar is not moving or no status is shown), then you can try closing the Netinstall application and opening it up again or try to put the device into Etherboot mode again. If you are still unable to get Netinstall working, then you should try using it on a different computer since there might be an operating system's issue that is preventing Netinstall from working properly.
- You are done! Remove the device from power, remove the Ethernet cable, place the device back in your network and your device should be running properly now!
| Notewarning |
|---|
After using Netinstall the device will be reset to defaults (unless you specified not to apply default configuration). Some devices are not accessible through ether1 port with the default configuration for security reasons. Read more about Default configuration. |
| Note |
|---|
Option "Keep branding" allows you to keep the device's already installed branding package without reinstalling it using Netinstall. |
| Note |
|---|
The "Keep old configuration" process involves downloading the configuration database from the router, reinstalling the router (including disk formatting), and uploading the configuration files back to it. However, it's important to note that this process solely applies to the configuration itself and does not impact the files, including databases like the User Manager database, Dude database, and others. |
| Tip |
|---|
When using the Configure script option, it is suggested to introduce a delay before configuration execution. Configure script pre-configures the device with the provided configuration (text file in .RSC format). This configuration also takes the place of the default configuration. The script can access factory passwords with read-only variables $defconfPassword and $defconfWifiPassword |
Instructions for Linux
The Linux version is a command line tool, which offers nearly the same parameters as the Windows counterpart.
Download the tool from our download page (links not literal):
wget https://download.mikrotik.com/routeros/[VERSION]/netinstall-[VERSION].tar.gzExtract it:
tar -xzf netinstall-[VERSION].tar.gzRun the tool:
./netinstall-cli -a 192.168.0.1 routeros-arm64-[VERSION].npk| Info |
|---|
The tool requires privileged access and must be run as root, use sudo. |
The available parameters are as follows:
| Parameter | Meaning |
|---|---|
| -r | When the reinstallation process is performed, the configuration is reset, and for devices that have it, the default configuration will be applied. (optional) |
| -e | When the reinstallation process is performed reset the device to empty configuration. |
| -b | Option to discard the currently installed branding package from the device, otherwise it will be reinstalled together with RouterOS |
| -k keyfile | Provides the device with a license key in .KEY format. (optional) |
| -s userscript | Pre-configures the device with the provided configuration (text file in .RSC format). This configuration also takes the place of the default configuration. The script can access factory passwords with read-only variables $defconfPassword and $defconfWifiPassword (starting from RouterOS 7.10beta8). (optional) |
-a IP | Uses a specific IP address that the Netinstall server will assign to the device. Mandatory, but can be auto-assigned if interface parameter is used. |
| PACKAGE | Specify a list of RouterOS.NPK format packages that Netinstall will try to install on the device. (mandatory) |
| -i | Allows you to specify an interface. (optional) |
| Note | ||
|---|---|---|
| ||
If the "-r" or "e-" parameter is not specified, netinstall-cli will reinstall RouterOS and will keep the current configuration by downloading the current configuration database from the router, reinstalling the router (including disk formatting), and uploading the configuration back to it, the same as Netinstall "Keep old configuration" option. However, it's important to note that this process solely applies to the configuration itself and does not impact the files, including databases like the User Manager database, Dude database, and others. |
First, make sure you have set the IP on your computer's interface:
| Code Block | ||||
|---|---|---|---|---|
| ||||
admin@ubuntu:~$ sudo ifconfig <interface> 192.168.88.2/24 |
Then run the Netinstall version 6 (an example that resets the configuration upon reinstallation procedure):
| Code Block | ||||
|---|---|---|---|---|
| ||||
admin@ubuntu:~$ sudo ./netinstall -r -a 192.168.88.3 routeros-mipsbe-6.48.1.npk
Using server IP: 192.168.88.2
Starting PXE server
Waiting for RouterBOARD...
PXE client: 01:23:45:67:89:10
Sending image: mips
Discovered RouterBOARD...
Formatting...
Sending package routeros-mipsbe-6.48.1.npk ...
Ready for reboot...
Sent reboot command |
Or run the Netinstall version 7 (an example that resets the configuration upon reinstallation procedure):
| Code Block | ||||
|---|---|---|---|---|
| ||||
admin@ubuntu:~$ sudo ./netinstall-cli -r -a 192.168.88.3 routeros-7.5-mipsbe.npk
Version: 7.5 (2022-08-30 09:34:59)
Using server IP: 192.168.88.2
Use Netmask: 255.255.255.0
Starting PXE server
Waiting for RouterBOARD...
PXE client: C4:AD:34::89:10
Sending image: mips
Discovered RouterBOARD...
Formatting...
Sending package routeros-mipsbe-7.5.npk ...
Ready for reboot...
Sent reboot command |
Etherboot
Etherboot mode is a special state for a MikroTik device that allows you to reinstall your device using 24805391Netinstall. There are several ways to put your device into Etherboot mode depending on the device you are using.
...
The Reset can be found on all MikroTik devices, this button can be used to put the device into Etherboot mode. An easy way to put a device into Etherboot mode using the Reset button is by powering off the device, hold holding the Reset button, power powering on the device while holding the Reset button, and keep holding it until the device shows up in your NetinstalllNetinstall window.
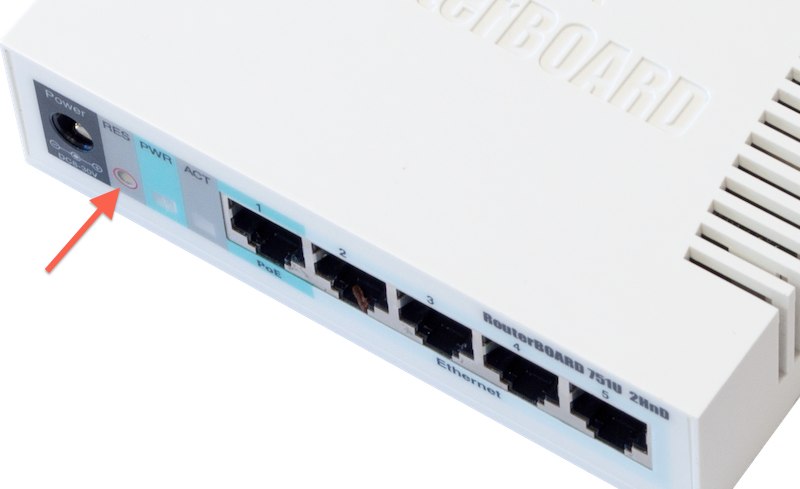
| Warning |
|---|
If you have set up a Protected bootloader, then the reset button's behavior is changed. Make sure you remember the settings you used to set up the Protected bootloader, otherwise, you will not be able to use Eterboot mode and will not be able to reset your device. |
RouterOS
If your device is able to can boot up and you are able to can log in, then you can easily put the device into Etherboot mode. To do so, just connect to your device and execute the following command:
...
After that either reboot the device or do a power cycle on the device. Next time the device will boot up, then it will first try going into Etherboot mode. Note that after the first boot-up, the device will not try going to go into Etherboot mode and will boot directly of from NAND or of from the storage type the device is using.
...
Some devices come with a serial console that can be used to put the device into Etherboot mode. To do so, make sure you configure your computer's serial console. The required parameters for all MikroTik devices (except for RouterBOARD 230 series) are as followingfollows:
| Code Block | ||
|---|---|---|
| ||
115200bit/s, 8 data bits, 1 stop bit, no parity, flow control=none by default. |
For RouterBOARD 230 series devices the parameters are as followingfollows:
| Code Block | ||
|---|---|---|
| ||
9600bit/s, 8 data bits, 1 stop bit, no parity, hardware (RTS/CTS) flow control by default. |
...