...
The intercell 10 B38+B39 is an outdoor TDD-LTE dual carriers base station with 2*(2*10W) output power (each carrier supports 2x2 MIMO with 10W output for each RF channel).
Quickstart
...
- Connect external antennas and Ethernet cable to the connectors (see "Expansion ports and slots");
- Connect the device to the power source (see "Powering");
- Connect with your laptop to the Ethernet port for configuration.
- The device can get the IP address by DHCP and Static assignment;
- Once connected, default maintenance IP address: 192.168.200.200, user name: admin, password: MikroTik;
- If connecting with the Static assignment method, configure the IP address of your laptop as 192.168.200.100/24, then connect through https HTTPS to the device: 192.168.200.200;
- Configure backhaul and radio network see "Configuration".
...
The device accepts power in the following way:
- Input The input power jack accepts 48 V DC⎓. The only connector with cable is provided with the package, you will need the power unit - generating 48 V.
...
- Connect provided cable to your power source.
- Connect the cable connector to the device.
If using an Ethernet cable add RBGESP to the setup, which comes with the package.
Configuration
...
NMS: HeNB management system (HeMS) is a virtualized solution that provides a full lifecycle
of small cell management functions. It supports TR-181 and TR-196 data model
models which are defined by Broadband.
HeNB-GW: HeNB Gateway is deployed between HeNB and MME, provide providing the
aggregation of control and user plane traffic and capabilities necessary to manage
large clusters of small cells. It plays functions of data aggregation and forwarding,
and S1/X2 proxy
...
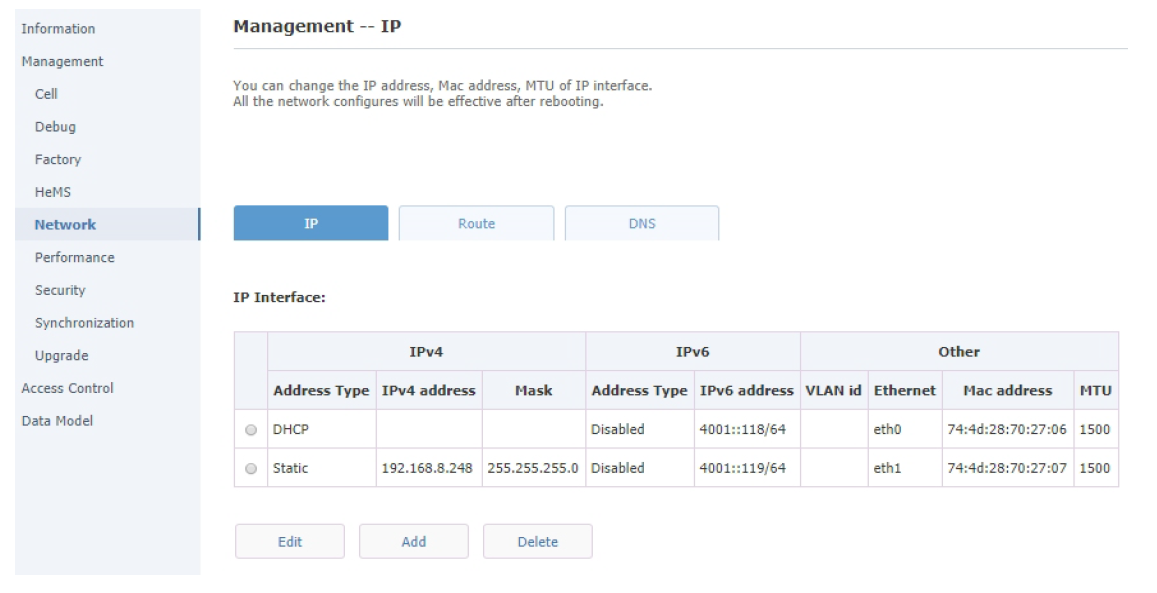
HeNB can get the IP address by DHCP and Static assignment.
The WAN port is an SFP port and is named as ID1 in the Network configuration.
LAN port os is an Ethernet port and is named ID2 in the Network configuration.
In the DHCP method, can check the HeNB IP address by MAC Scan.
In the static assignment method, configuration procedures are as below:
- Configure the IP address of the PC as 192.168.200.100/24
- Connect to the HeNB WAN interface directly, login WebGUI through httpsHTTPS
Default maintenance IP address: 192.168.200.200
User name: admin
Password: MikroTik - Configure HeNB IP address
Configure "Address Type" as "Static"
Configure "IPv4 address" and "Mask" accordingly.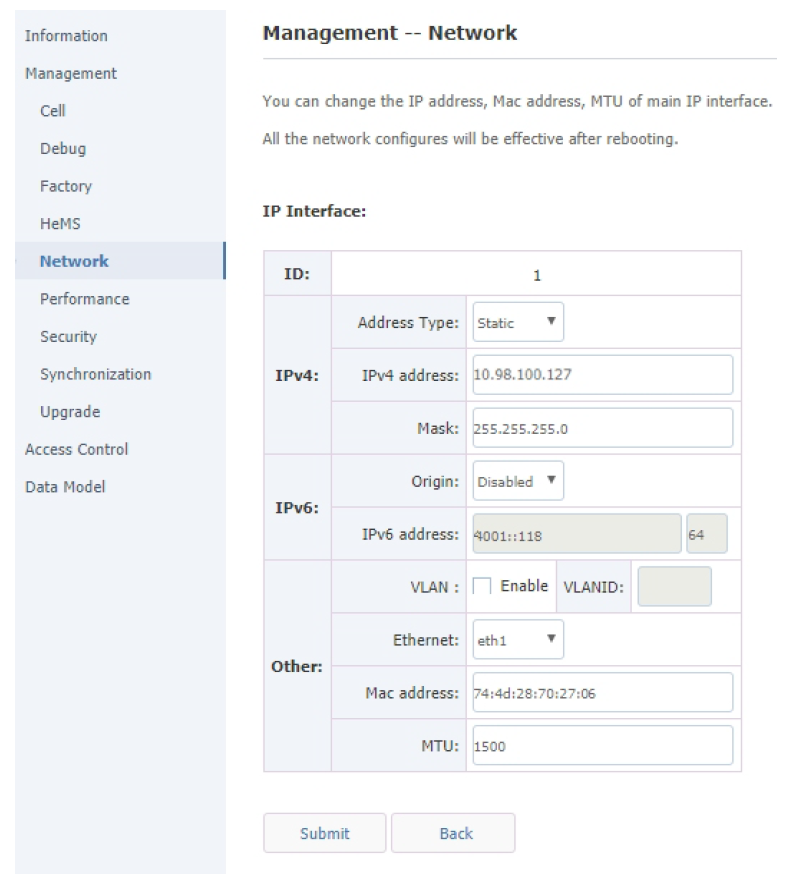
- Press "Submit", and HeNB will reboot to take the configuration into effect.
- Connect the HeNB WAN interface back to LAN.
Login:
Login to WebGUI with httpsHTTPS.
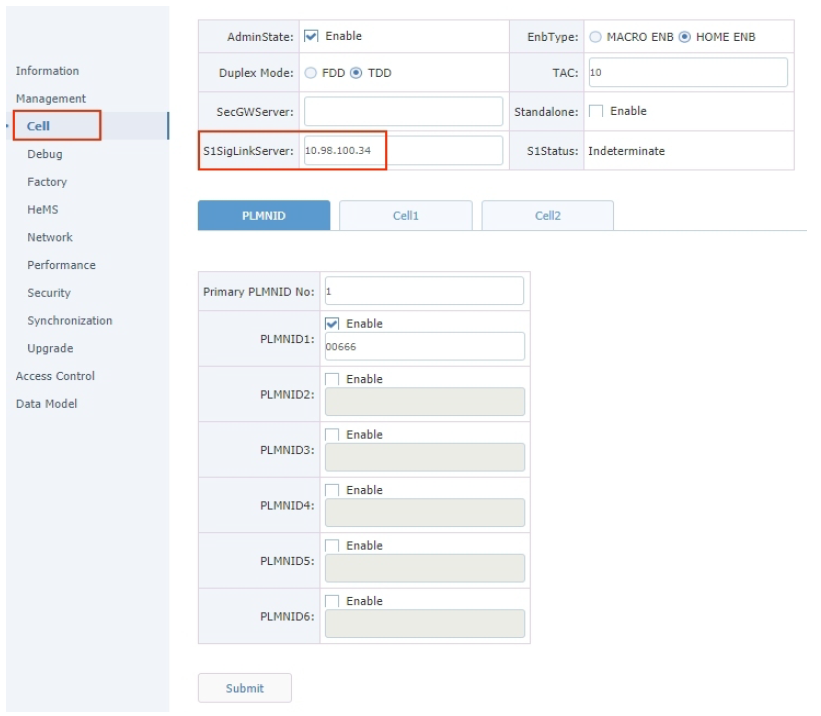
Backhaul parameter
Configure the NME/HeNB-GW IP address:
Path: Management > Cell > S1SigLinkServer.
Radio network parameter
Output power calculation table
Please see the formula and table on how to determine output power:
Output power of each antenna = ReferenceSignalPower + Base(dBm)
Output power of 2 antennas = ReferenceSignalPower + Base + 3(dBm)
Band Width | Base |
1MHz | 19 |
3MHz | 23 |
5MHz | 25 |
10MHz | 28 |
15MHz | 30 |
20MHz | 31 |
| Info |
|---|
Warning! The maximum Tx power is 40 dBm, please calculate the Tx power accordingly otherwise the power amplifier might be damaged! |
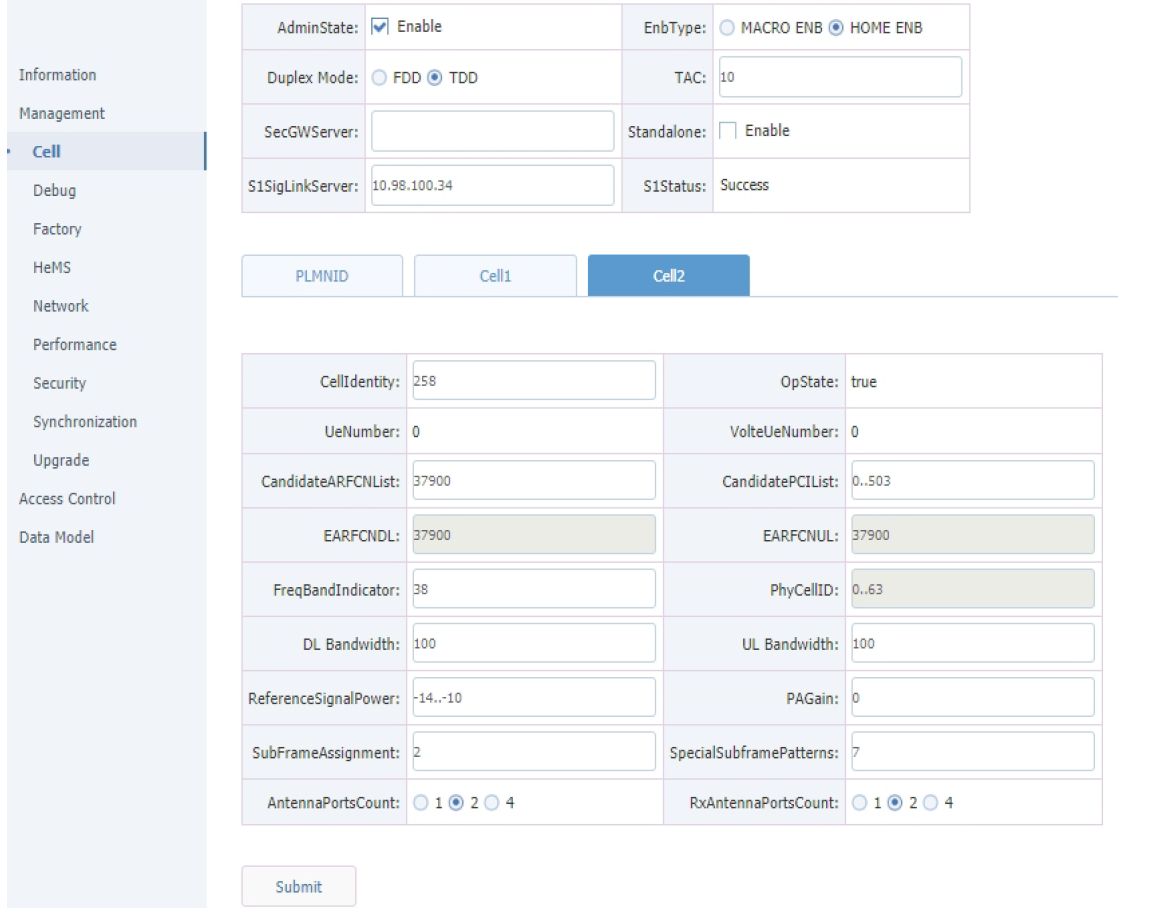
Configure common radio parameters:
Path: Management > Cell
...
Note: Reference signal power, -14 means (-14+31) 17dBm, max value for the product is 9 which will be (9+31) 40dBm.
...
Note: Reference signal power, -14 means (-14+31) 17dBm, max value for the product is 9 which will be (9+31) 40dBm.

Select the "AdminState" when all the above parameters are well configured.
Note: This is the switch to control the RF function, select enable RF function when all parameters are well configured.
Press "Submit", then HeNB will reboot to take the configuration into effect.
Checking the RF status:
Path: Management > Cell > Cell1 > OpState, Management > Cell > Cell1 > OpState;
Note: "True" means the radio cell was established successfully.
Mounting
 The device is designed to be used outdoors.
When mounting on the wall or mast, please ensure that the cable feed is pointing downwards.
The IPX rating scale of this device is IP66. We recommend using Cat6 shielded cables.
Mounting and configuration of this device should be done by a qualified person.
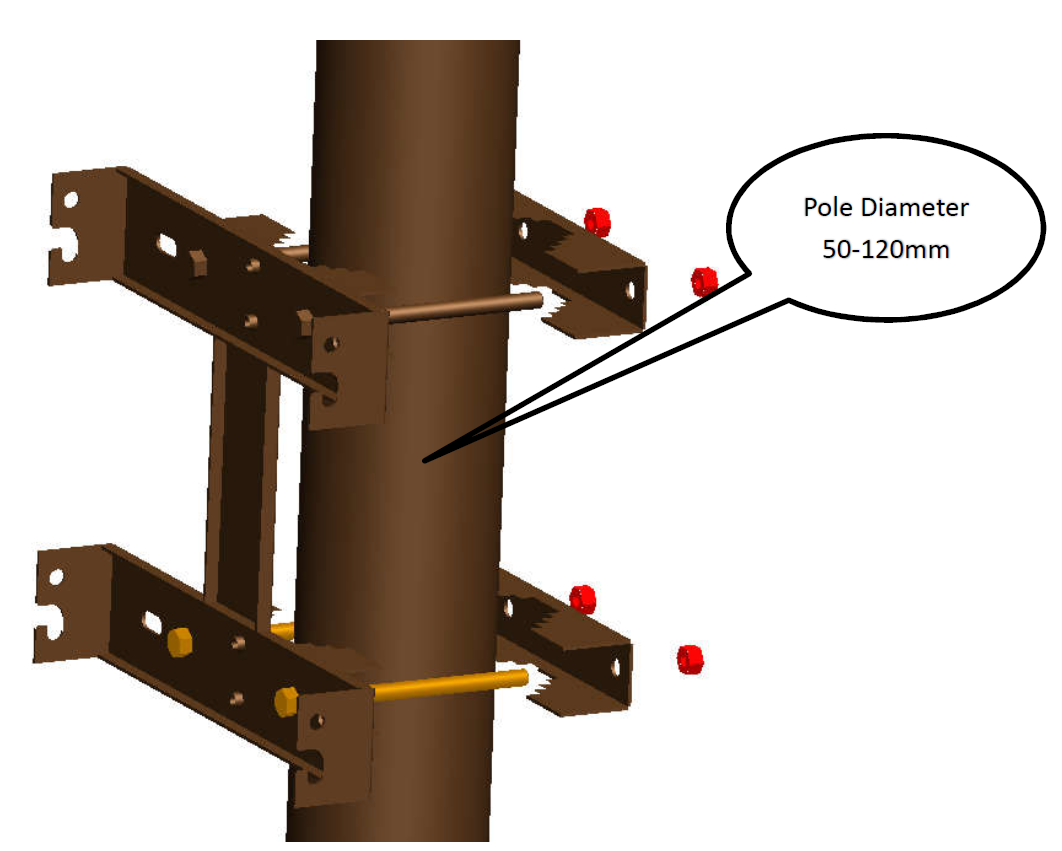
Package The package includes mounting parts for pole or wall mounting. Acceptable pole diameter 50 – 120 mm.
Please note the weight of the device is 25kg!
- Package The package contains mounting accessories – 4 x fixed plates, 4 x M12 Bolts, and 4 x M12 nuts. Use the M12 bolt and guide through the mounting frame, the fixing plate, and the cradle.
- Screw in the four fixing screws near the lower side of the base, leave leaving a 3mm gap for hanging to the mounting frame.
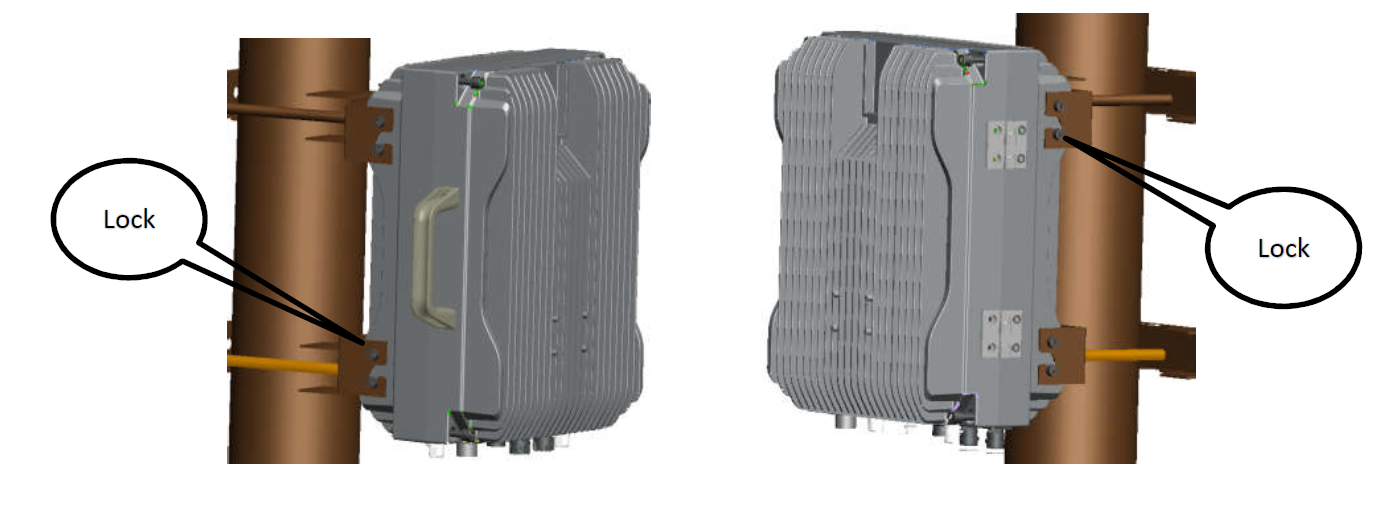
- Install the case at the mount, and let the screws on the two sides of the chassis fall into the mounting frame fixing holes. Lock all eight screws and secure them.
- Open the packing case and get mounting racks.
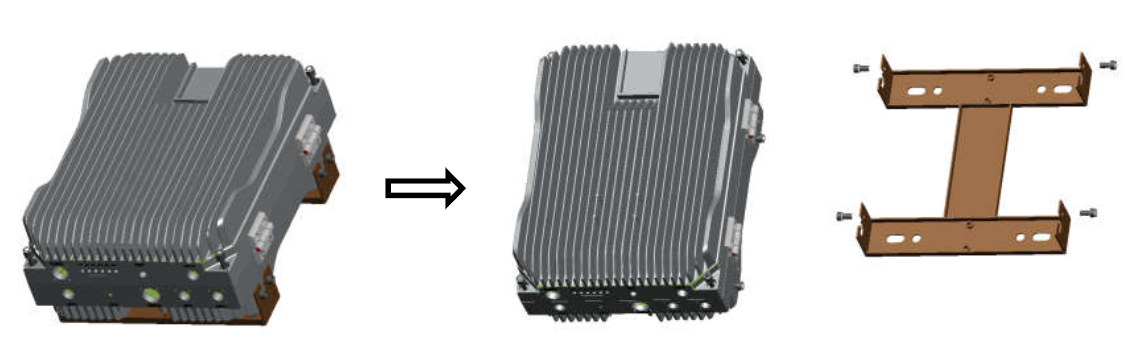
- Get the pole mounting accessories from the packing case, including 4 fixed plates, 4 M12 bolts, and 4 M12 nuts. Guide the M12 bolt through the mounting frame, the fixing plate, cradle, and fix it on the cradle as shown in the picture.
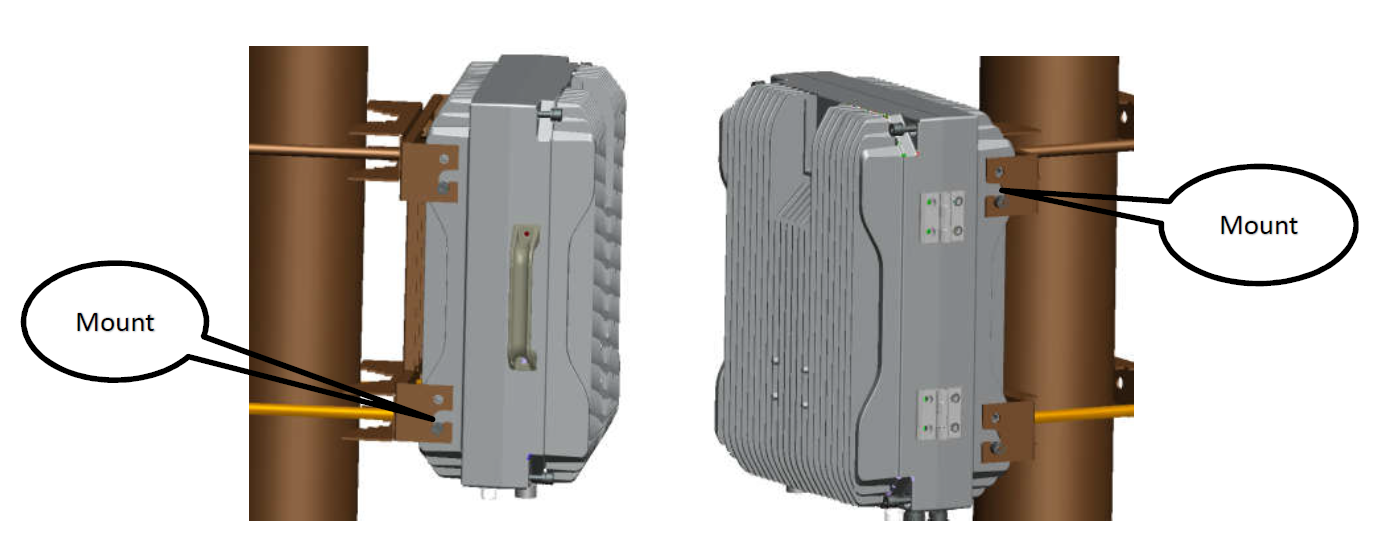
- Keep the 4 fixing screws near the lower side of the chassis fixed on the chassis and leave a 3mm gap for hanging the mounting frame.

- Aim the case on the wall mount, and let screws on the 2 sides of the chassis fall into the mounting frame fixing holes. Lock all 8 screws to finish.
...
Frequency Bands B38:2570MHz-2620MHz, B39:1880MHz-1920MHz, channel bandwidth 5/10/15/20 MHz.
Accessories
Package The package includes the following accessories that come with the device:
- Power cable with a plug (PSU not included);
- SFP – S-31DLC20D, https://mikrotik.com/product/S-31DLC20D-181
- Ethernet cable navigation plug, RBGESP - https://mikrotik.com/product/rbgesp#fndtn-specificationsGPS thunder prevention;
- Sniffer thunder prevention;
- Converter (N/SMA-JK);
- Lightning protection for GPS and Sniffer connectors;
- Installation bracket;
- Large pole installation accessories.
Please visit wiki pages for the MikroTik SFP module compatibility table: https://wiki.mikrotik.com/wiki/MikroTik_SFP_module_compatibility_table
Upgrade example
| View file | ||||
|---|---|---|---|---|
|
B38 CFG example
| View file | ||||
|---|---|---|---|---|
|
Intercell build-in EPC guide
| View file | ||||
|---|---|---|---|---|
|
Reset configuration via serial console
| View file | ||||
|---|---|---|---|---|
|
CFG Import for Intercell
| View file | ||||
|---|---|---|---|---|
|
Intercell monitoring
| View file | ||||
|---|---|---|---|---|
|
Intercell dual-carrier TDD enterprise small cell configuration guide
| View file | ||||
|---|---|---|---|---|
|
Operating system support
The device supports Intercell HeNB software. RouterOS are not supported.
Safety Notice
...
| Info |
|---|
| Note. The information contained here is subject to change. Please visit the product page on www.mikrotik.com for the most up-to-date version of this document. |