| Table of Contents |
|---|
Introduction
The introduction of the container feature into the RouterOS made it possible to run all kinds of servers for all sorts of tasks inside the router. This is especially relevant for people, who want to reduce the number of devices in their network. Instead of running a server on a separate device/machine, why not run it inside the router?
...
In our example, we will showcase tb-postgres - a single instance of ThingsBoard with PostgreSQL database.
Summary
Sub-menu: /container
note: container package is required.
RouterOS versions that are older than 7v7.x 8 will not be able to run this scenario as they will not have a "SYSVIPC" feature added to the kernel that allows it to work.
Make sure to study our container guide before proceeding with the configuration. Make sure to check the disclaimer and requirements sections to understand all the risks and necessary steps you might be required to do.
In this example, we will run it on a Cloud Hosted Router (, CHR) device. To help you set it up in a Virtual Box, please check our youtube tutorial.
...
- You need to understand that it is a server and that you will need to have additional space for the data that is stored there and the image itself. In our tests, 8 GB of disk space was plenty enough but! you might want to consider adding more for real-life applications, especially if you are planning on running more containers. Just remember → it might be better to have a reserve.
- Same as with disk space, RAM memory is also important. Per the ThingsBoard documentation, when using a single instance of ThingsBoard with a PostgreSQL database, it is recommended to allocate at least 1GB of RAM and use a minimum load (a few messages per second). 2-4GB RAM is recommended. In other words, if you want to run it on a RouterBoard device, please understand, that you might not be able to achieve it on devices that have less than 1 GB RAM. That is why → consider having a device with more RAM memory to spare. Check your specific device's installed RAM size under the "Specifications" section, like for example CCR2116-12G-4S+.
Go to the tips and tricks section to understand how to limit RAM.
Configuration
Container mode
Enable container mode:
| Code Block | ||
|---|---|---|
| ||
/system/device-mode/update container=yes |
You will need to confirm the device-mode with a press of the reset button, or a cold reboot, if using container on X86.
Networking
Add veth interface for the container:
| Code Block | ||
|---|---|---|
| ||
/interface/veth/add name=veth1 address=172.18.0.2/24 gateway=172.18.0.1 |
Create a bridge for containers the container, assign an IP network to it, and add veth to itthe bridge:
| Code Block | ||
|---|---|---|
| ||
/interface/bridge/add name=dockertb /ip/address/add address=172.18.0.1/24 interface=dockertb /interface/bridge/port add bridge=dockertb interface=veth1 |
...
| Info |
|---|
After going through the rest of the steps shown in this guide and verifying that the ThingsBoard non-SSL MQTT communication works locally → further secure the setup:
When you enable SSL MQTT, you can consider opening TCP 8883 (which is the default SSL MQTT port) from WAN (by using your public IP address in the |
Environment variables and mounts
Check docker-thingsboard documentation for exact mounts and variables that need to be added.
...
| Code Block | ||
|---|---|---|
| ||
/container/mounts/add name=mytb-data src=tb/mytb-data dst=/data /container/mounts/add name=mytb-logs src=tb/mytb-logs dst=/var/log/thingsboard |
Getting image
To simplify the configuration, we will get the image from an external library but you can also import it via the .tar file.
...
After running the command, RouterOS should start "extracting" the package. Check "File System" for newly created folders and monitor container status with the command /container/print.
Starting the container
After you make sure that the container has been added and the status changed to status=stopped after using /container/print → you can initiate it:
...
Wait for a couple of minutes for the container to fully load.
Verification
Management access
After the container is started and installed, access it using any browser via the machine, where CHR is installed, by going to → http://192.168.88.1:9090 (where the IP address is the address used in the DNAT rule).:
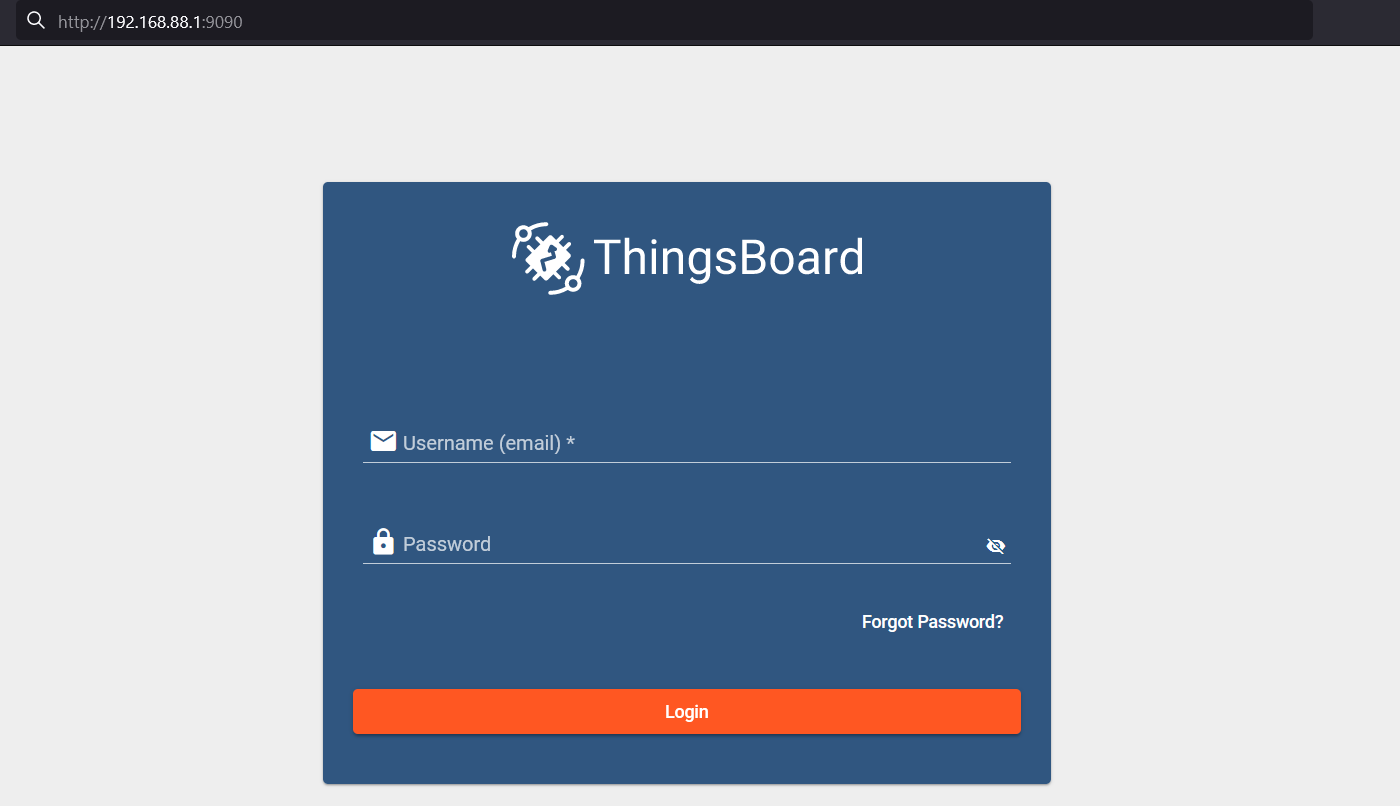
By default, credentials are (Username/Password):
...
The login prompt should confirm that the server is running.
MQTT test
Log in with the tenant and create a new device. Go to the "Devices" menu, click on the "+" (Add Device) button and choose the "Add new device" option:
...
Confirm that the message was posted:
Enabling HTTPS and SSL MQTT
By default, HTTP and MQTT protocols are used. As mentioned previously in the "Networking" section, working with non-SSL HTTP and non-SSL MQTT is not very safe (unless they are used within heavily protected networks with a well-configured firewall/restricted access) and we advise enabling HTTPS and SSL MQTT.
...
In our guide, we will use RouterOS to generate both certificates (but you can also use OpenSSL or other tools you want).
Create certificates
Create a certificate for HTTPS:
...
| Code Block | ||
|---|---|---|
| ||
/certificate/export-certificate file-name=keystore export-passphrase=thingsboard_cert_password type=pkcs12 numbers=0 /certificate/export-certificate file-name=mqttserver export-passphrase=thingsboard_mqttcert_password type=pkcs12 numbers=1 |
User Use your own export-passphrase and remember them.
...
Download both files from the router into any directory on your PC. For example, we've downloaded it into C:\Users\DenissPCAdmin\Desktop\ThingsBoard folder.
Download the ThingsBoard's configuration file
Open your command terminal ("CMD", as Administrator, for Windows users, or "Linux Shell or Command Terminal" for Linux users) and navigate it to the directory where the certificates are:
| Code Block | ||
|---|---|---|
| ||
C:\Windows\System32>cd c:\Users\DenissPCAdmin\Desktop\ThingsBoard C:\Users\DenissPCAdmin\Desktop\ThingsBoard>dir Directory of C:\Users\DenissPCAdmin\Desktop\ThingsBoard 27.01.2023 15:36 <DIR> . 27.01.2023 15:36 <DIR> .. 27.01.2023 15:09 2 4482 448 keystore.p12 27.01.2023 15:36 2 2 434434 mqttserver.p12 2 File(s) 4 8824 882 bytes 2 Dir(s) 51 380 154 51 380 154 368368 bytes free |
From this directory, you will need to connect to the router's IP via the SFTP (which allows you to file transfer using SSH protocol, so you need to make sure that SSH service is enabled beforehand):
| Code Block | ||
|---|---|---|
| ||
c:\Users\DenissPCAdmin\Desktop\ThingsBoard>sftp admin@192.168.88.1 The authenticity of host '192.168.88.1 (192.168.88.1)' can't be established. RSA key fingerprint is SHA256:/WmmZErqWL51SOlS4EaGvSQ0i4HPnSIHCEjnc8AmP2c. Are you sure you want to continue connecting (yes/no/[fingerprint])?yes admin@192.168.88.1's password: Connected to 192.168.88.1. sftp> |
...
| Code Block | ||
|---|---|---|
| ||
sftp> get thingsboard.yml Fetching /ThingsBoard/usr/share/thingsboard/conf/thingsboard.yml to thingsboard.yml /ThingsBoard/usr/share/thingsboard/conf/thingsboard.yml 100% 67KB 2.0MB/s 00:00 sftp> quit c:\Users\DenissPCAdmin\Desktop\ThingsBoard>dir Directory of c:\Users\DenissPCAdmin\Desktop\ThingsBoard 30.01.2023 10:59 <DIR> . 30.01.2023 10:59 <DIR> .. 27.01.2023 15:09 2 2 448448 keystore.p12 27.01.2023 15:36 2 4342 434 mqttserver.p12 30.01.2023 10:59 68 68 846846 thingsboard.yml 3 File(s) 73 73 728728 bytes 2 Dir(s) 50 901 626 50 901 626 880880 bytes free |
Alter the ThingsBoard's settings
Open "thingsboard.yml" via your preferred text editor (notepad or any other), and alter a few lines. You can backup this file and save it with a different name to have a copy of the default settings, in case, of misconfiguration.
...
Apply the changes to the "thingsboard.yml" file (re-save it after editing).
Upload altered ThingsBoard configuration file
All that is left is to overwrite the current configuration file with an altered file and upload both certificates to the configured destination folder.
Once again, make sure your terminal is pointing to the right folder (where 3 files are located → both certificates and an altered "thingsboard.yml" file), and, from there, SFTP into the container's configuration file directory:
| Code Block | ||
|---|---|---|
| ||
c:\Users\DenissPCAdmin\Desktop\ThingsBoard>dir Directory of c:\Users\DenissPCAdmin\Desktop\ThingsBoard 30.01.2023 10:59 <DIR> . 30.01.2023 10:59 <DIR> .. 27.01.2023 15:09 2 2 448448 keystore.p12 27.01.2023 15:36 2 4342 434 mqttserver.p12 30.01.2023 10:59 68 68 846846 thingsboard.yml 3 File(s) 73 73 728728 bytes 2 Dir(s) 50 901 626 50 901 626 880880 bytes free c:\Users\DenissPCAdmin\Desktop\ThingsBoard>sftp admin@192.168.88.1 admin@192.168.88.1's password: Connected to 192.168.88.1. sftp> cd ThingsBoard\usr\share\thingsboard\conf sftp> dir banner.txt i18n logback.xml templates thingsboard.conf thingsboard.yml |
...
| Code Block | ||
|---|---|---|
| ||
sftp> put thingsboard.yml Uploading thingsboard.yml to /ThingsBoard/usr/share/thingsboard/conf/thingsboard.yml thingsboard.yml 100% 67KB 2.2MB/s 00:00 sftp> put keystore.p12 Uploading keystore.p12 to /ThingsBoard/usr/share/thingsboard/conf/keystore.p12 keystore.p12 100% 2448 1.2MB/s 00:00 sftp> put mqttserver.p12 Uploading mqttserver.p12 to /ThingsBoard/usr/share/thingsboard/conf/mqttserver.p12 mqttserver.p12 100% 2434 608.5KB/s 00:00 sftp> dir banner.txt i18n keystore.p12 logback.xml mqttserver.p12 templates thingsboard.conf thingsboard.yml |
Restart the container:
| Code Block | ||
|---|---|---|
| ||
[admin@MikroTik] > /container/stop 0 ____ ____ [admin@MikroTik[admin@MikroTik] > /container/start 0 |
MQTT client:
Upload mqttserver.p12 file to the file list.
Import it:
...
Make sure to wait for the container to stop (status=stopped should be shown after using /container/print command) before initiating it again.
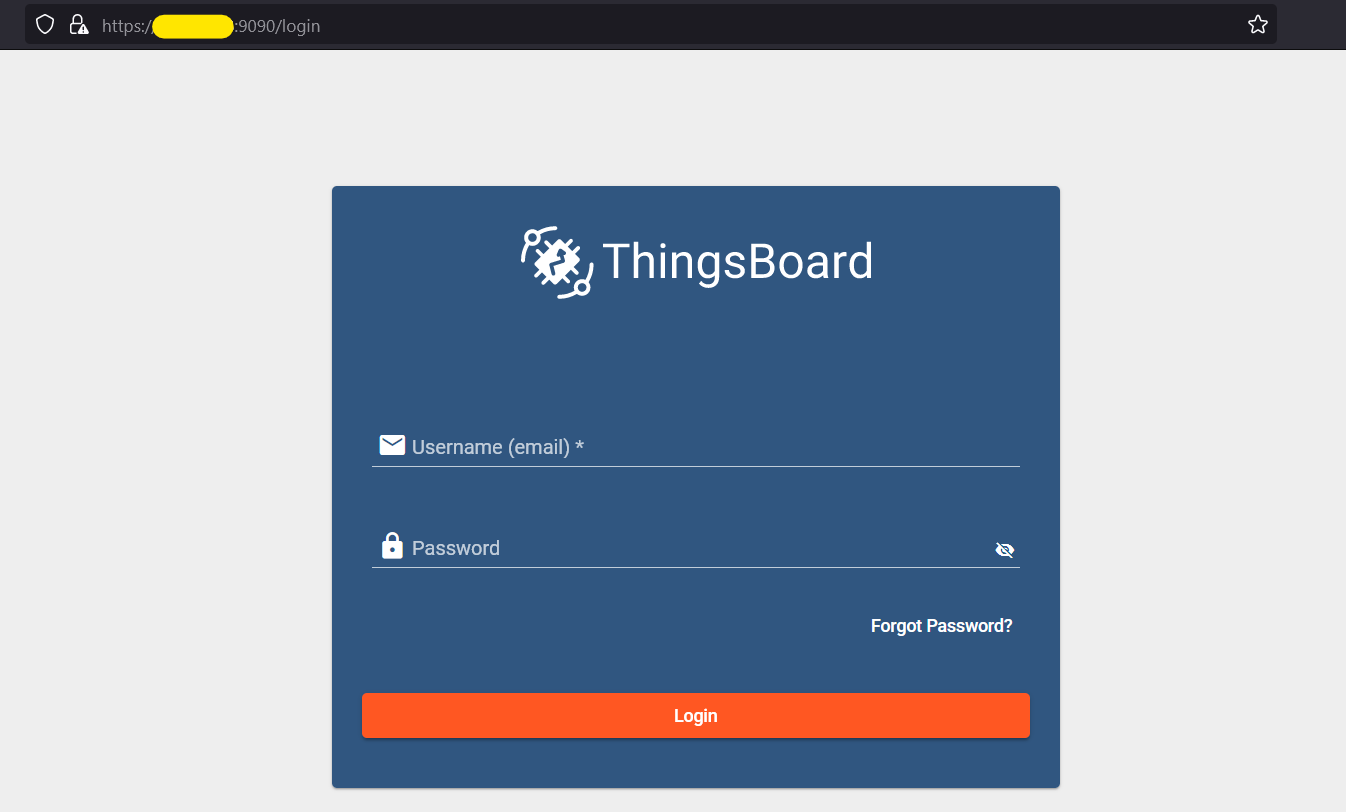
Confirm HTTPS access
Now, you should be able to access https://your_IP:9090 (where the IP address is the address used in the DNAT rule):
| Info |
|---|
Since we are using a self-signed certificate that was not issued by a trusted authority → an error indicating that the connection is not secure might appear but you can view the certificate through the browser (confirm it is the one), accept the risk, and continue. |
Confirm SSL MQTT connection
| Info |
|---|
Do not forget to alter the port forwarding rule that is shown in the "Networking" section by changing |
In this example, we will test a one-way SSL communication access token scenario.
Testing with the device that is running the container
| Info |
|---|
MQTT certificate should already be installed into the device's system (because it is the device that generated it). |
Add MQTT broker:
| Code Block | ||
|---|---|---|
| ||
/iot/mqtt/brokers/add name=tbssl address=172.18.0.2 port=8883 username=YOUR_TOKEN ssl=yes |
Publish a static test MQTT message in the JSON format:
| Code Block | ||
|---|---|---|
| ||
/iot/mqtt/publish broker="tbssl" topic="v1/devices/me/telemetry" message="{\"test\":\"123\"}" |
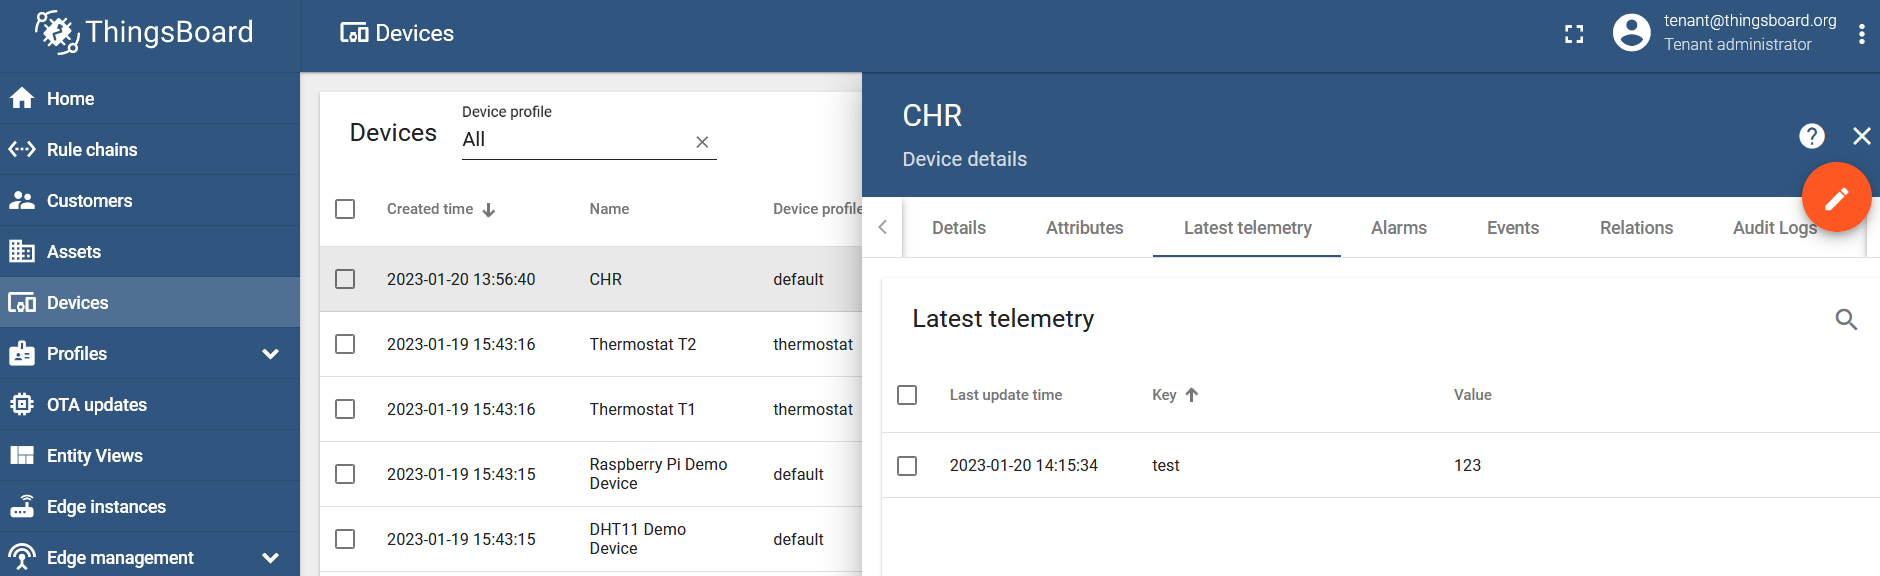
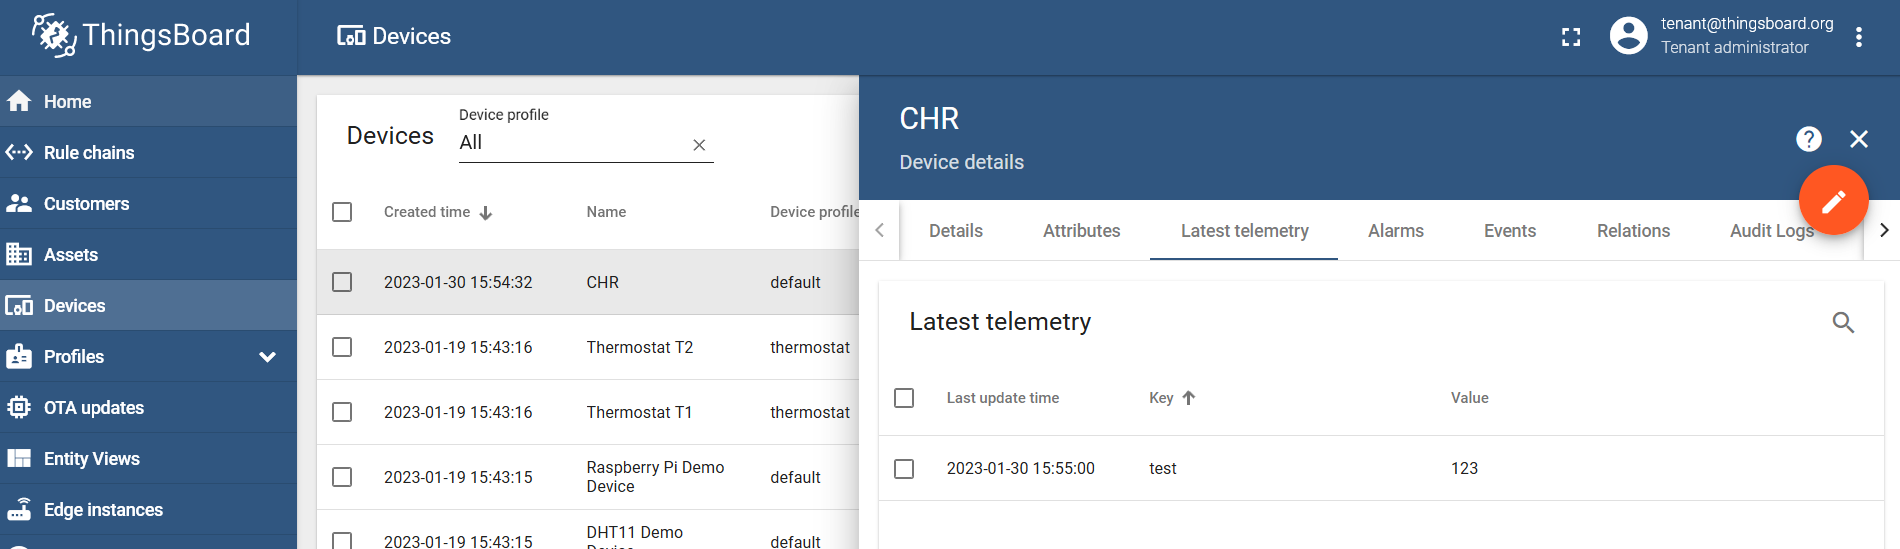
Confirm that it was received by the MQTT broker:
Testing with another device
When you have two RouterOS devices, one that is running the container (and, in our example, is the same device that generated the certificate) and the other one that you wish to test the MQTT connection from (let's say, an LTAP or any other RouterOS device with IoT package installed) → you will need to import the certificate to the second device.
Drag and drop the exported certificate (mqttserver.p12) into the device's "File List":
| Code Block | ||
|---|---|---|
| ||
[admin@LTAP] > /file/print
Columns: NAME, TYPE, SIZE, CREATION-TIME
#  NAME            TYPE       SIZE  CREATION-TIME
0  mqttserver.p12  .p12 file  2438  jan/30/2023 13:28:11
1  flash           disk             jul/06/2021 14:51:53
2  flash/pub       directory        jul/06/2021 14:51:53
3  flash/skins     directory        jan/01/1970 02:00:07
[admin@LTAP] > |
Import the certificate:
| Code Block | ||
|---|---|---|
| ||
[admin@LTAP] > /certificate/import file-name=mqttserver.p12 passphrase=thingsboard_mqttcert_password |
Add MQTT broker, where the address is the IP address "dst-address" that is used in the TCP 8883 port-forwarding rule on the ThingsBoard-container router:
| Code Block | ||
|---|---|---|
| ||
/iot/mqtt/brokers/add name=tbssl address=192.168.88.1 port=8883 username=YOUR_TOKEN ssl=yes |
Publish a static test MQTT message in the JSON format:
| Code Block | ||
|---|---|---|
| ||
/iot/mqtt/publish broker="tbssl" topic="v1/devices/me/telemetry" message="{\"test\":\"123\"}" |
And confirm that the broker received it → under the "Latest Telemetry" section on the ThingsBoard.