...
| Property | Description |
|---|---|
| comment (string; Default: ) | Short description of the profile |
| name (string; Default: ) | Name of the Interworking profile. |
Configuration guide using native RadSec and Orion Wifi:
This guide describes how to set up your MikroTik devices so you can use them with RadSec proxy and Orion Wifi, though the main configuration steps remain the same and will work with different providers as well:
Make sure to use the latest long-term or stable RouterOS releases.
It is important to set up a secure RADIUS connection between the wireless LAN controller and Orion Wifi.
Orion Wifi uses RADIUS over TLS (RadSec) to ensure end-to-end encryption of AAA traffic.
1) Import RadSec certificate you have downloaded from the Orion:
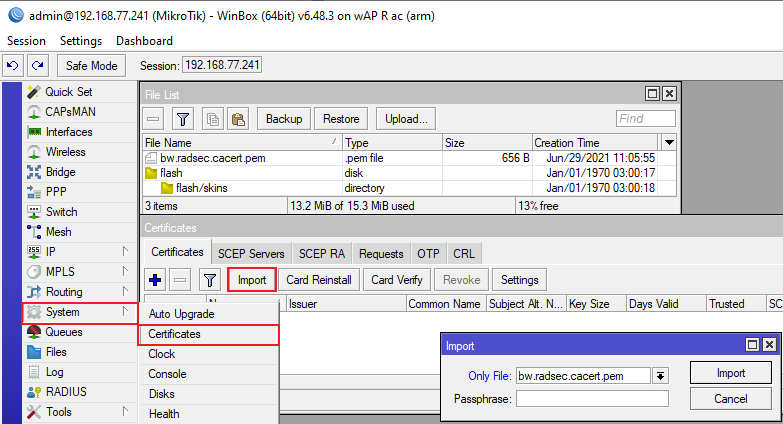
Drag and drop certificate in WinBox, and then use the import function for it, which can be found under /system certificates in WinBox, command line equivalent is :"/certificate import file-name=bw.radsec.cacert.pem passphrase="""
2) Configure the Radius client
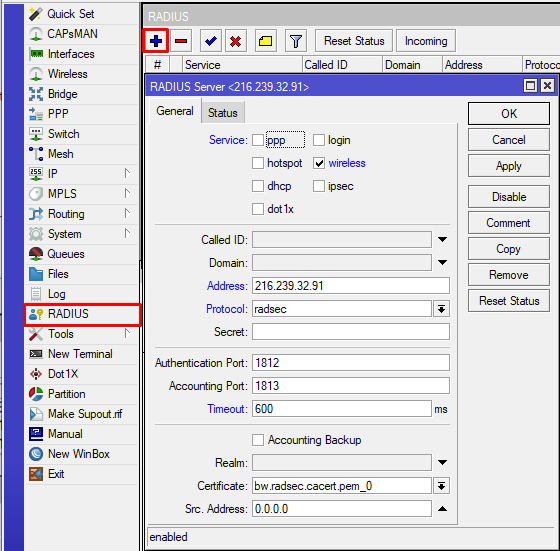
Command line equivalent: "/radius add address=216.239.32.91 certificate=bw.radsec.cacert.pem_0 protocol=radsec service=wireless timeout=1s"
3) Create a wireless security profile that would perform 802.1x authentication

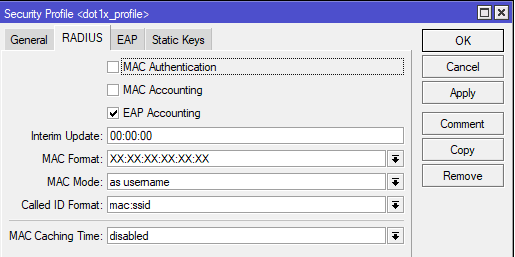
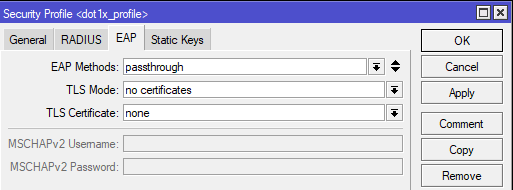
Command line equivalent is “/interface wireless security-profiles add authentication-types=wpa2-eap management-protection=allowed mode=dynamic-keys name=dot1x_profile supplicant-identity="" radius-eap-accounting=yes eap-methods=passthrough“.
4) The next step is configuring the wireless interface and assigning the created security profile. Press “Advanced mode” to see all the options.
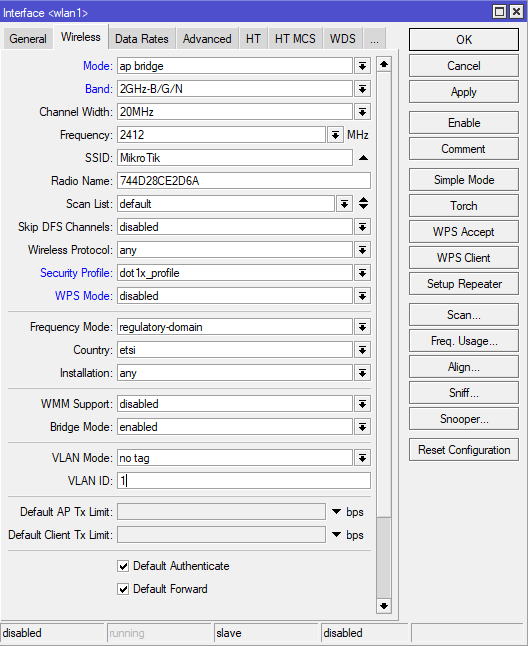
Command line equivalent is: "/interface wireless set [ find default-name=wlan1 ] mode=ap-bridge security-profile=dot1x_profile wps-mode=disabled".
Make sure the correct country profile is configured. In this example, we are using “wlan1”, but the same command would work with other interfaces, or as “/interface wireless set wlan1”.
5) Configure interworking settings (hotspot 2.0 ). This step can only be done via command line: “/interface wireless interworking-profiles add domain-names=orion.area120.com name=Orion_MikroTik network-type=public-chargeable operator-names=Orion:eng realms=orion.area120.com:eap-tls roaming-ois=f4f5e8f5f4,baa2D00100,baa2d00000 venue=business-unspecified venue-names=Orion:eng”.
Set “venue” – venue type, “operator-names=” and ”venue-names”, “wan-uplink” and “wan-uplink” and other attributes as applicable. “domain-names” should be of hotspot 2.0 Operator.
6) Assign the interworking profile to the interface. This step can only be done via the command line, with the following command: “/interface wireless set wlan1 interworking-profile=Orion_MikroTik”.
Configuration guide using RadSec proxy and Orion Wifi:
...
4) Configure interworking settings (hotspot 2.0 ). This step can only be done via command line: “/interface wireless interworking-profiles add domain-names=orion.area120.com name=Orion_Mikrotik domainMikroTik network-names=prod.dogwood120.net type=public-chargeable operator-names=ButtonwoodOrion:eng realms=prodorion.dogwood120area120.netcom:eap-tls roaming-ois=004096,005014,f4f5e8f5f4,baa2D00100,baa2d00000 venue-names=Buttonwood:eng venue=business-unspecified networkunspecified venue-type=public-chargeable ”names=Orion:eng”.
Set “venue” – venue type, “operator-names=” and ”venue-names”, “wan-uplink” and “wan-uplink” and other attributes as applicable. “domain-names” should be of hotspot 2.0 Operator.
...