Interworking
Interworking is the occurrence of two or more things working together. For a better Wireless network experience information about the network must be exchanged between Access Points and Wireless client devices, the information that can be found in basic Wireless beacons and probe requests is limited. For this reason, the IEEE 802.11u™-2011 (Interworking with External Networks) standard was created, that specifies how devices should exchange information between each other. Network discovery and Access Point selection process can be enhanced with the interworking service. Wireless client devices can have more criteria upon which they can choose the network with which to associate.
Hotspot 2.0
Hotspot 2.0 is a specification developed and owned by the Wi-Fi Alliance. It was designed to enable a more cellular-like experience when connecting to Wi-Fi networks. In the attempt to increase Wireless network security Hotspot 2.0 access points use mandatory WPA2 authentication. Hotspot 2.0 relies on Interworking as well as adds some of its own properties and procedures.
Interworking profiles are implemented according to IEEE 802.11u and Hotspot 2.0 Release 1 specifications.
This manual page describes the configuration of the regular wireless package, the same parameters are available in the WifiWave2 package as well.
Configuration Properties
Sub-menu: /interface wireless interworking-profiles
Information elements in beacon and probe response
Some information can be added to beacon and probe response packets with a Interworking element. Following parameters of a Interworking element can be configured:
| Property | Description |
|---|---|
| asra (yes | no; Default: no) | Additional Steps Required for Access. Set to yes, if a user should take additional steps to access the internet, like the walled garden. |
| esr (yes | no; Default: no) | Emergency services reachable (ESR). Set to yes in order to indicate that emergency services are reachable through the access point. |
| hessid (MAC address; Default: ) | Homogenous extended service set identifier (HESSID). Devices that provide access to same external networks are in one homogenous extended service set. This service set can be identified by HESSID that is the same on all access points in this set. 6-byte value of HESSID is represented as MAC address. It should be globally unique, therefore it is advised to use one of the MAC address of access point in the service set. |
| internet (yes | no; Default: yes) | Whether the internet is available through this connection or not. This information is included in the Interworking element. |
| network-type (emergency-only | personal-device | private | private-with-guest | public-chargeable | public-free | test | wildcard; Default: wildcard) | Information about network access type.
|
| uesa (yes | no; Default: no) | Unauthenticated emergency service accessible (UESA).
|
| venue (venue; Default: unspecified) | Specify the venue in which the Access Point is located. Choose the value from available ones. Some examples:venue=business-bank venue=mercantile-shopping-mall venue=educational-university-or-college |
ANQP elements
Access network query protocol (ANQP). Not all necessary information is included in probe response and beacon frames. For client device to get more information before choosing access point to associate with ANQP is used. The Access Point can have stored information in multiple ANQP elements. Client device will use ANQP to query only for the information it is interested in. This reduces the time needed before association.
| Property | Description |
|---|---|
| 3gpp-raw (octet string in hex; Default: ) | Cellular network advertisement information - country and network codes. This helps Hotspot 2.0 clients in the selection of an Access Point to access 3GPP network. Please see 3GPP TS 24.302. (Annex H) for a format of this field. This value is sent ANQP response if queried. |
| 3gpp-info (number/number; Default: ) | Cellular network advertisement information - country and network codes. This helps Hotspot 2.0 clients in the selection of an Access Point to access 3GPP network. Written as "mcc/mnc". Usage is identical to "3gpp-raw", but without using hex. Multiple mcc/mnc pairs can be defined, by separating them with a comma. |
authentication-types (dns-redirection:url | https-redirection:url | online-enrollment:url | terms-and-conditions:url; Default: ) | This property is only effective when asra is set to yes. Value of url is optional and not needed if dns-redirection or online-enrollment is selected. To set the value of url to empty string use double quotes. For example:authentication-types=online-enrollment:"" |
| connection-capabilities (number:number:closed|open|unknown; Default: ) | This option allows to provide information about the allowed IP protocols and ports. This information can be provided in ANQP response. The first number represents the IP protocol number, the second number represents a port number.
Example: connection-capabilities=6:80:open,17:5060:closed Setting such a value on an Access Point informs the Wireless client, which is connecting to the Access Point, that HTTP (6 - TCP, 80 - HTTP) is allowed and VoIP (17 - UDP; 5060 - VoIP) is not allowed. This property does not restrict or allow usage of these protocols and ports, it only gives information to station device which is connecting to Access Point. |
| domain-names (list of strings; Default: ) | None or more fully qualified domain names (FQDN) that indicate the entity operating the Hotspot. A station that is connecting to the Access Point can request this AQNP property and check if there is a suffix match with any of the domain names it has credentials to. |
| ipv4-availability (double-nated | not-available | port-restricted | port-restricted-double-nated | port-restricted-single-nated | public | single-nated | unknown; Default: not-available) | Information about what IPv4 address and access are available.
|
| ipv6-availability (available | not-available | unknown; Default: not-available) | Information about what IPv6 address and access are available.
|
| realms (string:eap-sim|eap-aka|eap-tls|not-specified; Default: ) | Information about supported realms and the corresponding EAP method.realms=example.com:eap-tls,foo.ba:not-specified |
| realms-raw (octet string in hex; Default: ) | Set NAI Realm ANQP-element manually. |
| roaming-ois (octet string in hex; Default: ) | Organization identifier (OI) usually are 24-bit is unique identifiers like organizationally unique identifier (OUI) or company identifier (CID). In some cases, OI is longer for example OUI-36. A subscription service provider (SSP) can be specified by its OI. roaming-ois property can contain zero or more SSPs OIs whose networks are accessible via this AP. Length of OI should be specified before OI itself. For example, to set E4-8D-8C and 6C-3B-6B: roaming-ois=03E48D8C036C3B6B |
| venue-names (string:lang; Default: ) | Venue name can be used to provide additional info on the venue. It can help the client to choose a proper Access Point. Venue-names parameter consists of zero or more duple that contain Venue Name and Language Code: venue-names=CoffeeShop:eng,TiendaDeCafe:esThe Language Code field value is a two or three-character 8 language code selected from ISO-639. |
Realms raw
realms-raw - list of strings with hex values. Each string specifies contents of "NAI Realm Tuple", excluding "NAI Realm Data Field Length" field.
Each hex encoded string must consist of the following fields:
- NAI Realm Encoding (1 byte)
- NAI Realm Length (1 byte)
- NAI Realm (variable)
- EAP Method Count (1 byte)
- EAP Method Tuples (variable)
For example, value "00045465737401020d00" decodes as:
- NAI Realm Encoding: 0 (rfc4282)
- NAI Realm Length: 4
- NAI Realm: Test
- EAP Method Count: 1
- EAP Method Length: 2
- EAP Method Tuple: TLS, no EAP method parameters
Note, that setting "realms-raw=00045465737401020d00" produces the same advertisement contents as setting "realms=Test:eap-tls".
Refer to 802.11-2016, section 9.4.5.10 for full NAI Realm encoding.
Hotspot 2.0 ANQP elements
Hotspot 2.0 specification introduced some additional ANQP elements. These elements use an ANQP vendor specific element ID. Here are available properties to change these elements.
| Property | Description |
|---|---|
| hotspot20 (yes | no; Default: yes) | Indicate Hotspot 2.0 capability of the Access Point. |
| hotspot20-dgaf (yes | no; Default: yes) | Downstream Group-Addressed Forwarding (DGAF). Sets value of DGAF bit to indicate whether multicast and broadcast frames to clients are disabled or enabled.
multicast-helper=full. |
| operational-classes (list of numbers; Default: ) | Information about other available bands of the same ESS. |
| operator-names (string:lang; Default: ) | Set operator name. Language must be specified for each operator name entry. Operator-names parameter consists of zero or more duple that contain Operator Name and Language Code: operator-names=BestOperator:eng,MejorOperador:esThe Language Code field value is a two or three-character 8 language code selected from ISO-639. |
| wan-at-capacity (yes | no; Default: no) | Whether the Access Point or the network is at its max capacity. If set to yes no additional mobile devices will be permitted to associate to the AP. |
| wan-downlink (number; Default: 0) | The downlink speed of the WAN connection set in kbps. If the downlink speed is not known, set to 0. |
| wan-downlink-load (number; Default: 0) | The downlink load of the WAN connection measured over wan-measurement-duration. Values from 0 to 255.
|
| wan-measurement-duration (number; Default: 0) | Duration during which wan-downlink-load and wan-uplink-load are measured. Value is a numeric value from 0 to 65535 representing tenths of seconds.
|
| wan-status (down | reserved | test | up; Default: reserved) | Information about the status of the Access Point's WAN connection. The value reserved is not used. |
| wan-symmetric (yes | no; Default: no) | Weather the WAN link is symmetric (upload and download speeds are the same) or not. |
| wan-uplink (number; Default: 0) | The uplink speed of the WAN connection set in kbps. If the uplink speed is not known set to 0. |
| wan-uplink-load (number; Default: 0) | The uplink load of th WAN connection measured over wan-measurement-duration. Values from 0 to 255.
|
Other Properties
| Property | Description |
|---|---|
| comment (string; Default: ) | Short description of the profile |
| name (string; Default: ) | Name of the Interworking profile. |
Configuration guide using native RadSec and Orion Wifi:
This guide describes how to set up your MikroTik devices so you can use them with RadSec proxy and Orion Wifi, though the main configuration steps remain the same and will work with different providers as well:
Make sure to use the latest long-term or stable RouterOS releases.
It is important to set up a secure RADIUS connection between the wireless LAN controller and Orion Wifi.
Orion Wifi uses RADIUS over TLS (RadSec) to ensure end-to-end encryption of AAA traffic.
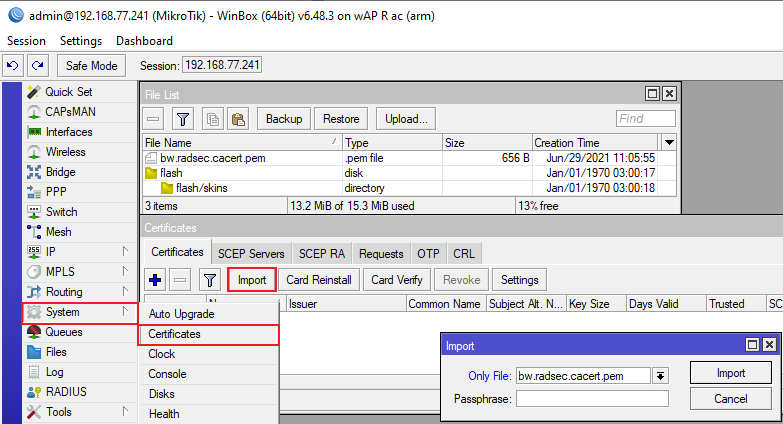
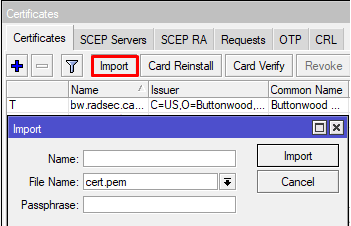
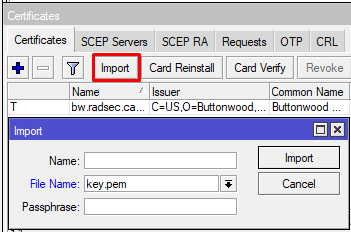
1) Import RadSec certificates you have downloaded from the Orion:
Drag and drop certificate in WinBox, and then use the import function for it, which can be found under /system certificates in WinBox, command line equivalent is :"/certificate import file-name=bw.radsec.cacert.pem passphrase=""", "/certificate import file-name=cert.pem passphrase=""", "/certificate import file-name=key.pem passphrase="""
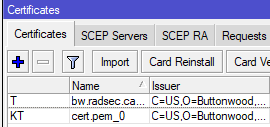
Once certificates are imported, they should look like this:
2) Configure the Radius client
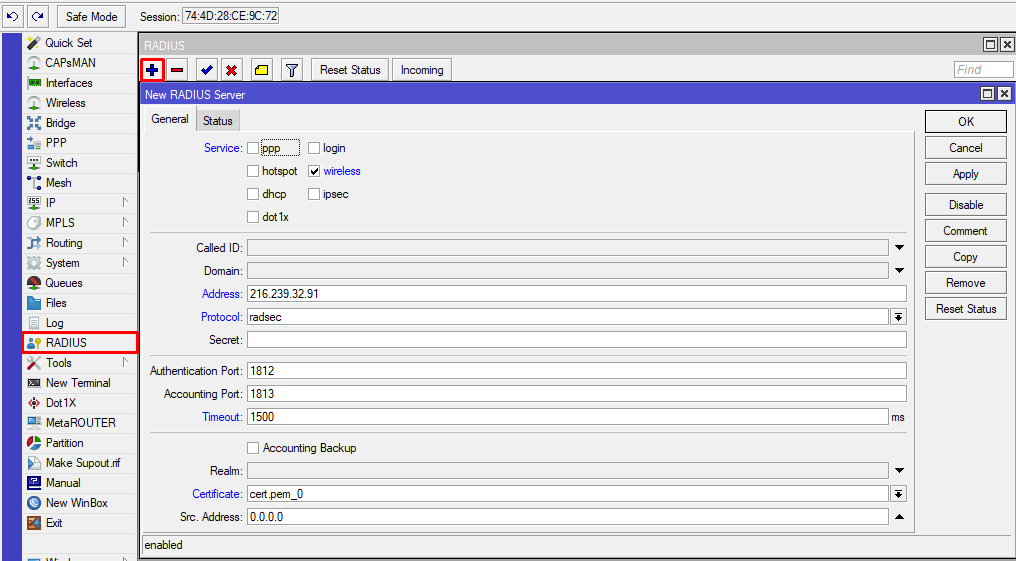
Command line equivalent: "/radius add address=216.239.32.91 certificate=cert.pem_0 protocol=radsec service=wireless timeout=1s500ms"
3) Create a wireless security profile that would perform 802.1x authentication

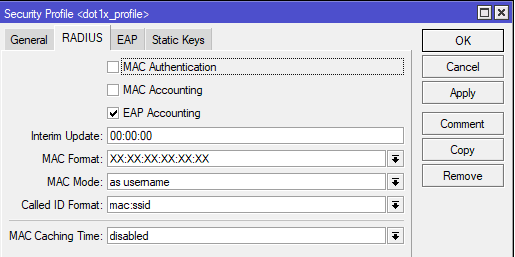
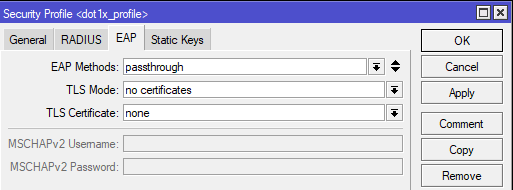
Command line equivalent is “/interface wireless security-profiles add authentication-types=wpa2-eap management-protection=allowed mode=dynamic-keys name=dot1x_profile supplicant-identity="" radius-eap-accounting=yes eap-methods=passthrough“.
4) The next step is configuring the wireless interface and assigning the created security profile. Press “Advanced mode” to see all the options.
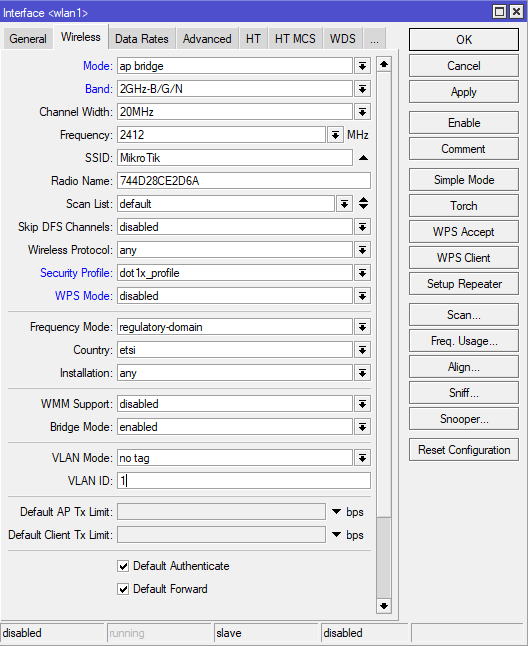
Command line equivalent is: "/interface wireless set [ find default-name=wlan1 ] mode=ap-bridge security-profile=dot1x_profile wps-mode=disabled".
Make sure the correct country profile is configured. In this example, we are using “wlan1”, but the same command would work with other interfaces, or as “/interface wireless set wlan1”.
5) Configure interworking settings (hotspot 2.0 ).
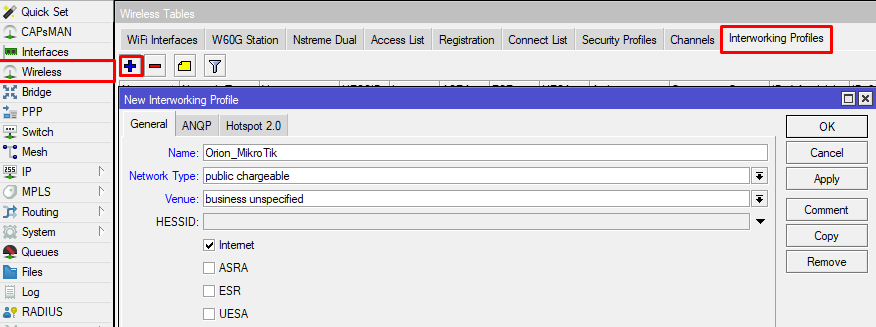
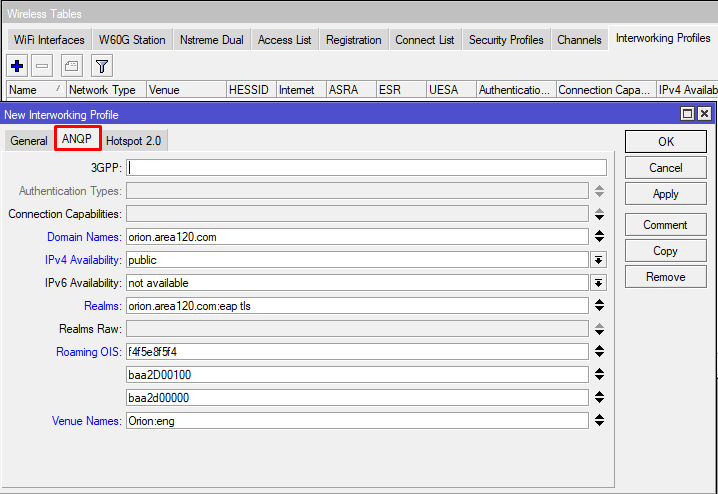
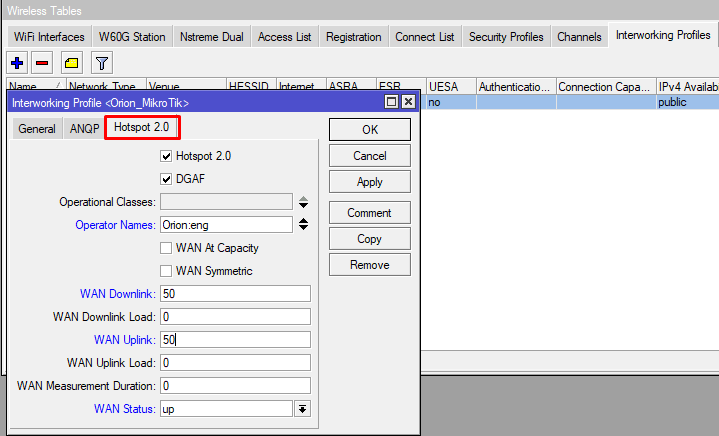
Command line equivalent: “/interface wireless interworking-profile add domain-names=orion.area120.com ipv4-availability=public name=Orion_MikroTik network-type=public-chargeable operator-names=Orion:eng realms=orion.area120.com:eap-tls roaming-ois=f4f5e8f5f4,baa2D00100,baa2d00000 venue=business-unspecified venue-names=Orion:eng wan-downlink=50 wan-uplink=50 wan-status=up”.
Pay special attention to "wan-downlink" and "wan-uplink", in this scenario value of "50" is used as a placeholder, make sure to adjust the values according to your setup, some client devices use it to evaluate, if they should join the network. Set “venue” – venue type, ”venue-names” and other attributes as applicable. “domain-names” should be of hotspot 2.0 Operator.
6) Assign the interworking profile to the interface.
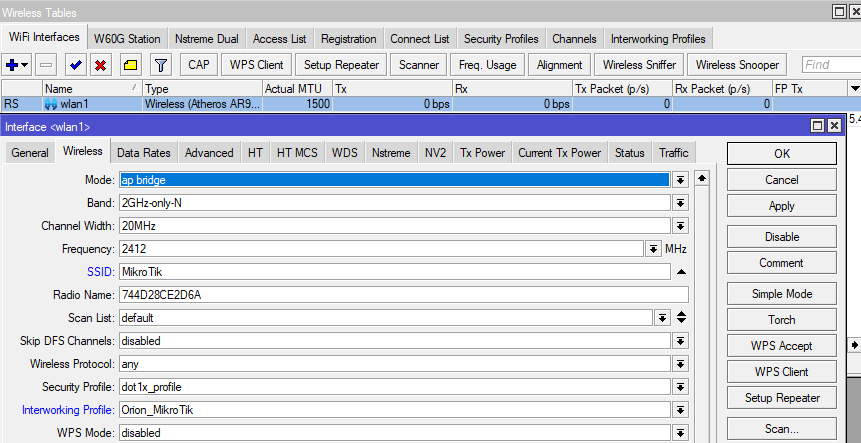
Command-line equivalent is: “/interface wireless set wlan1 interworking-profile=Orion_MikroTik”. If you don't see the interworking-profile field, press "Advanced mode".
Note: NAS-id that's used by Orion to differentiate networks is equal to system identity, to adjust the nas-id, you can do "/system identity set name=exampleName". Graphical interface support for interworking profiles are added from versions above 6.47.10, 6.48.3.
Configuration guide using RadSec proxy and Orion Wifi:
This guide describes how to set up your MikroTik devices so you can use them with RadSec proxy and Orion Wifi, though the main configuration steps remain the same and will work with different providers as well:
This guide assumes that you have configured a radsecproxy with Orion Wifi credentials. Make sure to use the latest long-term or stable RouterOS releases.
It is important to set up a secure RADIUS connection between the wireless LAN controller and Orion Wifi.
Orion Wifi uses RADIUS over TLS (RadSec) to ensure end-to-end encryption of AAA traffic. This guide is made for scenarios where the RouterOS access point redirects AAA traffic to a RadSec proxy (radsecproxy) before the traffic is sent over the internet.
1) Configure the Radius client that points to radsecproxy.

Command line equivalent is “/radius add address=192.168.88.233 secret=yourSecret service=wireless timeout=1s500ms”
The secret should match the one configured on the radsecproxy, in this example “192.168.88.233” is a virtual machine running the proxy.
2) Create a wireless security profile that would perform 802.1x authentication
Command line equivalent is “/interface wireless security-profiles add authentication-types=wpa2-eap management-protection=allowed mode=dynamic-keys name=dot1x_profile supplicant-identity="" radius-eap-accounting=yes eap-methods=passthrough“.
3) The next step is configuring the wireless interface and assigning the created security profile. Press “Advanced mode” to see all the options.
Command line equivalent is: "/interface wireless set [ find default-name=wlan1 ] mode=ap-bridge security-profile=dot1x_profile wps-mode=disabled".
Make sure the correct country profile is configured. In this example, we are using “wlan1”, but the same command would work with other interfaces, or as “/interface wireless set wlan1”.
4) Configure interworking settings (hotspot 2.0 ).

Command line equivalent: “/interface wireless interworking-profile add domain-names=orion.area120.com ipv4-availability=public name=Orion_MikroTik network-type=public-chargeable operator-names=Orion:eng realms=orion.area120.com:eap-tls roaming-ois=f4f5e8f5f4,baa2D00100,baa2d00000 venue=business-unspecified venue-names=Orion:eng wan-downlink=50 wan-uplink=50 wan-status=up”.
Be sure to specify somevalue in "wan-downlink" and "wan-uplink", in this scenario value of "50" is used as a placeholder, some client devices use it to evaluate, if they should join the network. Set “venue” – venue type, ”venue-names” and other attributes as applicable. “domain-names” should be of hotspot 2.0 Operator.
5) Assign the interworking profile to the interface.
This step can also be done with the following command: “/interface wireless set wlan1 interworking-profile=Orion_MikroTik”.
If the radsecproxy is working, then clients with the appropriate Hotspot profile installed should be able to connect.
Note: NAS-id that's used by Orion to differentiate networks is equal to system identity, to adjust the nas-id, you can do "/system identity set name=exampleName". Graphical interface support for interworking profiles is added from versions above 6.47.10, 6.48.3.
Troubleshooting
To check the status of RADIUS messages, you can use the radius menu.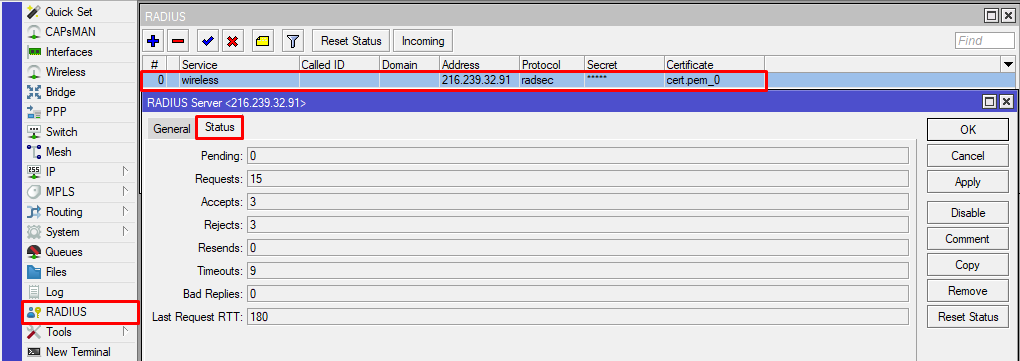
Or alternatively via the command line run "/radius monitor X", X being the numerical ID, you can see the IDs with "/radius print".
For more information, additional logging can be configured under "/system logging add topics=radius,debug,packet". You can view results under "/log".
To view active wireless connections check the wireless registration table (/interface wireless registration-table print)
