DHCP Client
Summary
The DHCP (Dynamic Host Configuration Protocol) is used for the easy distribution of IP addresses in a network. The MikroTik RouterOS implementation includes both server and client parts and is compliant with RFC 2131.
The MikroTik RouterOS DHCP client may be enabled on any Ethernet-like interface at a time. The client will accept an address, netmask, default gateway, and two DNS server addresses. The received IP address will be added to the interface with the respective netmask. The default gateway will be added to the routing table as a dynamic entry. Should the DHCP client be disabled or not renew an address, the dynamic default route will be removed. If there is already a default route installed prior to the DHCP client obtaining one, the route obtained by the DHCP client would be shown as invalid.
RouterOS DHCP client asks for the following options:
- option 1 - SUBNET_MASK,
- option 3 - GATEWAY_LIST,
- option 6 - TAG_DNS_LIST,
- option 33 - STATIC_ROUTE,
- option 42 - NTP_LIST,
- option 121 - CLASSLESS_ROUTE,
Option
DHCP client has the possibility to set up options that are sent to the DHCP server. For example, hostname and MAC address. The syntax is the same as for DHCP server options.
Currently, there are three variables that can be used in options:
- HOSTNAME;
- CLIENT_MAC - client interface MAC address;
- CLIENT_DUID - client DIUD of the router, same as used for the DHCPv6 client. In conformance with RFC4361
DHCP client default options include these default Options:
| Name | code | value |
|---|---|---|
| clientid_duid | 61 | 0xff$(CLIENT_DUID) |
| clientid | 61 | 0x01$(CLIENT_MAC) |
| hostname | 12 | $(HOSTNAME) |
IPv6
DHCP Client can receive delegated prefixes from the DHCPv6 server. The currently received prefix is added to the IPv6 pool, which later can be used for example in PPPoE server configuration. DHCPv6 client configuration can be found in the /ipv6 sub-menu
Setup example
Add a DHCP client on ether1 interface:
/ip dhcp-client add interface=ether1 disabled=no
After the interface is added, you can use the "print" or "print detail" command to see what parameters the DHCP client acquired:
[admin@MikroTik] ip dhcp-client> print detail
Flags: X - disabled, I - invalid
 0   interface=ether1 add-default-route=yes use-peer-dns=yes use-peer-ntp=yes
     status=bound address=192.168.0.65/24 gateway=192.168.0.1
     dhcp-server=192.168.0.1 primary-dns=192.168.0.1 primary-ntp=192.168.0.1
     expires-after=9m44s
[admin@MikroTik] ip dhcp-client>
If the interface used by the DHCP client is part of the VRF configuration, then the default route and other received routes from the DHCP server will be added to the VRF routing table.
DHCP client status can be checked with:
/ip dhcp-client print detail
Examples
Lease script example
It is possible to execute a script when a DHCP client obtains a new lease or loses an existing one. This is an example script that automatically adds a default route with routing-mark=WAN1 and removes it when the lease expires or is removed.
/ip dhcp-client
add add-default-route=no dhcp-options=hostname,clientid disabled=no interface=ether2 script="{\r\
    \n    :local rmark \"WAN1\"\r\
    \n    :local count [/ip route print count-only where comment=\"WAN1\"]\r\
    \n    :if (\$bound=1) do={\r\
    \n        :if (\$count = 0) do={\r\
    \n            /ip route add gateway=\$\"gateway-address\" comment=\"WAN1\" routing-mark=\$rmark\r\
    \n        } else={\r\
    \n            :if (\$count = 1) do={\r\
    \n                :local test [/ip route find where comment=\"WAN1\"]\r\
    \n                :if ([/ip route get \$test gateway] != \$\"gateway-address\") do={\r\
    \n                    /ip route set \$test gateway=\$\"gateway-address\"\r\
    \n                }\r\
    \n            } else={\r\
    \n                :error \"Multiple routes found\"\r\
    \n            }\r\
    \n        }\r\
    \n    } else={\r\
    \n        /ip route remove [find comment=\"WAN1\"]\r\
    \n    }\r\
    \n}\r\
    \n"
Resolve default gateway when 'router' (option3) is from a different subnet
In some cases, administrators tend to set the 'router' option which cannot be resolved with offered IP's subnet. For example, the DHCP server offers 192.168.88.100/24 to the client, and option 3 is set to 172.16.1.1. This will result in an unresolved default route:
 #      DST-ADDRESS        PREF-SRC        GATEWAY            DISTANCE
 0  DS  0.0.0.0/0                          172.16.1.1              1
 1 ADC  192.168.88.0/24    192.168.88.100  ether1
To fix this we need to add /32 route to resolve the gateway over ether1, which can be done by the running script below each time the DHCP client gets an address
/system script add name="dhcpL" source={ /ip address add address=($"lease-address" . "/32") network=$"gateway-address" interface=$interface }
Now we can further extend the script, to check if the address already exist, and remove the old one if changes are needed
/system script add name="dhcpL" source={
  /ip address {
    :local ipId [find where comment="dhcpL address"]
    :if ($ipId != "") do={
      :if (!([get $ipId address] = ($"lease-address" . "/32") && [get $ipId network]=$"gateway-address" )) do={
        remove $ipId;
        add address=($"lease-address" . "/32") network=$"gateway-address" \
          interface=$interface comment="dhcpL address"
      }
    } else={
      add address=($"lease-address" . "/32") network=$"gateway-address" \
        interface=$interface comment="dhcpL address"
    }
  }
}
DHCP Server
The DHCP (Dynamic Host Configuration Protocol) is used for the easy distribution of IP addresses in a network. The MikroTik RouterOS implementation includes both server and client parts and is compliant with RFC 2131.
The router supports an individual server for each Ethernet-like interface. The MikroTik RouterOS DHCP server supports the basic functions of giving each requesting client an IP address/netmask lease, default gateway, domain name, DNS-server(s) and WINS-server(s) (for Windows clients) information (set up in the DHCP networks submenu)
In order for the DHCP server to work, IP pools must also be configured (do not include the DHCP server's own IP address into the pool range) and the DHCP networks.
It is also possible to hand out leases for DHCP clients using the RADIUS server; the supported parameters for a RADIUS server are as follows:
Access-Request:
- NAS-Identifier - router identity
- NAS-IP-Address - IP address of the router itself
- NAS-Port - unique session ID
- NAS-Port-Type - Ethernet
- Calling-Station-Id - client identifier (active-client-id)
- Framed-IP-Address - IP address of the client (active-address)
- Called-Station-Id - the name of DHCP server
- User-Name - MAC address of the client (active-mac-address)
- Password - " "
Access-Accept:
- Framed-IP-Address - IP address that will be assigned to a client
- Framed-Pool - IP pool from which to assign an IP address to a client
- Rate-Limit - Datarate limitation for DHCP clients. Format is: rx-rate[/tx-rate] [rx-burst-rate[/tx-burst-rate] [rx-burst-threshold[/tx-burst-threshold] [rx-burst-time[/tx-burst-time][priority] [rx-rate-min[/tx-rate-min]]]]. All rates should be numbers with optional 'k' (1,000s) or 'M' (1,000,000s). If tx-rate is not specified, rx-rate is as tx-rate too. Same goes for tx-burst-rate and tx-burst-threshold and tx-burst-time. If both rx-burst-threshold and tx-burst-threshold are not specified (but burst-rate is specified), rx-rate and tx-rate are used as burst thresholds. If both rx-burst-time and tx-burst-time are not specified, 1s is used as default. Priority takes values 1..8, where 1 implies the highest priority, but 8 - the lowest. If rx-rate-min and tx-rate-min are not specified rx-rate and tx-rate values are used. The rx-rate-min and tx-rate-min values can not exceed rx-rate and tx-rate values.
- Ascend-Data-Rate - TX/RX data rate limitation if multiple attributes are provided, first limits tx data rate, second - RX data rate. If used together with Ascend-Xmit-Rate, specifies RX rate. 0 if unlimited
- Ascend-Xmit-Rate - tx data rate limitation. It may be used to specify the TX limit only instead of sending two sequential Ascend-Data-Rate attributes (in that case Ascend-Data-Rate will specify the receive rate). 0 if unlimited
- Session-Timeout - max lease time (lease-time)
DHCP server requires a real interface to receive raw ethernet packets. If the interface is a Bridge interface, then the Bridge must have a real interface attached as a port to that bridge which will receive the raw ethernet packets. It cannot function correctly on a dummy (empty bridge) interface.
Lease Store Configuration
/ip dhcp-server config
This sub-menu allows the configuration of how often the DHCP leases will be stored on disk. If they would be saved on a disk on every lease change, a lot of disk writes would happen which is very bad for Compact Flash (especially, if lease times are very short). To minimize writes on disk, all changes are saved on disk every store-leases-disk seconds. Additionally, leases are always stored on disk on graceful shutdown and reboot.
Manual changes to leases - addition/removal of a static lease, removal of a dynamic lease will cause changes to be pushed for this lease to storage.
Leases
/ip dhcp-server lease
DHCP server lease submenu is used to monitor and manage server leases. The issued leases are shown here as dynamic entries. You can also add static leases to issue a specific IP address to a particular client (identified by MAC address).
Generally, the DHCP lease is allocated as follows:
- an unused lease is in the "waiting" state
- if a client asks for an IP address, the server chooses one
- if the client receives a statically assigned address, the lease becomes offered, and then bound with the respective lease time
- if the client receives a dynamic address (taken from an IP address pool), the router sends a ping packet and waits for an answer for 0.5 seconds. During this time, the lease is marked testing
- in the case where the address does not respond, the lease becomes offered and then bound with the respective lease time
- in other cases, the lease becomes busy for the lease time (there is a command to retest all busy addresses), and the client's request remains unanswered (the client will try again shortly)
A client may free the leased address. The dynamic lease is removed, and the allocated address is returned to the address pool. But the static lease becomes busy until the client reacquires the address.
IP addresses assigned statically are not probed!
Parameters
Properties
| Property | Description |
|---|---|
| add-arp (yes | no; Default: no) | Whether to add dynamic ARP entry. If set to no either ARP mode should be enabled on that interface or static ARP entries should be administratively defined in /ip arp submenu. |
| address-pool (string | static-only; Default: static-only) | IP pool, from which to take IP addresses for the clients. If set to static-only, then only the clients that have a static lease (added in lease submenu) will be allowed. |
| allow-dual-stack-queue (yes | no; Default: yes) | Creates a single simple queue entry for both IPv4 and IPv6 addresses, uses the MAC address and DUID for identification. Requires IPv6 DHCP Server to have this option enabled as well to work properly. |
| always-broadcast (yes | no; Default: no) | Always send replies as broadcasts even if the destination IP is known. Will add additional load on L2 network. |
| authoritative (after-10sec-delay | after-2sec-delay | yes | no; Default: yes) | Option changes the way how a server responds to DHCP requests:
|
| bootp-lease-time (forever | lease-time | time; Default: ) | Accepts two predefined options or time value:
|
| bootp-support (none | static | dynamic; Default: static) | Support for BOOTP clients:
|
| client-mac-limit (integer | unlimited; Default: unlimited) | Specifies whether to limit a specific number of clients per single MAC address or leave unlimited. Note that this setting should not be used in relay setups. |
| conflict-detection (yes | no; Default: ) | Allows disabling/enable conflict detection. If the option is enabled, then whenever the server tries to assign a lease it will send ICMP and ARP messages to detect whether such address in the network already exists. If any of the above get reply address is considered already used. Conflict detection must be disabled when any kind of DHCP client limitation per port or per mac is used. |
| delay-threshold (time | none; Default: none) | If the sec's field in the DHCP packet is smaller than the delay threshold, then this packet is ignored. If set to none - there is no threshold (all DHCP packets are processed) |
| dhcp-option-set (name | none; Default: ) | Use a custom set of DHCP options defined in the option sets menu. |
| insert-queue-before (bottom | first | name; Default: ) | Specify where to place dynamic simple queue entries for static DCHP leases with a rate-limit parameter set. |
| interface (string; Default: ) | The interface on which server will be running. |
| lease-script (string; Default: "") | A script that will be executed after a lease is assigned or de-assigned. Internal "global" variables that can be used in the script:
|
| lease-time (time; Default: 10m) | The time that a client may use the assigned address. The client will try to renew this address after half of this time and will request a new address after the time limit expires. |
| name (string; Default: ) | Reference name |
| parent-queue (string | none; Default: none) | |
| relay (IP; Default: 0.0.0.0) | The IP address of the relay this DHCP server should process requests from:
|
| src-address (IP; Default: 0.0.0.0) | The address to which the DHCP client must send requests in order to renew an IP address lease. If there is only one static address on the DHCP server interface and the source address is left as 0.0.0.0, then the static address will be used. If there are multiple addresses on the interface, an address in the same subnet as the range of given addresses should be used. |
| use-framed-as-classless (yes | no; Default: yes) | Forward RADIUS Framed-Route as a DHCP Classless-Static-Route to DHCP-client. Whenever both Framed-Route and Classless-Static-Route are received Classless-Static-Route is preferred. |
| use-radius (yes | no | accounting; Default: no) | Whether to use RADIUS server:
|
Network
/ip dhcp-server network
| Property | Description |
|---|---|
| address (IP/netmask; Default: ) | the network DHCP server(s) will lease addresses from |
| boot-file-name (string; Default: ) | Boot filename |
| caps-manager (string; Default: ) | A comma-separated list of IP addresses for one or more CAPsMAN system managers. DHCP Option 138 (capwap) will be used. |
| dhcp-option (string; Default: ) | Add additional DHCP options from the option list. |
| dhcp-option-set (string; Default: ) | Add an additional set of DHCP options. |
| dns-none (yes | no; Default: no) | If set, then DHCP Server will not pass dynamic DNS servers configured on the router to the DHCP clients if no DNS Server in DNS-server is set. By default, if there are no DNS servers configured, then the dynamic DNS Servers will be passed to DHCP clients. |
| dns-server (string; Default: ) | the DHCP client will use these as the default DNS servers. Two comma-separated DNS servers can be specified to be used by the DHCP client as primary and secondary DNS servers |
| domain (string; Default: ) | The DHCP client will use this as the 'DNS domain' setting for the network adapter. |
| gateway (IP; Default: 0.0.0.0) | The default gateway to be used by DHCP Client. |
| netmask (integer: 0..32; Default: 0) | The actual network mask is to be used by the DHCP client. If set to '0' - netmask from network address will be used. |
| next-server (IP; Default: ) | The IP address of the next server to use in bootstrap. |
| ntp-server (IP; Default: ) | the DHCP client will use these as the default NTP servers. Two comma-separated NTP servers can be specified to be used by the DHCP client as primary and secondary NTP servers |
| wins-server (IP; Default: ) | The Windows DHCP client will use these as the default WINS servers. Two comma-separated WINS servers can be specified to be used by the DHCP client as primary and secondary WINS servers |
Rate limiting
It is possible to set the bandwidth to a specific IPv4 address by using DHCPv4 leases. This can be done by setting a rate limit on the DHCPv4 lease itself, by doing this a dynamic simple queue rule will be added for the IPv4 address that corresponds to the DHCPv4 lease. By using the rate-limit parameter you can conveniently limit a user's bandwidth.
For any queues to work properly, the traffic must not be FastTracked, make sure your Firewall does not FastTrack traffic that you want to limit.
First, make the DHCPv4 lease static, otherwise, it will not be possible to set a rate limit to a DHCPv4 lease:
[admin@MikroTik] > /ip dhcp-server lease print
Flags: X - disabled, R - radius, D - dynamic, B - blocked
 #   ADDRESS               MAC-ADDRESS       HOST-NAME               SERVER               RATE-LIMIT               STATUS
 0 D 192.168.88.254        6C:3B:6B:7C:41:3E MikroTik                DHCPv4_Server                                 bound

[admin@MikroTik] > /ip dhcp-server lease make-static 0

[admin@MikroTik] > /ip dhcp-server lease print
Flags: X - disabled, R - radius, D - dynamic, B - blocked
 #   ADDRESS               MAC-ADDRESS       HOST-NAME               SERVER               RATE-LIMIT               STATUS
 0   192.168.88.254        6C:3B:6B:7C:41:3E MikroTik                DHCPv4_Server                                 bound
Then you can set a rate to a DHCPv4 lease that will create a new dynamic simple queue entry:
[admin@MikroTik] > /ip dhcp-server lease set 0 rate-limit=10M/10M

[admin@MikroTik] > /queue simple print
Flags: X - disabled, I - invalid, D - dynamic
 0  D name="dhcp-ds<6C:3B:6B:7C:41:3E>" target=192.168.88.254/32 parent=none packet-marks="" priority=8/8 queue=default-small/default-small limit-at=10M/10M max-limit=10M/10M burst-limit=0/0 burst-threshold=0/0 burst-time=0s/0s
      bucket-size=0.1/0.1
By default allow-dual-stack-queue is enabled, this will add a single dynamic simple queue entry for both DCHPv6 binding and DHCPv4 lease, without this option enabled separate dynamic simple queue entries will be added for IPv6 and IPv4.
If allow-dual-stack-queue is enabled, then a single dynamic simple queue entry will be created containing both IPv4 and IPv6 addresses:
[admin@MikroTik] > /queue simple print
Flags: X - disabled, I - invalid, D - dynamic
 0  D name="dhcp-ds<6C:3B:6B:7C:41:3E>" target=192.168.88.254/32,fdb4:4de7:a3f8:418c::/66 parent=none packet-marks="" priority=8/8 queue=default-small/default-small limit-at=10M/10M max-limit=10M/10M burst-limit=0/0 burst-threshold=0/0
      burst-time=0s/0s bucket-size=0.1/0.1
RADIUS Support
Since RouterOS v6.43 it is possible to use RADIUS to assign a rate limit per lease, to do so you need to pass the Mikrotik-Rate-Limit attribute from your RADIUS Server for your lease. To achieve this you first need to set your DHCPv4 Server to use RADIUS for assigning leases. Below is an example of how to set it up:
/radius
add address=10.0.0.1 secret=VERYsecret123 service=dhcp
/ip dhcp-server
set dhcp1 use-radius=yes
After that, you need to tell your RADIUS Server to pass the Mikrotik-Rate-Limit attribute. In case you are using FreeRADIUS with MySQL, then you need to add appropriate entries into radcheck and radreply tables for a MAC address, that is being used for your DHCPv4 Client. Below is an example for table entries:
INSERT INTO `radcheck` (`username`, `attribute`, `op`, `value`) VALUES
('00:0C:42:00:D4:64', 'Auth-Type', ':=', 'Accept'),

INSERT INTO `radreply` (`username`, `attribute`, `op`, `value`) VALUES
('00:0C:42:00:D4:64', 'Framed-IP-Address', '=', '192.168.88.254'),
('00:0C:42:00:D4:64', 'Mikrotik-Rate-Limit', '=', '10M'),
Alerts
To find any rogue DHCP servers as soon as they appear in your network, the DHCP Alert tool can be used. It will monitor the ethernet interface for all DHCP replies and check if this reply comes from a valid DHCP server. If a reply from an unknown DHCP server is detected, an alert gets triggered:
[admin@MikroTik] ip dhcp-server alert>/log print
00:34:23 dhcp,critical,error,warning,info,debug dhcp alert on Public:
    discovered unknown dhcp server, mac 00:02:29:60:36:E7, ip 10.5.8.236
[admin@MikroTik] ip dhcp-server alert>
When the system alerts about a rogue DHCP server, it can execute a custom script.
As DHCP replies can be unicast, the 'rogue DHCP detector' may not receive any offer to other DHCP clients at all. To deal with this, the rogue DHCP detector acts as a DHCP client as well - it sends out DHCP discover requests once a minute.
DHCP Options
With the help of the DHCP Option list, it is possible to define additional custom options for DHCP Server to advertise. Option precedence is as follows:
- radius,
- lease,
- server,
- network.
This is the order in which the client option request will be filled in.
According to the DHCP protocol, a parameter is returned to the DHCP client only if it requests this parameter, specifying the respective code in the DHCP request Parameter-List (code 55) attribute. If the code is not included in the Parameter-List attribute, the DHCP server will not send it to the DHCP client, but since RouterOS v7.1rc5 it is possible to force the DHCP option from the server-side even if the DHCP-client does not request such parameter:
ip/dhcp-server/option/set force=yes
Properties
| Property | Description |
|---|---|
| code (integer:1..254; Default: ) | dhcp option code. All codes are available at http://www.iana.org/assignments/bootp-dhcp-parameters |
| name (string; Default: ) | Descriptive name of the option |
| value (string; Default: ) | Parameter's value. Available data types for options are:
RouterOS has predefined variables that can be used:
For example if HOSTNAME is 'kvm', then raw value will be 0x0176617264736b766d. |
| raw-value (HEX string ) | Read-only field which shows raw DHCP option value (the format actually sent out) |
Example
Classless Route
A classless route adds a specified route in the clients routing table. In our example, it will add
- dst-address=160.0.0.0/24 gateway=10.1.101.1
- dst-address=0.0.0.0/0 gateway=10.1.101.1
According to RFC 3442: The first part is the netmask ("18" = netmask /24). Second part is significant part of destination network ("A00000" = 160.0.0). Third part is IP address of gateway ("0A016501" = 10.1.101.1). Then There are parts of the default route, destination netmask (0x00 = 0.0.0.0/0) followed by default route (0x0A016501 = 10.1.101.1)
/ip dhcp-server option
add code=121 name=classless value=0x18A000000A016501000A016501
/ip dhcp-server network
set 0 dhcp-option=classless
Result:
[admin@MikroTik] /ip route> print
Flags: X - disabled, A - active, D - dynamic, C - connect, S - static, r - rip, b - bgp, o - ospf,
m - mme, B - blackhole, U - unreachable, P - prohibit
 #      DST-ADDRESS        PREF-SRC        GATEWAY            DISTANCE
 0 ADS  0.0.0.0/0                          10.1.101.1         0
 1 ADS  160.0.0.0/24                       10.1.101.1         0
A much more robust way would be to use built-in variables, the previous example can be rewritten as:
/ip dhcp-server option
add name=classless code=121 value="0x18A00000\$(NETWORK_GATEWAY)0x00\$(NETWORK_GATEWAY)"
Auto proxy config
/ip dhcp-server option
  add code=252 name=auto-proxy-config value="'https://autoconfig.something.lv/wpad.dat'"
DHCP Option Sets
/ip dhcp-server option sets
This menu allows combining multiple options in option sets, which later can be used to override the default DHCP server option set.
Vendor Classes
Since 6.45beta6 version RouterOS support vendor class ID matcher. The vendor class is used by DHCP clients to optionally identify the vendor and configuration.
Example
In the following configuration example, we will give an IP address from a particular pool for an Android-based mobile phone. We will use the RouterBOARD with a default configuration
/ip pool
add name=default-dhcp ranges=192.168.88.10-192.168.88.254
add name=pool-for-VID ranges=172.16.16.10-172.16.16.120
Configure vendor-class-id matcher. DHCP servers configuration remains the default
/ip dhcp-server
add address-pool=default-dhcp disabled=no interface=bridge name=defconf
/ip dhcp-server network
add address=192.168.88.0/24 comment=defconf gateway=192.168.88.1
/ip dhcp-server vendor-class-id
add address-pool=pool-for-VID name=samsung server=defconf vid=android-dhcp-9
Connect your mobile phone to the device to receive an IP address from the 172.16.16.0 network
[admin@mikrotik] > /ip dhcp-server lease print detail
Flags: X - disabled, R - radius, D - dynamic, B - blocked
 0 D address=172.16.16.120 mac-address=30:07:4D:F5:07:49 client-id="1:30:7:4d:f5:7:49" address-lists="" server=defconf dhcp-option=""
     status=bound expires-after=8m55s last-seen=1m5s active-address=172.16.16.120 active-mac-address=30:07:4D:F5:07:49
     active-client-id="1:30:7:4d:f5:7:49" active-server=defconf host-name="Galaxy-S8"
If you do not know your devices Vendor Class ID, you can turn on DHCP debug logs with /system logging add topics=dhcp. Then in the logging entries, you will see Class-ID
10:30:31 dhcp,debug,packet defconf received request with id 4238230732 from 0.0.0.0
10:30:31 dhcp,debug,packet     secs = 3
10:30:31 dhcp,debug,packet     ciaddr = 0.0.0.0
10:30:31 dhcp,debug,packet     chaddr = 30:07:4D:F5:07:49
10:30:31 dhcp,debug,packet     Msg-Type = request
10:30:31 dhcp,debug,packet     Client-Id = 01-30-07-4D-F5-07-49
10:30:31 dhcp,debug,packet     Address-Request = 172.16.16.120
10:30:31 dhcp,debug,packet     Server-Id = 192.168.88.1
10:30:31 dhcp,debug,packet     Max-DHCP-Message-Size = 1500
10:30:31 dhcp,debug,packet     Class-Id = "android-dhcp-9"
10:30:31 dhcp,debug,packet     Host-Name = "Galaxy-S8"
10:30:31 dhcp,debug,packet     Parameter-List = Subnet-Mask,Router,Domain-Server,Domain-Name,Interface-MTU,Broadcast-Address,Address-Time,Ren
ewal-Time,Rebinding-Time,Vendor-Specific
10:30:31 dhcp,info defconf assigned 172.16.16.120 to 30:07:4D:F5:07:49
10:30:31 dhcp,debug,packet defconf sending ack with id 4238230732 to 172.16.16.120
10:30:31 dhcp,debug,packet     ciaddr = 0.0.0.0
10:30:31 dhcp,debug,packet     yiaddr = 172.16.16.120
10:30:31 dhcp,debug,packet     siaddr = 192.168.88.1
10:30:31 dhcp,debug,packet     chaddr = 30:07:4D:F5:07:49
10:30:31 dhcp,debug,packet     Msg-Type = ack
10:30:31 dhcp,debug,packet     Server-Id = 192.168.88.1
10:30:31 dhcp,debug,packet     Address-Time = 600
10:30:31 dhcp,debug,packet     Domain-Server = 192.168.88.1,10.155.0.1,10.155.0.126
Configuration Examples
Setup
To simply configure DHCP server you can use a setup command.
First, you configure an IP address on the interface:
[admin@MikroTik] > /ip address add address=192.168.88.1/24 interface=ether3 disabled=no
Then you use setup a command which will automatically ask necessary parameters:
[admin@MikroTik] > /ip dhcp-server setup
Select interface to run DHCP server on

dhcp server interface: ether3
Select network for DHCP addresses

dhcp address space: 192.168.88.0/24
Select gateway for given network

gateway for dhcp network: 192.168.88.1
Select pool of ip addresses given out by DHCP server

addresses to give out: 192.168.88.2-192.168.88.254
Select DNS servers

dns servers: 10.155.126.1,10.155.0.1,
Select lease time

lease time: 10m
That is all. You have configured an active DHCP server.
Manual configuration
To configure the DHCP server manually to respond to local requests you have to configure the following:
- An IP pool for addresses to be given out, make sure that your gateway/DHCP server address is not part of the pool.
/ip pool add name=dhcp_pool0 ranges=192.168.88.2-192.168.88.254
- A network indicating subnets that DHCP-server will lease addresses from, among other information, like a gateway, DNS-server, NTP-server, DHCP options, etc.
/ip dhcp-server network add address=192.168.88.0/24 dns-server=192.168.88.1 gateway=192.168.88.1
- In our case, the device itself is serving as the gateway, so we'll add the address to the bridge interface:
/ip address add address=192.168.88.1/24 interface=bridge1 network=192.168.88.0
- And finally, add DHCP Server, here we will add previously created address pool, and specify on which interface the DHCP server should work on
/ip dhcp-server add address-pool=dhcp_pool0 disabled=no interface=bridge1 name=dhcp1
DHCP Relay
Summary
The purpose of the DHCP relay is to act as a proxy between DHCP clients and the DHCP server. It is useful in networks where the DHCP server is not on the same broadcast domain as the DHCP client.
DHCP relay does not choose the particular DHCP server in the DHCP-server list, it just sends the incoming request to all the listed servers.
Example setup
Let us consider that you have several IP networks 'behind' other routers, but you want to keep all DHCP servers on a single router. To do this, you need a DHCP relay on your network which will relay DHCP requests from clients to the DHCP server.
This example will show you how to configure a DHCP server and a DHCP relay that serves 2 IP networks - 192.168.1.0/24 and 192.168.2.0/24 that are behind a router DHCP-Relay.
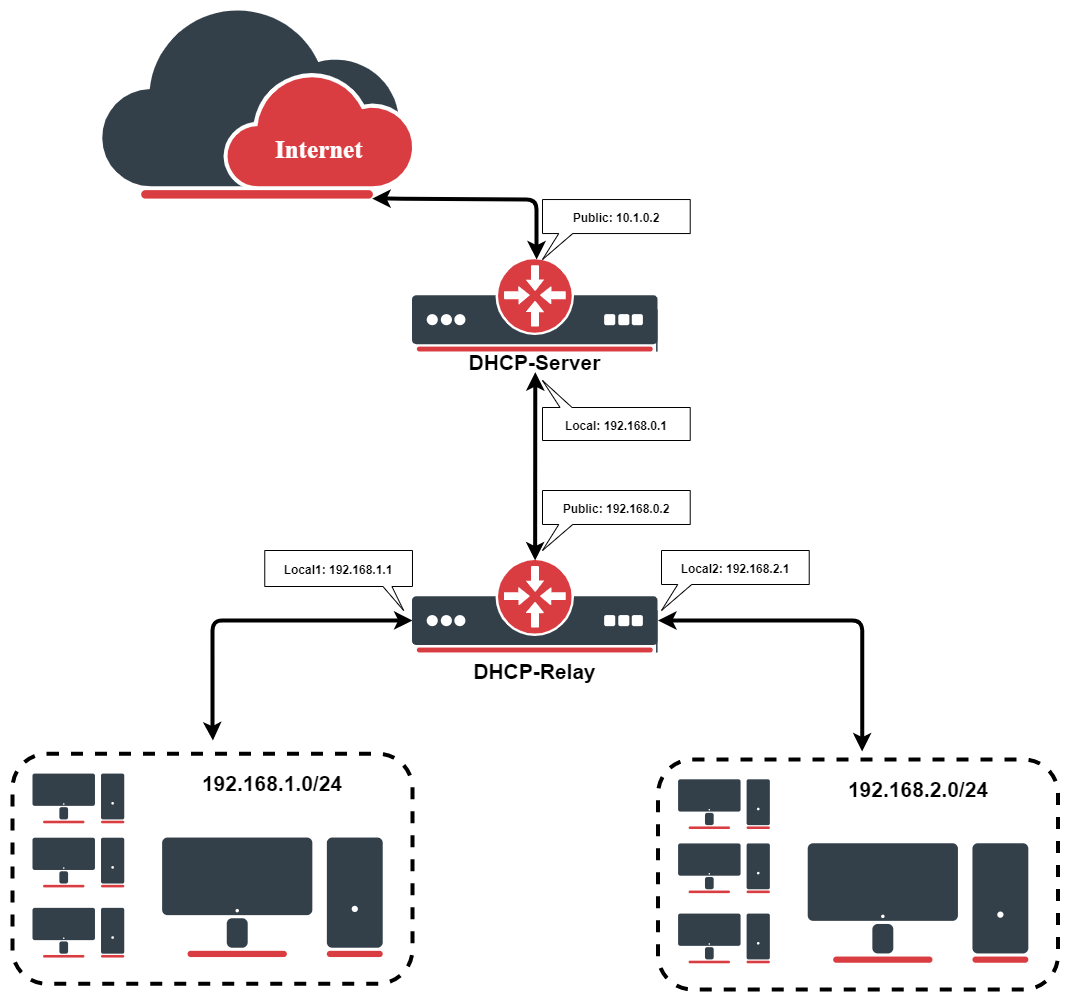
IP Address Configuration
IP addresses of DHCP-Server:
[admin@DHCP-Server] ip address> print
Flags: X - disabled, I - invalid, D - dynamic
 #   ADDRESS            NETWORK         BROADCAST       INTERFACE
 0   192.168.0.1/24     192.168.0.0     192.168.0.255   To-DHCP-Relay
 1   10.1.0.2/24	10.1.0.0	10.1.0.255	Public
[admin@DHCP-Server] ip address>
IP addresses of DHCP-Relay:
[admin@DHCP-Relay] ip address> print
Flags: X - disabled, I - invalid, D - dynamic
 #   ADDRESS            NETWORK         BROADCAST       INTERFACE
 0   192.168.0.2/24     192.168.0.0     192.168.0.255   To-DHCP-Server
 1   192.168.1.1/24     192.168.1.0     192.168.1.255   Local1
 2   192.168.2.1/24     192.168.2.0     192.168.2.255   Local2
[admin@DHCP-Relay] ip address>
DHCP Server Setup
To setup 2 DHCP Servers on the DHCP-Server router add 2 pools. For networks 192.168.1.0/24 and 192.168.2.0:
/ip pool add name=Local1-Pool ranges=192.168.1.11-192.168.1.100
/ip pool add name=Local1-Pool ranges=192.168.2.11-192.168.2.100
[admin@DHCP-Server] ip pool> print
 # NAME                                         RANGES
 0 Local1-Pool                                  192.168.1.11-192.168.1.100
 1 Local2-Pool                                  192.168.2.11-192.168.2.100
[admin@DHCP-Server] ip pool>
Create DHCP Servers:
/ip dhcp-server add interface=To-DHCP-Relay relay=192.168.1.1 \
   address-pool=Local1-Pool name=DHCP-1 disabled=no
/ip dhcp-server add interface=To-DHCP-Relay relay=192.168.2.1 \
   address-pool=Local2-Pool name=DHCP-2 disabled=no
[admin@DHCP-Server] ip dhcp-server> print
Flags: X - disabled, I - invalid
 #   NAME         INTERFACE     RELAY           ADDRESS-POOL LEASE-TIME ADD-ARP
 0   DHCP-1       To-DHCP-Relay 192.168.1.1     Local1-Pool  3d00:00:00
 1   DHCP-2       To-DHCP-Relay 192.168.2.1     Local2-Pool  3d00:00:00
[admin@DHCP-Server] ip dhcp-server>
Configure respective networks:
/ip dhcp-server network add address=192.168.1.0/24 gateway=192.168.1.1 \
   dns-server=159.148.60.20
/ip dhcp-server network add address=192.168.2.0/24 gateway=192.168.2.1 \
   dns-server 159.148.60.20
[admin@DHCP-Server] ip dhcp-server network> print
 # ADDRESS            GATEWAY         DNS-SERVER      WINS-SERVER     DOMAIN
 0 192.168.1.0/24     192.168.1.1     159.148.60.20
 1 192.168.2.0/24     192.168.2.1     159.148.60.20
[admin@DHCP-Server] ip dhcp-server network>
DHCP Relay Config
Configuration of DHCP-Server is done. Now let's configure DHCP-Relay:
/ip dhcp-relay add name=Local1-Relay interface=Local1 \
   dhcp-server=192.168.0.1 local-address=192.168.1.1 disabled=no
/ip dhcp-relay add name=Local2-Relay interface=Local2 \
   dhcp-server=192.168.0.1 local-address=192.168.2.1 disabled=no
[admin@DHCP-Relay] ip dhcp-relay> print
Flags: X - disabled, I - invalid
 #   NAME                        INTERFACE      DHCP-SERVER     LOCAL-ADDRESS
 0   Local1-Relay                Local1         192.168.0.1     192.168.1.1
 1   Local2-Relay                Local2         192.168.0.1     192.168.2.1
[admin@DHCP-Relay] ip dhcp-relay>