...
- Make sure your ISP is allowing hardware change and will issue an automatic IP address.;
- Open the bottom lid (see "Bottom Lid").;
- Connect an external antenna to the SMA connector (see "Antenna usage").;
- Connect the device to the power source (see "Powering").;
- Connect with your device ISP cable to the MikroTik wireless networkEthernet port;
- Navigate to the network connections section on your computer and locate the wireless network named "MikroTik-...". Proceed to connect to it (check the wireless passwords on the sticker);
- The configuration has to be done through the wireless network using a web browser or mobile app - (see "MikroTik mobile app"). Alternatively, you can use the WinBox configuration tool
Configure via a wireless network using a mobile app. Alternatively, use a web browser through WebFig or the Winbox configuration tool
. By default, Ethernet port access is blocked by a firewall.;
- Download and open Winbox, and choose the Neighbors tab to find the device;
- The default IP address is Once connected to the wireless network, open https:// 192.168.88.1
 in your web browser to start the configuration.
 - user name: admin and there is no password by default.
- When using a mobile application choose Quick setup and it will guide you through all necessary configuration in six easy steps.
- Find your LR Gateway ID on the label within the product and register it in your Network Server.
- To make the device connect to the LR Network Server, please see "Configuration".
- . Click on the IP address. If the IP is not available, use Winbox and connect using the MAC address. The username is "admin" and there is no password (or, for some models, check user and wireless passwords on the sticker);
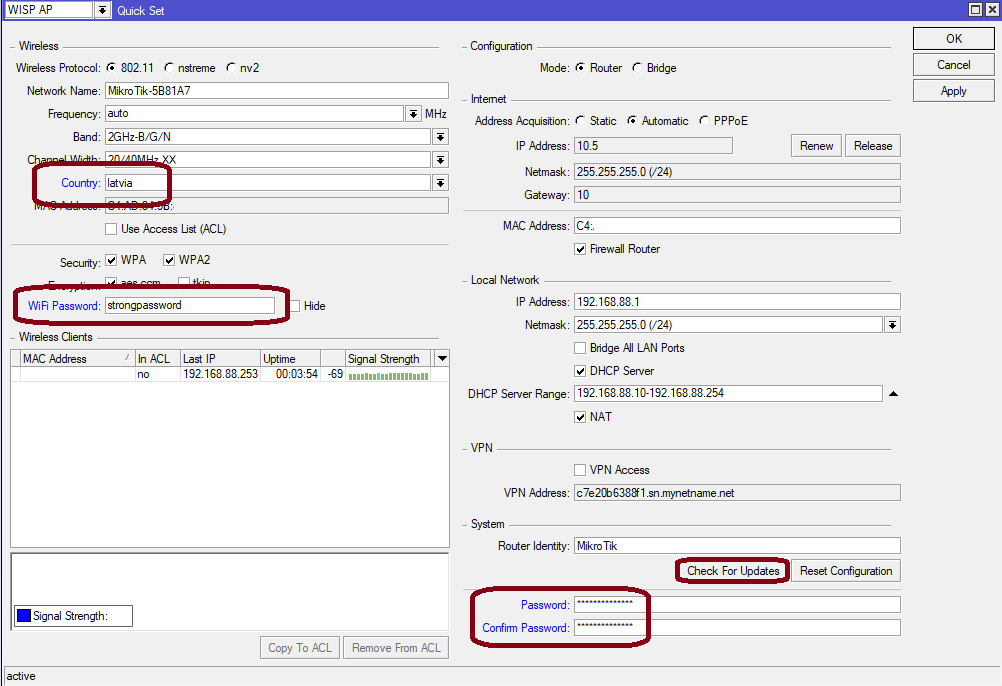
- Click the "Check for updates" button and update RouterOS to the latest version;
- For a manual update of the device, visit the products page at https://mikrotik.com/products to find your product. The required packages are accessible under the "Support&Downloads" menu;
- Upload downloaded packages to the WebFig or Winbox "Files" menu and reboot the device;
- By upgrading Click the "Check for updates" button and update your RouterOS software to the latest version, the device needs to have an active Internet connection.you can ensure optimal performance, stability, and security updates;
- In the "QuickSet" menu set up the following: Choose After update set your country, to apply country regulation settings.
- Set your WiFi password.
- ;
- Set up your wireless network password in the left field;
- Set up your router password in the bottom field;
- Find LR Gateway ID on the label within the product and register it in your Network ServerSet the router password.
Expansion slots and ports
...
- 10/100 Ethernet port, supporting automatic cross/straight cable correction (Auto MDI/X). Either straight or crossover cable can be used for connecting to other network devices.
- External SMA antenna connector already connected to the LR card.
- LED indicating a the power state of the device.
- LED Indicating the activity of the Wireless network.
- Automotive connector. Pinout: A - reserved for future use (orange), B - reserved for future use (blue), C - ground (black), D – power in (red).
...
The device accepts power in the following ways:
- The Ethernet port accepts passive PoE 9-30 V DC ⎓.
- Direct-input power jack (5.5 mm outside and 2 mm inside, female, pin-positive plug) accepts 9-30 V DC⎓.
- Automotive connector 9-30 V DC⎓.
...
The device can be mounted in several ways: pole, wall, ceiling or it can be placed in a specially designed Mikrotik holder which comes with the package. The package also includes a drill hole template with detailed mounting instructions, to help you with the Ethernet cable installation and attachment to a ceiling or a wall. Steel bracket to put on the other side of a dropdown ceiling tile and two screws and wall anchors. Zip ties or steel clamps for mounting on the pole.
...
- Mount plastic tie straps to steel bracket guiding them through holes.
- Mount the bracket to the device.
- Secure them with a screw.
- Mount and align the device on the pole or mast.
- Guide the Ethernet cable through the opening and connect it to the Ethernet port.
- Close the bottom latch and secure it with a screw.
| Info |
|---|
It's recommended to secure the Ethernet cable to the pole using zip ties. With the The distance from the device is approximately 30 cm. |
Mounting unit on the wall:
- Use included a template to mark spots for drilling holes. And if needed for Ethernet cable. Align accordingly, it will depend on how the device will be mounted finally.
- Insert dowels if needed, depends depending on the wall structure and material.
- Place included a steel bracket on the wall.
- Use screws to secure it in the place.
- Extend your Ethernet cable through the opening and connect to the Ethernet port.
- Mount the device on the steel bracket
- Secure it in place with the screw.
- Close the bottom latch.
| Info |
|---|
Avoid mounting the device on the low ground spot, as you won't be able to attach and close the bottom latch. |
...
- Extend your Ethernet cable through the opening and connect to the Ethernet port.
- Mount the device on the steel bracket.
- Secure it in place with the screw.
- Close the bottom latch.
Bottom Lid
- The bottom lid is secured in place with the captive screw.

- Use a Torx T20 screwdriver to unscrew it, but do not remove the screw completely.
...
- Once logged in, Quick Set will be selected, please switch to WebFig on the right side of the screen. If the configuration is done through a mobile application then click on the gear symbol on the right side of the screen to open up an advanced menu.
- On the left side menu please find and select the section "Lora".
- On the newly opened window select the Servers tab.
- Click + to add a new server configuration.
- A new window will appear and you will have to enter:
...
- Select the Device tab on the previous window.
- Double-click or tap on the line to configure.
- Choose the previously entered network on the drop-down menu.
- Click on the button Enable to enable the gateway.
- Click OK to saveto save.
- The configuration is done.
For more detailed information on LoRa settings, check the guide over here.
The configuration
...
example, for both UDP and LNS scenarios with The Things Stack server, can be found here.
We recommend clicking the "Check for updates" button in the QuickSet menu, as updating your RouterOS software to the latest version ensures the best performance and stability. For wireless models, please make sure you have selected the country where the device will be used, to conform with local regulations.
RouterOS includes many configuration options in addition to what is described in this document. We suggest starting here to get yourself accustomed to the possibilities: https://mt.lv/help. In case IP connection is not available, the Winbox tool (https://mt.lv/winbox) can be used to connect to the MAC address of the device from the LAN side (all access is blocked from the Internet port by default).
For recovery purposes, it is possible to boot the device for reinstallation, see the section Buttons and Jumpers.
...
Use the MikroTik smartphone app to configure your router in the field, or to apply the most basic initial settings for your MikroTik home access point.

- Scan the QR code and choose your preferred OS.
- Install and open the application.
- By default, the IP address and user name will be already entered.
- Click Connect to establish a connection to your device through a wireless network.
- Choose Quick setup and the application will guide you through all basic configuration settings in a couple of easy steps.
- An advanced menu is available to fully configure all necessary settings.
Antenna usage
We recommend to use using an external antenna, the "LR Antenna kit" - which can be obtained separately. Antenna The antenna kit has a pole mount and cable ready to use with LR cards. https://mikrotik.com/product/lora_antenna_kit
The SMA connector located under the bottom door is already connected to the LR card and ready to be used. Please see the Mounting section on how to remove the door.
...
Internal antenna 2 dBi can be used for setups where the distance to the gateway are is closer than 1km. By default, the antenna is not connected to the card! To use an internal antenna:
- Open the bottom door (see "Mounting").

- Use the PH2 screwdriver to remove the screw.
- Disassemble the upper case from the bottom by sliding them to opposite sides.

- Locate the internal antenna cable and replace it with the SMA cable connector on the LR card.
...
- Hold this button during boot time until the LED light starts flashing, and release the button to reset the RouterOS configuration (total 5 seconds).
- Keep holding for 5 more seconds, LED turns solid, release now to turn on CAP mode. The device will now look for a CAPsMAN server (total of 10 seconds).
- Or Keep holding the button for 5 more seconds until the LED turns off, then release it to make the RouterBOARD look for Netinstall servers (total 15 seconds).
Regardless of the above option used, the system will load the backup RouterBOOT loader if the button is pressed before power is applied to the device. Useful for RouterBOOT debugging and recovery.
Accessories
Package The package includes the following accessories that come with the device:
...
The device supports RouterOS software version 6.44.5 and above. The specific factory-installed version number is indicated in the RouterOS menu /system resource. Other operating systems have not been tested.
RouterOS LR support is limited to MikroTik LR cardcards, it does not support 3rd party Lora cards.
...
UKCA marking

Eurasian Conformity Mark
Частотный диапазон | Мощность передатчика |
|---|---|
2412-2472 МГц | ≤100 мВт |
*Доступные частотные каналы могут различаться в зависимости от модели продукта и сертификации.
...
Por favor contacte a su distribuidor local para preguntas regionales específicas. La lista de importadores se puede encontrar en nuestra página de inicio – https://mikrotik.com/buy/latinamerica/mexico.
The National Commission for the State Regulation of Communications and Informatization
...
in Ukraine
Виробник: Mikrotikls SIA, Brivibas gatve 214i Рига, Латвія, LV1039.
...
| Note |
|---|
Справжнім Mikrotikls SIA заявляє, що маршрутизатор відповідає основним вимогам та іншим відповідним положенням директиви 2014/53/EC, а також суттєвим вимогам Технічного регламенту радіообладнання, затвердженого постановою Кабінету Міністрів України від 24 травня 2017 року № 355. Для експлуатації в Україні необхідно отримати дозвіл на експлуатацію у порядку, затвердженому рішенням НКРЗІ від 01.11.2012 № 559, зареєстрованому в Міністерстві юстиції України 03.01.2013 за № 57/22589. |
CE Declaration of Conformity
Manufacturer: Mikrotikls SIA, Brivibas gatve 214i Riga, Latvia, LV1039.
Hereby, Mikrotīkls SIA declares that the radio equipment type RBwAPR-2nD&R11e-LR8 is in compliance with Directive 2014/53/EU. The full text of the EU declaration of conformity is available at the following internet address: https://mikrotik.com/products
WLAN / LR
WLAN | Operating Frequency / Maximum output power Betriebsfrequenz / maximale Ausgangsleistung Fréquence de fonctionnement / puissance de sortie maximale Frequenza operativa / massima potenza di uscita Frecuencia de funcionamiento / potencia de salida máxima Рабочая частота / максимальная выходная мощность | 2412-2472 MHz / 20 dBm |
LR | 863-870 MHz / 14 dBm |
| Note |
|---|
| This MikroTik device meets Maximum transmit power limits per ETSI regulations. For more detailed information see Declaration of Conformity above / Dieses MikroTik-Gerät erfüllt die maximalen Sendeleistung Grenzwerte gemäß ETSI-Vorschriften. Weitere Informationen finden Sie oben in der Konformitätserklärung / Cet appareil MikroTik respecte les limites de puissance de transmission maximale conformément aux réglementations ETSI. Pour plus d'informations, voir la déclaration de conformité ci-dessus / Questo dispositivo MikroTik è conforme ai limiti di potenza massima di trasmissione in conformità con le normative ETSI. Per ulteriori informazioni, consultare la dichiarazione di conformità sopra / Este dispositivo MikroTik cumple con los valores límite de potencia máxima de transmisión de acuerdo con la normativa ETSI. Para obtener información más detallada, consulte la Declaración de conformidad anterior / Это устройство MikroTik соответствует предельным значениям максимальной мощности передачи в соответствии с правилами ETSI. Для получения более подробной информации см. Декларацию соответствия выше. |
...
| Info |
|---|
| Note. The information contained here is subject to change. Please visit the product page on www.mikrotik.com for the most up-to-date version of this document. |
...