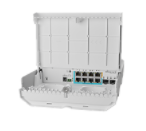
netPower Lite 7R (CSS610-1Gi-7R-2S+OUT)
Safety Warnings
Before you work on any equipment, be aware of the hazards involved with electrical circuitry, and be familiar with standard practices for preventing accidents.
Read the installation instructions before connecting the system to the power source.
This equipment is to be installed by trained and qualified personnel, as per these installation instructions. The installer is responsible for obtaining any required local or national safety inspections of the structural integrity of the installation by the local authority/inspection department.
All installation methods for mounting an access point on any wall surface is subject to the acceptance of local jurisdiction.
The Installation of the equipment must comply with local and national electrical codes.
This unit is intended to be mounted outdoors on a pole. Please read the mounting instructions carefully before beginning installation. Failure to use the correct hardware and configuration or to follow the correct procedures could result in a hazardous situation to people and damage to the systemUltimate disposal of this product should be handled according to all national laws and regulations.
The Installation of the equipment must comply with local and national electrical codes.
This product is intended to be mounted outdoors on a pole. Please read the mounting instructions carefully before beginning installation. Failure to use the correct hardware and configuration or to follow the correct procedures could result in a hazardous situation for people and damage to the system.
Use only the power supply and accessories approved by the manufacturer, and which can be found in the original packaging of this product.
Read the installation instructions before connecting the system to the power source.
We cannot guarantee that no accidents or damage will occur due to the improper use of the device. Please use this product with care and operate at your own risk.
Quickstart
Please follow these quick steps to set up your device:
- Download the latest SwitchOS software version from https://mikrotik.com/download;
- Connect your computer to any of the ethernet ports;
- Connect the device to the power source;
- Set an IP address of your computer to the 192.168.88.3;
- Open your Web browser, the default management IP address is 192.168.88.1, with the username admin and no password;
- Upload file with the web browser to the Upgrade tab, the device will reboot after an upgrade;
- Set up your password to secure the device.
Expansion slots and ports
- Gigabit Ethernet, one port PoE-out.
- Gigabit Ethernet, eight ports.
- Gigabit Ethernet, seven ports, Reverse PoE (PoE in).
- Two - 10G SFP+ ports.
Configuration
...
!
In the case of device failure, please disconnect it from power. The fastest way to do so is by unplugging the power plug from the power outlet.
It is the customer's responsibility to follow local country regulations, including operation within legal frequency channels, output power, cabling requirements, and Dynamic Frequency Selection (DFS) requirements. All Mikrotik devices must be professionally installed.
Quickstart
Please follow these quick steps to set up your device:
- Download the latest SwitchOS software version from https://mikrotik.com/download;
- Connect your computer to any of the ethernet ports;
- Connect the device to the power source;
- Set an IP address of your computer to the 192.168.88.3;
- Open your Web browser, the default management IP address is 192.168.88.1
...
| Pagebreak |
|---|
Powering
The device accepts power in the two ways following ways:
- Direct-input power jack, (5.5 mm outside and 2 mm inside, female, pin positive plug) accepts 12-57 V DC⎓.
- Direct-input block terminal, 12-57 V DC ⎓.
- PoE in, 12-57 V DC ⎓.
The power consumption under maximum load can reach 7 W, with attachments 29 W.
Power output
The device supports passive PoE from Ethernet port eight. You can power Mikrotik devices which supports powering through Ethernet. The power delivered through the PoE port will depend on the incoming to the device.
Connecting to a PoE Adapter, only to deliver power to other devices:
- Connect the Ethernet cable from the device to the PoE+DATA port of the PoE adapter.
- Connect an Ethernet cable from your local network (LAN) to the PoE adapter.
- Connect the power cord to the adapter, and then plug the power cord into a power outlet.
Bottom Lid
- Bottom lid is secured in place with the captive screw, it can be unscrewed by hand, but do not remove the screw completely.
- Pull the cover towards.
- Lift to access Ethernet ports.
Mounting
The device can be mounted in several ways: pole, wall, or ceiling. The package also includes a drill hole template with detailed mounting instructions, to help you with the drill hole marking. The device has eight mounting points for versatility use zip ties or steel clamps for mounting on the pole.
The IP rating scale for this device is IP54. When mounting outdoors, please ensure that any cable openings are directed downwards. We recommend using the POE injector and proper grounding with Cat6 shielded cable.
Mounting points:
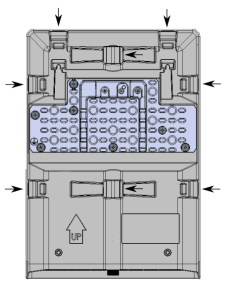
- There are eight mounting points on the back of this device. Choose the most relevant ones.
- Middle points are designed for mounting on the mast, there are curves on the case for slim fitment.
...
| Info |
|---|
The device must be mounted by UP arrow facing upwards. |
...
- Attach your grounding wire to the grounding screw.
- Attach the other end of the grounding wire to the grounded mast.
...
- Insert provided steel clamps into mounting spots.
- Attach the unit to the mast.
- Align the device and secure it by tightening steel clamps with a PH2 screwdriver.
- Guide Ethernet cables through the opening and connect to the Ethernet ports.
- Close bottom latch and secure with a screw.
...
- Use included a template to mark spots for drilling holes. Align accordingly, it will depend on how the device will be mounted finally.
- Insert dowels if needed, depends on wall structure and material.
- Insert screws and screw them by leaving approximately 1 cm out.
- Attach the unit to the position.
- Use screw holes under the bottom cover and tighten to secure in place. Extend your Ethernet cables through the openings and connect to Ethernet ports.
- Close bottom latch.
...
Buttons and jumpers
The RouterBOOT reset button has the following functions. Press the button and apply the power, then:
- Release the button when the green LED starts flashing, to reset the SwOS configuration to defaults.
- Release the button when the LED turns solid green to clear all configuration and bridge all interfaces.
Regardless of the above option used, the system will load the backup RouterBOOT loader if the button is pressed before power is applied to the device. Useful for RouterBOOT debugging and recovery.
Accessories
Package includes the following accessories that come with the device:
- Hose Clamp SUS304.
- K-66 fastening set.
- OED-drill-template, paper brochure.
Operating system support
The device supports SwOS software. Other operating systems have not been tested.
Federal Communication Commission Interference Statement
This equipment has been tested and found to comply with the limits for a Class B digital device, pursuant to Part 15 of the FCC Rules. These limits are designed to provide reasonable protection against harmful interference in a residential installation.
This equipment generates, uses and can radiate radio frequency energy and, if not installed and used in accordance with the instructions, may cause harmful interference to radio communications. However, there is no guarantee that interference will not occur in a particular installation. If this equipment does cause harmful interference to radio or television reception, which can be determined by turning the equipment off and on, the user is encouraged to try to correct the interference by one of the following measures:
- Reorient or relocate the receiving antenna.
- Increase the separation between the equipment and receiver.
- Connect the equipment into an outlet on a circuit different from that to which the receiver is connected.
- Consult the dealer or an experienced radio/TV technician for help.
FCC Caution: Any changes or modifications not expressly approved by the party responsible for compliance could void the user's authority to operate this equipment.
This device complies with Part 15 of the FCC Rules. Operation is subject to the following two conditions: (1) This device may not cause harmful interference, and (2) this device must accept any interference received, including interference that may cause undesired operation.
Note: This unit was tested with shielded cables on the peripheral devices. Shielded cables must be used with the unit to ensure compliance.
Industry Canada
...
- / 192.168.88.2, with the username admin and no password (or, for some models, check user and wireless passwords on the sticker);
- Upload file with the web browser to the Upgrade tab, the device will reboot after an upgrade;
- Set up your password to secure the device.
Expansion slots and ports
- Gigabit Ethernet, one port PoE-out.
- Gigabit Ethernet, eight ports.
- Gigabit Ethernet, seven ports, Reverse PoE (PoE in).
- Two - 10G SFP+ ports.
Configuration
The device can be discovered using Winbox utility, by clicking on the Neighbors list. The default management address is 192.168.88.1.
SwOS is a simple software designed for the switch. We suggest starting here to get yourself accustomed to the possibilities: https://mt.lv/help.
For recovery purposes, it is possible to boot the device for reinstallation, see section Buttons and Jumpers.
| Pagebreak |
|---|
Powering
The device accepts power in the two ways following ways:
- Direct-input power jack, (5.5 mm outside and 2 mm inside, female, pin positive plug) accepts 12-57 V DC⎓.
- Direct-input block terminal, 12-57 V DC ⎓.
- PoE in, 12-57 V DC ⎓.
The power consumption under maximum load can reach 7 W, with attachments 29 W.
Power output
The device supports passive PoE from Ethernet port eight. You can power Mikrotik devices which supports powering through Ethernet. The power delivered through the PoE port will depend on the incoming to the device.
Connecting to a PoE Adapter, only to deliver power to other devices:
- Connect the Ethernet cable from the device to the PoE+DATA port of the PoE adapter.
- Connect an Ethernet cable from your local network (LAN) to the PoE adapter.
- Connect the power cord to the adapter, and then plug the power cord into a power outlet.
Bottom Lid
- The bottom lid is secured in place with the captive screw, it can be unscrewed by hand, but do not remove the screw completely.
- Pull the cover towards.
- Lift to access Ethernet ports.
Mounting
The device can be mounted in several ways: pole, wall, or ceiling. The package also includes a drill hole template with detailed mounting instructions, to help you with the drill hole marking. The device has eight mounting points for versatility use zip ties or steel clamps for mounting on the pole.
The IP rating scale for this device is IP54. When mounting outdoors, please ensure that any cable openings are directed downwards. We recommend using the POE injector and proper grounding with Cat6 shielded cable.
Mounting points:
- There are eight mounting points on the back of this device. Choose the most relevant ones.
- Middle points are designed for mounting on the mast, there are curves on the case for slim fitment.
It's recommended to secure Ethernet cable to the pole using zip ties. With the distance from the device approximately 30 cm.
| Info |
|---|
The device must be mounted by UP arrow facing upwards. |
The installation infrastructure (towers and masts), as well as the router itself, must be properly grounded. The device includes a grounding wire attachment screw on the backside.
- Attach your grounding wire to the grounding screw.
- Attach the other end of the grounding wire to the grounded mast.
Mounting and configuration of this device should be performed by a qualified person.
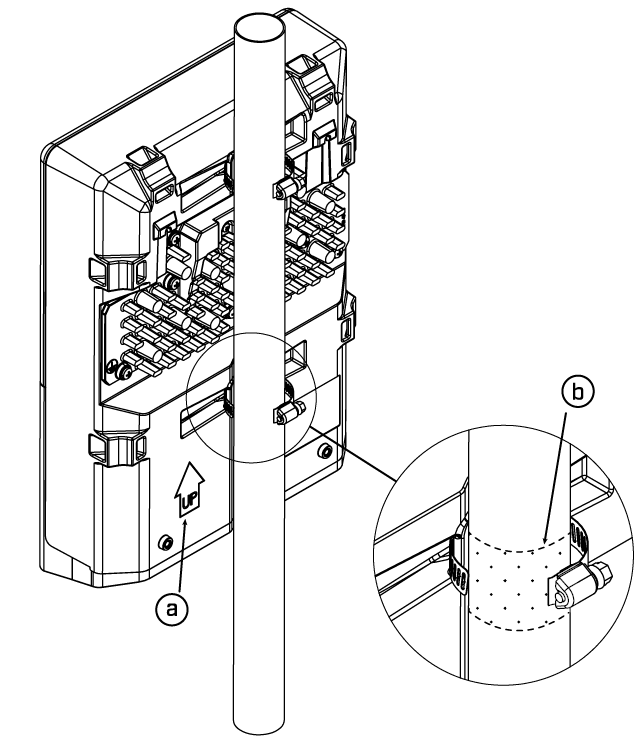
Mounting on the mast or pole:
- Insert provided steel clamps into mounting spots.
- Attach the unit to the mast.
- Align the device and secure it by tightening steel clamps with a PH2 screwdriver.
- Guide Ethernet cables through the opening and connect to the Ethernet ports.
- Close bottom latch and secure with a screw.
A – Always make sure to place the unit in an upwards position.
B - It's recommended to use electrical tape to increase friction between materials.
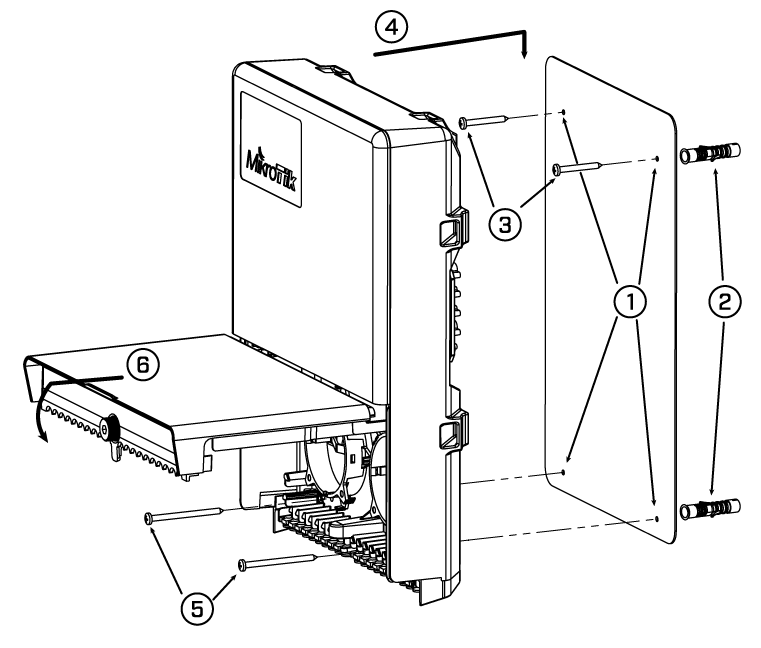
Mounting unit on the wall:
- Use included a template to mark spots for drilling holes. Align accordingly, it will depend on how the device will be mounted finally.
- Insert dowels if needed, depends on wall structure and material.
- Insert screws and screw them by leaving approximately 1 cm out.
- Attach the unit to the position.
- Use screw holes under the bottom cover and tighten to secure in place. Extend your Ethernet cables through the openings and connect to Ethernet ports.
- Close bottom latch.
Carefully check the wall for electric cables before drilling mounting holes.
Buttons and jumpers
The RouterBOOT reset button has the following functions. Press the button and apply the power, then:
- Release the button when the green LED starts flashing, to reset the SwOS configuration to defaults.
- Release the button when the LED turns solid green to clear all configuration and bridge all interfaces.
Regardless of the above option used, the system will load the backup RouterBOOT loader if the button is pressed before power is applied to the device. Useful for RouterBOOT debugging and recovery.
Accessories
The package includes the following accessories that come with the device:
- Hose Clamp SUS304.
- K-66 fastening set.
- OED-drill-template, paper brochure.
Operating system support
The device supports SwOS software. Other operating systems have not been tested.
| Note |
|---|
To avoid pollution of the environment, please separate the device from household waste and dispose of it in a safe manner, such as in designated waste disposal sites. Familiarize yourself with the procedures for the proper transportation of the equipment to the designated disposal sites in your area. |
Federal Communication Commission Interference Statement
This equipment has been tested and found to comply with the limits for a Class A digital device, pursuant to Part 15 of the FCC Rules. These limits are designed to provide reasonable protection against harmful interference in a commercial installation.
This equipment generates, uses, and can radiate radio frequency energy and, if not installed and used in accordance with the instruction manual, may cause harmful interference to radio communications. Operation of this equipment in a residential area is likely to cause harmful interference in which case the user will be required to correct the interference at his own expense
FCC Caution: Any changes or modifications not expressly approved by the party responsible for compliance could void the user’s authority to operate this equipment.
This device complies with Part 15 of the FCC Rules. Operation is subject to the following two conditions: (1)
...
This device may not cause harmful interference, and (2) this device must accept any interference received, including interference that may cause undesired operation
...
.
Note: This unit was tested with shielded cables on the peripheral devices. Shielded cables must be used with the unit to ensure compliance.
Innovation, Science and Economic Development Canada
This device contains license-exempt transmitter(s)/receiver(s) that comply with Innovation, Science, and Economic Development Canada’s license-exempt RSS(s). Operation is subject to the following two conditions: (1) This device may not cause interference. (2) This device must accept any interference, including interference that may cause undesired operation of the device.
L’émetteur/récepteur exempt de licence contenu dans le présent appareil est conforme aux CNR d’Innovation, Sciences et Développement économique Canada applicables aux appareils radio exempts de licence. L’exploitation est autorisée aux deux conditions suivantes : 1) L’appareil ne doit pas produire de brouillage; 2) L’appareil doit accepter tout brouillage radioélectrique subi, même si le brouillage est susceptible d’en compromettre le fonctionnement.
This Class A digital apparatus complies with Canadian ICES-003.
Cet appareil numérique de la classe [A] est conforme à la norme NMB-003 du Canada.
CAN ICES-003 (A) / NMB-003 (A)
UKCA marking
Eurasian Conformity Mark
Информация о дате изготовления устройства указана в конце серийного номера на его наклейке через дробь. Первая цифра означает номер года (последняя цифра года), две последующие означают номер недели.
Изготовитель: Mikrotikls SIA, Aizkraukles iela 23, Riga, LV-1006, Латвия, support@mikrotik.com. Сделано в Китае, Латвии или Литве. Cм. на упаковке.
Для получения подробных сведений о гарантийном обслуживании обратитесь к продавцу. Информация об импортерах продукции MikroTik в Российскую Федерацию: https://mikrotik.com/buy/europe/russia
Продукты MikroTik, которые поставляются в Евразийский таможенный союз, оцениваются с учетом соответствующих требований и помечены знаком EAC, как показано ниже:
Norma Oficial Mexicana
EFICIENCIA ENERGETICA CUMPLE CON LA NOM-029-ENER-2017.
La operacion de este equipo esta sujeta a las siguientes dos condiciones:
- Es posible que este equipo o dispositivo no cause interferencia perjudicial y.
- Este equipo debe aceptar cualquier interferencia, incluyendo la que pueda causar su operacion no deseada.
Fabricante: Mikrotikls SIA, Brivibas gatve 214i, Riga, LV-1039, Latvia.
País De Origen: Letonia; Lituania; China (Republica Popular); Estados Unidos De America; Mexico.
Por favor contacte a su distribuidor local para preguntas regionales específicas. La lista de importadores se puede encontrar en nuestra página de inicio – https://mikrotik.com/buy/latinamerica/mexico.
CE Declaration of Conformity
Manufacturer: Mikrotikls SIA, Brivibas gatve 214i Riga, Latvia, LV1039.
The full text of the EU Declaration of Conformity is available at the following internet address: https://mikrotik.com/products
| Info |
|---|
| Information contained here is subject to change. Please visit the product page on www.mikrotik.com for the most up to date version of this document. |
CE Declaration of Conformity
Manufacturer: Mikrotikls SIA, Brivibas gatve 214i Riga, Latvia, LV1039.
...
BG
...
С настоящото Mikrotīkls SIA декларира, че този тип радиосъоръжение RouterBOARD е в съответствие с Директива 2014/53/ЕС. Цялостният текст на ЕС декларацията за съответствие може да се намери на следния интернет адрес:
https://mikrotik.com/products...
CS
...
Tímto Mikrotīkls SIA prohlašuje, že typ rádiového zařízení RouterBOARD je v souladu se směrnicí 2014/53/EU. Úplné znění EU prohlášení o shodě je k dispozici na této internetové adrese:
https://mikrotik.com/products...
DA
...
Hermed erklærer Mikrotīkls SIA , at radioudstyrstypen RouterBOARD er i overensstemmelse med direktiv 2014/53/EU. EU-overensstemmelseserklæringens fulde tekst kan findes på følgende internetadresse:
https://mikrotik.com/products...
DE
...
Hiermit erklärt Mikrotīkls SIA , dass der Funkanlagentyp RouterBOARD der Richtlinie 2014/53/EU entspricht. Der vollständige Text der EU-Konformitätserklärung ist unter der folgenden Internetadresse verfügbar:
https://mikrotik.com/products...
EL
...
Με την παρούσα ο/η Mikrotīkls SIA , δηλώνει ότι ο ραδιοεξοπλισμός RouterBOARD πληροί την οδηγία 2014/53/ΕΕ. Το πλήρες κείμενο της δήλωσης συμμόρφωσης ΕΕ διατίθεται στην ακόλουθη ιστοσελίδα στο διαδίκτυο:
https://mikrotik.com/products...
EN
...
Hereby, Mikrotīkls SIA declares that the radio equipment type RouterBOARD is in compliance with Directive 2014/53/EU. The full text of the EU declaration of conformity is available at the following internet address:
https://mikrotik.com/products...
ES
...
Por la presente, Mikrotīkls SIA declara que el tipo de equipo radioeléctrico RouterBOARD es conforme con la Directiva 2014/53/UE. El texto completo de la declaración UE de conformidad está disponible en la dirección Internet siguiente:
https://mikrotik.com/products...
ET
...
Käesolevaga deklareerib Mikrotīkls SIA , et käesolev raadioseadme tüüp RouterBOARD vastab direktiivi 2014/53/EL nõuetele. ELi vastavusdeklaratsiooni täielik tekst on kättesaadav järgmisel internetiaadressil:
https://mikrotik.com/products...
FI
...
Mikrotīkls SIA vakuuttaa, että radiolaitetyyppi RouterBOARD on direktiivin 2014/53/EU mukainen. EU-vaatimustenmukaisuusvakuutuksen täysimittainen teksti on saatavilla seuraavassa internetosoitteessa:
https://mikrotik.com/products...
FR
...
Le soussigné, Mikrotīkls SIA , déclare que l'équipement radioélectrique du type RouterBOARD est conforme à la directive 2014/53/UE. Le texte complet de la déclaration UE de conformité est disponible à l'adresse internet suivante:
https://mikrotik.com/products...
HR
...
Mikrotīkls SIA ovime izjavljuje da je radijska oprema tipa RouterBOARD u skladu s Direktivom 2014/53/EU. Cjeloviti tekst EU izjave o sukladnosti dostupan je na sljedećoj internetskoj adresi:
https://mikrotik.com/products...
HU
...
Mikrotīkls SIA igazolja, hogy a RouterBOARD típusú rádióberendezés megfelel a 2014/53/EU irányelvnek. Az EU-megfelelőségi nyilatkozat teljes szövege elérhető a következő internetes címen:
https://mikrotik.com/products...
IT
...
Il fabbricante, Mikrotīkls SIA , dichiara che il tipo di apparecchiatura radio RouterBOARD è conforme alla direttiva 2014/53/UE. Il testo completo della dichiarazione di conformità UE è disponibile al seguente indirizzo Internet:
https://mikrotik.com/products...
IS
...
Hér með lýsir Mikrotīkls SIA því yfir að RouterBOARD er í samræmi við grunnkröfur og aðrar kröfur, sem gerðar eru í tilskipun 2014/53/EU.
Fullur texti ESB samræmisyfirlýsingar er að finna á eftirfarandi veffangi:
...
LT
...
Aš, Mikrotīkls SIA , patvirtinu, kad radijo įrenginių tipas RouterBOARD atitinka Direktyvą 2014/53/ES. Visas ES atitikties deklaracijos tekstas prieinamas šiuo interneto adresu:
https://mikrotik.com/products...
LV
...
Ar šo Mikrotīkls SIA deklarē, ka radioiekārta RouterBOARD atbilst Direktīvai 2014/53/ES. Pilns ES atbilstības deklarācijas teksts ir pieejams šādā interneta vietnē:
https://mikrotik.com/products...
MT
...
B'dan, Mikrotīkls SIA , niddikjara li dan it-tip ta' tagħmir tar-radju RouterBOARD huwa konformi mad-Direttiva 2014/53/UE. It-test kollu tad-dikjarazzjoni ta' konformità tal-UE huwa disponibbli f'dan l-indirizz tal-Internet li ġej:
https://mikrotik.com/products...
NL
...
Hierbij verklaar ik, Mikrotīkls SIA , dat het type radioapparatuur RouterBOARD conform is met Richtlijn 2014/53/EU. De volledige tekst van de EU-conformiteitsverklaring kan worden geraadpleegd op het volgende internetadres:
https://mikrotik.com/products...
NO
...
Mikrotīkls SIA erklærer herved at utstyret RouterBOARD er i samsvar med de grunnleggende krav og øvrige relevante krav i direktiv 2014/53/EU. Den fulle teksten til EU-samsvarserklæringen er tilgjengelig på følgende internettadresse:
https://mikrotik.com/products...
PL
...
Mikrotīkls SIA niniejszym oświadcza, że typ urządzenia radiowego RouterBOARD jest zgodny z dyrektywą 2014/53/UE. Pełny tekst deklaracji zgodności UE jest dostępny pod następującym adresem internetowym:
https://mikrotik.com/products...
PT
...
O(a) abaixo assinado(a) Mikrotīkls SIA declara que o presente tipo de equipamento de rádio RouterBOARD está em conformidade com a Diretiva 2014/53/UE. O texto integral da declaração de conformidade está disponível no seguinte endereço de Internet:
https://mikrotik.com/products...
RO
...
Prin prezenta, Mikrotīkls SIA declară că tipul de echipamente radio RouterBOARD este în conformitate cu Directiva 2014/53/UE. Textul integral al declarației UE de conformitate este disponibil la următoarea adresă internet:
https://mikrotik.com/products...
SK
...
Mikrotīkls SIA týmto vyhlasuje, že rádiové zariadenie typu RouterBOARD je v súlade so smernicou 2014/53/EÚ. Úplné EÚ vyhlásenie o zhode je k dispozícii na tejto internetovej adrese:
https://mikrotik.com/products...
SL
...
Mikrotīkls SIA potrjuje, da je tip radijske opreme RouterBOARD skladen z Direktivo 2014/53/EU. Celotno besedilo izjave EU o skladnosti je na voljo na naslednjem spletnem naslovu:
https://mikrotik.com/products...
SV
...
Härmed försäkrar Mikrotīkls SIA att denna typ av radioutrustning RouterBOARD överensstämmer med direktiv 2014/53/EU. Den fullständiga texten till EU-försäkran om överensstämmelse finns på följande webbadress:
https://mikrotik.com/products...
