...
- While holding the unit by its central column, apply force to the tab, which holds the latch closed, until the latch pops open.
- Insert the SIM card into the slot, with chips facing UP.
- Assemble the case by attaching legs to the base of the unit, please see the Case assembly paragraph.
- Mount the unit in your desired place, please see the Mounting paragraph.
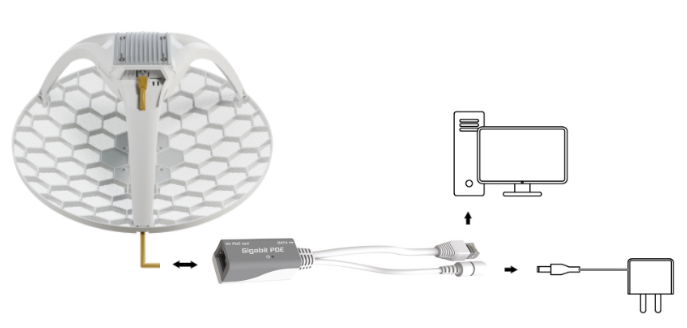
- Connect an Ethernet cable (not included in the kit) to the Ethernet port, and connect the other end of the Ethernet cable to the included PoE injector.
- Plug the PoE injector into your PC.
- Plug the included power supply into the PoE injector to start up the device. please see the powering paragraph.
- Set LAN computer IP configuration to automatic (DHCP).
- Open httpshttp://192.168.188.1 in your web browser to start the configuration.
- User name: admin and password on the label (or, for some models, check user and wireless passwords on the sticker).
- Update the device by clicking the "Check for updates" button on the right side and updating your RouterOS software to the latest version to ensure the best performance and stability. Must have a valid SIM card inserted.
- To manually update the device, please go to https://mikrotik.com/download
- Choose ARM64 packages for this device and download them to your PC.
- Upload downloaded packages to the WebFig "Files" menu and reboot the device.
- Updating your RouterOS software to the latest version will ensure the best performance, stability, and security updates.
- Set up your router password in the bottom field "Password" to the right and repeat it in the field "Confirm Password", it will be used to log in next time.
- Click on the "Apply Configuration" to save changes.
Case assembly
...
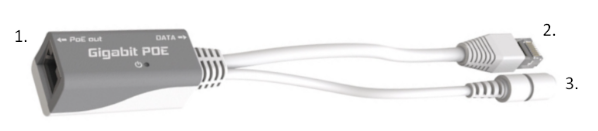
- Connect the Ethernet cable from the device to the PoE+DATA port of the PoE adapter;
- Connect an Ethernet cable from your local network (LAN) to the PoE adapterPoE adapter to the PC or other network device by using the adapter Ethernet cable marked DATA;
- Connect the power cord to the adapter, and then plug the power cord into a power outlet.
Mounting
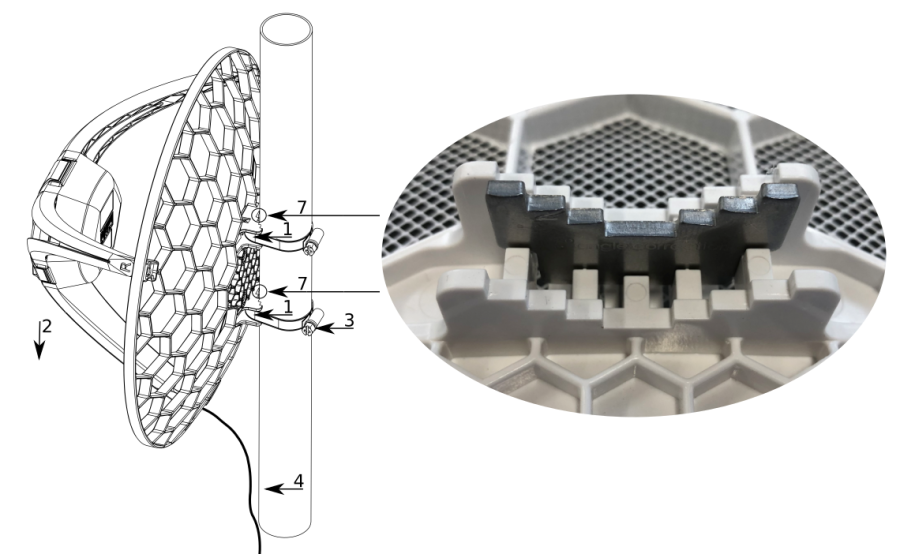
- Slide the included metallic mounting rings into the two slots on the back of the antenna dish.
- Attach the unit to a pole, with the Ethernet port pointing downward.
- Use a PH2 screwdriver to tighten the rings.
- Fix the Ethernet cable to the pole using zip ties, less than one meter from the unit, to avoid the cable being pulled out of the port.
- Check mounting angle and positioning.
- Optional: If required, before mounting the unit, you can insert the included 5-degree adjustment adapter into the top or bottom slot where the mounting ring is inserted. This will create an additional upward or downward angle when the unit is tightened to a vertical pole.
- Insert a 5-degree angle adapter to one of the slots and remount the unit.
...
Once logged in, we recommend clicking the "Check for updates" button in the QuickSet menu, as updating your RouterOS software to the latest version ensures the best performance and stability. For wireless models, please make sure you have selected the country where the device will be used, to conform to local regulations.
RouterOS includes many configuration options in addition to what is described in this document. We suggest starting here to get yourself accustomed to the possibilities: https://mt.lv/help. In case an IP connection is not available, the Winbox tool (https://mt.lv/winbox) can be used to connect to the MAC address of the device from the LAN side (all access is blocked from the Internet port by default).
For recovery purposes, it is possible to boot the device for reinstallation, see a section Reset button.
| Pagebreak |
|---|
Accessories
The package includes the following accessories that come with the device:
...
- Product code LHGGM&EG18-EA
- CPU 88F3720 800 MHz
- CPU architecture ARM 64bit
- Size of RAM 256 MB
- Storage 16 MB flash
- Number of 1G Ethernet ports 1
- LTE modem R11mL-EG18-EA
- TAC 86981604
- LTE category 18 (1.2Gbps Downlink, 150Mbps Uplink)
- LTE FDD bands 1 (2100MHz) / 3 (1800MHz) / 5 (850MHz) / 7 (2600MHz) / 8 (900 MHz) / 20 (800MHz) / 28 (700MHz) / 38 (2600MHz) / 40 (2300MHz) / 41 (2500MHz)
- 3G category R8 (42.2Mbps Downlink, 11.2Mbps Uplink)
- 3G bands 1 (2100MHz) / 3 (1800MHz) / 5 (850MHz) / 8 (900MHz)
- Micro SIM slot 1
- Dimensions 391 x 391 x 227 mm
- Operating system RouterOS v7, License level 3
- Operating temperature -40°C to +70°C
SIM slot usage

SIM card slot is designed to be used with Micro SIM cards.
Nano SIM cards have different thicknesses and usage with an adapter is not recommended.
Reset button
The reset button has three functions:
...
Изготовитель: Mikrotikls SIA, Aizkraukles iela 23, Riga, LV-1006, Латвия, support@mikrotik.com. Сделано в Китае, Латвии или Литве. Cм. на упаковке.
Для получения подробных сведений о гарантийном обслуживании обратитесь к продавцу. Информация об импортерах продукции MikroTik в Российскую Федерацию: https://mikrotik.com/buy/europe/russia
Продукты MikroTik, которые поставляются в Евразийский таможенный союз, оцениваются с учетом соответствующих требований и помечены знаком EAC, как показано ниже:
...
Por favor contacte a su distribuidor local para preguntas regionales específicas. La lista de importadores se puede encontrar en nuestra página de inicio – https://mikrotik.com/buy/latinamerica/mexico.
The National Commission for the State Regulation of Communications and Informatization by Ukraine
...
| Note |
|---|
| This MikroTik device meets Maximum TX power limits per ETSI regulations. For more detailed information see Declaration of Conformity above / Dieses MikroTik-Gerät erfüllt die maximalen Sendeleistungsgrenzwerte gemäß ETSI-Bestimmungen. Weitere Informationen finden Sie oben in der Konformitätserklärung. Nähere Informationen finden Sie oben in der Konformitätserklärung / Cet appareil MikroTik respecte les limites de puissance TX maximale via les réglementations ETSI. Pour plus d'informations, voir la déclaration de conformité ci-dessus / Questo dispositivo MikroTik soddisfa i limiti di potenza massima TX tramite le normative ETSI. Per informazioni più dettagliate consultare la Dichiarazione di conformità sopra / Este dispositivo MikroTik cumple con los límites máximos de potencia TX a través de las normas ETSI. Para obtener información más detallada, consulte la Declaración de conformidad anterior / Это устройство MikroTik соответствует ограничениям максимальной мощности передачи согласно правилам ETSI. Для получения более подробной информации см. Декларацию соответствия выше. |
| Info |
|---|
| Note. The information contained here is subject to change. Please visit the product page on www.mikrotik.com for the most up to date version of this document. |