...
Before you work on any equipment, be aware of the hazards involved with electrical circuitry, and be familiar with standard practices for preventing accidents.
Ultimate disposal of this product should be handled according to all national laws and regulations.
The Installation of the equipment must comply with local and national electrical codes.
This unit is intended to be installed in the rackmount. Please read the mounting instructions carefully before beginning installation. Failure to use the correct hardware or to follow the correct procedures could result in a hazardous situation to people and damage to the system.
This product is intended to be installed indoors. Keep this product away from water, fire, humidity or hot environments.
Use only the power supply and accessories approved by the manufacturer, and which can be found in the original packaging of this product.
Read the installation instructions before connecting the system to the power source.
We cannot guarantee that no accidents or damage will occur due to the improper use of the device. Please use this product with care and operate at your own risk!
In the case of device failure, please disconnect it from power. The fastest way to do so is by unplugging the power plug from the power outlet.
It is the customer's responsibility to follow local country regulations, including operation within legal frequency channels, output power, cabling requirements, and Dynamic Frequency Selection (DFS) requirements. All Mikrotik radio devices must be professionally installed.
Exposure to Radio Frequency Radiation: This MikroTik equipment complies with the FCC, IC, and European Union radiation exposure limits set forth for an uncontrolled environment. This MikroTik device should be installed and operated no closer than 20 centimeters from your body, occupational user, or the general public.
Connecting
- Remove metal ring see Removing mounting ring;
- Connect POE to the Ethernet port 1, please see the Powering section for instructions on how to connect POE.
- Set your computer IP configuration to automatic (DHCP).
- The device wireless access point mode is enabled by default.
- The device will boot up and Wireless network will be available for connecting.
- Open network connections on your PC, mobile phone, or other device and search for computer and search for MikroTik wireless network and - connect to it.;
- The configuration can be done through Once connected to the wireless network , open using a web browser or mobile app. Alternatively, you can use a WinBox configuration tool https://mt.lv/winbox;
- Open http://192.168.88.1
 in in your web browser to start configuration, user name: admin, since admin and there is no password by default, you will be logged in automatically. (or, for some models, check user and wireless passwords on the sticker);
 - Click We recommend clicking the "Check for updates" button and updating your update RouterOS software to the latest version to ensure the best performance and stability.
- Choose your country, to apply country regulation settings, and set up your password on the screen that loads.
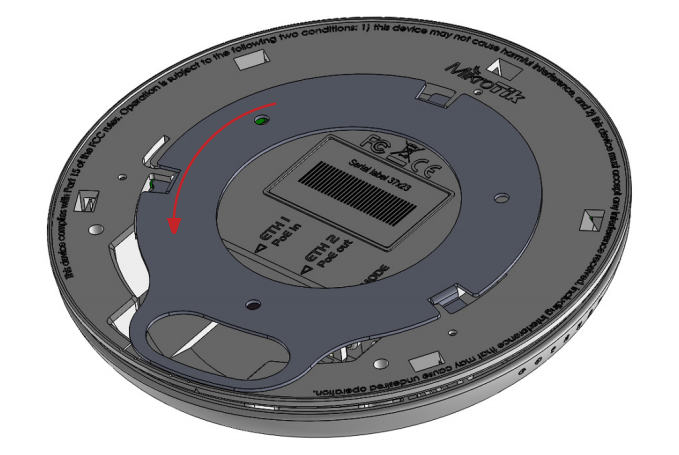
Removing mounting ring
The Mounting ring comes installed on the device, in order to access Ethernet ports please remove it by turning it counterclockwise and the ring will be released.
Powering
The device accepts power from the Ethernet port, so you must either use the included passive PoE injector or make sure your switch supports passive or 802.3af/at PoE output.
- Ethernet port accepts 12-57 V DC ⎓ (802.3af/at or passive PoE).
The power consumption under maximum load can reach 13 W.
Connecting to a POE Adapter:
- Connect the Ethernet cable from the device to the POE port of the POE adapter.
- Connect an Ethernet cable from your LAN to the LAN port of the POE adapter, please mind arrows for data and power flow.
- Connect the power cord to the adapter, and then plug the power cord into a power outlet.
Mounting
It is possible to attach the device to a wall or ceiling, using the provided mounting bracket on the back of the unit:
- ;
- For a manual update of the device, visit the products page at https://mikrotik.com/products to find your product. The required packages are accessible under the "Support&Downloads" menu;
- Upload downloaded packages to the WebFig or Winbox "Files" menu and reboot the device;
- By upgrading your RouterOS software to the latest version, you can ensure optimal performance, stability, and security updates;
- In the "QuickSet" menu set up the following: Choose your country, to apply country regulation settings;
- Set up your wireless network password in the left field;
- Set up your router password in the bottom field.
Removing mounting ring
The Mounting ring comes installed on the device, in order to access Ethernet ports please remove it by turning it counterclockwise and the ring will be released.
Powering
The device accepts power from the Ethernet port, so you must either use the included passive PoE injector or make sure your switch supports passive or 802.3af/at PoE output.
- Ethernet port accepts 12-57 V DC ⎓ (802.3af/at or passive PoE).
The power consumption under maximum load can reach 13 W.
Connecting to a POE Adapter:
- Connect the Ethernet cable from the device to the POE port of the POE adapter.
- Connect an Ethernet cable from your LAN to the LAN port of the POE adapter, please mind arrows for data and power flow.
- Connect the power cord to the adapter, and then plug the power cord into a power outlet.
Mounting
It is possible to attach the device to a wall or ceiling, using the provided mounting bracket on the back of the unit:
- Attach the mounting bracket to the wall or ceiling with provided three screws;
- Attach the mounting bracket to the wall or ceiling with provided three screws;
- Use 5 mm drill bit if necessary with provided dowels;
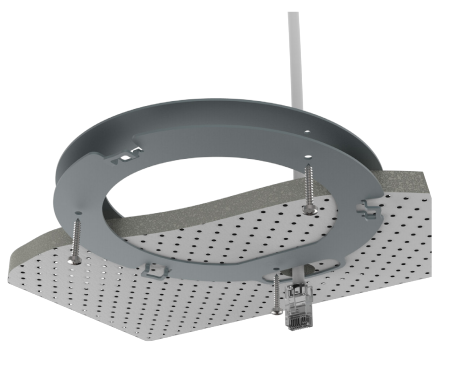
- Connect needed cables to the device;
- If needed second mounting bracket can be used for additional support when working on thin ceilings or walls, provided screw length is 20 mm;
- Attach the second mount to the other side of the ceiling and secure with screws through the first mount;
- Attach the device to the mounting bracket and turn clockwise until the device secures in place;
...
UKCA marking

Eurasian Conformity Mark
Частотный диапазон | Мощность передатчика |
|---|---|
2400-2483.5 МГц, 5150-5350 МГц, 5650-5850 МГц | ≤100 мВт |
*Доступные частотные каналы могут различаться в зависимости от модели продукта и сертификации.
...
Frequency bands terms of use
Frequency range (for applicable models) | Channels used | Maximum Output Power (EIRP) | Restriction |
2412-2472 MHz | 1 - 13 | 20 dBm | Without any restriction to use in all EU Member States |
5150-5250 MHz | 26 - 48 | 23 dBm | Restricted to indoor use only* |
5250-5350 MHz | 52 - 64 | 20 dBm | Restricted to indoor use only* |
5470-5725 MHz | 100 - 140 | 27 dBm | Without any restriction to use in all EU Member States |
* It is the customer's responsibility to follow local country regulations, including operation within legal frequency channels, output power, cabling requirements, and Dynamic Frequency Selection (DFS) requirements. All Mikrotik radio devices must be professionally installed!
| Note |
|---|
This MikroTik device meets Maximum WLAN transmit power limits per ETSI regulations. For more detailed information see Declaration of Conformity above / Dieses MikroTik-Gerät erfüllt die maximalen WLAN- Sendeleistung Grenzwerte gemäß ETSI-Bestimmungen. Weitere Informationen finden Sie oben unter Konformitätserklärung / Cet appareil MikroTik respecte les limites maximales de puissance de transmission WLAN conformément aux réglementations ETSI. Pour plus d'informations, voir la déclaration de conformité ci-dessus / Questo dispositivo MikroTik è conforme ai limiti massimi di potenza di trasmissione WLAN in conformità con le normative ETSI. Per ulteriori informazioni, consultare la dichiarazione di conformità sopra / Este dispositivo MikroTik cumple con los límites máximos de potencia de transmisión WLAN de acuerdo con las regulaciones ETSI. Para obtener más información, consulte la declaración de conformidad anterior / Это устройство MikroTik соответствует максимальным пределам мощности передачи WLAN в соответствии с правилами ETSI. Для получения дополнительной информации см. Декларацию соответствия выше.
The WLAN function for this device is restricted to indoor use only when operating in the 5150 to 5350 MHz frequency range. / Die WLAN-Funktion dieses Geräts ist nur für die Verwendung in Innenräumen im Frequenzbereich 5150 bis 5350 MHz beschränkt. / La fonction WLAN de cet appareil est limitée à une utilisation en intérieur uniquement lorsqu'il fonctionne dans la gamme de fréquences 5150 à 5350 MHz. / La funzione WLAN per questo dispositivo è limitata all'uso interno solo quando si opera nella gamma di frequenza da 5150 a 5350 MHz. / La función WLAN para este dispositivo está restringida al uso en interiores solo cuando se opera en el rango de frecuencia de 5150 a 5350 MHz. / Функция WLAN для этого устройства ограничена использованием внутри помещения только при работе в диапазоне частот от 5150 до 5350 МГц. |

| Info |
|---|
| Note. The information contained here is subject to change. Please visit the product page on www.mikrotik.com for the most up to date version of this document. |
...