...
There are two types of routers:
- With Routers with default configuration.
- Without Routers without default configuration. When In cases where no specific configuration is foundpresent, the IP address 192.168.88.1/24 is set on assigned to ether1 or , combo1, sfp1, or sfp1 MGMT/BOOT.
More information about For additional details regarding the current default configuration can be found in , please refer to the Quick Guide document that came provided with your device. The quick guide document will include information about This document outlines which ports should be used to connect for the first time and how to plug in your devicesinitially utilize for connection and instructions on device setup.
This document describes how to set up the step-by-step process for configuring the device from the ground up, so we will ask you to clear away all defaultsscratch. Therefore, we recommend clearing all defaults when initiating the setup.
When connecting the first time to the router with the default username admin and no password (or, you will be asked to reset or keep for some models, check user and wireless passwords on the sticker). Upon the initial boot, a notification will appear, offering you the choice to either remove the default configuration (even if the default config has only an IP address). Since this article , leading to a reboot with no configuration applied, or to "Show Script" and retain the current default configuration, applying it accordingly. Since this article assumes that there is no configuration on the router, you should remove it by pressing "r" on the keyboard when prompted or click on the "Remove configurationConfiguration" button in WinBox.
Router without Default Configuration
If there is no default configuration on the router you have several options, but here we will use one method that suits our needs.doesn't have a default configuration, there are multiple options to consider. However, in this case, we'll opt for a method that best fits our requirements.
Connect the ISP cable to the router's ether1 port Connect Routers ether1 port to the WAN cable and connect your PC to ether2. Now open WinBox and look any port except ether1. Then, launch WinBox and search for your router in using the neighbor discovery feature. See detailed example in Winbox article.
If you see the router appears in the list, click on select its MAC address and click Connect.
The simplest way to make sure you have absolutely easiest method to ensure a completely clean router is to run the CLI command
| Code Block | ||
|---|---|---|
| ||
/system reset-configuration no-defaults=yes skip-backup=yes | ||
| Section | ||
| Column | ||
|
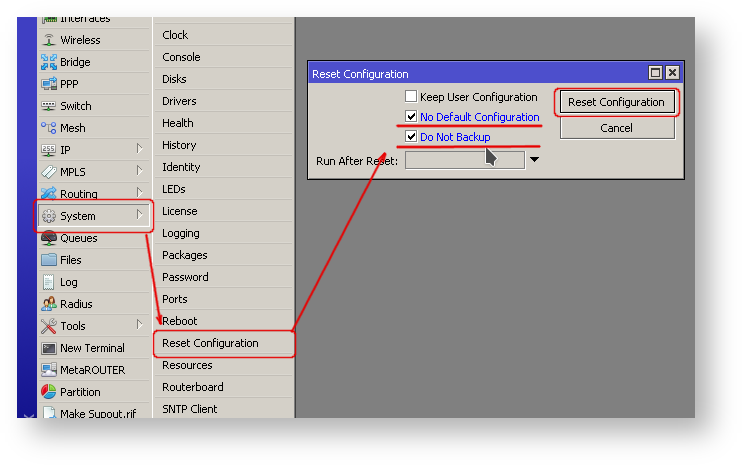
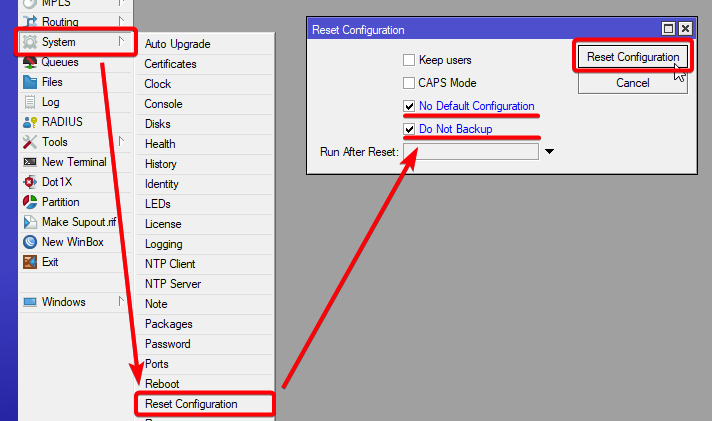
Or from WinBox:
Configuring IP Access
Since As MAC connection is not very stable, the first thing we need to do is to set up a router so that IP connectivity is available:can sometimes be unreliable, our first step is to configure the router to enable IP connectivity:
- Create a bridge interface and assign add bridge interface and bridge ports;
- add Assign an IP address to LAN the bridge interface;
- set up Configure a DHCP server.
Set Setting up the bridge and assigning an IP address are quite easystraightforward processes:
| Code Block | ||
|---|---|---|
| ||
/interface bridge add name=localbridge1 /interface bridge port add interface=ether2 bridge=localbridge1 /ip address add address=192.168.88.1/24 interface=localbridge1 |
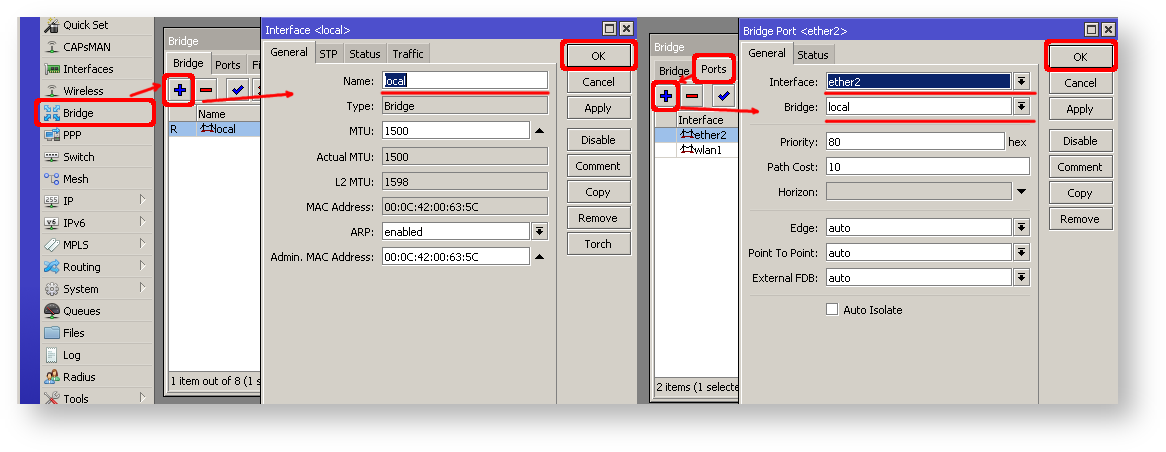
If you prefer WinBox/WeBfig WebFig as configuration tools:
...
| width | 450px |
|---|
- Open Bridge window, Bridge tab should be selected;
- Click on the + button
...
- to open a new dialog
...
- box. You can either enter a custom bridge name or retain the default bridge1, then click OK to proceed;
- Switch to
...
- the Ports tab and click on the + button
...
- to open another dialog box;
...
- Select interface ether2 and bridge
...
- bridge1 form drop-down lists and click on the OK button to apply settings;
- You may close the bridge dialog.
| Column | ||
|---|---|---|
| ||
...
| width | 450px |
|---|
...
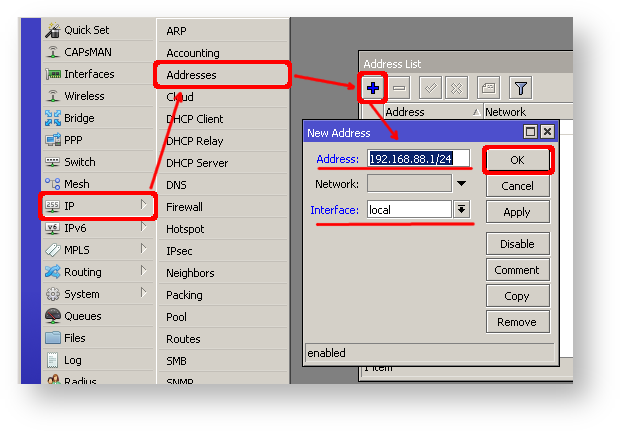
- Access the IP menu and navigate to the
- Addresses dialog;
...
- Select the + button
...
- to open a new dialog
...
- box;
- Enter IP address 192.168.88.1/24 select interface
...
- bridge1 from the drop-down list
...
- ;
| Column | ||
|---|---|---|
| ||
- Click OK to confirm the settings.
Next, proceed with setting The next step is to set up a DHCP server. We will run To simplify and expedite this process, we'll execute the setup command for easy and fast configuration:.
| Code Block | ||
|---|---|---|
| ||
[admin@MikroTik] /> ip dhcp-server/ setup [enter] Select interface to run DHCP server on dhcp server interface: localbridge1 [enter] Select network for DHCP Select network for DHCP addresses addresses dhcp address space: 192.168.88.0/24 [enter] Select gateway for given network gateway for dhcp network: 192.168.88.1 [enter] Select pool of ip addresses given out by DHCP server addresses to give out: 192.168.88.2-192.168.88.254 [enter] Select DNS servers dns servers: 192.168.88.1 [enter] Select lease time lease time: 10m1800 [enter] |
Notice that most of the configuration options are automatically determined and you just simply need to hit the enter key.
...
The
...
setup tool is also
...
accessible in WinBox/
...
WebFig:
...
| width | 400px |
|---|
...
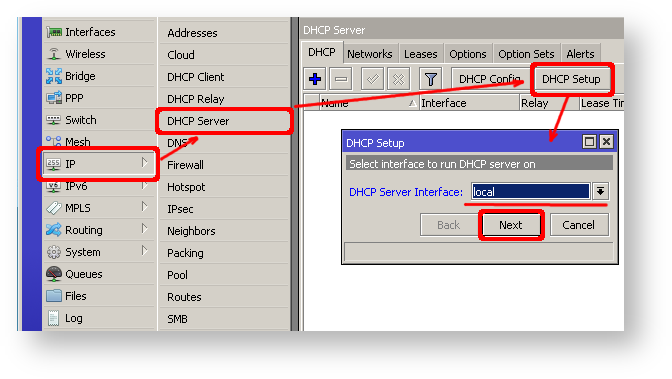
- Navigate to IP -> DHCP Server window, ensuring the DHCP tab
...
- is selected;
- Click on the DHCP Setup button
...
- to open a new dialog
...
- ;
- Select the bridge1 as the DHCP Server Interface
...
- and
...
- click Next
...
- ;
- Follow the wizard to complete the setup.
| Column |
|---|
Following these steps, the Now connected PC should be able to get now obtain a dynamic IP address. Close the You can then close Winbox and reconnect to the router using the IP address (192.168.88.1).
Configuring Internet Connection
The next step is to get To enable internet access for the router, you'll need to the router. There can be several configure one of the following common types of internet connections, but the most common ones are:
- dynamic Dynamic public IP address;.static
- Static public IP address;.
- PPPoE connection.
Dynamic Public IP
Dynamic address configuration is the simplest one. You just need to easiest option. Simply set up a DHCP client on the public interface. The DHCP client will receive obtain information from an internet service provider your Internet Service Provider (ISP) and set up , such as an IP address, DNS servers, NTP servers, and default route, making the setup process straightforward for you.
| Code Block | ||
|---|---|---|
| ||
/ip dhcp-client add disabled=no interface=ether1 |
After adding the client you should see the assigned address and status should be bound
| Code Block | ||||
|---|---|---|---|---|
| ||||
[admin@MikroTik] /> ip dhcp-client>client print FlagsColumns: XINTERFACE, USE- disabledPEER-DNS, ADD-DEFAULT-ROUTE, I - invalid STATUS, ADDRESS # INTERFACE USE-PEER-DNS USE ADD-DEFAULT-ROUTE STATUS ADDRESS ADDRESS 0 ether1 ether1 yes yes yes bound 1.2.3.100/24 |
Static Public IP
In the case of When configuring a static address configuration, your ISP gives you provides specific parameters, for examplesuch as:
- IP: 1.2.3.100/24
- Gateway: 1.2.3.1
- DNS: 8.8.8.8
These are three basic parameters that you need to get the internet connection working.
To set configure this in RouterOS, we will 'll manually add an IP address, add a default route with a provided gateway, and set up a DNS server
...
| Code Block | ||
|---|---|---|
| ||
/interface pppoe-client
  add disabled=no interface=ether1 user=me password=123 \
add-default-route=yes use-peer-dns=yes | ||
| Section |
Winbox/
...
WebFig actions:
...
| width | 450px |
|---|
...
- In the PPP window, select the Interfaces tab
...
- and click the "+" button;
- Choose PPPoE Client from the dropdown list
...
- ;
...
- Set the name and select ether1 as the interface;
- Go to the Dial Out tab, configure the username, password, and other parameters;
- Click OK to save the settings.
...
| Note |
|---|
Further in configuration, the WAN interface is now the pppoe-outout1 interface, not ether1. |
Verify Connectivity
After successful Once the configuration is complete, you should be able to access the internet from the router.Verify To verify IP connectivity by , try pinging a known IP address (google , such as a Google DNS server for example).
| Code Block | ||||
|---|---|---|---|---|
| ||||
[admin@MikroTik] > /ping 8.8.8.8 SEQ HOST SIZE TTL TIME STATUS 8.8.8.8 STATUS 0 8.8.8.8 56 47 21ms 8.8.8.8 56 55 14ms399us 1 8.8.8.8 56 47 21ms |
Verify DNS request
| Code Block | ||||
|---|---|---|---|---|
| ||||
[admin@MikroTik] > /ping www.google.com HOST 56 55 18ms534us 2 8.8.8.8 SIZE TTL TIME STATUS 173.194.32.49 56 55 56 55 13ms 173.194.32.4914ms384us |
Verify DNS request
| Code Block | ||
|---|---|---|
| ||
[admin@MikroTik] > /ping google.com SEQ HOST 56SIZE TTL 55 12ms |
If everything is set up correctly, ping in both cases should not fail.
In case of failure refer to the troubleshooting section
Protecting the Router
Now anyone over the world can access our router so it is the best time to protect it from intruders and basic attacks
User Password Access
TIME       STATUS
    0 142.250.74.14                              56  55 14ms475us
    1 142.250.74.14                              56  55 14ms308us
2 142.250.74.14 56 55 14ms238us |
If all settings are configured correctly, both pings should succeed.
If there's a failure, please refer to the Troubleshooting section for assistance.
Protecting the Router
As the router is now accessible worldwide, it's important to protect it from potential intruders and basic attacks.
User Password Access
For MikroTik routers, it's essential to set up passwords. We recommend MikroTik routers require password configuration, we suggest using a password generator tool to create secure and non-repeating passwords. With secure password we mean:robust passwords that meet the following criteria:
- At least 12 characters long;
- Consist of numbers, symbols, uppercase, and lowercase letters;
- Avoid using dictionary words or combinations thereof.
- Minimum 12 characters;
- Include numbers, Symbols, Capital and lower case letters;
- Is not a Dictionary Word or Combination of Dictionary Words;
| Code Block | ||
|---|---|---|
| ||
/user set 0 password="!={Ba3N!40TуX+GvKBzjTLIUcx/," |
Another option method to set a password ,for the current user:
| Code Block | ||
|---|---|---|
| ||
/password |
We strongly suggest highly recommend using a second secondary method or the Winbox interface to apply a new password for update your router, just to keep it safe from other 's password, as an added measure to safeguard against unauthorized access.
| Code Block | language | text|
|---|---|---|
| ||
[admin@MikroTik] > /password password old -password: ******** new -password: *********** retype new ***************** confirm-new-password: **************************** |
Ensure Make sure you remember the password! If you forget it's forgotten, there is no recovery. You will need to 's no way to recover it. You'll have to reset the configuration or reinstall the router system!
You can also add more additional users with full or limited router access in the /user menu
| Tip |
|---|
The best practice is to add create a new user with a strong password and disable or remove the default default admin user. |
| Code Block | ||
|---|---|---|
| ||
/user add name=myname password=mypassword group=full /user remove admin |
| Info |
|---|
| Note: login Log in to the router with using the new credentials to check verify that the username /password is workingand password are functioning correctly. |
MAC Connectivity Access
By default mac , the MAC server runs on all interfaces, so we will disable . To restrict MAC connectivity from the WAN port, we'll disable the default all entry and add a local interface to disallow MAC connectivity from the WAN port.LAN interface.
First, create an interface list:
| Code Block | ||||
|---|---|---|---|---|
| ||||
[admin@MikroTik] > /toolinterface mac-server> print Flags: X - disabled, * - default # INTERFACE 0 * alllist add name=LAN |
Then, add your previously created bridge named "bridge1" to the interface list:
| Code Block | ||
|---|---|---|
| ||
[admin@MikroTik] > /interface list member add list=LAN interface=bridge1 |
Apply newly created interface list to the MAC server:
| Code Block | ||
|---|---|---|
| ||
[admin@MikroTik] > /tool mac-server disable 0; add interface=local;set allowed-interface-list=LAN |
Do the same for Winbox MAC access
| Code Block | ||
|---|---|---|
| ||
[admin@MikroTik] > /tool mac-server mac-winbox disable 0; add interface=local; | ||
set allowed-interface-list=LAN |
Winbox/Webfig actions:
...
- Navigate to Interfaces → Interface List → Lists window;
- Click on the "+" button to add a new list;
- Enter "LAN" into the Name field and click OK;
- Return to the Interfaces → Interface List section;
- Click on the "+" button;
- Select "LAN" from the dropdown List options;
- Choose "bridge1" from the dropdown Interface options;
- Click OK to confirm;
...
- Open Tools -> Mac Server window
...
- ;
- Click on
...
- the MAC Telnet Server button;
- In the new dialog, select the newly created list "LAN" from the dropdown list;
- Click OK to apply settings.
...
Do the same in the the MAC Winbox InterfaceServer tab to block Mac Winbox connections from the internet.
Neighbor Discovery
MikroTik Neighbor discovery protocol is used to show and recognize other MikroTik routers in the network, disable . Disable neighbor discovery on public interfaces:
| Code Block | ||
|---|---|---|
| ||
/ip neighbor discovery-settings set discover-interface-list=local LAN |
IP Connectivity Access
Besides the fact that While the firewall protects your router from unauthorized access from outer by external networks, it is 's also possible to restrict username access for the based on specific IP addressaddresses
| Code Block | ||
|---|---|---|
| ||
/user set 0 allowed-address=x.x.x.x/yy |
...
IP connectivity on the public interface must be limited in the firewall. We will accept only ICMP(ping/traceroute), IP Winbox, and ssh access.
| Code Block | ||||
|---|---|---|---|---|
| ||||
/ip firewall filter add chain=input action=accept connection-state=established,related action=accept,untracked comment="accept established,related,untracked"; add chain=input action=inputdrop connection-state=invalid actioncomment="drop; invalid" add chain=input in-interface=ether1 action=accept protocol=icmp action=accept comment="allowaccept ICMP"; add chain=input in-interface=ether1 action=accept protocol=tcp port=8291 action=accept comment="allow Winbox"; add chain=input in-interface=ether1 action=accept protocol=tcp port=22 action=accept comment="allow SSH"; add chain=input in-interface=ether1 action=drop comment="block everything else"; |
| Warning |
|---|
In case if a If the public interface is a pppoe, then the PPPoE, LTE, or any other type, the 'in-interface' should be set to "pppoe-out"that interface. |
The first two rules accept rule accepts packets from already established connections, so we assume those are OK assuming they are safe to not overload the CPU. The third second rule drops any packet which that connection tracking thinks is identifies as invalid. After that, we set up typical accept rules for specific protocols.
...
If you are using Winbox/
...
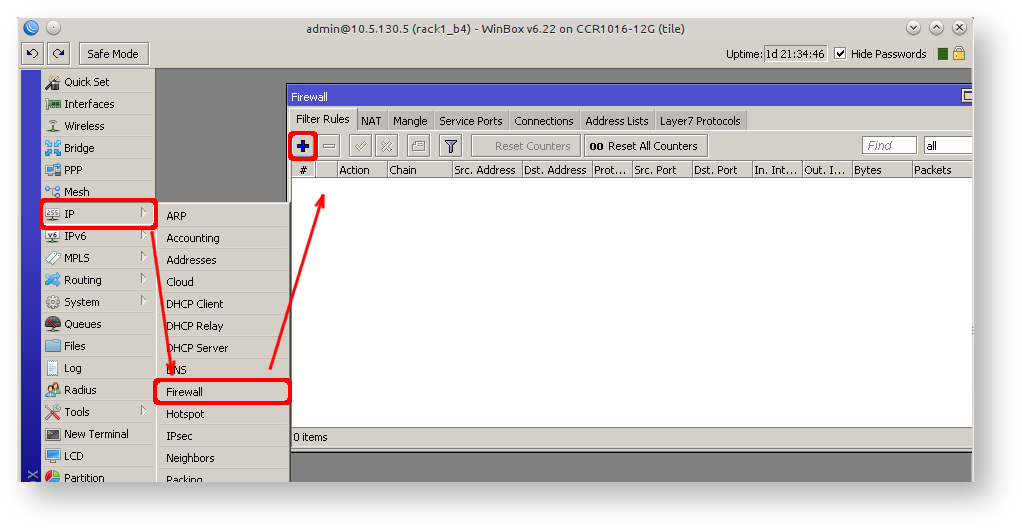
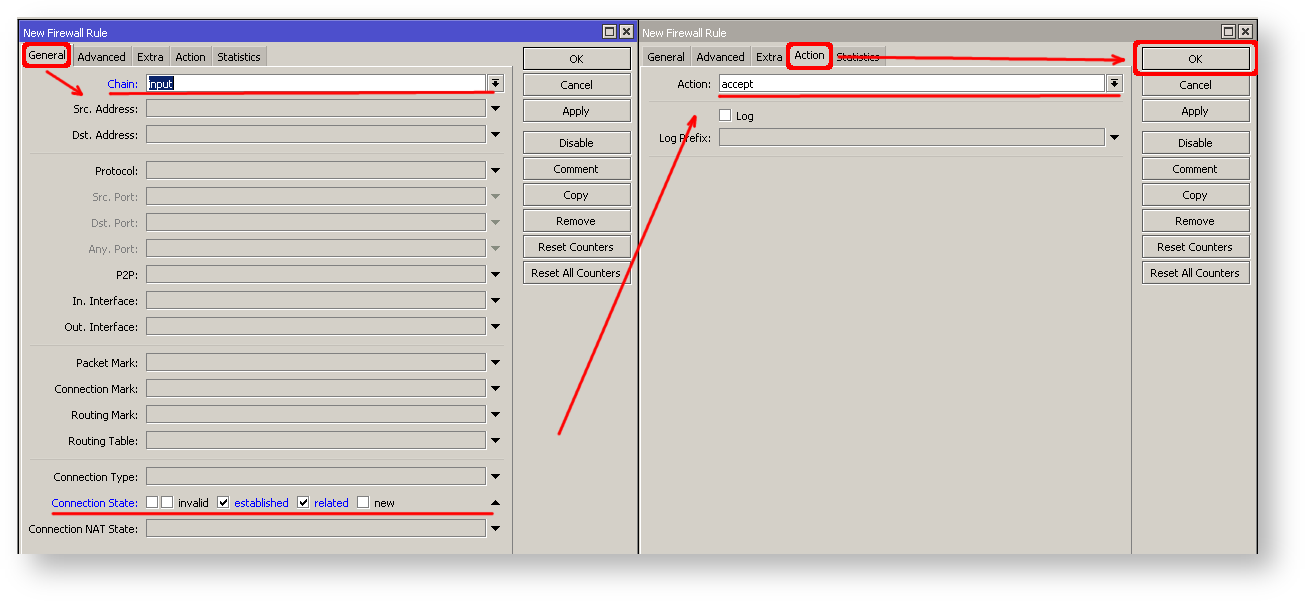
WebFig for configuration, here is an example of how to add an established/related/untracked rule:
...
- Open
...
- the IP -> Firewall window
...
- and navigate to the Filter Rules tab;
- Click on the "+" button
...
- to open a new dialog
...
- ;
- Select
...
- "input" for the chain.
- Click on "Connection state" and check the boxes for "established," "related," and "untracked."
- Go to the Action tab and ensure that "accept" is selected.
- Click on OK to apply the settings.
To add additional rules, click on the "+" button
| Column |
|---|
To add other rules click on + for each new rule and fill in the same parameters as provided in the console example.
...
| Code Block | ||
|---|---|---|
| ||
/ip dns set allow-remote-requests=no |
Some
...
RouterBOARDs
...
have
...
an
...
LCD
...
module
...
for
...
informational
...
purposes,
...
set
...
pin
...
or
...
disable
...
it.
| Code Block | ||
|---|---|---|
| ||
/lcd set enabled=no |
...
| Code Block | ||
|---|---|---|
| ||
/ip firewall nat add chain=srcnat out-interface=ether1 action=masquerade |
| Warning |
|---|
In case if a If the public interface is a pppoe, then the in-interface PPPoE, LTE, or any other type, the 'out-interface' should be set to "pppoe-out"that interface. |
Another benefit of such a setup is that NATed clients behind the router are not directly connected to the Internet, that way additional protection against attacks from outside mostly is not required.
...
| Code Block | ||
|---|---|---|
| ||
/ip firewall filter
  add chain=forward action=fasttrack-connection connection-state=established,related \
    comment="fast-track for established,related";
  add chain=forward action=accept connection-state=established,related \
    comment="accept established,related";
  add chain=forward action=drop connection-state=invalid
  add chain=forward action=drop connection-state=new connection-nat-state=!dstnat \
in-interface=ether1 comment="drop access to clients behind NAT formfrom WAN" |
A ruleset is similar to input chain rules (accept established/related and drop invalid), except the first rule with action=fasttrack-connection. This rule allows established and related connections to bypass the firewall and significantly reduce CPU usage.
...
