...
- With default configuration
- Without default configuration. When no specific configuration is found, the IP address 192.168.88.1/24 is set on ether1 or combo1, or sfp1.
...
When connecting the first time to the router with the default username admin and no password (for some models, check the user password on the sticker), you will be asked to reset or keep the default configuration (even if the default config has only an IP address). Since this article assumes that there is no configuration on the router you should remove it by pressing "r" on the keyboard when prompted or click on the "Remove configuration" button in WinBox.
...
If there is no default configuration on the router you have several options, but here we will use one method that suits our needs.
Connect the Routers ether1 port to the WAN cable and connect your PC to ether2. Now open WinBox open WinBox and look for your router in neighbor discoveryNeighbor Discovery. See detailed example in in Winbox article.
If you see the router in the list, click on the MAC address and click click Connect.
The simplest way to make sure you have absolutely clean router, with no configuration, is to run:
| Code Block | ||
|---|---|---|
| ||
/system reset-configuration no-defaults=yes skip-backup=yes |
...
Configuring IP Access
Since the MAC connection is not very stable, the first thing we need to do is to set up a router so that IP connectivity is available:
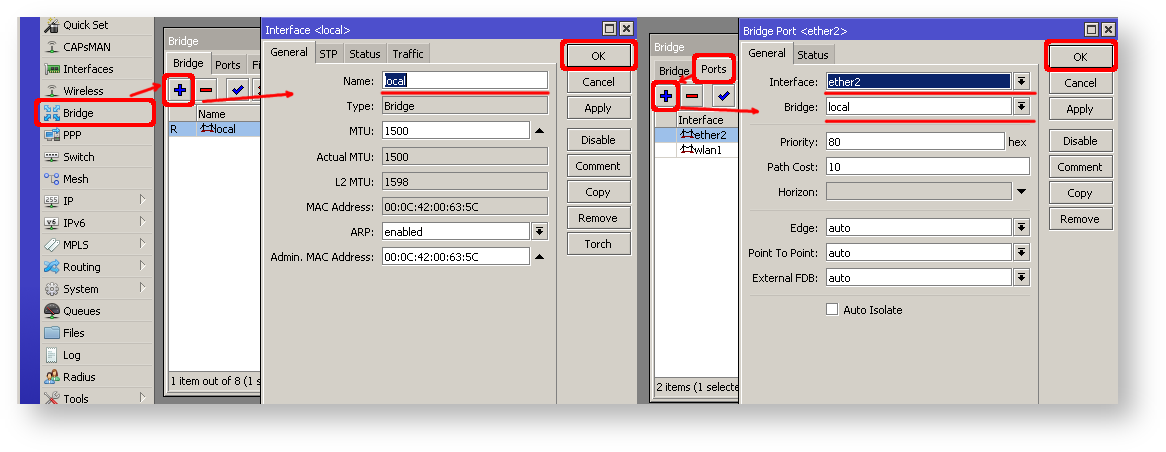
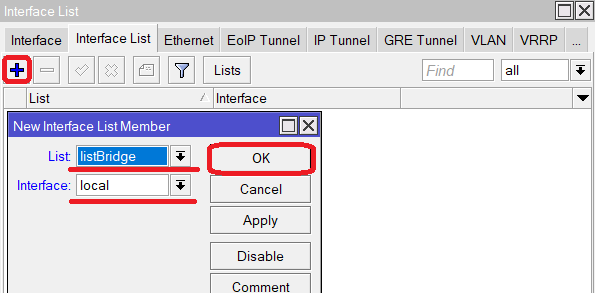
- add bridge interface and bridge ports;
- add an IP address to the LAN interface;
- set up a DHCP server.
...
| Section | ||||||||||
|---|---|---|---|---|---|---|---|---|---|---|
|
...
| Section | |||||||
|---|---|---|---|---|---|---|---|
The same setup tool is also available in WinBox/WeBfig:
|
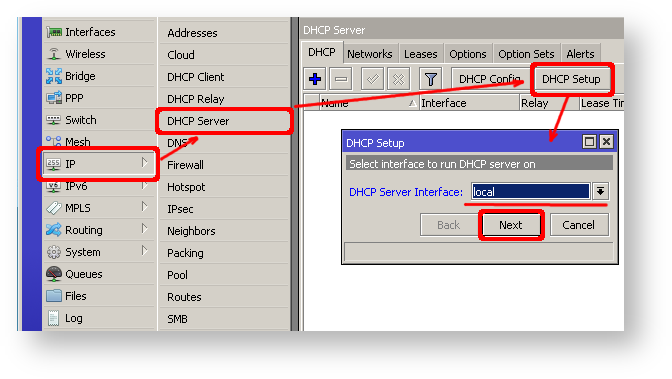
Now connected PC should be able to get a dynamic IP address. Close the Winbox and reconnect to the router using the IP address (192.168.88.1)
...
After adding the client you should see the assigned address and the status should be bound
| Code Block | ||||
|---|---|---|---|---|
| ||||
[admin@MikroTik] /ip dhcp-client> print Flags: X - disabled, I - invalid # INTERFACE USE ADD-DEFAULT-ROUTE STATUS ADDRESS 0 ether1 yes yes bound 1.2.3.100/24 |
...
| Code Block | ||
|---|---|---|
| ||
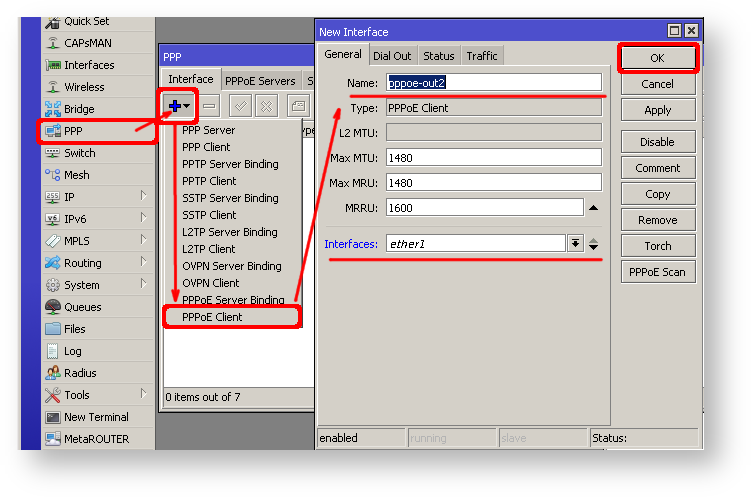
/interface pppoe-client
  add disabled=no interface=ether1 user=me password=123 \
add-default-route=yes use-peer-dns=yes |
...
| Section | |||||||
|---|---|---|---|---|---|---|---|
Winbox/Webfig actions:
|
| Note |
|---|
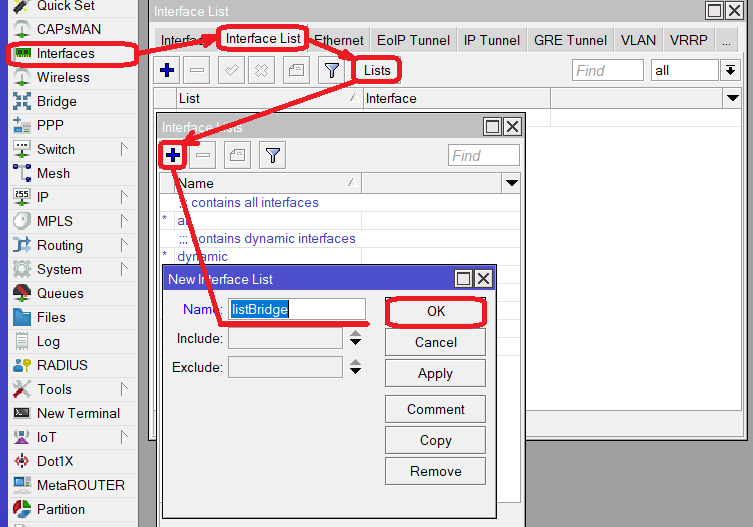
Further Now in configuration WAN interface is now pppoe-out interface, not ether1, make sure to adjust "/interface/list/member" to reflect these changes, if you are referencing interface lists in your configuration. |
Verify Connectivity
After successful configuration, you should be able to access the internet from the router.
Verify IP connectivity by pinging a known IP address (google DNS server for example)
...
MikroTik routers require password configuration, we suggest using a password generator tool to create secure and non-repeating passwords. With By secure password, we mean:
- Minimum 12 characters;
- Include numbers, Symbols, Capital and lower case lowercase letters;
- Is not a Dictionary Word or Combination a combination of Dictionary Words;
| Code Block | ||
|---|---|---|
| ||
/user set 0 password="!={Ba3N!40TуX+GvKBzjTLIUcx/," |
...
MAC Connectivity Access
By default mac , MAC server runs on all interfaces, so we will disable the default "all" entry and add a local interface to disallow MAC connectivity from the WAN port. MAC Telnet Server feature allows you to apply restrictions to the interface "list".
...
| Section | |||||||
|---|---|---|---|---|---|---|---|
Winbox/Webfig actions:
|
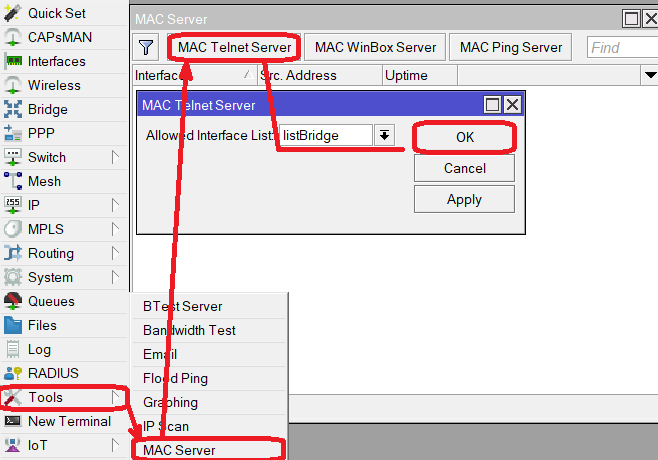
Do the same in the the MAC Winbox Server tab to block Mac Winbox connections from the internet.
...
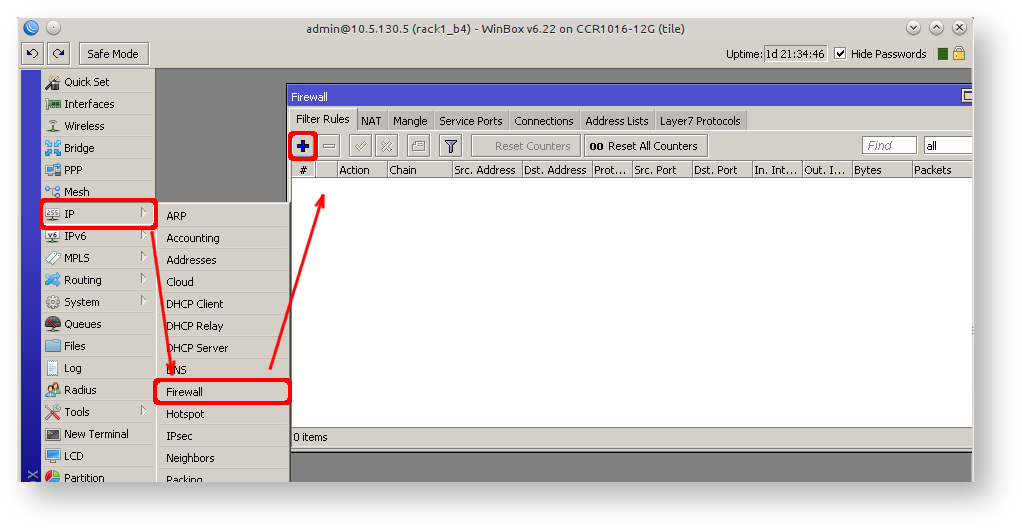
IP connectivity on the public interface must be limited in the firewall. We will accept only ICMP(ping/traceroute), IP Winbox, and ssh SSH access.
| Code Block | ||||
|---|---|---|---|---|
| ||||
/ip firewall filter add chain=input connection-state=established,related action=accept comment="accept established,related"; add chain=input connection-state=invalid action=drop; add chain=input in-interface=ether1 protocol=icmp action=accept comment="allow ICMP"; add chain=input in-interface=ether1 protocol=tcp port=8291 action=accept comment="allow Winbox"; add chain=input in-interface=ether1 protocol=tcp port=22 action=accept comment="allow SSH"; add chain=input in-interface=ether1 action=drop comment="block everything else"; |
| Warning |
|---|
In case if a the public interface is a pppoePPPoE, then the in-interface should be set to "pppoe-out". |
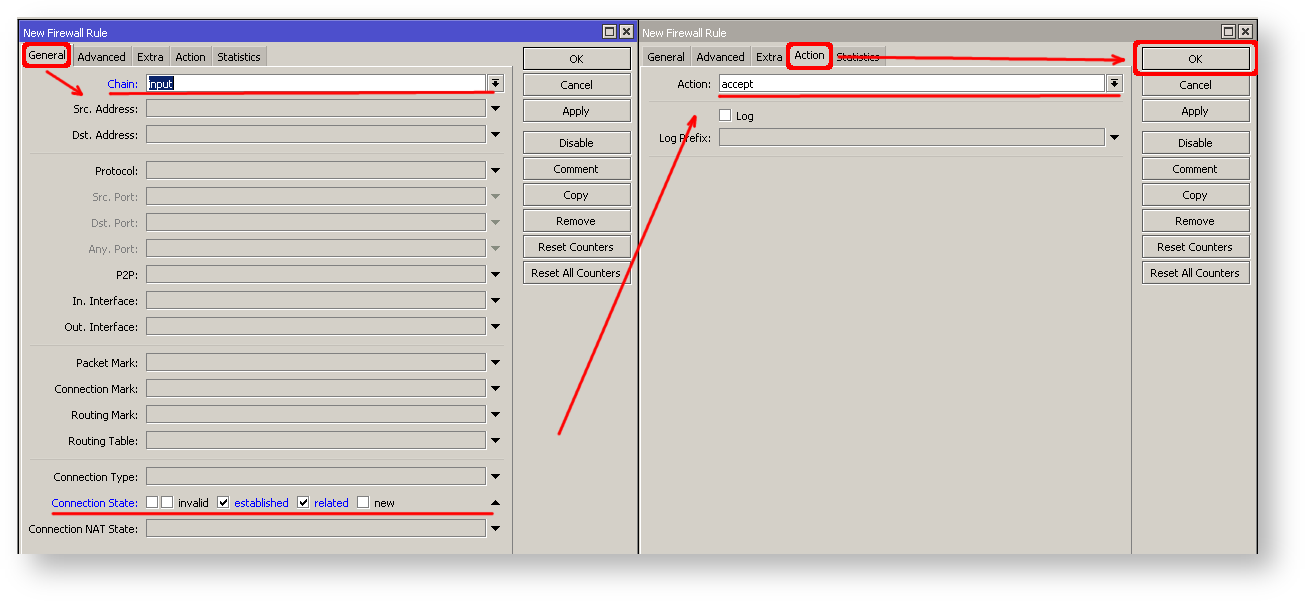
The first two rules accept packets from already established connections, so we assume those are OK to not overload the CPU. The third rule drops any packet which that connection tracking thinks is invalid. After that, we set up typical accept rules for specific protocols.
| Section | |||||||
|---|---|---|---|---|---|---|---|
If you are using Winbox/Webfig for configuration, here is an example of how to add an established/related rule:
|
...
Additionally, each service can be secured by the allowed IP address or address range(the address service will reply to), although more the preferred method is to block unwanted access in the firewall filter,because the firewall will not even allow to open socket
...
A router might have DNS cache enabled, which decreases the resolving time for DNS requests from clients to remote servers. In case DNS cache is not required on your router or another router is used for such purposes, disable it.
...
Some RouterBOARDs have an LCD module for informational purposes, set a pin or disable it.
| Code Block | ||
|---|---|---|
| ||
/lcd set enabled=no |
It is good practice to disable all unused interfaces on your router, in order to decrease the chances of unauthorized access to your router.
| Code Block | ||
|---|---|---|
| ||
/interface print /interface set x disabled=yes |
Where "X" is a the number of the unused interfaces.
RouterOS utilizes You can enable stronger crypto for SSH, most newer programs use it, to turn on SSH strong crypto:
| Code Block | ||
|---|---|---|
| ||
/ip ssh set strong-crypto=yes |
Following The following services are disabled by default, nevertheless, it is better to make sure that none of then them were enabled accidentally:
...
NAT Configuration
At this point, the PC is not yet able to access the Internet, because locally used addresses are not routable over the Internet. Remote hosts simply do not know how to correctly reply to your local address.
The solution for this problem is to change the source address for outgoing packets to routers the router's public IP. This can be done with the NAT rule:
...
After a quick search on Google, we can find out that RDP runs on TCP port 3389. Now we can add a destination NAT rule to redirect RDP to the client's PC.
| Code Block | ||
|---|---|---|
| ||
/ip firewall nat
  add chain=dstnat protocol=tcp port=3389 in-interface=ether1 \
action=dst-nat to-address=192.168.88.254 |
...
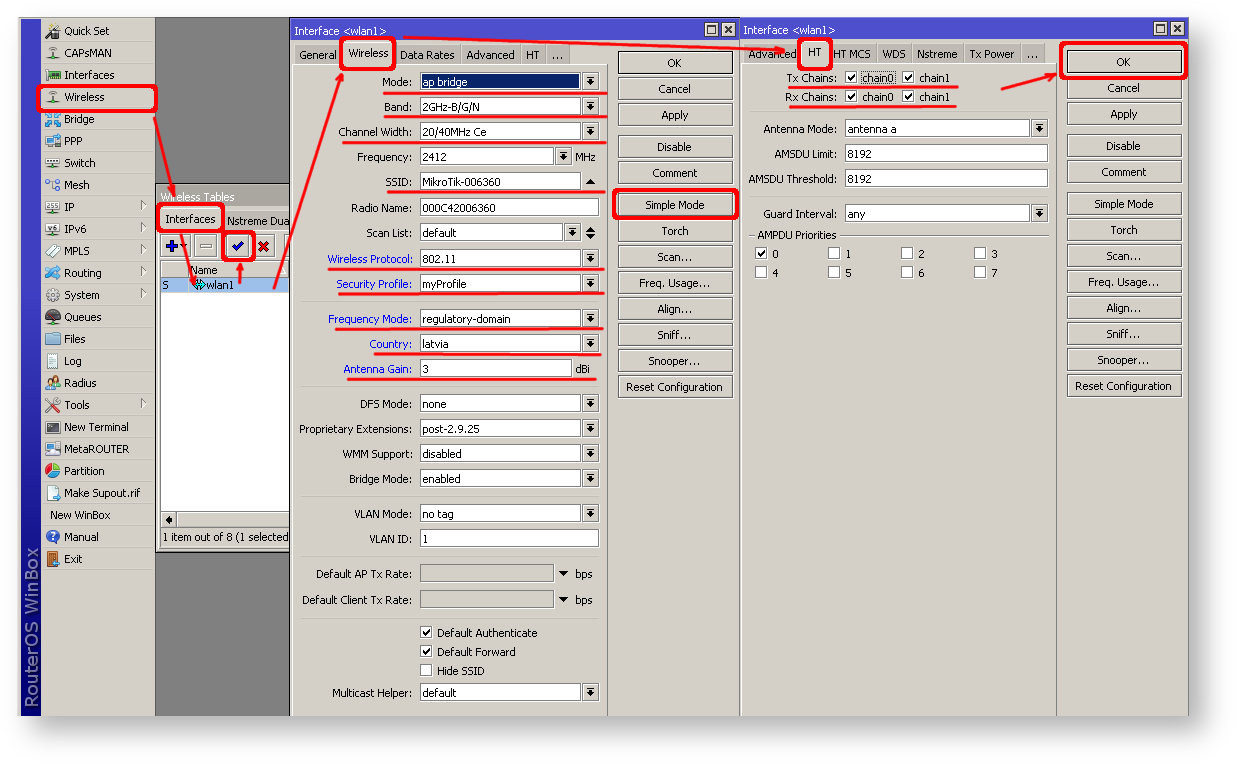
| Code Block | ||
|---|---|---|
| ||
/interface wireless security-profiles
  add name=myProfile authentication-types=wpa2-psk mode=dynamic-keys \
wpa2-pre-shared-key=1234567890 |
...
| Code Block | ||
|---|---|---|
| ||
/interface wireless enable wlan1; set wlan1 band=2ghz-b/g/n channel-width=20/40mhz-Ce distance=indoors \ mode=ap-bridge ssid=MikroTik-006360 wireless-protocol=802.11 \ securitysecurity-profile=myProfile frequency-mode=regulatory-domain \ set country=latvia antenna-gain=3 |
| Section | |||||||
|---|---|---|---|---|---|---|---|
To do the same from Winbox/Webfig:
|
The last step is to add a wireless interface to a local bridge, otherwise, connected clients will not get an IP address:
...
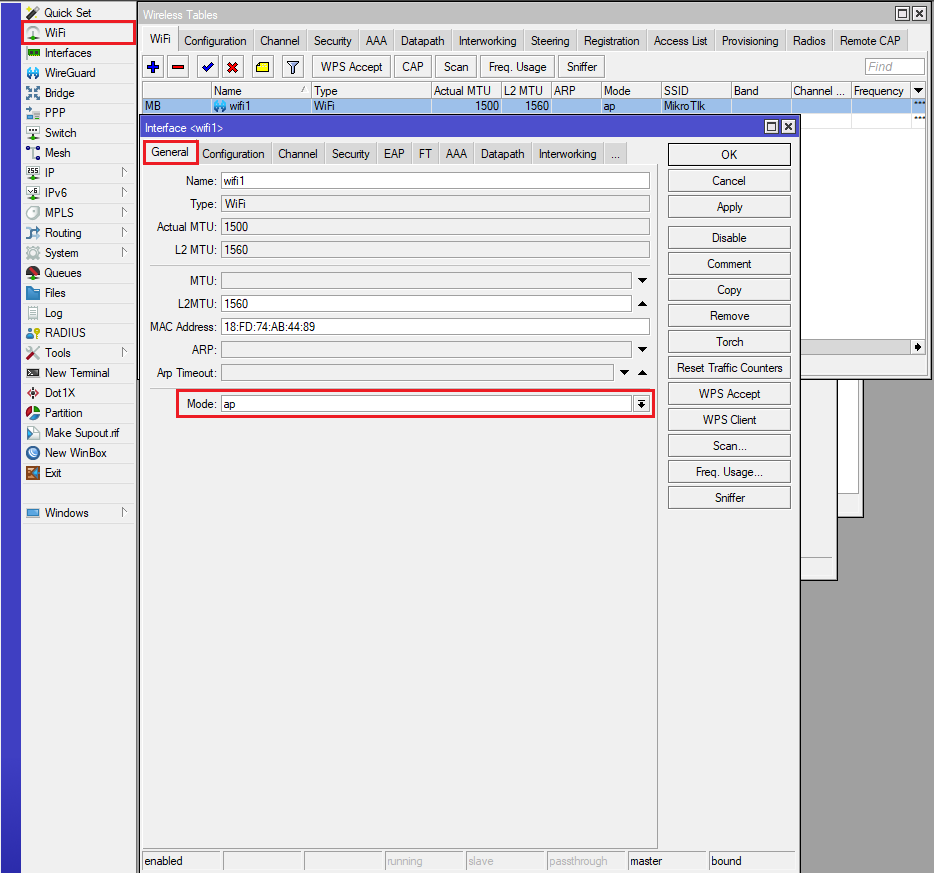
RouterOS 7.13+ wireless setup
Enabling First enable the device as an Access Point, by navigating to general tabthe General tab and setting Mode to AP:
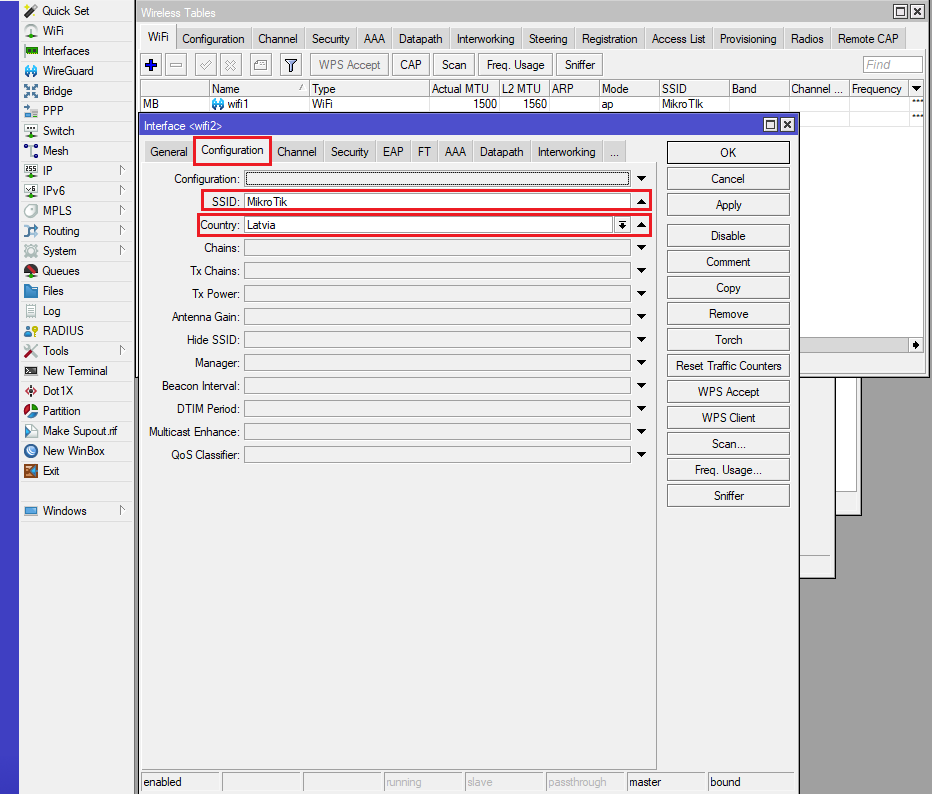
Setting Country/region and SSID, navigating to In the "Configuration tab" set the Country and SSID
Setting Configure the wireless network`s security, it is recommended, tu use we recommend using both WPA3 and WPA2 protocols, in order for older devices to be compatibleto ensure compatibility with older wireless clients, authentication-types and passphrase should be set here:
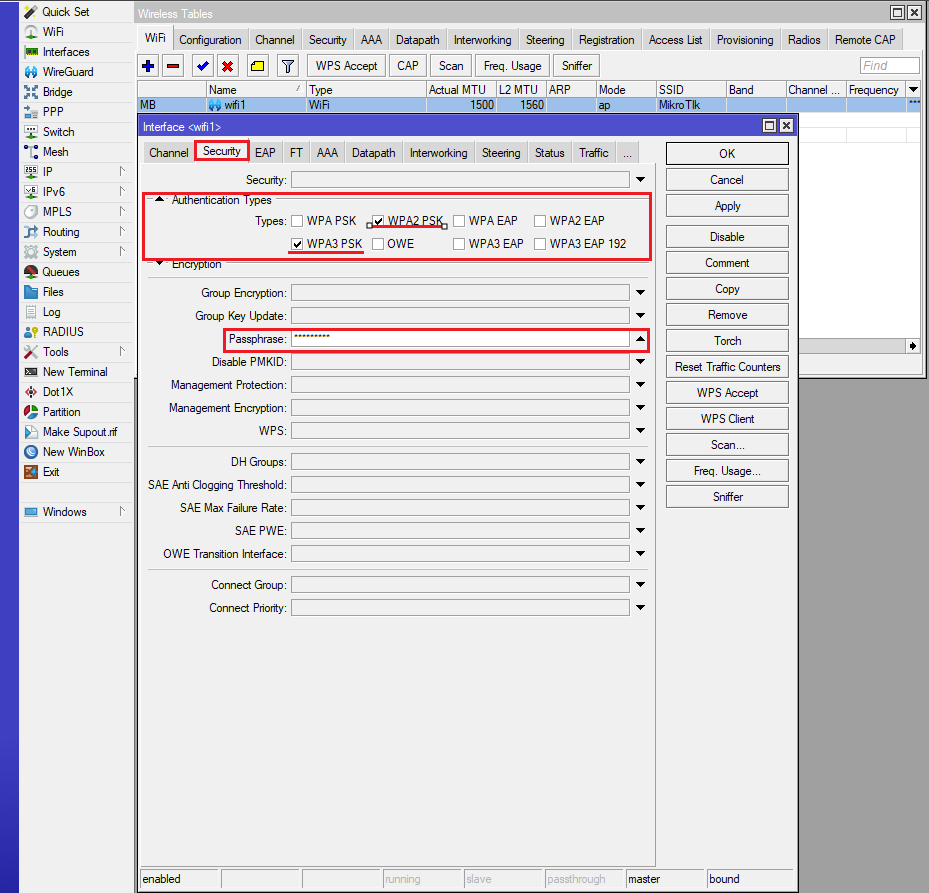
| Code Block | ||
|---|---|---|
| ||
interface/wifi/set wifi1 configuration.country=Latvia .mode=ap .ssid=MikroTIkMikroTik security.authentication-types=wpa2-psk,wpa3-psk .passphrase=123456789 |
...
| Code Block | ||
|---|---|---|
| ||
/ip firewall filter add chain=forward action=fasttrack-connection connection-state=established,related \ comment="fast-track for established,related"; add chain=forward action=accept connection-state=established,related \ comment="accept established,related"; add chain=forward action=drop connection-state=invalid add chain=forward action=drop connection-state=new connection-nat-state=!dstnat \ in-interface=ether1 comment="drop access to clients behind NAT from WAN" |
A ruleset is similar to input chain rules (accept established/related and drop invalid), except the first rule with with action=fasttrack-connection. This rule allows established and related connections to bypass the firewall and significantly reduce CPU usage.
...
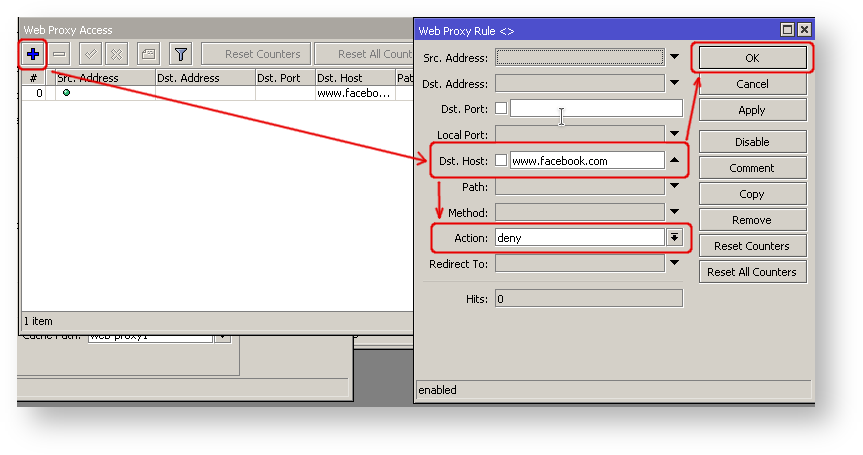
Sometimes you may want to block certain websites, for example, deny access to entertainment sites for employees, deny access to porn, and so on. This can be achieved by redirecting HTTP traffic to a proxy server and use using an access-list to allow or deny certain websites.
...
| Code Block | ||
|---|---|---|
| ||
/ip firewall nat
  add chain=dst-nat protocol=tcp dst-port=80 src-address=192.168.88.0/24 \
action=redirect to-ports=8080 |
...
| Section | |||||||
|---|---|---|---|---|---|---|---|
|
...
The problem with the ping tool is that it says only that the destination is is unreachable, but no more detailed information is available. Let's overview the basic mistakes.
...
| Tip |
|---|
If you are not sure how exactly to configure your gateway device, please reach out to MikroTik's official official consultants for configuration support. |
...