| Table of Contents |
|---|
Description
Flashfig FlashFig is an application for mass router configuration. It can be used by MikroTik distributors, ISPs, or any other companies who need to apply RouterOS configuration to many routers in the shortest possible time.
Flashfig FlashFig applies MikroTik RouterOS configuration to any RouterBOARD within 3 seconds. You can perform Flashfig FlashFig on a batch of routers, the only thing you need is to connect RouterBOARD to a Layer 2 network running Flashfig FlashFig and to power a FlashfigFlashFig-enabled RouterBOARD up.
Flashfig FlashFig only runs on a Windows computer and is available from the downloads page.
All RouterBOARDs support Flashfig FlashFig mode. It works between a Windows computer running Flasfig FlashFig and a RouterBOARD in the same broadcast domain (direct Layer 2 Ethernet network connection is required).
Flashfig FlashFig support is enabled on every new RouterBOARD manufactured since March 2010 by default from the factory. For older models, Flashfig FlashFig can be enabled via RouterBOOT or from MikroTik RouterOS console - /system routerboard settings set boot-device=flash-boot-once-then-nand or /system routerboard settings set boot-device=flash-boot.
After Flashfig FlashFig is used once on a brand new RouterBOARD, it is disabled on further boots to avoid unwanted reconfiguration at a later time. To use Flashfig FlashFig a second time on the same router, you need to enable flash-boot in Bootloader settings (this setting will revert to NAND after a successful configuration change OR once any user logs into the board).
If RouterOS reset-configuration command is used later (or configuration reset using the Reset button), Flashfig FlashFig configuration is loaded. To permanently overwrite, use the Netinstall process and check Apply default configuration or use -r flag in Linux-based command line.
A Flashfig You view FlashFig video tutorialcan find on MikroTik on MikroTik YouTube channel.
...
FlashFig Example
This is a step-by-step example of how to use the Flashfig FlashFig process to apply a chosen MikroTik RouterOS configuration to a 'factory fresh' RouterBOARD.
...
- A working Ethernet port;
- Valid .rsc file(s) with MikroTik RouterOS configuration similar to an export/import file. In addition to regular configuration commands, it is also possible to re-apply the factory passwords by using the read-only variables $defconfPassword and $defconfWifiPassword (starting from RouterOS 7.10beta8);
- Always use the latest Flashfig FlashFig program available from the downloads page;
- The RouterBOARD has to be in flash-boot mode, if this is the very first boot, nothing needs to be done
| Info |
|---|
| Be aware of the text editor's treatment of CR/LF characters and test that the config has no errors when normally applied onto an identical version of RouterOS before applying via Flashfig FlashFig as run-time errors will not be visible! |
Pre-Configuration
Windows Computer
- Run FlashfigFlashFig;
- Prepare .rsc file, .rsc file is regular/import file, it accepts valid MikroTik RouterOS CLI commands. You can create .rsc file with any text editor program (Notepad, Notepad++, Texteditor, TextEdit, Microsoft Word, OpenOffice Writer)
...
- Browse for .rsc MikroTik RouterOS configuration file to apply to the RouterBOARD, highlight the file and Select to approve it,

- Activate Flashfig FlashFig server, now it is ready to FlashfigFlashFig. Note, any RouterBOARD will be flashfigFlashFig'ed within the network when they are powered on with boot-device configured to flash-boot or flash-boot-once-then-nand,
...
Anchor RouterBOARD RouterBOARD
| RouterBOARD | |
| RouterBOARD |
RouterBOARD
- Flashfig FlashFig mode is enabled on every RouterBOARD from the factory by default, which means no configuration is required on RouterBOARD.
- If Flashfig FlashFig is not enabled on your router, access the RouterBOARD with WinBox/Console and change the boot-device to flash-boot or flash-boot-once-then-nand:
...
Your router is now ready for FlashfigFlashFig.
Connect
Connect the Boot port of RouterBOARD and Flashfig FlashFig computer to the same Local Area Network.
Run
...
FlashFig
- Plug-in power for RouterBOARD
- Check the status on Flashfig FlashFig program,
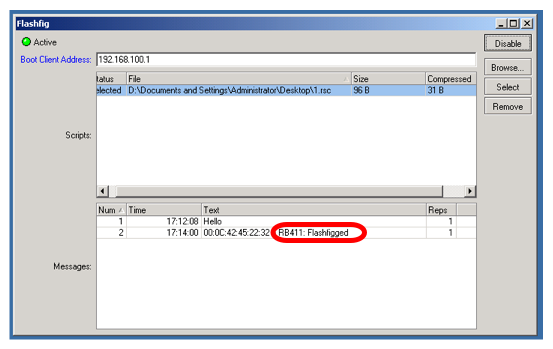
Messages log shows "FlashfiggedFlashFigged" and RouterBOARD should repeatedly make the morse code sound for the character "/" ("_.._." and flash the LED - it is now safe to unplug / power down the router.
- FlashfigFlashFig configuration was applied to the RouterBOARD and it is ready to be used in production with this new config.
Troubleshoot
...
FlashFig can not find a router
If between a PC and a router there is used another device (a router/switch), ensure that for this device:
- DHCP server is disabled;
- if used ports are in a bridge, set bridge protocol-mode to none;
- HW-offload for used ports is disabled.
...
FlashFig finds a router, flashing is not done (no TFTP request)
Ensure that the computer on which Flashfig FlashFig is running has only one network interface active.
...
FlashFig is done, but a configuration is not applied
If all procedures went successfully, but RouterOS configuration from .rsc file is not applied, add startup delay to *.rsc configuration file. The reason might be, that the configuration script is executed before all interfaces boots up.
Not enough flash space, ignoring
Flashfig FlashFig configuration maximum file size is up to 4000 bytes, otherwise program will return an error as above.
...