...
- Use a Phillips head screwdriver to loosen the screw, which secures the bottom lid (see Bottom Lid).
- Insert the SIM card into the slot with the chip facing up.
- Choose your powering solution, please see the Powering section for possibilities.
- Open network connections on your PC and search for the SSID that begins with "MikroTik".
- Connect to the wireless network, open https://192.168.88.1
 in your web browser to start the configuration.
 - User name: admin and there is no password by default you will be logged in automatically to the Quick Set screen.
- Update the device by clicking the "Check for updates" button on the right side and updating your RouterOS software to the latest version to ensure the best performance and stability. Must have a valid SIM card inserted.
- To manually update the device, please go https://mikrotik.com/download
- Choose ARM packages for this device and download it them to your PC.
- Upload downloaded packages to the WebFig "Files" menu and reboot the device.
- Updating your RouterOS software to the latest version will ensure the best performance, stability, and security updates.
- To personalize your wireless network, SSID can be changed in the fields "Network Name";
- Choose your country on the left side of the screen in the field "Country", to apply country regulation settings.
- Set up your wireless network password in the field "WiFi Password" the password must be at least eight symbols.
- Set up your router password in the bottom field "Password" to the right and repeat it in the field "Confirm Password", it will be used to login next time.
- Click on the "Apply Configuration" to save changes.
...
- Scan QR code and choose your preferred OS.
- Install and open the application.
- By default, the IP address and user name will be already entered.
- Click Connect to establish a connection to your device through a wireless network.
- Choose Quick setup and the application will guide you through all basic configuration settings in a couple of easy steps.
- An advanced menu is available to fully configure all necessary settings.
...
Before you work on any equipment, be aware of the hazards involved with electrical circuitry, and be familiar with standard practices for preventing accidents.
Read the installation instructions before connecting the system to the power source.
This equipment is to be installed by trained and qualified personnel, as per these installation instructions. The installer is responsible for obtaining any required local or national safety inspections of the structural integrity of the installation by the local authority/inspection department.
All installation methods for mounting an access point on any wall surface is are subject to the acceptance of local jurisdiction.
The Installation of the equipment must comply with local and national electrical codes.
This unit is intended to be mounted outdoors on a pole. Please read the mounting instructions carefully before beginning installation. Failure to use the correct hardware and configuration or to follow the correct procedures could result in a hazardous situation to for people and damage to the system.
We cannot guarantee that no accidents or damage will occur due to the improper use of the device. Please use this product with care and operate at your own risk.
...
The device can be mounted in several ways: pole, wall, ceiling or it can be placed in a specially designed Mikrotik holder which comes with the package. The package also includes a drill hole template with detailed mounting instructions, to help you with the Ethernet cable installation and attachment to a ceiling or a wall. Steel bracket to put on the other side of a dropdown ceiling tile and two screws and wall anchors. Zip ties or steel clamps for mounting on the pole.
The IP rating scale for this device is IP54. When mounting outdoors, please ensure that any cable openings are directed downwards. We recommend using the POE injector and proper grounding with Cat6 shielded cable. When using and installing this device please pay attention to the Maximum Permissible Exposure (MPE) safety distance with a minimum of 35 cm between the radiator and your body.
Mounting on the mast or pole: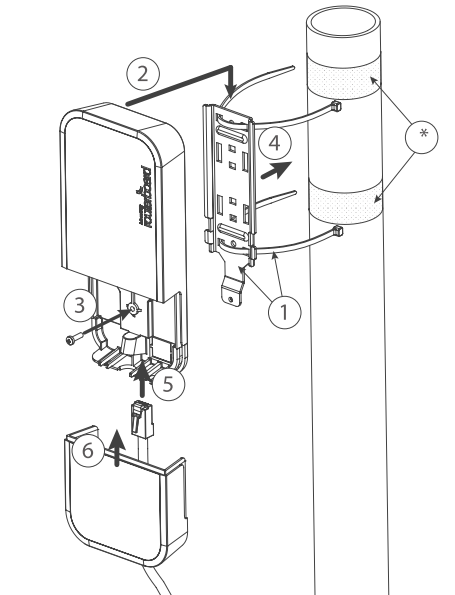
...
- Use included a template to mark spots for drilling holes. And if needed for Ethernet cable. Align accordingly, it will depend on how the device will be mounted finally.
- Insert dowels if needed, depends on wall structure and material.
- Place included a steel bracket on the wall.
- Use screws to secure it in the place.
- Extend your Ethernet cable through the opening and connect to the Ethernet port.
- Mount the device on the steel bracket
- Secure it in place with the screw.
- Close bottom latch.
...
The device is equipped with a miniPCIe slot with a factory-installed LTE6, LTE, or 4G card. A SIM slot is provided for use together with a miniPCIe modem. The SIM slot is not used separately. As additional In addition, you can install external antennas of your choice, this should be done by a qualified person, please follow safety precautions when handling electrical equipment, use a wrist grounding strap when unpacking, and working with electrical components to avoid electrical discharge (ESD) damage.
To install the external antennas:
- Remove the screw using Philips PH2 screwdriver and slide down the bottom lid to remove it;
- Remove both screws below the power jack and slide out the wAP PCB board;
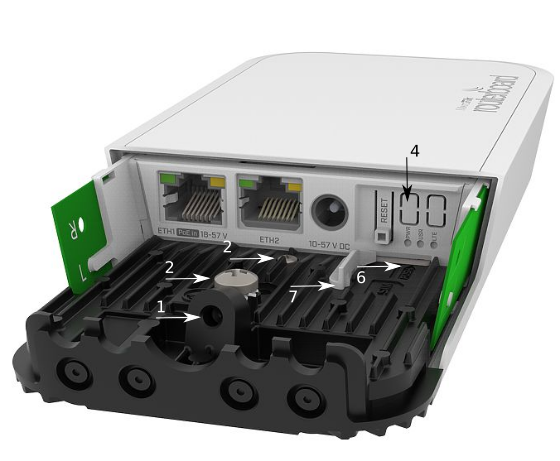
- Disconnect the grey uFL connector from the MAIN antenna connector of the modem, disconnect the black cable from the other (or AUX) connector;
- Remove two plastic doors using a flat screwdriver or similar tool and feed antenna wires through the holes and connect to the LTE6 card installed;
- After you have reinserted the wAP board into the case and secured it with the screw that was removed earlier;
- Slide in the SIM card from your mobile operator into the SIM slot, with the chip facing up. The slot accepts miniSIM (2FF);
- The SIM slot protects the SIM card from falling out with a plastic latch. You can press the latch to the left side to unlock and then insert the SIM card or replacing it using tweezers or a similar tool.
...
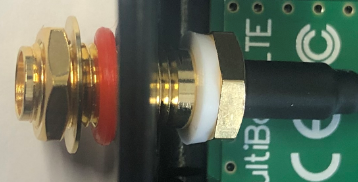
- Make openings and use a 6.5 mm drill bit, and drill in any of four pre-designed spots;
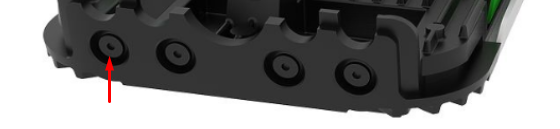
- Guide your ACSMAUFL connectors and secure them in place, see the picture below for reference on how to place rubber seals for best water protection:
SIM slot usage
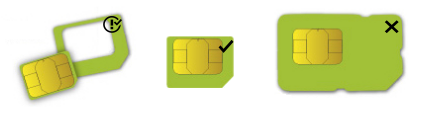
SIM card slot is designed to use with Micro SIM cards.
Nano SIM cards have different thickness, usage with adapter are not recommended.
Buttons and jumpers
The reset button has three functions:
...
- Hold this button during boot time until the LED light starts flashing, release the button to reset RouterOS configuration (total 5 seconds).
- Keep holding for 5 more seconds, LED turns solid, release now to turn on CAP mode. The device will now look for a CAPsMAN server (total 10 seconds).
- Or Keep holding the button for 5 more seconds until LED turns off, then release it to make the RouterBOARD look for Netinstall servers (total 15 seconds).
...
We recommend clicking the "Check for updates" button and updating your RouterOS software to the latest version to ensure the best performance and stability. RouterOS includes many configuration options in addition to what is described in this document. We suggest visiting the RouterOS documentation page to get yourself accustomed to the possibilities: https://mt.lv/help![]() .
.
In case an IP connection is not available, the Winbox tool (https://mt.lv/winbox![]() ) can be used to connect to the MAC address of the device from the LAN side (all access is blocked from the internet port by default).
) can be used to connect to the MAC address of the device from the LAN side (all access is blocked from the internet port by default).
It is possible to boot the device from a network, for reinstalling RouterOS for recovery purposes. This can be done from the first Ethernet port. See above how to do this.
Accessories
Package The package includes the following accessories that come with the device:
...
| Info |
|---|
Please make sure the device has a lock package (firmware version from the manufacturer) which is required to be applied to the end-user equipment to prevent the end-user from reconfiguration. The product will be marked with country code “-EG”. This device needs to be upgraded to the latest version to ensure compliance with local authority regulations! It is the end users' responsibility to follow local country regulations, including operation within legal frequency channels, output power, cabling requirements, and Dynamic Frequency Selection (DFS) requirements. All MikroTik radio devices must be professionally installed. |
...
This equipment has been tested and found to comply with the limits for a Class A digital device, pursuant to Part 15 of the FCC Rules. These limits are designed to provide reasonable protection against harmful interference in a residential installation.
This equipment generates, uses, and can radiate radio frequency energy and, if not installed and used in accordance with the instructions, may cause harmful interference to radio communications. However, there is no guarantee that interference will not occur in a particular installation. If this equipment does cause harmful interference to radio or television reception, which can be determined by turning the equipment off and on, the user is encouraged to try to correct the interference by one of the following measures:
...