

LHGG LTE6 kit (RBLHGGR&R11e-LTE6)
Quickstart
- While holding the unit by its central column, apply force to the tab, which holds the latch closed, until the latch pops open.Open the Ethernet port door;
- Insert the SIM card into the slot, with chips the chip facing UP.
- Assemble case by attaching legs to the base of the unit, please see Case assembly paragraph.
- Mount unit in your desired place.
- Connect an Ethernet cable to the Ethernet port, connect the other end of the Ethernet cable to the included PoE injector.
- Plug the PoE injector into your PC.
- Plug the included power supply into the PoE injector to start up the device. please see the powering paragraph.
- Set LAN computer IP configuration to automatic (DHCP).
- ;
- Connect the device to the included PoE injector with Ethernet cable to the data+power end;
- Connect the data end of the PoE injector into the computer;
- Connect the power adapter to the PoE injector;
- Open the Open https://192.168.88.1
 in your web browser to start the configuration.;
 - User name: admin admin, and there is no password by default you will be logged in automatically to the Quick Set screen.
- Update the device by clicking the "Check for updates" button on the right side and updating your RouterOS software to the latest version to ensure the best performance and stability. Must have a valid SIM card inserted.
- To manually update the device, please go https://mikrotik.com/download
- Choose MIPSBE packages for this device and download it to your PC.
- Upload downloaded packages to the WebFig "Files" menu and reboot the device.
- Updating your RouterOS software to the latest version will ensure the best performance, stability, and security updates.
- To personalize your wireless network, SSID can be changed in the fields "Network Name".
- Set up your wireless network password in the field "WiFi Password" the password must be at least eight symbols.
- Set up your router password in the bottom field "Password" to the right and repeat it in the field "Confirm Password", it will be used to login next time.
- ;
- Enter the PIN code, if required by your mobile network operator;
- Use the check for update option to upgrade the device to the latest version. You must have an active SIM card with available data;
- The device will reboot;
- Connect again and in the QuickSet menu set a strong passwordClick on the "Apply Configuration" to save changes.
Case assembly
- Attach the two legs to the LHG case by sliding them onto the respective sides, legs are different and cannot be exchanged (when looking at the product place it that cover for Ethernet port is in front of you, leg marked R is for the right side, leg marked L is for the left side).
- Snap the assembled LHG unit to the grid in the appropriate central location.
- Fix the two legs in place with included two self thread screws (Phillips screwdriver PH2).
...
The device is equipped with a miniPCIe slot and has already installed a modem depending on what model you havean LTE6 modem. One SIM slot is provided for use together with a miniPCIe modem. The SIM slot is not used separately.
Replacing a miniPCIe module should be done by a qualified person, please follow safety precautions when handling electrical equipment:
- Use a wrist grounding strap when unpacking and working with electrical components to avoid electrical discharge (ESD) damage;
- Open the upper cover as shown on in instruction previously;
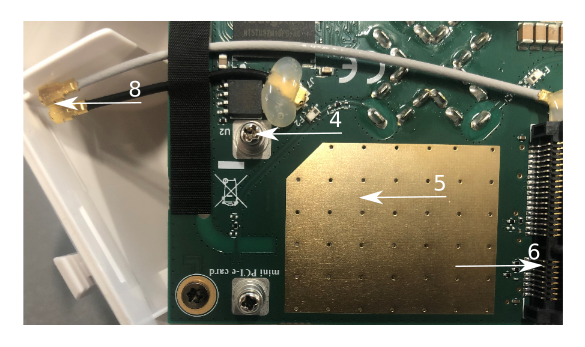
- The antenna is located underneath PCB;
- Locate the miniPCIe slot on the PCB and remove two factory attached screws;
- Attach provided a thick thermal pad to the card, and install the card into miniPCIe slot so that thermal pad is between PCB and card;
- Insert your desired card;
- The secure card in place using previously removed two screws;
- Attach the grey uFL connector to the MAIN antenna connector of the modem, attach the black cable to the secondary (or AUX) connector;
- Attach a thinner thermal pad to the top of the card;
- Reassemble.
...
When mounting outdoors, please ensure that any cable openings are directed downwards. Use POE injector and proper grounding, this device has a specially designed grounding connector under the port cover. Recommended using shielded Cat5/6 cable. The IP rating scale for this device is IP54.
Warning! This equipment should be installed and operated with a minimum distance of 120 cm between the device and your body. Operation of this equipment in the residential environment could cause radio interference.
...
Expansion slots and ports
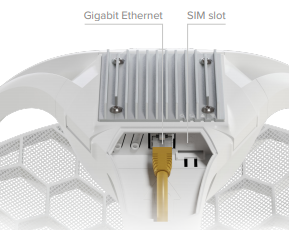
- One 10/100 Gigabit Ethernet port, supporting automatic cross/straight cable correction (Auto MDI/X). Either straight or crossover cable can be used for connecting to other network devices. The Ethernet port accepts 9-30 V DC powering from a passive PoE injector.
- MiniPCIe slot with LTE6 modem.
- and SIM slot (can't be used separately) to be used with a 3G/4G/LTE modem.
Reset button
The reset button has three functions:
...
The device supports RouterOS software version 6.46. The specific factory-installed version number is indicated in the RouterOS menu /system resource. Other operating systems have not been tested.
...