...
Full RouterOS documentation is located here: https://mt.lv/help. Specific wAP 60G configuration can be found https://wiki.mikrotik.com/wiki/Manual:Interface/W60G
Access device by connecting to the Ethernet port and then use the MikroTik Winbox utility for connection. The default IP address of 192.168.88.1. Username for login is admin and there is no password.
For recovery purposes, it is possible to boot the device from the network, see section 14221750.
In case the IP connection is not available, the Winbox utility can also be used to connect to the MAC address of the device.
Mounting
Mounting on the mast or pole: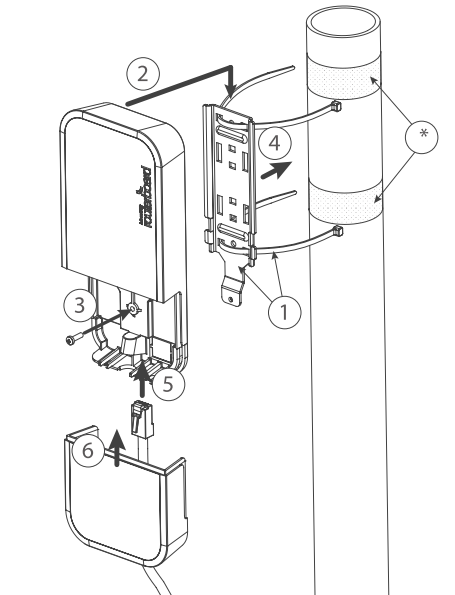
* It's recommended to use electrical tape to increase friction between materials.
- Mount plastic tie straps to steel brackets guiding them through holes.
- Mount bracket to the device.
- Secure them with a screw.
- Mount and align the device on the pole or mast.
- Guide Ethernet cable through the opening and connect to the Ethernet port.
- Close bottom latch and secure with a screw.
 It's recommended to secure Ethernet cable to the pole using zip ties. With the distance from the device approximately 30 cm.
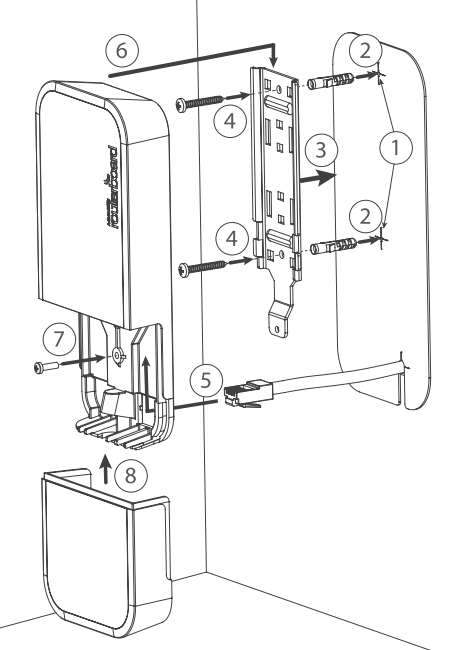
Mounting unit on the wall:
- Use included a template to mark spots for drilling holes. And if needed for Ethernet cable. Align accordingly, it will depend on how the device will be mounted finally.
- Insert dowels if needed, depends on wall structure and material.
- Place included a steel bracket on the wall.
- Use screws to secure it in the place.
- Extend your Ethernet cable through the opening and connect to the Ethernet port.
- Mount the device on the steel bracket
- Secure it in place with the screw.
- Close bottom latch.
Avoid mounting the device on the low ground spot, as you won't be able to attach and close the bottom latch.
Mounting on the ceiling:
A Special bracket is included in the package to mount on the drop ceiling. As it consists of two parts, to be attached on both sides of the ceiling tile.
- Use the template to mark spots for holes.
- Place both mounting brackets on the spot.
- Secure them together using screws.
Continue assembling in the same manner if mounting on the wall.
- Extend your Ethernet cable through the opening and connect to the Ethernet port.
- Mount the device on the steel bracket.
- Secure it in place with the screw.
- Close bottom latch.
Bottom Lid
- The bottom lid is secured in place with the captive screw.
- Use the Philips PH2 screwdriver to unscrew it, but do not remove the screw completely.
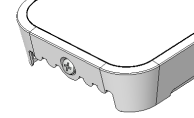
- Pull the cover in the opposite direction from the device to remove it.
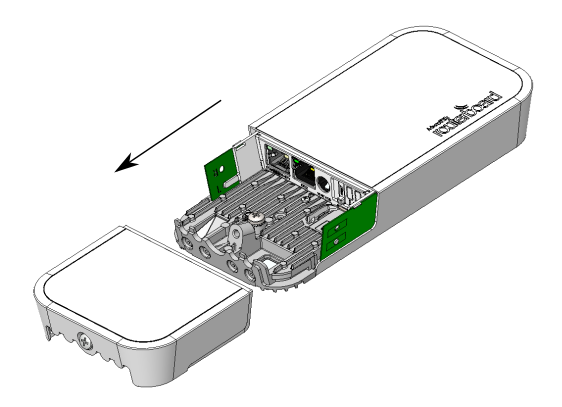
- Reassemble.
Buttons and jumpers
The routerBOOT reset button has the following functions. Press the button and apply the power, then:
...