...
| Code Block | ||||
|---|---|---|---|---|
| ||||
/system reset-configuration no-defaults=yes skip-backup=yes |
Or from Winbox
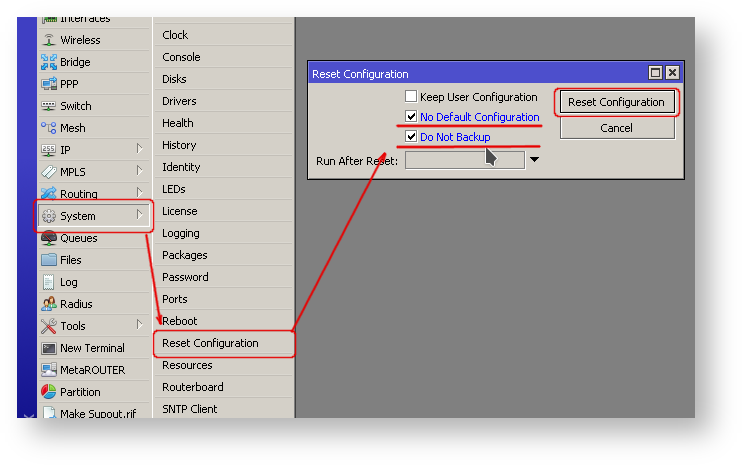

- From the left menu pick System -> Reset configuration
- In "Reset Configuration" dialog, check "No Default" and "Do Not Backup"
- Click on "Reset Configuration" button. Now router will boot with clean config.
...
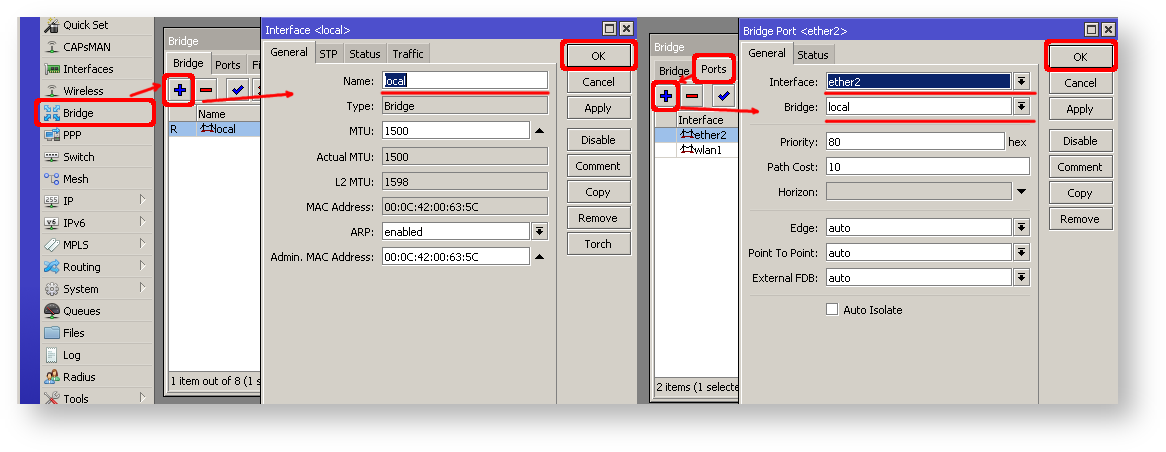
- Open Bridge window, Bridge tab should be selected;
- Click on + button, new dialog will open, enter bridge name local and click on OK;
- Select Ports tab and click on + button, new dialog will open;
- select interface ether2 and bridge local form drop-down lists and click on OK button to apply settings;
- You may close the bridge dialog.

- Open Ip -> Addresses dialog;
- Click on + button, new dialog will open;
- Enter IP address 192.168.88.1/24 select interface local from drop-down list and click on OK button;


Next step is to set up DHCP server. We will run setup command for easy and fast configuration:
...
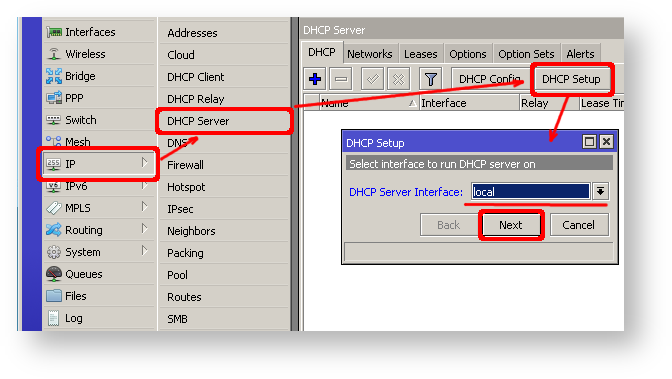
- Open Ip -> DHCP Server window, DHCP tab should be selected;
- Click on DHCP Setup button, new dialog will open, enter DHCP Server Interface local and click on Next button;
- Follow the wizard to complete the setup.

Now connected PC should be able to get dynamic IP address. Close the Winbox and reconnect to the router using IP address (192.168.88.1)
...
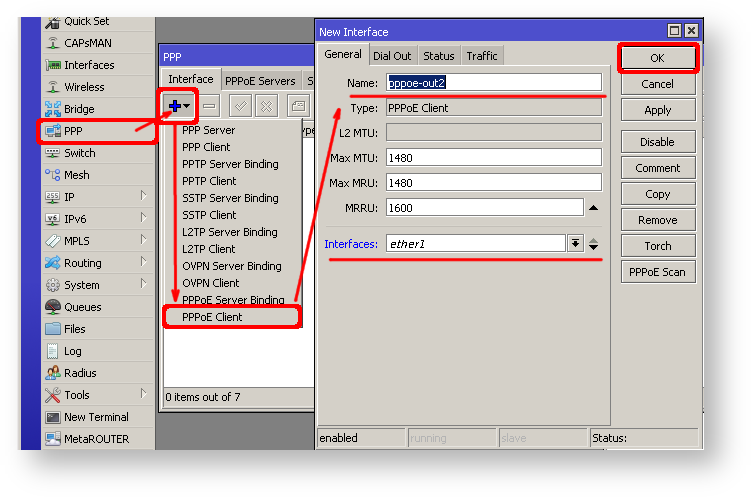
- Open PPP window, Interfaces tab should be selected;
- Click on + button, and choose PPPoE Client from the dropdown list, new dialog will open;
- Select interface ether1 form dropdown list and click on OK button to apply settings.

| Note |
|---|
Further in configuration WAN interface is now pppoe-out interface not ether1. |
...
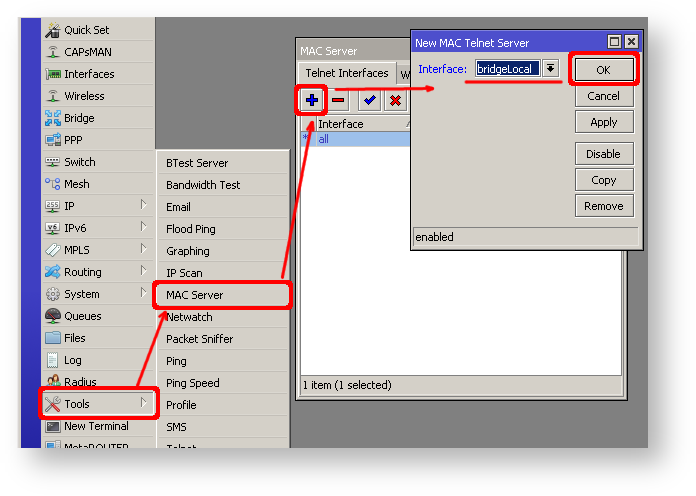
By default mac server runs on all interfaces, so we will disable default all entry and add only local interface to disallow MAC connectivity from WAN port.
| Code Block | ||||
|---|---|---|---|---|
| ||||
[admin@MikroTik] /tool mac-server> print
Flags: X - disabled, * - default
 #    INTERFACE
0 * all |
...
| Code Block |
|---|
...
|
...
|
...
|
...
| |
/tool mac-server |
...
disable 0; |
...
add interface=local; |
Do the same for Winbox MAC access
| Code Block |
|---|
...
|
...
|
...
|
...
| |
/tool mac-server mac-winbox |
...
disable 0; |
...
add interface=local; |
Winbox/Webfig actions:
- Open Tools -> Mac Server window, Telnet Interfaces tab should be selected;
- Click on + button, new dialog will open;
- Select interface local form dropdown list and click on OK button to apply settings;
- From the list of entries in Telnet Interface tab select all and click on x to disable selected entry.

Do the same in Winbox Interface tab to block Mac Winbox connections from the internet
...
IP connectivity on public interface also must be limited. We will accept only ICMP(ping/traceroute), IP winbox and ssh access.?
| Code Block |
|---|
...
|
...
|
...
|
...
| |
/ip firewall filter |
...
add chain=input connection-state=established,related action=accept comment="accept established,related"; |
...
add chain=input connection-state=invalid action=drop; |
...
add chain=input in-interface=ether1 protocol=icmp action=accept comment="allow ICMP"; |
...
add chain=input in-interface=ether1 protocol=tcp port=8291 action=accept comment="allow Winbox"; |
...
add chain=input in-interface=ether1 protocol=tcp port=22 action=accept comment="allow SSH"; |
...
add chain=input in-interface=ether1 action=drop comment="block everything else"; |
| Warning |
|---|
...
In case if public interface is pppoe, then in-interface should be set to "pppoe-out". |
First two rules accepts packets from already established connections, so we assume those are OK to not overload the CPU. The third rule drops any packet which connection tracking thinks is invalid. After that we set up typical accept rules for specific protocols.
...
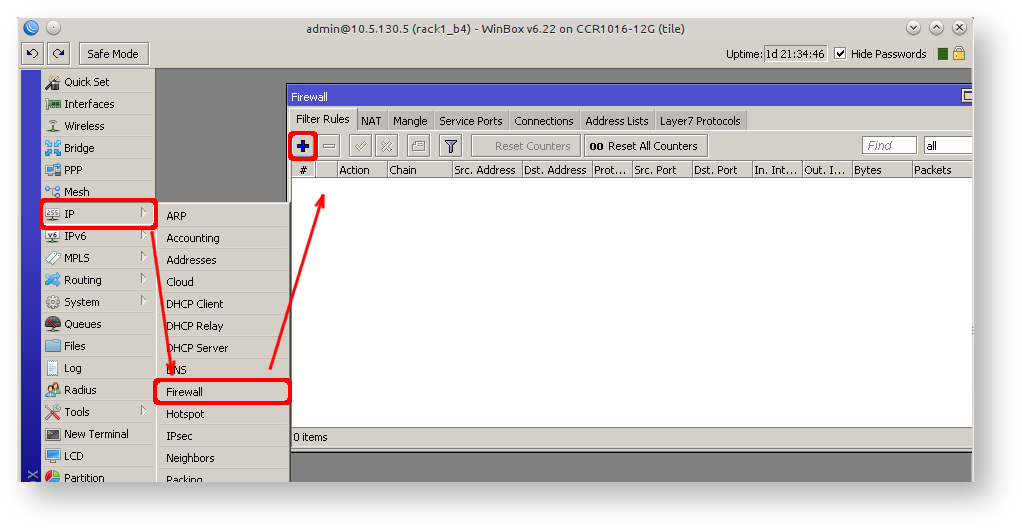
- Open Ip -> Firewall window, click on Filter rules tab;
- Click on + button, new dialog will open;
- Select chain input, click on Connection state and select checkboxes for established and related;
- Click on Action tab and make sure action accept is selected;
- click on Ok button to apply settings.
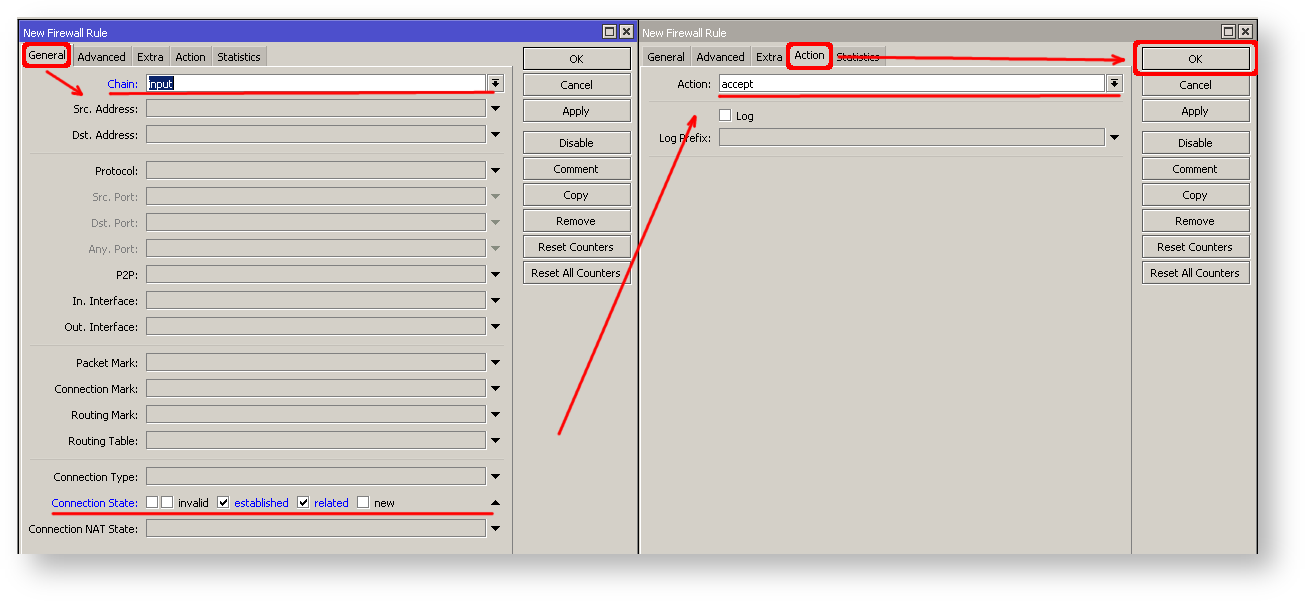


To add other rules click on + for each new rule and fill the same parameters as provided in console example.
...
Solution for this problem is change the source address for outgoing packets to routers public IP. This can be done with NAT rule:?
...
| Code Block | ||||
|---|---|---|---|---|
| ||||
/ip firewall nat |
...
add chain=srcnat out-interface=ether1 action=masquerade |
...
| Warning |
|---|
In case if public interface is pppoe, then |
...
in-interface should be set to "pppoe-out". |
Another benefit of such setup is that NATed clients behind the router are not directly connected to the Internet, that way additional protection against attacks from outside mostly is not required.
...
After quick search on Google we find out that RDP runs on TCP port 3389. Now we can add destination NAT rule to redirect RDP to the clients PC.?
| Code Block | |
|---|---|
|
...
|
...
|
...
| |
/ip firewall nat |
...
add chain=dstnat protocol=tcp port=3389 in-interface=ether1 |
...
\ action=dst-nat to-address=192.168.88.254 |
| Tip |
|---|
...
If you have set up strict firewall rules |
...
then RDP protocol must be allowed in firewall filter forward chain. |
Setting up Wireless
For ease of use bridged wireless setup will be made, so that your wired hosts are in the same Ethernet broadcast domain as wireless clients.
...
Security profiles are configured from /interface wireless security-profiles menu in terminal or in Winbox/Webfig click on Wireless to open wireless windows and choose Security Profile tab.?
| Code Block | |
|---|---|
|
...
|
...
|
...
| |
/interface wireless security-profiles |
...
add name=myProfile authentication-types=wpa2-psk mode=dynamic-keys |
...
\ wpa2-pre-shared-key=1234567890 |

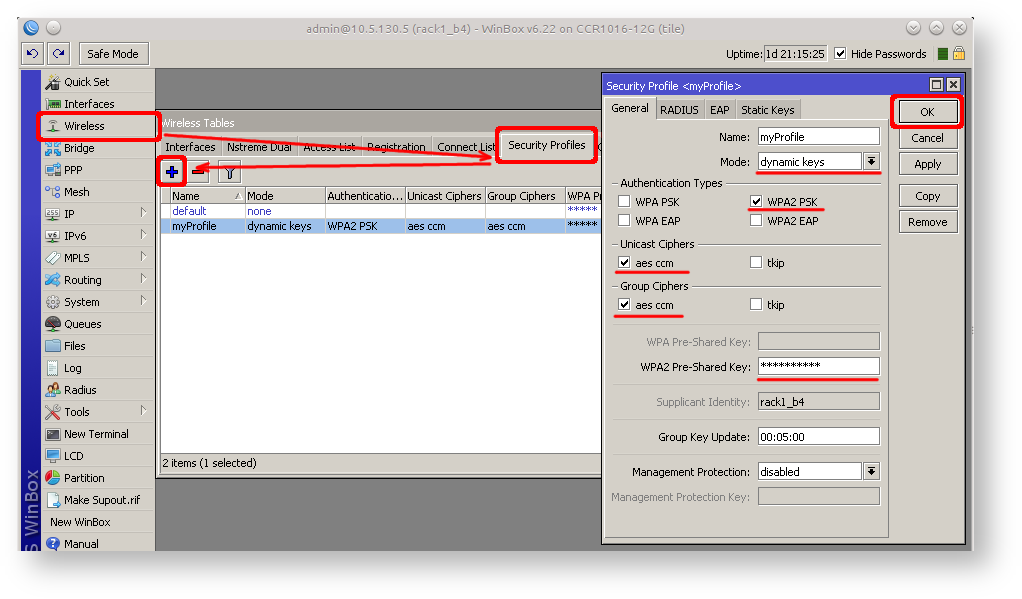
If there are legacy devices which do not support WPA2 (like Windows XP), you may also want to allow WPA protocol.
| Warning |
|---|
...
WPA and WPA2 pre-shared keys should not be the same. |
Now when security profile is ready we can enable wireless interface and set desired parameters?
| Code Block |
|---|
...
|
...
|
...
|
...
|
...
/interface wireless |
...
enable wlan1; |
...
set wlan1 band=2ghz-b/g/n channel-width=20/40mhz-Ce distance=indoors |
...
\ mode=ap-bridge ssid=MikroTik-006360 wireless-protocol=802.11 |
...
\ security-profile=myProfile frequency-mode=regulatory-domain |
...
\ set country=latvia antenna-gain=3 |
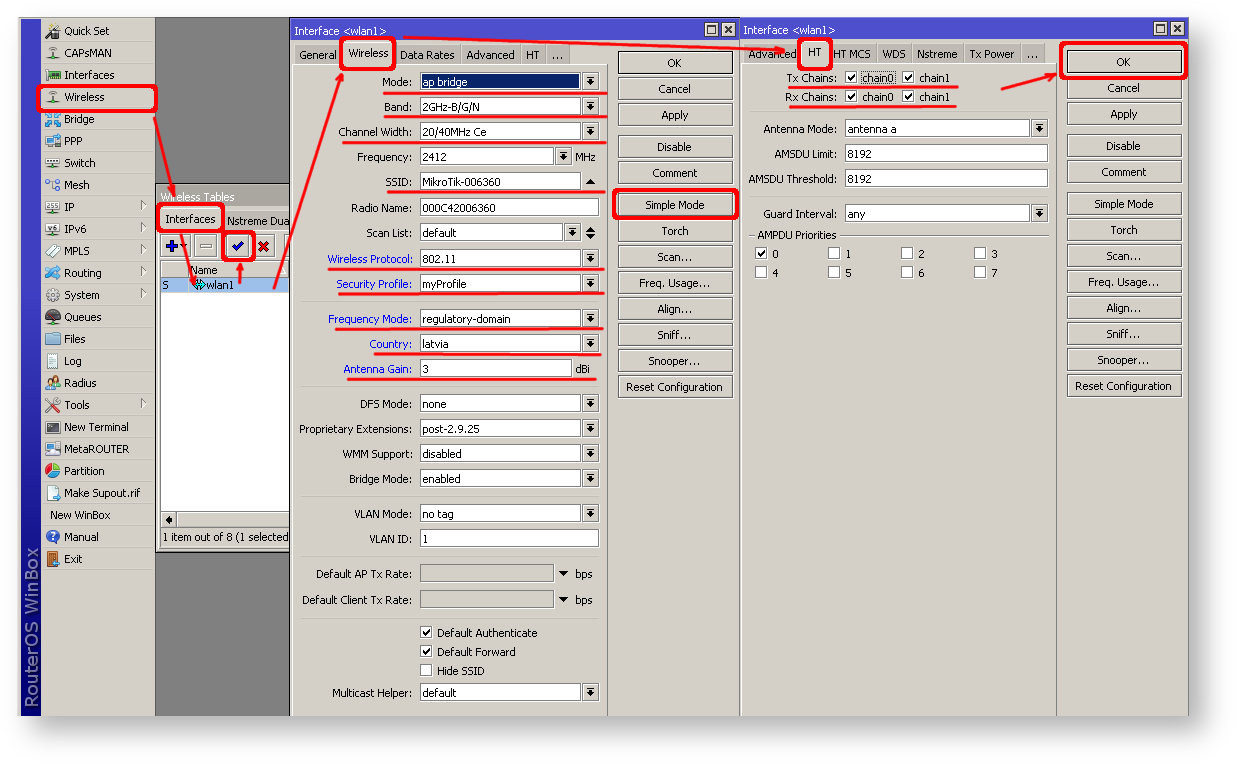
To do the same from Winbox/Webfig:
- Open Wireless window, select wlan1 interface and click on enable button;
- Double click on wireless interface to open configuration dialog;
- In configuration dialog click on Wireless tab and click Advanced mode button on the right side. When you click on the button additional configuration parameters will appear and description of the button will change to Simple mode;
- Choose parameters as shown in the screenshot, except for the country settings and SSID. You may want to also choose different frequency and antenna gain;
- Next click on HT tab and make sure both chains are selected;
- click on OK button to apply settings.

Last step is to add wireless interface to local bridge, otherwise connected clients will not get an IP address:
?
...
1 |
|
Using Winbox
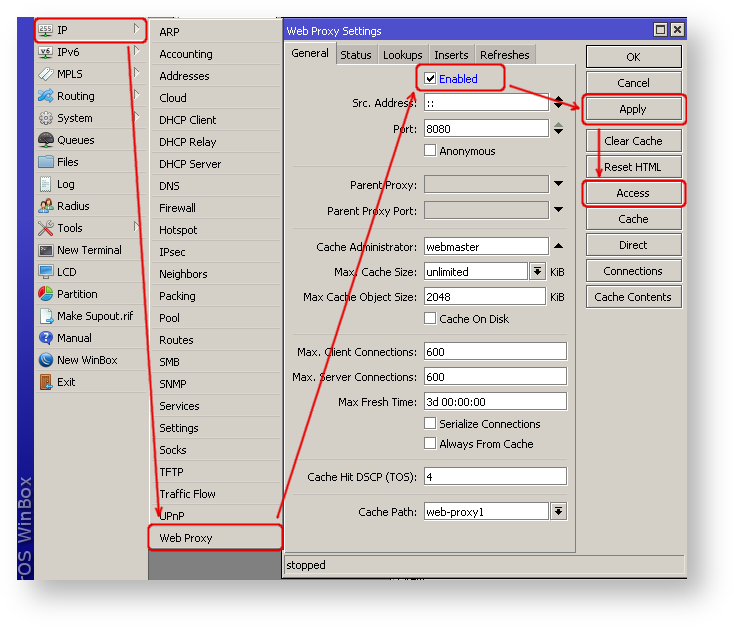

- On the left menu navigate to IP -> Web Proxy
- Web proxy settings dialog will appear.
- Check the "Enable" checkbox and click on "Apply" button
- Then click on "Access" button to open "Web Proxy Access" dialog
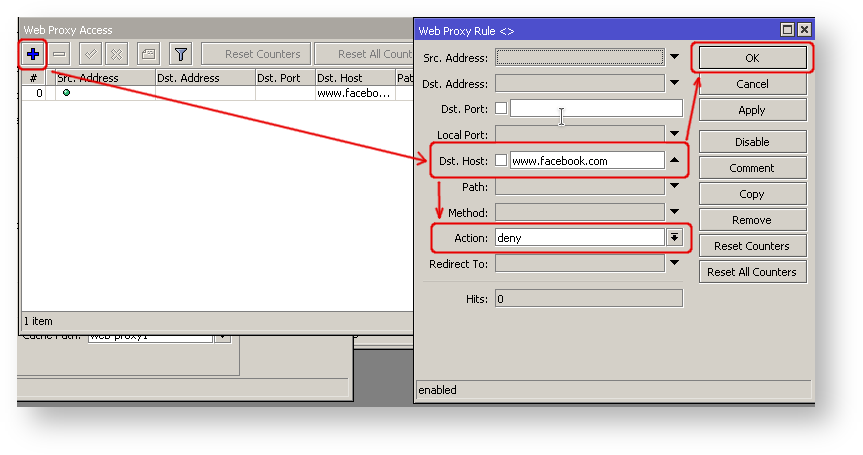

- In "Web Proxy Access" dialog click on "+" to add new Web-proxy rule
- Enter Dst.Host name that you wan to block, in this case "www.facebook.com", choose action "deny"
- Then click on "Ok" button to apply changes.
- Repeat the same to add other rules.
...