...
The device can be used both indoors and outdoors. The IP rating scale of IP54. If you intend to mount outdoors, please ensure that any cable openings are directed downwards. The Mounting direction is indicated on the device with an arrow pointing up. Use POE injector and proper grounding. Recommended using Cat6 shielded cable.
Warning! This equipment should be installed and operated with a minimum distance of 30 cm between the device and your body. Operation of this equipment in the residential environment could cause radio interference.
...
We recommend clicking the "Check for updates" button and updating your RouterOS software to the latest version to ensure the best performance and stability. RouterOS includes many configuration options in addition to what is described in this document. We suggest starting here to get yourself accustomed to the possibilities: https://mt.lv/help. In case IP connection is not available, the Winbox tool (https://mt.lv/winbox) can be used to connect to the MAC address of the device from the LAN side (all access is blocked from the internet port by default). For recovery purposes, it is possible to boot the device from a network, see the section 16351316.
GPS
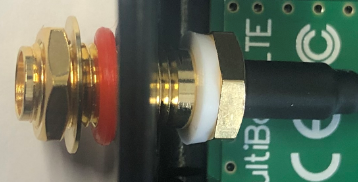
The The built-in GPS module requires an external antenna to be used (SMA connector is already mounted behind the unit door). Please see the 16351316 section on how to remove the door.
Attention the GPS uses an active antenna, only connect and disconnect the antenna, when the device is turned off!
Make sure that the GPS package is installed on your device. Check by following command /system package print. If not installed please download extra packages at our download page accordingly to your RouterOS version and install GPS package by dragging it to the Files menu. Enable GPS and start working:
...
- MiniPCIe 1 (top slot) supports PCIe and USB 2.0 cards but is shared with the USB 2.0 type A port (can use either the USB port or miniPCIe slot at the same time). It can be used only SIM slot #1.
- MiniPCIe 2 (bottom slot) supports only USB (2.0 and 3.0) miniPCIe modems (no PCIe support). Uses SIM slot #2 and SIM slot #3. By default uses SIM slot #2.
- USB 2.0 type A port (can only be used if miniPCIe 1 is not used).
- To use the top miniPCIe slot with a USB type miniPCIe card, switch the USB connections to the miniPCIe slot: /system routerboard usb set type=mini-PCIe This will disable the USB 2.0 port on the front of the unit.
- Insert the SIM card into the top slot by a chip on the SIM card facing down. Bottom slots – with the chip facing up.
Please Please check if you are using the correct SIM slot. For the modem inserted in the bottom mini-pcie slot, you need to use either sim slot 2 or sim slot 3. And the used sim slot needs to be selected in RouterOS.
CLI command to select the sim slot: /system routerboard modem set sim-slot=2
...
- Use a wrist grounding strap when unpacking and working with electrical components to avoid electrical discharge (ESD) damage;
- Remove six screws on the bottom of the case and lift off the top part of the case.
- Locate the miniPCIe slot and remove two factory attached screws;
- Attach provided a thick thermal pad to the card, and install the card into miniPCIe slot so that thermal pad is between PCB and card;
- The secure card in place using previously removed two screws;
- Connect internal antenna cables to your modem. Or guide your antenna cables through openings near GPS connector and connect to the modem. Recommended using silicone rubber to secure connectors in place.
- Attach a thinner thermal pad to the top of the card;
- When using external antennas, connectors can be attached on the case sides, to make openings use 6.5 mm drill bit, please see 16351316 section part 4;
- Please see picture below for reference on how to place rubber seals for best water protection;
- Reassembly in backorder. Tightening torque for PCB screws 0.3 Nm, case cover/enclosure screws 0.5 Nm.
...
- Scan QR code and choose your preferred OS.
- Install and open application.
- By default, the IP address and user name will be already entered.
- Click Connect to establish a connection to your device through a wireless network.
- Choose Quick setup and application will guide you through all basic configuration settings in a couple of easy steps.
- An advanced menu is available to fully configure all necessary settings.
Safety Warnings
Before you work on any equipment, be aware of the hazards involved with electrical circuitry, and be familiar with standard practices for preventing accidents.
Read the installation instructions before connecting the system to the power source.
This equipment is to be installed by trained and qualified personnel, as per these installation instructions. The installer is responsible for obtaining any required local or national safety inspections of the structural integrity of the installation by the local authority/inspection department.
All installation methods for mounting an access point on any wall surface is subject to the acceptance of local jurisdiction.
The Installation of the equipment must comply with local and national electrical codes.
This unit is intended to be mounted outdoors on a pole. Please read the mounting instructions carefully before beginning installation. Failure to use the correct hardware and configuration or to follow the correct procedures could result in a hazardous situation to people and damage to the system.
We cannot guarantee that no accidents or damage will occur due to the improper use of the device. Please use this product with care and operate at your own risk.
...
* It is the customer's responsibility to follow local country regulations, including operation within legal frequency channels, output power, cabling requirements, and Dynamic Frequency Selection (DFS) requirements. All MikroTik radio devices must be professionally installed!
According to Commission Decision 2000/299/EC (6 April 2000), the product falls under the scope of Class 2.
Note. Information contained here is subject to change. Please visit the product page on www.mikrotik.com for the most up to date version of this document.![]()
BG. Инструкция: Свържете адаптера на захранване, за да включите устройството. Отворете 192.168.88.1 в уеб браузър, за да настроите продукта. Повече информация в {_}{+}https://mt.lv/help-bg+_![]()
CS. Návod k použití: Připojte napájecí adaptér k zapnutí přístroje. Otevřete 192.168.88.1 ve webovém prohlížeči pro konfiguraci produktu. Více informací najdete v {_}{+}https://mt.lv/help-cs+_![]()
DA. Instruktionsbog: Tilslut strømadapteren for at tænde for enheden. Åbn 192.168.88.1 i en webbrowser til at konfigurere produktet. Mere information i {_}{+}https://mt.lv/help-da+_![]()
DE. Bedienungsanleitung: Verbinden Sie das Netzteil, um das Gerät einzuschalten. Öffnen Sie 192.168.88.1 in einem Web-Browser, um das Produkt zu konfigurieren. Weitere Informationen im {_}{+}https://mt.lv/help-de+_![]()
EL. εγχειρίδιο οδηγιών: Συνδέστε τον προσαρμογέα τροφοδοσίας για να ενεργοποιήσετε τη μονάδα. Ανοίξτε 192.168.88.1 σε ένα πρόγραμμα περιήγησης στο Web για να διαμορφώσετε το προϊόν. Περισσότερες πληροφορίες στο {_}{+}https://mt.lv/help-el+_![]()
EN. Instruction manual: Connect the power adapter to turn on the device. Open 192.168.88.1 in your web browser, to configure it. More information on {_}{+}https://mt.lv/help+_![]()
ES. Manual de instrucciones: Conecte el adaptador de alimentación para encender la unidad. Abra 192.168.88.1 en un navegador web para configurar el producto. Más información en {_}{+}https://mt.lv/help-es+_![]()
ET. Kasutusjuhend: Ühendage toiteadapter seadme sisselülitamiseks. Avatud 192.168.88.1 in veebilehitseja seadistada toodet. Rohkem teavet {_}{+}https://mt.lv/help-et+_![]()
FI. Käyttöohje: Kytke virtalähde päälle laitteen. Avaa 192.168.88.1 in selaimen määrittää tuotteen. Lisää tietoa {_}{+}https://mt.lv/help-fi+_![]()
FR. Mode d'emploi: Connectez l'adaptateur d'alimentation pour allumer l'appareil. Ouvrez 192.168.88.1 dans un navigateur Web pour configurer le produit. Plus d'informations dans {_}{+}https://mt.lv/help-fr+_![]()
HR. Uputa za uporabu: Priključite napajanje i uključite uređaj. Za konfiguraciju uređaja u pregledniku otvorite 192.168.88.1. Više informacija je na {_}{+}https://mt.lv/help-hr+_![]()
HU. Használati utasítás: Csatlakoztassa a hálózati adaptert a készülék bekapcsolásához. Megnyitása 192.168.88.1 egy webböngészőben beállítani a terméket. Több információ {_}{+}https://mt.lv/help-hu+_![]()
IT. Manuale di istruzioni: Collegare l'adattatore di alimentazione per accendere l'unità. Aprire 192.168.88.1 in un browser Web per configurare il prodotto. Maggiori informazioni in {_}{+}https://mt.lv/help-it+_![]()
IS. Notkunarhandbók: Tengdu straumbreytirinn til að kveikja á tækinu. Opnaðu 192.168.88.1 í vafranum þínum til að stilla það. Nánari upplýsingar á {_}{+}https://mt.lv/help-is+_![]()
NO. Instruksjonsmanual: Koble strømadapteren for å slå på enheten. Åpne 192.168.88.1 i nettleseren din for å konfigurere den. Mer informasjon på {_}{+}https://mt.lv/help-no+_![]()
LT. Naudojimosi instrukcija: Prijunkite maitinimo adapterį įjunkite įrenginį. Į interneto naršyklę 192.168.88.1 Atidarykite galite konfigūruoti gaminį. Daugiau informacijos rasite {_}{+}https://mt.lv/help-lt+_![]()
LV. Lietošanas instrukcija: Pievienojiet Strāvas adapteri, lai ieslēgtu ierīci. Atvērt 192.168.88.1 ar interneta pārlūku, lai konfigurētu produktu. Plašāka informācija {_}{+}https://mt.lv/help-lv+_![]()
MT. Manwal tal-istruzzjoni: Qabbad l-adapter tal-qawwa biex iddawwar it-tagħmir. Iftaħ 192.168.88.1 fil-web browser tiegħek, biex jiġi kkonfigurat. Aktar informazzjoni fuq {_}{+}https://mt.lv/help-mt+_![]()
NL. Handleiding: Sluit voedingsadapter aan op het apparaat in te schakelen. Open 192.168.88.1 in een webbrowser om het product te configureren. Meer informatie in {_}{+}https://mt.lv/help-nl+_![]()
PL. Instrukcja obsługi: Podłącz adapter zasilania, aby włączyć urządzenie. Otwórz 192.168.88.1 w przeglądarce internetowej, aby skonfigurować urządzenie. Więcej informacji w {_}{+}https://mt.lv/help-pl+_![]()
PT. Manual de instruções: Conecte o adaptador de alimentação para ligar o aparelho. Abra 192.168.88.1 em um navegador da web para configurar o produto. Mais informações em {_}{+}https://mt.lv/help-pt+_![]()
RO. Instrucțiuni de utilizare: Conectați adaptorul de alimentare pentru a porni aparatul. Deschide 192.168.88.1 într-un browser web pentru a configura produsul. Mai multe informații în {_}{+}https://mt.lv/help-ro+_![]()
SK. Navodila: Priključite napajalnik za vklop naprave. Odprite 192.168.88.1 v spletnem brskalniku nastaviti izdelek. Več informacij v
{_}{+}https://mt.lv/help-sk+_![]()
SL. Návod na použitie: Pripojte napájací adaptér k zapnutiu prístroja. Otvorte 192.168.88.1 vo webovom prehliadači pre konfiguráciu produktu. Viac informácií nájdete v {_}{+}https://mt.lv/help-sl+_![]()
SV. Instruktionsmanual: Anslut nätadaptern för att slå på enheten. Öppna 192.168.88.1 i en webbläsare för att konfigurera produkten. Mer information på {_}{+}https://mt.lv/help-sv+_![]()
NO. Bruksanvisningen: Koble strømadapteren for å slå på enheten. Åpne 192.168.88.1 i en nettleser for å konfigurere produktet. Mer informasjon på {_}{+}https://mt.lv/help-no+_![]()
RU. Руководство по эксплуатации: подключите адаптер питания чтобы включить устройство. Откройте 192.168.88.1 в своем веб-браузере для конфигурации. Дополнительная информация https://mt.lv/help-ru
CN. 说明书。 连接电源适配器以打开设备。 在Web浏览器中打开192.168.88.1进行配置。 有关{_}{+}https://mt.lv/help-zh+_![]() 的更多信息
的更多信息