...
- Unscrew two screws and remove doors to access all ports. Please see the Mounting 16351316 section.
- Connect your Internet cable to the Ethernet port (this is optional if using LTE as the primary connection).
- Install your modem see miniPCIe slot usage (optional).
- Insert the SIM card into the slot (optional) (see SIM card).
- Connect GPS antenna (optional).
- Mount unit in your desired place, please see Mounting 16351316 paragraph.
- Choose your powering solution, please see the Powering 16351316 section for possibilities.
- Set your computer IP configuration to automatic (DHCP).
- From your PC or smartphone, connect to the wireless network name which starts with "MikroTik".
- Once connected to the wireless network, open https://192.168.88.1
 in your web browser to start configuration, since there is no password by default, you will be logged in automatically.
 - We recommend clicking the "Check for updates" button and updating your RouterOS software to the latest version to ensure the best performance and stability.
- Choose your country, to apply country regulation settings and set up your password on the screen that loads.
...
We recommend clicking the "Check for updates" button and updating your RouterOS software to the latest version to ensure the best performance and stability. RouterOS includes many configuration options in addition to what is described in this document. We suggest starting here to get yourself accustomed to the possibilities: https://mt.lv/help. In case IP connection is not available, the Winbox tool (https://mt.lv/winbox) can be used to connect to the MAC address of the device from the LAN side (all access is blocked from the internet port by default). For recovery purposes, it is possible to boot the device from a network, see the section Reset button 16351316.
GPS
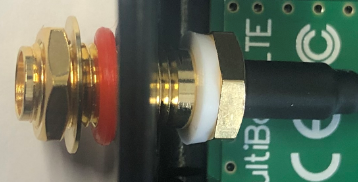
 The built-in GPS module requires an external antenna to be used (SMA connector is already mounted behind the unit door). Please see the Mounting 16351316 section on how to remove the door.
Attention the GPS uses an active antenna, only connect and disconnect the antenna, when the device is turned off!
Make sure that the GPS package is installed on your device. Check by following command /system package print. If not installed please download extra packages at our download page accordingly to your RouterOS version and install GPS package by dragging it to the Files menu. Enable GPS and start working:
...
This LtAP version is without modem installed. In this case, an internal antenna is not connected.
Installing a miniPCIe module should be done by a qualified person, please follow safety precautions when handling electrical equipment, the device supports two LoRa LR cards:
- Use a wrist grounding strap when unpacking and working with electrical components to avoid electrical discharge (ESD) damage;
- Remove six screws on the bottom of the case and lift off the top part of the case.
- Locate the miniPCIe slot and remove two factory attached screws;
- Attach provided a thick thermal pad to the card, and install the card into miniPCIe slot so that thermal pad is between PCB and card;
- The secure card in place using previously removed two screws;
- Connect internal antenna cables to your modem. Or guide your antenna cables through openings near GPS connector and connect to the modem. Recommended using silicone rubber to secure connectors in place.
- Attach a thinner thermal pad to the top of the card;
- When using external antennas, connectors can be attached on the case sides, to make openings use 6.5 mm drill bit, please see Mounting 16351316 section part 4;
- Please see picture below for reference on how to place rubber seals for best water protection;
- Reassembly in backorder. Tightening torque for PCB screws 0.3 Nm, case cover/enclosure screws 0.5 Nm.
...