SXT 6
The SXT 6 is an outdoor wireless router with a built-in directional antenna. It can be used as a CPE or for point to point links (use RouterOS wireless mode "bridge" to work as a single-client AP for point to point scenarios).
Safety Warnings
Before you work on any equipment, be aware of the hazards involved with electrical circuitry, and be familiar with standard practices for preventing accidents.
Ultimate disposal of this product should be handled according to all national laws and regulations.
All installation methods for mounting an access point on any wall surface is subject to the acceptance of local jurisdiction.
The Installation of the equipment must comply with local and national electrical codes.
This product is intended to be mounted outdoors on a pole. Please read the mounting instructions carefully before beginning installation. Failure to use the correct hardware and configuration or to follow the correct procedures could result in a hazardous situation for people and damage to the system.
Use only the power supply and accessories approved by the manufacturer, and which can be found in the original packaging of this product.
Read the installation instructions before connecting the system to the power source.
We cannot guarantee that no accidents or damage will occur due to the improper use of the device. Please use this product with care and operate at your own risk!
In the case of device failure, please disconnect it from power. The fastest way to do so is by unplugging the power plug from the power outlet.
It is the customer's responsibility to follow local country regulations, including operation within legal frequency channels, output power, cabling requirements, and Dynamic Frequency Selection (DFS) requirements. All Mikrotik radio devices must be professionally installed.
This is a class A device. In a domestic environment, this product might cause radio interference in which case the user might be required to take adequate measures.
Connecting
- Open the Ethernet door to connect an Ethernet cable to the Ethernet port, connect the other end of the Ethernet cable to the included PoE injector;
- Plug the PoE injector into your network switch or computer;
- Plug the included power supply into the PoE injector to start up the device;
- Set LAN computer IP configuration to automatic (DHCP);
- The default IP address of the unit is 192.168.88.1, open this address in your web browser to start the configuration. The username is admin and there is no password (or, for some models, check user and wireless passwords on the sticker);
- We recommend clicking the "Check for updates" button and updating your RouterOS software to the latest version to ensure the best performance and stability;
- Choose your country, to apply country regulation settings, and set up your password on the screen that loads.
Configuration
Once logged in, we recommend clicking the "Check for updates" button in the QuickSet menu, as updating your RouterOS software to the latest version ensures the best performance and stability. For wireless models, please make sure you have selected the country where the device will be used, to conform with local regulations.
RouterOS includes many configuration options in addition to what is described in this document. We suggest starting here to get yourself accustomed to the possibilities: https://mt.lv/help. In case IP connection is not available, the Winbox tool (https://mt.lv/winbox) can be used to connect to the MAC address of the device from the LAN side (all access is blocked from the Internet port by default).
For recovery purposes, it is possible to boot the device from the network, see a section Reset button.
Powering
The device only accepts 7-30 V power from Passive PoE injectors (one power supply and PoE injector are included). Maximum power consumption 14 W.
Connecting to a POE Adapter:
- Connect the Ethernet cable from the device to the POE port of the POE adapter.
- Connect an Ethernet cable from your LAN to the LAN port of the POE adapter, please mind arrows for data and power flow.
- Connect the power cord to the adapter, and then plug the power cord into a power outlet.
MikroTik mobile app
Use the MikroTik smartphone app to configure your router in the field, or to apply the most basic initial settings for your MikroTik home access point.

- Scan QR code and choose your preferred OS.
- Install and open application.
- By default, the IP address and user name will be already entered.
- Click Connect to establish a connection to your device through a wireless network.
- Choose Quick setup and the application will guide you through all basic configuration settings in a couple of easy steps.
- An advanced menu is available to fully configure all necessary settings.
Mounting
SXT designed to be mounted on the pole, the package includes a mounting bracket and steel clamp: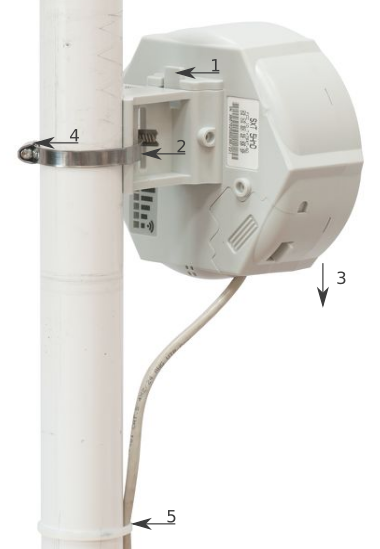
- With the clip pointed forward, slide the mounting bracket into the rail on the bottom of the case, until the clip clicks into place;
- Guide the clamp through the opening in the bracket;
- Attach the unit to a pole, with the Ethernet port pointing downward;
- Use a PH2 screwdriver to tighten the rings when alignment is complete;
- Fix the Ethernet cable to the pole using zip ties, less than one meter from the unit, to avoid the cable being pulled out of the port;
- Check mounting angle and positioning.
When mounting outdoors, please ensure that any cable openings are directed downwards. Use POE injector and proper grounding, this device has a specially designed grounding connector under the port cover. Recommended using Cat6 cable. The IP rating scale for this device is IP54.
The SXT device has a sliding door, behind which the Ethernet ports and the reset buttons are located. This door can be also secured shut with a screw in the provided screw hole.
When using both Ethernet ports, make sure to cut a wider cable opening in the plastic door. You can use pliers to tear out the plastic piece that is protecting the cable opening. When closing the plastic door, make sure to apply pressure, until it "clicks" into place.
Mounting and configuration of this device should be done by a qualified person.
Grounding
The installation infrastructure (towers and masts), as well as the router itself, must be properly grounded. The device includes a grounding wire attachment connector behind the case door. Attach your grounding wire to the grounding connector, then attach the other end of the grounding wire to the grounded mast. This is to substantially reduce the risk of ESD and lightning damage.
Extension slots and ports
- One Ethernet (10/100 Mbit or Gigabit, depends on model), supporting automatic cross/straight cable correction (Auto MDI/X), so you can use either straight or cross-over cables for connecting to other network devices.
- One Integrated Wireless with a built-in 26-degree directional antenna, max gain 16 dBi.
Reset button
The routerBOOT reset button has the following functions. Press the button and apply the power, then:
- Release the button when the green LED starts flashing, to reset RouterOS configuration to defaults.
- Release the button when the LED turns solid green to clear all configuration and defaults.
- Release the button after LED is no longer lit (~20 seconds) to cause the device to look for Netinstall servers (required for reinstalling RouterOS over the network).
Regardless of the above option used, the system will load the backup RouterBOOT loader if the button is pressed before power is applied to the device. Useful for RouterBOOT debugging and recovery.
Accessories
Package includes the following accessories that come with the device:
- DC ⎓ EU/US Switching Power Supply 24 V;
- Hose Clamp SUS304 (Philips type; clamping diameter range 35-70 mm);
- POE Injector with shielded connector;
- Pole mounting bracket;
Specifications
For more information about this product, specification and pictures please visit our web page: https://mikrotik.com/product/RBSXTG-6HPnD
Operating system support
The device supports the RouterOS software v6 version number is indicated in the RouterOS menu /system resource. Other operating systems have not been tested.
To avoid pollution of the environment, please separate the device from household waste and dispose of it in a safe manner, such as in designated waste disposal sites. Familiarize yourself with the procedures for the proper transportation of the equipment to the designated disposal sites in your area.
Eurasian Conformity Mark
Доступные частотные каналы могут различаться в зависимости от модели продукта и сертификации.
Информация о дате изготовления устройства указана в конце серийного номера на его наклейке через дробь. Первая цифра означает номер года (последняя цифра года), две последующие означают номер недели.
Изготовитель: Mikrotikls SIA, Aizkraukles iela 23, Riga, LV-1006, Латвия, support@mikrotik.com. Сделано в Китае, Латвии или Литве. Cм. на упаковке.
Для получения подробных сведений о гарантийном обслуживании обратитесь к продавцу. Информация об импортерах продукции MikroTik в Российскую Федерацию: https://mikrotik.com/buy/europe/russia
Продукты MikroTik, которые поставляются в Евразийский таможенный союз, оцениваются с учетом соответствующих требований и помечены знаком EAC, как показано ниже: