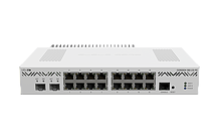
CCR2004-16G-2S+PC
Safety Warnings
- Before you work on any MikroTik equipment, be aware of the hazards involved with electrical circuitry, and be familiar with standard practices for preventing accidents. The installer should be familiar with network structures, terms, and concepts.
- Use only the power supply and accessories approved by the manufacturer, which can be found in the original packaging of this product.
- This equipment is to be installed by trained and qualified personnel, as per these installation instructions. The installer is responsible for making sure, that the Installation of the equipment is compliant with local and national electrical codes. Do not attempt to disassemble, repair, or modify the device.
- This product is intended to be installed indoors. Keep this product away from water, fire, humidity, or hot environments.
- We cannot guarantee that no accidents or damage will occur due to the improper use of the device. Please use this product with care and operate at your own risk!
In the case of device failure, please disconnect it from power. The fastest way to do so is by unplugging the power plug from the power outlet.
This is a Class A product. In a domestic environment, this product might cause radio interference in which case the user might be required to take adequate measures
![]() Electric shock hazard. This equipment is to be serviced by trained personnel only
Electric shock hazard. This equipment is to be serviced by trained personnel only
Quick start
- Connect with your computer to the device;
- Download the configuration tool https://mt.lv/winbox;
- Open the Neighbors tab and connect to the device using the MAC address, 192.168.88.1 is available on ether15 using a web browser;
- The user name: admin, by default there is no password (or, for some models, check user and wireless passwords on the sticker).;
- To update the device to the latest software version download the latest RouterOS software from https://mikrotik.com/download;
- Choose ARM64 packages, and save them to your computer;
- Return to the WinBox and upload downloaded packages;
- Restart the device.
Powering
The device has dual integrated power supply units AC ⏦ 100-240V with standard IEC compatible sockets.
Supported input voltage 36-57 V (DC jack) 36-57 (2-pin terminal)
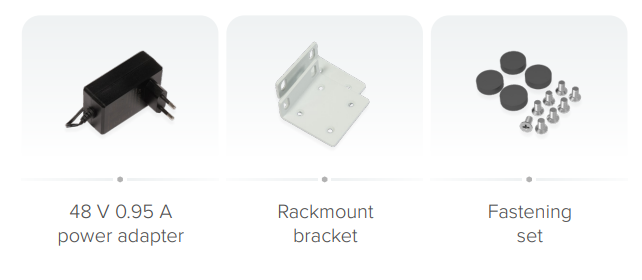
Power adapter nominal voltage 48 V
Power adapter nominal current 0.9 A
Max power consumption (without attachments) 30 W
Max power consumption 36 W
Configuration
The Ethernet port 15 has a default IP address for connecting: 192.168.88.1. The username is admin and there is no password. The device doesn't have any other configuration applied by default, please set up WAN IP addresses, user passwords, and update the device. RouterOS includes many configuration options in addition to what is described in this document. We suggest starting here to get yourself accustomed to the possibilities: https://mt.lv/help. In case the IP connection is not available, the Winbox tool (https://mt.lv/winbox) can be used to connect to the MAC address of the device from the LAN side
For recovery purposes, it is possible to boot the device for reinstallation, see a section Reset button.
Specifications
- Product code CCR2004-16G-2S+PC
- CPU AL32400 1.2 GHz
- CPU architecture ARM 64bit
- CPU core count 4
- Size of RAM 4 GB
- RAM type DDR4
- Storage 128 MB, NAND
- Number of 1G Ethernet ports 16
- Number of 10G SFP+ ports 2
- Operating system RouterOS v7, License level 6
- Switch chip model 88E6191X
- Number of Gbit ports in switch 8
- Dimensions 272 x 195 x 44 mm
- Operating temperature -20°C to +60°C
Reset button
The reset button has two functions:
- Hold this button during boot time until the LED light starts flashing, release the button to reset the RouterOS configuration.
- Or Keep holding the button for 5 more seconds until LED turns off, then release it to make the RouterBOARD look for Netinstall servers.
Regardless of the above option used, the system will load the backup RouterBOOT loader if the button is pressed before power is applied to the device. Useful for RouterBOOT debugging and recovery.
Mounting
The device is designed to use indoors and it can be mounted in a rackmount enclosure using provided rack mounts, or it can be placed on the desktop. Use a Phillips screwdriver to attach rackmount ears on both sides of the device if designated use is for rackmount enclosure:
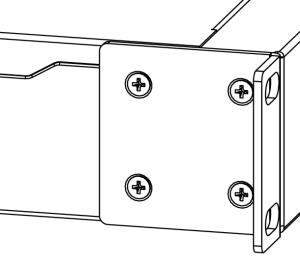
- Attach rack ears to both sides of the device and tighten four screws to secure them in place, as shown in the picture to the right;
- Place the device in rackmount enclosure and align with the holes so that the device fits conveniently;
- Tighten screws to secure it in place.
The device has no protection from water contamination, please ensure the placement of the device in a dry and ventilated environment. We recommend Cat6 cables for our devices.
Included Parts
Operating System Support
The device supports RouterOS software with version number v7.2 at or above what is indicated in the RouterOS menu /system resource. Other operating systems have not been tested.
Federal Communication Commission Interference Statement
![]()
This equipment has been tested and found to comply with the limits for a Class B digital device, pursuant to Part 15 of the FCC Rules. These limits are designed to provide reasonable protection against harmful interference in a residential installation.
This equipment generates, uses, and can radiate radio frequency energy and, if not installed and used in accordance with the instructions, may cause harmful interference to radio communications. However, there is no guarantee that interference will not occur in a particular installation. If this equipment does cause harmful interference to radio or television reception, which can be determined by turning the equipment off and on, the user is encouraged to try to correct the interference by one or more of the following measures:
- Reorient or relocate the receiving antenna.
- Increase the separation between the equipment and receiver.
- Connect the equipment into an outlet on a circuit different from that to which the receiver is connected.
- Consult the dealer or an experienced radio/TV technician for help.
FCC Caution: Any changes or modifications not expressly approved by the party responsible for compliance could void the user’s authority to operate this equipment.
This device complies with Part 15 of the FCC Rules. Operation is subject to the following two conditions: (1) This device may not cause harmful interference, and (2) this device must accept any interference received, including interference that may cause undesired operation.
Note: This unit was tested with shielded cables on the peripheral devices. Shielded cables must be used with the unit to ensure compliance.
Innovation, Science, and Economic Development Canada
This device contains license-exempt transmitter(s)/receiver(s) that comply with Innovation, Science, and Economic Development Canada’s license-exempt RSS(s). Operation is subject to the following two conditions: (1) This device may not cause interference. (2) This device must accept any interference, including interference that may cause undesired operation of the device.
L’émetteur/récepteur exempt de licence contenu dans le présent appareil est conforme aux CNR d’Innovation, Sciences et Développement économique Canada applicables aux appareils radio exempts de licence. L’exploitation est autorisée aux deux conditions suivantes: 1) L’appareil ne doit pas produire de brouillage; 2) L’appareil doit accepter tout brouillage radioélectrique subi, même si le brouillage est susceptible d’en compromettre le fonctionnement.
This Class B digital apparatus complies with Canadian ICES-003.
Cet appareil numérique de la classe [B] est conforme à la norme NMB-003 du Canada.
CAN ICES-003 (B) / NMB-003 (B)
UKCA marking

(EN) Technical Specifications / (DE) Technische Spezifikationen / (FR) Spécifications techniques / (IT) Specifiche tecniche / (ES) Especificaciones técnicas / (RU) Технические характеристики: | ||||
| (EN) Product Power Input Options (DE) Produkt Stromquellen Optionen (FR) Options d'entrée d'alimentation du produit (IT) Opzioni di ingresso alimentazione del prodotto (ES) Opciones de entrada de energía del producto (RU) Варианты входной мощности продукта | (EN) DC Adapter Output Specification, (V/A) (DE) Ausgangsspezifikationen des Gleichstromadapters, (V/A) (FR) Spécifications de sortie de l'adaptateur de courant continu, (V/A) (IT) Specifiche di uscita dell'adattatore di corrente continua, (V/A) (ES) Especificaciones de salida del adaptador de corriente continua, (V/A) (RU) Выходные характеристики адаптера постоянного тока, (В/А) | (EN) IP class of the enclosure (DE) IP-Klasse des Gehäuses (FR) Classe IP du boîtier (IT) Classe IP della custodia (ES) Clase de IP del recinto (RU) Класс защиты корпуса IP | (EN) Operating Temperature (DE)Betriebstemperatur (FR) température de fonctionnement (IT) temperatura di esercizio (ES) Temperatura de funcionamiento (RU) Рабочая Температура | |
|---|---|---|---|---|
| Voltage, V | Current, A | |||
DC Jack (36 - 57 V DC) 2-pin terminal (36 - 57 V DC) | 48 | 0.9 | IP20 | ±0°..+60°C |