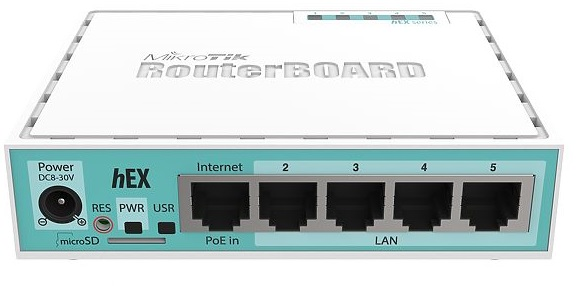
hEX
hEX is a powerful five port Gigabit Ethernet router for locations where wireless connectivity is not required.
First use
- Choose your powering solution, please see hEX0 section for possibilities.
- Connect your Internet cable to port 1 (labeled "Internet"), and local network computers to ports 2-5.
- Connect your direct input power jack if not using POE, to start up the device.
- If using POE please see section POE Adapter on how to connect.
- The device will boot up and after short beep, the network will be available for connecting.
- Set your computer IP configuration to automatic (DHCP).
- Once connected to the network, open https://192.168.88.1
 in your web browser to start configuration, since there is no password by default, you will be logged in automatically.
 - We recommend clicking the "Check for updates" button and updating your RouterOS software to the latest version to ensure the best performance and stability.
- Set up your password in the screen that loads.
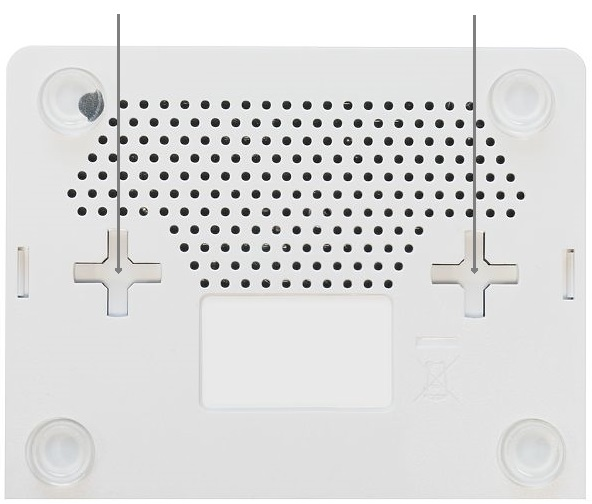
Mounting
This device is designed for use indoors by placing it on the flat surface or mounting on the wall, mounting points are shown on the picture below, screws are not included in the package. Screws with size 4x25 mm fit nicely, depending on your wall structure you can use dowels 6x30 mm and 6 mm drill bit if needed.
When mounting on the wall, please ensure that cable feed is pointing downwards. We recommend using Cat6 cable for our devices. The IP rating scale for this device is IPX0.
Powering
The device accepts power from the power jack or from the first Ethernet port (Passive PoE):
- Direct input power jack (5.5mm outside and 2mm inside, female, pin positive) accepts 8-30 V ⎓DC.
- The first Ethernet port accepts passive Power over Ethernet 8-30 V ⎓DC. 12 V or more is recommended to compensate for the loss in cables.
The power consumption of this device under maximum load with attachments is 10 W. Without attachments 5 W.
Booting process
RouterOS includes many configuration options in addition to what is described in this document. We suggest starting here to get yourself accustomed to the possibilities: https://mt.lv/help. In case IP connection is not available, the Winbox tool (https://mt.lv/winbox) can be used to connect to the MAC address of the device from the LAN side (all access is blocked from the Internet port by default).
For recovery purposes, it is possible to boot the device from the network, see a section Reset button.
Extension Slots and Ports
- The device has five individual Ethernet ports, supporting automatic cross/straight cable correction (Auto MDI/X), so you can use either straight or cross-over cables for connecting to other network devices.
- MicroSD card slot.
- USB type A slot.
Buttons and jumpers
Reset button
The RouterBOOT reset button has the following functions. Press the button and apply the power, then:
- Release the button when a green LED starts flashing, to reset RouterOS configuration to defaults.
- Release the button when the LED turns solid green to clear all configuration and bridge all interfaces.
- Release the button after LED is no longer lit (~20 seconds) to cause a device to look for Netinstall servers (required for reinstalling RouterOS over the network).
Regardless of the above option used, the system will load the backup RouterBOOT loader if the button is pressed before power is applied to the device. Useful for RouterBOOT debugging and recovery.
Mode button
The action of the mode buttons can be configured from RouterOS software to execute any user-supplied RouterOS script. You can also disable this button.
The mode button can be configured in RouterOS menu /system routerboard mode-button
Connecting to a POE Adapter:
- Connect the Ethernet cable from the device to the POE port of the POE adapter.
- Connect an Ethernet cable from your LAN to the LAN port of the POE adapter, please mind arrows for data and power flow.
- Connect the power cord to the adapter, and then plug the power cord into a power outlet.
Accessories
Package includes the following accessories that come with the device:
- DC ⎓ EU/US Switching Power Supply 24 V, 0.38 A, 9 W, Level VI, cable:1.5 m.
Specifications
For more information about this product, specification and pictures please visit our web page: https://mikrotik.com/product/RB750Gr3
Operating System Support
The device supports RouterOS software version 6. The specific factory installed version number is indicated in the RouterOS menu /system resource. Other operating systems have not been tested.