wAP LR2 kit
The wAP is a small weatherproof device with an integrated LR2 card.
Quickstart
- Make sure your ISP is allowing hardware change and will issue an automatic IP address.
- Open the bottom lid (see "Bottom Lid").
- Connect an external antenna to the SMA connector (see "Antenna usage").
- Connect the device to the power source (see "Powering").
- Connect with your device to the MikroTik wireless network
- The configuration has to be done through the wireless network using a web browser or mobile app - (see "MikroTik mobile app"). Alternatively, you can use the WinBox configuration tool https://mt.lv/winbox. By default, Ethernet port access is blocked by a firewall.
- Once connected to the wireless network, open https://192.168.88.1
 in your web browser to start the configuration.
 - user name: admin and there is no password by default.
- When using a mobile application choose Quick setup and it will guide you through all necessary configurations in six easy steps.
- Find your LR Gateway ID on the label within the product and register it in your Network Server.
- To make the device connect to the LR Network Server, please see "Configuration".
- Click the "Check for updates" button and update your RouterOS software to the latest version, the device needs to have an active Internet connection.
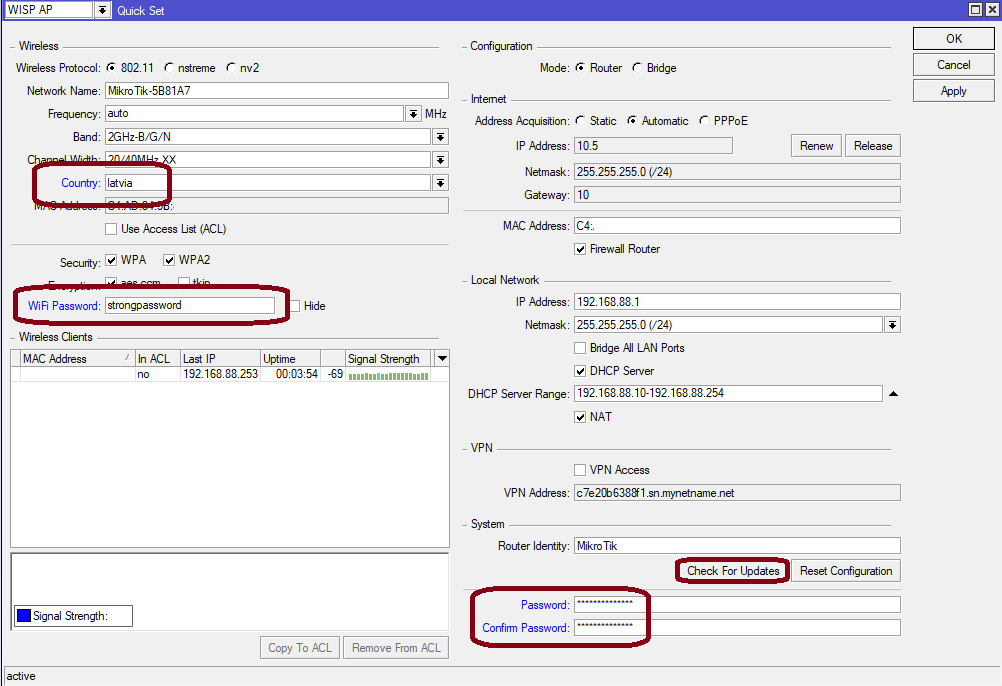
- After the update set your country, to apply country regulation settings.
- Set your WiFi password.
- Set the router password.
Expansion slots and ports
- 10/100 Ethernet port, supporting automatic cross/straight cable correction (Auto MDI/X). Either straight or crossover cable can be used for connecting to other network devices.
- External SMA antenna connector already connected to the LR card.
- Automotive connector. Pinout: A - reserved for future use (orange), B - reserved for future use (blue), C - ground (black), D – power in (red).
- MiniPCIe slot with an integrated LR2 card.
- Integrated Wireless module operating at 2.4 GHz, 802.11b/g/n protocol.
- Mini-SIM Slot.
Powering
The device accepts power in the following ways:
- Ethernet port accepts passive PoE 9-30 V DC ⎓.
- Direct-input power jack (5.5 mm outside and 2 mm inside, female, pin positive plug) accepts 9-30 V DC⎓.
- Automotive connector 9-30 V DC⎓.
The power consumption under maximum load can reach 8 W.
Connecting to a PoE Adapter:
- Connect the Ethernet cable from the device to the PoE+DATA port of the PoE adapter.
- Connect an Ethernet cable from your local network (LAN) to the PoE adapter.
- Connect the power cord to the adapter, and then plug the power cord into a power outlet.
Mounting
The device can be mounted in several ways: pole, wall, ceiling or it can be placed in a specially designed Mikrotik holder which comes with the package. The package also includes a drill hole template with detailed mounting instructions, to help you with the Ethernet cable installation and attachment to a ceiling or a wall. Steel bracket to put on the other side of a dropdown ceiling tile and two screws and wall anchors. Zip ties or steel clamps for mounting on the pole.
The IP rating scale for this device is IP54. When mounting outdoors, please ensure that any cable openings are directed downwards. We recommend using the POE injector and proper grounding with a Cat6 shielded cable. When using and installing this device please pay attention to the Maximum Permissible Exposure (MPE) safety distance with a minimum of 20 cm between the radiator and your body.
Mounting on the mast or pole:
* It's recommended to use electrical tape to increase friction between materials.
- Mount plastic tie straps to steel bracket guiding them through holes.
- Mount bracket to the device.
- Secure them with a screw.
- Mount and align the device on the pole or mast.
- Guide Ethernet cable through the opening and connect to the Ethernet port.
- Close bottom latch and secure with a screw.
It's recommended to secure an Ethernet cable to the pole using zip ties. With the distance from the device approximately 30 cm.
Mounting unit on the wall:
- Use included a template to mark spots for drilling holes. And if needed for Ethernet cable. Align accordingly, it will depend on how the device will be mounted finally.
- Insert dowels if needed, depends on wall structure and material.
- Place included a steel bracket on the wall.
- Use screws to secure it in place.
- Extend your Ethernet cable through the opening and connect to the Ethernet port.
- Mount the device on the steel bracket
- Secure it in place with the screw.
- Close bottom latch.
Avoid mounting the device on the low ground spot, as you won't be able to attach and close the bottom latch.
Mounting on the ceiling:
A Special bracket is included in the package to mount on the drop ceiling. As it consists of two parts, to be attached on both sides of the ceiling tile.
- Use the template to mark spots for holes.
- Place both mounting brackets on the spot.
- Secure them together using screws.
Continue assembling in the same manner if mounting on the wall.
- Extend your Ethernet cable through the opening and connect to the Ethernet port.
- Mount the device on the steel bracket.
- Secure it in place with the screw.
- Close bottom latch.
Bottom Lid
- The bottom lid is secured in place with the captive screw.

- Use a Torx T20 screwdriver to unscrew it, but do not remove the screw completely.

- Pull the cover in the opposite direction from the device to remove it.

- Reassemble.
Configuration
To set the configuration for LR please connect to the device and log in with your web browser or use a mobile application. Two easy steps to follow:
First step:
- Once logged in, Quick Set will be selected, please switch to WebFig on the right side of the screen. If the configuration is done through a mobile application then click on the gear symbol on the right side of the screen to open up an advanced menu.
- On the left side menu please find and select the section "Lora".
- On the newly opened window select the Servers tab.
- Click + to add a new server configuration.
- A new window will appear and you will have to enter:
Name: (Server name)
Address: (Server address)
Up port: (Usually it's 1700)
Down port: (Usually it's 1700)
- Click OK to save.
Second step:
- Select the Device tab on the previous window.
- Double-click or tap on the line to configure.
- Choose the previously entered network on the drop-down menu.
- Click on the button Enable to enable the gateway.
- Click OK to save.
- The configuration is done.
We recommend clicking the "Check for updates" button in the QuickSet menu, as updating your RouterOS software to the latest version ensures the best performance and stability. For wireless models, please make sure you have selected the country where the device will be used, to conform with local regulations.
RouterOS includes many configuration options in addition to what is described in this document. We suggest starting here to get yourself accustomed to the possibilities: https://mt.lv/help. In case IP connection is not available, the Winbox tool (https://mt.lv/winbox) can be used to connect to the MAC address of the device from the LAN side (all access is blocked from the Internet port by default).
For recovery purposes, it is possible to boot the device for reinstallation, see section Buttons and Jumpers.
MikroTik mobile app
Use the MikroTik smartphone app to configure your router in the field, or to apply the most basic initial settings for your MikroTik home access point.

- Scan QR code and choose your preferred OS.
- Install and open application.
- By default, the IP address and user name will be already entered.
- Click Connect to establish a connection to your device through a wireless network.
- Choose Quick setup and the application will guide you through all basic configuration settings in a couple of easy steps.
- An advanced menu is available to fully configure all necessary settings.
Antenna usage
We recommend using an external antenna, the "LR Antenna kit" - which can be obtained separately. The antenna kit has a pole mount and cable ready to use with LR cards. https://mikrotik.com/product/lora_antenna_kit
SMA connector located under the bottom door is already connected to the LR card and ready to be used. Please see the Mounting section on how to remove the door.
Please connect and disconnect the antenna, when the device is turned off!
Internal antenna 2 dBi can be used for setups where the distance to the gateway is closer than 1km. By default, the antenna is not connected to the card! To use an internal antenna:
- Open bottom door (see "Mounting").

- Use the PH2 screwdriver to remove the screw.
- Disassemble the upper case from the bottom by sliding them to opposite sides.

- Locate the internal antenna cable and replace it with the SMA cable connector on the LR card.

- Reassembly.
Buttons and jumpers
The reset button has three functions:
- Hold this button during boot time until LED light starts flashing, release the button to reset RouterOS configuration (total 5 seconds).
- Keep holding for 5 more seconds, LED turns solid, release now to turn on CAP mode. The device will now look for a CAPsMAN server (total 10 seconds).
- Or Keep holding the button for 5 more seconds until LED turns off, then release it to make the RouterBOARD look for Netinstall servers (total 15 seconds).
Regardless of the above option used, the system will load the backup RouterBOOT loader if the button is pressed before power is applied to the device. Useful for RouterBOOT debugging and recovery.
Accessories
The package includes the following accessories that come with the device:
- EU/US Switching Power Supply 24 V ⎓, 0.8 A, 19.2 W, 85.3 %, VI, cable:150 cm Hor CMC.
- WAP desk bracket.
- WAP outdoor case bracket AL, white.
- POE Injector cable.
- Cable (H4130-04PDB000R 3 mm 2x2P Housing) to (StripJacket 5 cm+WireEnd Strip/Tin 1 cm) 24 AWG.
- Hose Clamp, 35-70 mm, W4.
- K-52 fastening set.
- WAP-drill-template, paper brochure.
Operating system support
The device supports RouterOS software version 6.48.3. The specific factory-installed version number is indicated in the RouterOS menu /system resource. Other operating systems have not been tested.
RouterOS LR support is limited to MikroTik LR cards, it does not support 3rd party Lora cards.
(EN) EU Responsible Party Details: / (DE) Angaben zur verantwortlichen Partei der EU: /(FR) Détails de la partie responsable de l'UE: / (IT) Dettagli della parte responsabile dell'UE: /(ES) Detalles de la parte responsable de la UE: | ||||
| (EN)Company name: (DE) Name der Firma: (FR) Nom de la compagnie: (IT) Nome della ditta: (ES) Nombre de empresa: (RU) Название компании: | (EN) Address: (DE) Adresse: (FR) Adresse: (IT) Indirizzo: (ES) Habla a: (RU) Адрес: | (EN) Contact: (DE) Kontakt: (FR) Contacter: (IT) Contatto: (ES) Contacto: (RU) Контакт: | Email: | (EN) Phone No.: DE) Telefonnummer.: (FR) Pas de téléphone.: (IT) Telefono: (ES) Telefono no.: (RU) Номер телефона.: |
|---|---|---|---|---|
| SIA “Mikrotīkls” | Brivibas gatve 214i, Riga, LV1039, Latvia | MikroTik Compliance Department | certification@mikrotik.com | +371-6-7317700 |
UKCA marking

CE Declaration of Conformity
BG | С настоящото Mikrotīkls SIA декларира, че този тип радиосъоръжение RBwAPR-2nD&R11e-LR2 е в съответствие с Директива 2014/53/ЕС. Цялостният текст на ЕС декларацията за съответствие може да се намери на следния интернет адрес: https://mikrotik.com/products |
CS | Tímto Mikrotīkls SIA prohlašuje, že typ rádiového zařízení RBwAPR-2nD&R11e-LR2 je v souladu se směrnicí 2014/53/EU. Úplné znění EU prohlášení o shodě je k dispozici na této internetové adrese: https://mikrotik.com/products |
DA | Hermed erklærer Mikrotīkls SIA, at radioudstyrstypen RBwAPR-2nD&R11e-LR2 er i overensstemmelse med direktiv 2014/53/EU. EU-overensstemmelseserklæringens fulde tekst kan findes på følgende internetadresse: https://mikrotik.com/products |
DE | Hiermit erklärt Mikrotīkls SIA, dass der Funkanlagentyp RBwAPR-2nD&R11e-LR2 der Richtlinie 2014/53/EU entspricht. Der vollständige Text der EU-Konformitätserklärung ist unter der folgenden Internetadresse verfügbar: https://mikrotik.com/products |
EL | Με την παρούσα ο/η Mikrotīkls SIA, δηλώνει ότι ο ραδιοεξοπλισμός RBwAPR-2nD&R11e-LR2 πληροί την οδηγία 2014/53/ΕΕ. Το πλήρες κείμενο της δήλωσης συμμόρφωσης ΕΕ διατίθεται στην ακόλουθη ιστοσελίδα στο διαδίκτυο: https://mikrotik.com/products |
EN | Hereby, Mikrotīkls SIA declares that the radio equipment type RBwAPR-2nD&R11e-LR2 is in compliance with Directive 2014/53/EU. The full text of the EU declaration of conformity is available at the following internet address: https://mikrotik.com/products |
ES | Por la presente, Mikrotīkls SIA declara que el tipo de equipo radioeléctrico RBwAPR-2nD&R11e-LR2 es conforme con la Directiva 2014/53/UE. El texto completo de la declaración UE de conformidad está disponible en la dirección Internet siguiente: https://mikrotik.com/products |
ET | Käesolevaga deklareerib Mikrotīkls SIA, et käesolev raadioseadme tüüp RBwAPR-2nD&R11e-LR2 vastab direktiivi 2014/53/EL nõuetele. ELi vastavusdeklaratsiooni täielik tekst on kättesaadav järgmisel internetiaadressil: https://mikrotik.com/products |
FI | Mikrotīkls SIA vakuuttaa, että radiolaitetyyppi RBwAPR-2nD&R11e-LR2 on direktiivin 2014/53/EU mukainen. EU-vaatimustenmukaisuusvakuutuksen täysimittainen teksti on saatavilla seuraavassa internetosoitteessa: https://mikrotik.com/products |
FR | Le soussigné, Mikrotīkls SIA, déclare que l'équipement radioélectrique du type RBwAPR-2nD&R11e-LR2 est conforme à la directive 2014/53/UE. Le texte complet de la déclaration UE de conformité est disponible à l'adresse internet suivante: https://mikrotik.com/products |
HR | Mikrotīkls SIA ovime izjavljuje da je radijska oprema tipa RBwAPR-2nD&R11e-LR2 u skladu s Direktivom 2014/53/EU. Cjeloviti tekst EU izjave o sukladnosti dostupan je na sljedećoj internetskoj adresi: https://mikrotik.com/products |
HU | Mikrotīkls SIA igazolja, hogy a RBwAPR-2nD&R11e-LR2 típusú rádióberendezés megfelel a 2014/53/EU irányelvnek. Az EU-megfelelőségi nyilatkozat teljes szövege elérhető a következő internetes címen: https://mikrotik.com/products |
IT | Il fabbricante, Mikrotīkls SIA, dichiara che il tipo di apparecchiatura radio RBwAPR-2nD&R11e-LR2 è conforme alla direttiva 2014/53/UE. Il testo completo della dichiarazione di conformità UE è disponibile al seguente indirizzo Internet: https://mikrotik.com/products |
IS | Hér með lýsir Mikrotīkls SIA því yfir að RBwAPR-2nD&R11e-LR2 er í samræmi við grunnkröfur og aðrar kröfur, sem gerðar eru í tilskipun 2014/53/EU. Fullur texti ESB samræmisyfirlýsingar er að finna á eftirfarandi veffangi: https://mikrotik.com/products |
LT | Aš, Mikrotīkls SIA, patvirtinu, kad radijo įrenginių tipas RBwAPR-2nD&R11e-LR2 atitinka Direktyvą 2014/53/ES. Visas ES atitikties deklaracijos tekstas prieinamas šiuo interneto adresu: https://mikrotik.com/products |
LV | Ar šo Mikrotīkls SIA deklarē, ka radioiekārta RBwAPR-2nD&R11e-LR2 atbilst Direktīvai 2014/53/ES. Pilns ES atbilstības deklarācijas teksts ir pieejams šādā interneta vietnē: https://mikrotik.com/products |
MT | B'dan, Mikrotīkls SIA, niddikjara li dan it-tip ta' tagħmir tar-radju RBwAPR-2nD&R11e-LR2 huwa konformi mad-Direttiva 2014/53/UE. It-test kollu tad-dikjarazzjoni ta' konformità tal-UE huwa disponibbli f'dan l-indirizz tal-Internet li ġej: https://mikrotik.com/products |
NL | Hierbij verklaar ik, Mikrotīkls SIA, dat het type radioapparatuur RBwAPR-2nD&R11e-LR2 conform is met Richtlijn 2014/53/EU. De volledige tekst van de EU-conformiteitsverklaring kan worden geraadpleegd op het volgende internetadres: https://mikrotik.com/products |
NO | Mikrotīkls SIA erklærer herved at utstyret RBwAPR-2nD&R11e-LR2 er i samsvar med de grunnleggende krav og øvrige relevante krav i direktiv 2014/53/EU. Den fulle teksten til EU-samsvarserklæringen er tilgjengelig på følgende internettadresse: https://mikrotik.com/products |
PL | Mikrotīkls SIA niniejszym oświadcza, że typ urządzenia radiowego RBwAPR-2nD&R11e-LR2 jest zgodny z dyrektywą 2014/53/UE. Pełny tekst deklaracji zgodności UE jest dostępny pod następującym adresem internetowym: https://mikrotik.com/products |
PT | O(a) abaixo assinado(a) Mikrotīkls SIA declara que o presente tipo de equipamento de rádio RBwAPR-2nD&R11e-LR2 está em conformidade com a Diretiva 2014/53/UE. O texto integral da declaração de conformidade está disponível no seguinte endereço de Internet: https://mikrotik.com/products |
RO | Prin prezenta, Mikrotīkls SIA declară că tipul de echipamente radio RBwAPR-2nD&R11e-LR2 este în conformitate cu Directiva 2014/53/UE. Textul integral al declarației UE de conformitate este disponibil la următoarea adresă internet: https://mikrotik.com/products |
SK | Mikrotīkls SIA týmto vyhlasuje, že rádiové zariadenie typu RBwAPR-2nD&R11e-LR2 je v súlade so smernicou 2014/53/EÚ. Úplné EÚ vyhlásenie o zhode je k dispozícii na tejto internetovej adrese: https://mikrotik.com/products |
SL | Mikrotīkls SIA potrjuje, da je tip radijske opreme RBwAPR-2nD&R11e-LR2 skladen z Direktivo 2014/53/EU. Celotno besedilo izjave EU o skladnosti je na voljo na naslednjem spletnem naslovu: https://mikrotik.com/products |
| Härmed försäkrar Mikrotīkls SIA att denna typ av radioutrustning RBwAPR-2nD&R11e-LR2 överensstämmer med direktiv 2014/53/EU. Den fullständiga texten till EU-försäkran om överensstämmelse finns på följande webbadress: https://mikrotik.com/products |
WLAN | Operating Frequency / Maximum output power Betriebsfrequenz / maximale Ausgangsleistung Fréquence de fonctionnement / puissance de sortie maximale Frequenza operativa / massima potenza di uscita Frecuencia de funcionamiento / potencia de salida máxima Рабочая частота / максимальная выходная мощность | 2400-2483.5 MHz / 20 dBm |
LR | 2403-2479 MHz / 20 dBm |
This MikroTik device meets Maximum transmit power limits per ETSI regulations. For more detailed information see Declaration of Conformity above / Dieses MikroTik-Gerät erfüllt die maximalen Sendeleistung Grenzwerte gemäß ETSI-Vorschriften. Weitere Informationen finden Sie oben in der Konformitätserklärung / Cet appareil MikroTik respecte les limites de puissance de transmission maximale conformément aux réglementations ETSI. Pour plus d'informations, voir la déclaration de conformité ci-dessus / Questo dispositivo MikroTik è conforme ai limiti di potenza massima di trasmissione in conformità con le normative ETSI. Per ulteriori informazioni, consultare la dichiarazione di conformità sopra / Este dispositivo MikroTik cumple con los valores límite de potencia máxima de transmisión de acuerdo con la normativa ETSI. Para obtener información más detallada, consulte la Declaración de conformidad anterior / Это устройство MikroTik соответствует предельным значениям максимальной мощности передачи в соответствии с правилами ETSI. Для получения более подробной информации см. Декларацию соответствия выше.
(EN) Technical Specifications / (DE) Technische Spezifikationen / (FR) Spécifications techniques/ (IT) Specifiche tecniche / (ES) Especificaciones técnicas / (RU) Технические характеристики: | |||
| (EN) Product Power Input Options (DE) Produkt Stromquellen Optionen (FR) Options d'entrée d'alimentation du produit (IT) Opzioni di ingresso alimentazione del prodotto (ES) Opciones de entrada de energía del producto (RU) Варианты входной мощности продукта | (EN) DC Adapter Output Specification, (V/A) (DE) Ausgangsspezifikationen des Gleichstromadapters, (V/A) (FR) Spécifications de sortie de l'adaptateur de courant continu, (V/A) (IT) Specifiche di uscita dell'adattatore di corrente continua, (V/A) (ES) Especificaciones de salida del adaptador de corriente continua, (V/A) (RU) Выходные характеристики адаптера постоянного тока, (В/А) | (EN) IP class of the enclosure (DE) IP-Klasse des Gehäuses (FR) Classe IP du boîtier (IT) Classe IP della custodia (ES) Clase de IP del recinto (RU) Класс защиты корпуса IP | (EN) Operating Temperature (DE)Betriebstemperatur (FR) température de fonctionnement (IT) temperatura di esercizio (ES) Temperatura de funcionamiento (RU) Рабочая Температура |
|---|---|---|---|
DC Jack 9-30 V Automotive port 9-30 V DC PoE In Ethernet port 9-30 V DC | 24 / 0.8 | IP54 | -33°..+60°C |