Overview
CAPsMAN allows applying wireless settings to multiple MikroTik AP devices from a central configuration interface.
More specifically, the Controlled Access Point system Manager (CAPsMAN) allows centralization of wireless network management and if necessary, data processing. When using the CAPsMAN feature, the network will consist of a number of 'Controlled Access Points' (CAP) that provide wireless connectivity and a 'system Manager' (CAPsMAN) that manages the configuration of the APs, it also takes care of client authentication and optionally, data forwarding.
When a CAP is controlled by CAPsMAN it only requires the minimum configuration required to allow it to establish a connection with CAPsMAN. Functions that were conventionally executed by an AP (like access control, client authentication) are now executed by CAPsMAN. The CAP device now only has to provide the wireless link layer encryption/decryption.
Depending on the configuration, data is either forwarded to CAPsMAN for centralized processing (default) or forwarded locally at the CAP itself (local forwarding mode).
Requirements
- Any RouterOS device can be a controlled wireless access point (CAP) as long as it has at least a Level 4 RouterOS license
- CAPsMAN server can be installed on any RouterOS device, even if the device itself does not have a wireless interface
- Unlimited CAPs (access points) supported by CAPsMAN
- 32 Radios per CAP maximum
- 32 Virtual interfaces per master radio interface maximum
- Not possible to use Nv2 and NStreme proprietary protocols
Simple setup of a CAPsMAN system
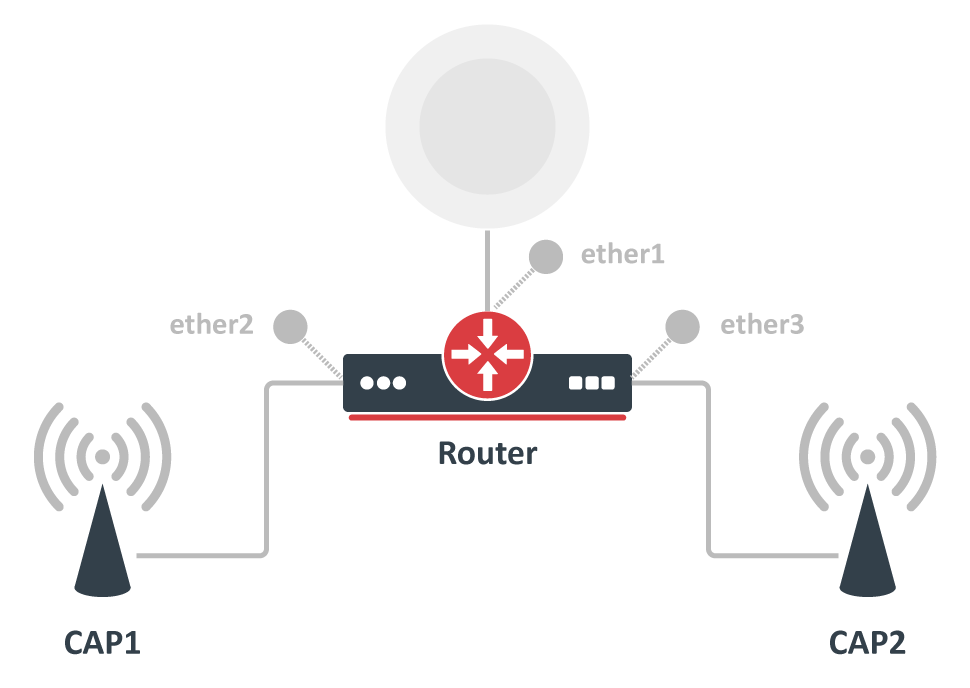
Before deep-diving into the details of CAPsMAN operation, let us quickly illustrate how to set up the most basic system where you have a MikroTik router that manages two MikroTik AP devices. The benefit of CAPsMAN is that the CAP units don't need to be configured, all settings are done in the CAPsMAN server.
The CAPsMAN setup consists of defining configuration templates, which will then be pushed to the controllable AP devices (CAPs). Assuming your main router is already connected to the internet and works fine, you can proceed as follows.
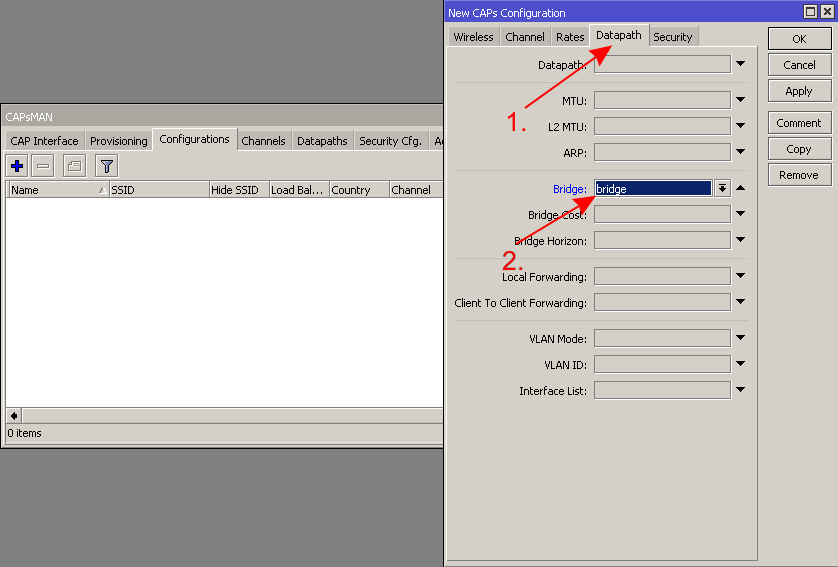
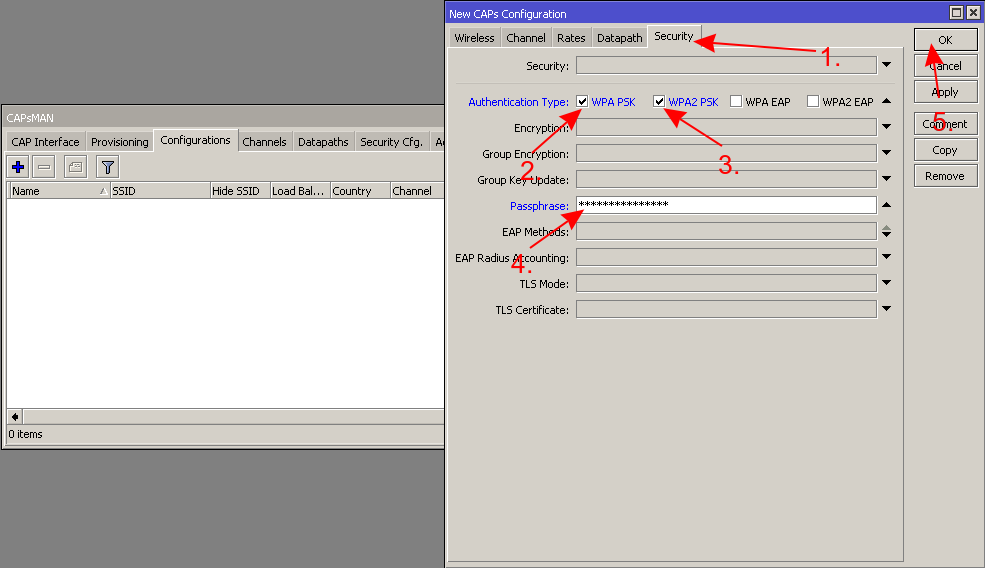
In the central device, which will be your CAPsMAN server, create a new "Configuration" template with only the basic settings (network name, country, the local LAN bridge interface, the wireless password):
1.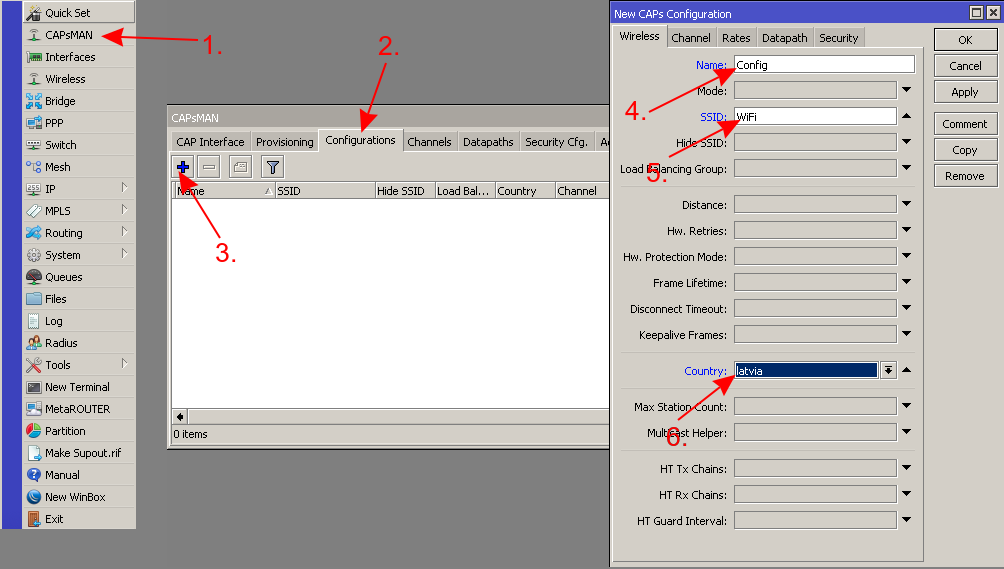 2.
2. 3.
3.
Then create a new "Provisioning" rule, which will assign the created configuration template to the CAP devices:
4. 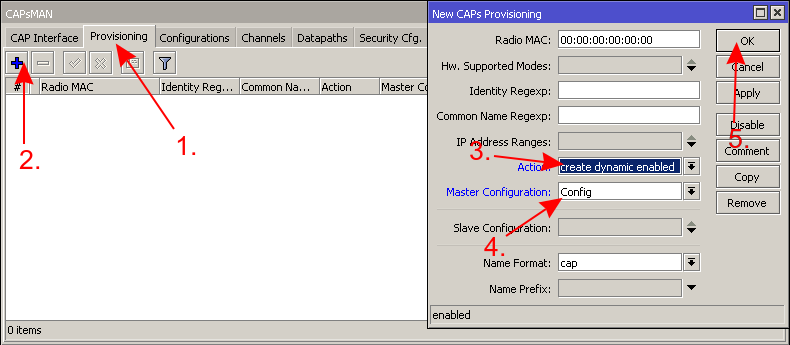
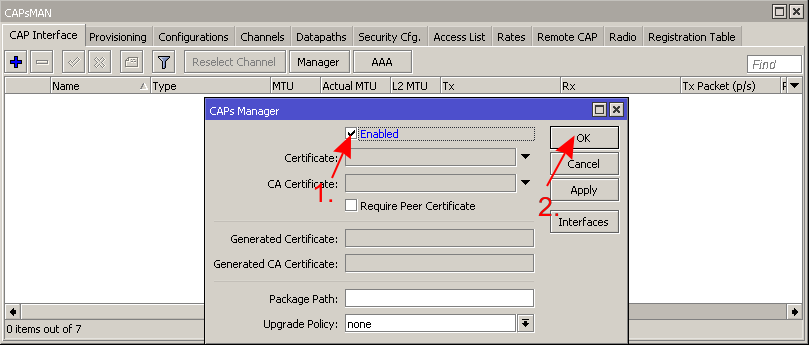
All that remains to do on the CAPsMAN, is to enable it:
5. 
Most MikroTik AP devices already support CAP mode out of the box, all you need to do, is make sure they are on the same network as your CAPsMAN, and then boot them up, while holding the reset button.
So, for example, connect the CAP device to one of the CAPsMAN device LAN ports while it is turned off, then hold the reset button, and power on the CAP device. Keep holding the button until the User LED turns solid, release now to turn on CAP mode. The device will now look for a CAPsMAN server (total time to hold the button, around 10 seconds).
The device will now show up in the CAPsMAN "Remote CAP" menu and will be "provisioned" with the configuration template, as per the provisioning settings. For more details on how to manually adjust all settings, keep reading this document.
CAP to CAPsMAN Connection
For the CAPsMAN system to function and provide wireless connectivity, a CAP must establish management connection with CAPsMAN. A management connection can be established using MAC or IP layer protocols and is secured using 'DTLS'.
A CAP can also pass the client data connection to the Manager, but the data connection is not secured. If this is deemed necessary, then other means of data security needs to be used, e.g. IPSec or encrypted tunnels.
CAP to CAPsMAN connection can be established using 2 transport protocols (via Layer 2 and Layer3).
- MAC layer connection features:
- no IP configuration necessary on CAP
- CAP and CAPsMAN must be on the same Layer 2 segment - either physical or virtual (by means of L2 tunnels)
- IP layer (UDP) connection features:
- can traverse NAT if necessary
- CAP must be able to reach CAPsMAN using IP protocol
- if the CAP is not on the same L2 segment as CAPsMAN, it must be provisioned with the CAPsMAN IP address, because IP multicast based discovery does not work over Layer3
In order to establish connection with CAPsMAN, CAP executes a discovery process. During discovery, CAP attempts to contact CAPsMAN and builds an available CAPsMANs list. CAP attempts to contact to an available CAPsMAN using:
- configured list of Manager IP addresses
- list of CAPsMAN IP addresses obtained from DHCP server
- broadcasting on configured interfaces using both - IP and MAC layer protocols.
When the list of available CAPsMANs is built, CAP selects a CAPsMAN based on the following rules:
- if caps-man-names parameter specifies allowed manager names (/system identity of CAPsMAN), CAP will prefer the CAPsMAN that is earlier in the list, if list is empty it will connect to any available Manager
- suitable Manager with MAC layer connectivity is preferred to Manager with IP connectivity
After Manager is selected, CAP attempts to establish DTLS connection. There are the following authentication modes possible:
- no certificates on CAP and CAPsMAN - no authentication
- only Manager is configured with certificate - CAP checks CAPsMAN certificate, but does not fail if it does not have appropriate trusted CA certificate, CAPsMAN must be configured with require-peer-certificate=no in order to establish connection with CAP that does not possess certificate
- CAP and CAPsMAN are configured with certificates - mutual authentication
After DTLS connection is established, CAP can optionally check CommonName field of certificate provided by CAPsMAN. caps-man-certificate-common-names parameter contains list of allowed CommonName values. If this list is not empty, CAPsMAN must be configured with certificate. If this list is empty, CAP does not check CommonName field.
If the CAPsMAN or CAP gets disconnected from the network, the loss of connection between CAP and CAPsMAN will be detected in approximately 10-20 seconds.
CAP Auto Locking to CAPsMAN
CAP can be configured to automatically lock to a particular CAPsMAN server. Locking is implemented by recording certificate CommonName of CAPsMAN that CAP is locked to and checking this CommonName for all subsequent connections. As this feature is implemented using certificate CommonName, use of certificates is mandatory for locking to work.
Locking is enabled by the following command:
[admin@CAP] > /interface wireless cap set lock-to-caps-man=yes
Once CAP connects to suitable CAPsMAN and locks to it, it is reflected like this:
[admin@wtp] > /interface wireless cap print
...
        locked-caps-man-common-name: CAPsMAN-000C424C30F3
From now on CAP will only connect to CAPsMAN with this CommonName, until locking requirement is cleared, by setting lock-to-caps-man=no. This approach needs to be used if it is necessary to force CAP to lock to another CAPsMAN - by at first setting lock-to-caps-man=no followed by lock-to-caps-man=yes.
Note that CAP can be manually "locked" to CAPsMAN by setting caps-man-certificate-common-names.
Auto Certificates
To simplify CAPsMAN and CAP configuration when certificates are required (e.g. for automatic locking feature), CAPsMAN can be configured to generate necessary certificates automatically and CAP can be configured to request certificate from CAPsMAN.
Automatic certificates do not provide full public key infrastructure and are provided for simple setups. If more complicated PKI is necessary - supporting proper certificate validity periods, multiple-level CA certificates, certificate renewal - other means must be used, such as manual certificate distribution or SCEP.
CAPsMAN has the following certificate settings:
- certificate - this is CAPsMAN certificate, private key must be available for this certificate. If set to none, CAPsMAN will operate in no-certificate mode and none of certificate requiring features will work. If set to auto, CAPsMAN will attempt to issue certificate to itself using CA certificate (see ca-certificate description). Note that CommonName automatically issued certificate will be "CAPsMAN-<mac address>" and validity period for will be the same as for CA certificate.
- ca-certificate - this is CA certificate that CAPsMAN will use when issuing certificate for itself if necessary (see certificate description) and when signing certificate requests from CAPs. If set to none, CAPsMAN will not be able to issue certificate to itself or sign certificate requests from CAPs. If set to auto, CAPsMAN will generate self-signed CA certificate to use as CA certificate. CommonName for this certificate will take form "CAPsMAN-CA-<mac address>" and validity period will be from jan/01/1970 until jan/18/2038.
When CAPsMAN will auto-generate certificates, this will be reflected like this:
[admin@CM] /caps-man manager> pr
                   enabled: yes
               certificate: auto
            ca-certificate: auto
  require-peer-certificate: no
     generated-certificate: CAPsMAN-000C424C30F3
  generated-ca-certificate: CAPsMAN-CA-000C424C30F3
And certificates:
[admin@CM] /certificate> print detail
Flags: K - private-key, D - dsa, L - crl, C - smart-card-key,
A - authority, I - issued, R - revoked, E - expired, T - trusted
 0 K   A T name="CAPsMAN-CA-000C424C30F3" common-name="CAPsMAN-CA-000C424C30F3" key-size=2048
           days-valid=24854 trusted=yes
           key-usage=digital-signature,key-encipherment,data-encipherment,key-cert-sign,crl-sign
           serial-number="1" fingerprint="69d77bbb45c50afd2d6c1785c2a3d72596b8a5f6"
           invalid-before=jan/01/1970 00:00:01 invalid-after=jan/18/2038 03:14:07

 1 K   I   name="CAPsMAN-000C424C30F3" common-name="CAPsMAN-000C424C30F3" key-size=2048
           days-valid=24854 trusted=no key-usage=digital-signature,key-encipherment
           ca=CAPsMAN-CA-000C424C30F3 serial-number="1"
           fingerprint="e853ddb9d41fc139083a176ab164331bc24bc5ed"
           invalid-before=jan/01/1970 00:00:01 invalid-after=jan/18/2038 03:14:07
CAP can be configured to request certificate from CAPsMAN. In order for this to work, CAP must be configured with setting certificate=request and CAPsMAN must have CA certificate available (either specified in ca-certificate setting or auto-generated).
CAP will initially generate private key and certificate request with CommonName of form "CAP-<mac address>". When CAP will establish connection with CAPsMAN, CAP will request CAPsMAN to sign its certificate request. If this will succeed, CAPsMAN will send CA certificate and newly issued certificate to CAP. CAP will import these certificates in its certificate store:
[admin@CAP] > /interface wireless cap print
...
              requested-certificate: cert_2
        locked-caps-man-common-name: CAPsMAN-000C424C30F3
[admin@CAP] > /certificate print detail
Flags: K - private-key, D - dsa, L - crl, C - smart-card-key,
A - authority, I - issued, R - revoked, E - expired, T - trusted
 0       T name="cert_1" issuer=CN=CAPsMAN-CA-000C424C30F3 common-name="CAPsMAN-CA-000C424C30F3"
           key-size=2048 days-valid=24837 trusted=yes
           key-usage=digital-signature,key-encipherment,data-encipherment,key-cert-sign,crl-sign
           serial-number="1" fingerprint="69d77bbb45c50afd2d6c1785c2a3d72596b8a5f6"
           invalid-before=jan/01/1970 00:00:01 invalid-after=jan/01/2038 03:14:07

 1 K     T name="cert_2" issuer=CN=CAPsMAN-CA-000C424C30F3 common-name="CAP-000C4200C032"
           key-size=2048 days-valid=24837 trusted=yes
           key-usage=digital-signature,key-encipherment serial-number="2"
           fingerprint="2c85bf2fbc9fc0832e47cd2773a6f4b6af35ef65"
           invalid-before=jan/01/1970 00:00:01 invalid-after=jan/01/2038 03:14:07
On subsequent connections to CAPsMAN, CAP will use generated certificate.
CAP Configuration
When an AP is configured to be controlled by CAPsMAN, configuration of the managed wireless interfaces on the AP is ignored (exceptions: antenna-gain,antenna-mode). Instead, AP accepts configuration for the managed interfaces from CAPsMAN.
The CAP wireless interfaces that are managed by CAPsMAN and whose traffic is being forwarded to CAPsMAN (ie. they are not in local forwarding mode), are shown as disabled, with the note Managed by CAPsMAN. Those interfaces that are in local forwarding mode (traffic is locally managed by CAP, and only management is done by CAPsMAN) are not shown disabled, but the note Managed by CAPsMAN is shown
CAP behavior of AP is configured in /interface wireless cap menu. From there you can:
- Disable or enable CAP feature on the device
- Set list of wireless interfaces to be controlled by Manager
- Set list of interfaces over which CAP should attempt to discover Manager
- Set list of Manager IP addresses that CAP will attempt to contact during discovery
- Set list of Manager names that CAP will attempt to connect
- Set list of Manager certificate CommonNames that CAP will connect to
- Set bridge to which interfaces should be added when local forwarding mode is used
Each wireless interface on a CAP that is under CAPsMAN control appears as a virtual interface on the CAPsMAN. This provides maximum flexibility in data forwarding control using regular RouterOS features, such as routing, bridging, firewall, etc.CAPsMAN Configuration Concepts
Many wireless interface settings are able to be grouped together into named groups ('profiles') that simplifies the reuse of configuration - for example, common configuration settings can be configured in a 'configuration profile' and multiple interfaces can then refer to that profile. At the same time any profile setting can be overridden directly in an interface configuration for maximum flexibility.
Currently there are the following setting groups:
- channel - channel related settings, such as frequency and width
- datapath - data forwarding related settings, such as bridge to which particular interface should be automatically added as port
- security - security related settings, such as allowed authentication types or passphrase
- configuration - main wireless settings group, includes settings such as SSID, and additionally binds together other setting groups - that is, configuration profile can refer to channel, security, etc. named setting groups. Additionally any setting can be overridden directly in configuration profile.
Interface settings bind together all setting groups, but additionally any setting can be overridden directly in interface settings.
By means of setting groups, configuration is organized in hierarchical structure with interface (actual user of configuration) as the root. In order to figure out the effective value of some setting this structure is consulted in a fashion where a higher level setting value overrides a lower level value.
For example, when WPA2 passphrase to be used by a particular interface needs to be found, the following places are consulted and the first place with WPA2 passphrase configured specifies effective passphrase. "->" denotes referring to setting profile (if configured):
- interface passphrase
- interface->security passphrase
- interface->configuration passphrase
- interface->configuration->security passphrase
There are 2 types of interfaces on CAPsMAN - "master" and "slave". The master interface holds the configuration for an actual wireless interface (radio), while a slave interface links to the master interface and is intended to hold the configuration for a Virtual-AP (multiple SSID support). There are settings that are meaningful only for master interface, i.e. mainly hardware setup related settings such as radio channel settings. Note that in order for a radio to accept clients, it's master interface needs to be enabled. Slave interfaces will become operational only if enabled and the master interface is enabled.
Interfaces on CAPsMAN can be static or dynamic. Static interfaces are stored in RouterOS configuration and will persist across reboots. Dynamic interfaces exist only while a particular CAP is connected to CAPsMAN.
CAPsMAN Global Configuration
Settings to enable CAPsMAN functionality are found in /caps-man manager menu:
| Property | Description |
|---|---|
| enabled (yes | no; Default: no) | Disable or enable CAPsMAN functionality |
| certificate (auto | certificate name | none; Default: none) | Device certificate |
| ca-certificate (auto | certificate name | none; Default: none) | Device CA certificate |
| require-peer-certificate (yes | no; Default: no) | Require all connecting CAPs to have a valid certificate |
| package-path (string |; Default: ) | Folder location for the RouterOS packages. For example, use "/upgrade" to specify the upgrade folder from the files section. If empty string is set, CAPsMAN can use built-in RouterOS packages, note that in this case only CAPs with the same architecture as CAPsMAN will be upgraded. |
| upgrade-policy (none | require-same-version | suggest-same-upgrade; Default: none) | Upgrade policy options
|
Radio Provisioning
CAPsMAN distinguishes between CAPs based on an identifier. The identifier is generated based on the following rules:
- if CAP provided a certificate, identifier is set to the Common Name field in the certificate
- otherwise identifier is based on Base-MAC provided by CAP in the form: '[XX:XX:XX:XX:XX:XX]'.
When the DTLS connection with CAP is successfully established (which means that CAP identifier is known and valid), CAPsMAN makes sure there is no stale connection with CAP using the same identifier. Currently connected CAPs are listed in /caps-man remote-cap menu:
[admin@CM] /caps-man> remote-cap print
 # ADDRESS                                    IDENT           STATE               RADIOS
 0 00:0C:42:00:C0:32/27044                    MT-000C4200C032 Run                      1
CAPsMAN distinguishes between actual wireless interfaces (radios) based on their builtin MAC address (radio-mac). This implies that it is impossible to manage two radios with the same MAC address on one CAPsMAN. Radios currently managed by CAPsMAN (provided by connected CAPs) are listed in /caps-man radio menu:
[admin@CM] /caps-man> radio print
Flags: L - local, P - provisioned
 #    RADIO-MAC         INTERFACE                               REMOTE-AP-IDENT
 0  P 00:03:7F:48:CC:07 cap1                                    MT-000C4200C032
When CAP connects, CAPsMAN at first tries to bind each CAP radio to CAPsMAN master interface based on radio-mac. If an appropriate interface is found, radio gets set up using master interface configuration and configuration of slave interfaces that refer to particular master interface. At this moment interfaces (both master and slaves) are considered bound to radio and radio is considered provisioned.
If no matching master interface for radio is found, CAPsMAN executes 'provisioning rules'. Provisioning rules is an ordered list of rules that contain settings that specify which radio to match and settings that specify what action to take if a radio matches.
Provisioning rules for matching radios are configured in /caps-man provisioning menu:
| Property | Description |
|---|---|
| action (create-disabled | create-enabled | create-dynamic-enabled | none; Default: none) | Action to take if rule matches are specified by the following settings:
|
| comment (string; Default: ) | Short description of the Provisioning rule |
| common-name-regexp (string; Default: ) | Regular expression to match radios by common name |
| hw-supported-modes (a|a-turbo|ac|an|b|g|g-turbo|gn; Default: ) | Match radios by supported wireless modes |
| identity-regexp (string; Default: ) | Regular expression to match radios by router identity |
| ip-address-ranges (IpAddressRange[,IpAddressRanges] max 100x; Default: "") | Match CAPs with IPs within configured address range. |
| master-configuration (string; Default: ) | If action specifies to create interfaces, then a new master interface with its configuration set to this configuration profile will be created |
| name-format (cap | identity | prefix | prefix-identity; Default: cap) | specify the syntax of the CAP interface name creation
|
| name-prefix (string; Default: ) | name prefix which can be used in the name-format for creating the CAP interface names |
| radio-mac (MAC address; Default: 00:00:00:00:00:00) | MAC address of radio to be matched, empty MAC (00:00:00:00:00:00) means match all MAC addresses |
| slave-configurations (string; Default: ) | If action specifies to create interfaces, then a new slave interface for each configuration profile in this list is created. |
If no rule matches radio, then implicit default rule with action create-enabled and no configurations set is executed.
To get the active provisioning matchers:
[admin@CM] /caps-man provisioning> print
Flags: X - disabled
 0   radio-mac=00:00:00:00:00:00 action=create-enabled master-configuration=main-cfg
     slave-configurations=virtual-ap-cfg name-prefix=""
For user's convenience there are commands that allow the re-execution of the provisioning process for some radio or all radios provided by some AP:
[admin@CM] > caps-man radio provision 0
and
[admin@CM] > caps-man remote-cap provision 0
Interface Configuration
CAPsMAN interfaces are managed in /caps-man interface menu:
[admin@CM] > /caps-man interface print
Flags: M - master, D - dynamic, B - bound, X - disabled, I - inactive, R - running
 #      NAME                                 RADIO-MAC         MASTER-INTERFACE
 0 M BR cap2                                 00:0C:42:1B:4E:F5 none
 1   B  cap3                                 00:00:00:00:00:00 cap2
Master Configuration Profiles
Configuration profiles permit pre-defined 'top level' master settings to be applied to CAP radios being provisioned.
Configuration Profiles are configured in /caps-man configuration menu:
| Property | Description |
|---|---|
| channel (list; Default: ) | User defined list taken from Channel names (/caps-man channels) |
| channel.band (2ghz-b | 2ghz-b/g | 2ghz-b/g/n | 2ghz-onlyg | 2ghz-onlyn | 5ghz-a | 5ghz-a/n | 5ghz-onlyn | 5ghz-a/n/ac | 5ghz-only-ac; Default: ) | Defines set of used channels. |
| channel.control-channel-width (40mhz-turbo | 20mhz | 10mhz | 5mhz; Default: ) | Defines set of used channel widths. |
| channel.extension-channel (Ce | Ceee | eC | eCee | eeCe | eeeC | xx | xxxx | disabled; Default: ) | Extension channel configuration. (E.g. Ce = extension channel is above Control channel, eC = extension channel is below Control channel) |
| channel.frequency (integer [0..4294967295]; Default: ) | Channel frequency value in MHz on which AP will operate. If left blank, CAPsMAN will automatically determine the best frequency that is least occupied. |
| channel.reselect-interval (time [00:00:00]; [00:00:00..00:00:00]; Default: ) | The interval after which the least occupied frequency is chosen, can be defined as a random interval, ex. as "30m..60m". Works only if channel.frequency is left blank. |
| channel.save-selected (yes | no; Default: no) | If channel frequency is chosen automatically and channel.reselect-interval is used, then saves the last picked frequency. |
| channel.secondary-frequency (integer [0..4294967295]; Default: auto) | Specifies the second frequency that will be used for 80+80MHz configuration. Set it to Disabled in order to disable 80+80MHz capability. |
| channel.skip-dfs-channels (yes | no; Default: no) | If channel.frequency is left blank, the selection will skip DFS channels |
| channel.tx-power (integer [-30..40]; Default: ) | TX Power for CAP interface (for the whole interface not for individual chains) in dBm. It is not possible to set higher than allowed by country regulations or interface. By default max allowed by country or interface is used. |
| channel.width (; Default: ) | Sets Channel Width in MHz. |
| comment (string; Default: ) | Short description of the Configuration profile |
| country (name of the country | no_country_set; Default: no_country_set) | Limits available bands, frequencies and maximum transmit power for each frequency. Also specifies default value of scan-list. Value no_country_set is an FCC compliant set of channels. |
| datapath (list; Default: ) | User defined list taken from Datapath names (/caps-man datapath) |
| datapath.bridge (list; Default: ) | Bridge to which particular interface should be automatically added as port |
| datapath.bridge-cost (integer [1..200000000]; Default: ) | bridge port cost to use when adding as bridge port |
| datapath.bridge-horizon (integer [0..4294967295]; Default: ) | bridge horizon to use when adding as bridge port |
| datapath.client-to-client-forwarding (yes | no; Default: no) | controls if client-to-client forwarding between wireless clients connected to interface should be allowed, in local forwarding mode this function is performed by CAP, otherwise it is performed by CAPsMAN |
| datapath.interface-list (; Default: ) | |
| datapath.l2mtu (; Default: ) | set Layer2 MTU size |
| datapath.local-forwarding (yes | no; Default: no) | controls forwarding mode |
| datapath.mtu (; Default: ) | set MTU size |
| datapath.openflow-switch (; Default: ) | OpenFlow switch port (when enabled) to add interface to |
| datapath.vlan-id (integer [1..4095]; Default: ) | VLAN ID to assign to interface if vlan-mode enables use of VLAN tagging |
| datapath.vlan-mode (use-service-tag | use-tag; Default: ) | Enables and specifies the type of VLAN tag to be assigned to the interface (causes all received data to get tagged with VLAN tag and allows the interface to only send out data tagged with given tag) |
| disconnect-timeout (; Default: ) | |
| distance (; Default: ) | |
| frame-lifetime (; Default: ) | |
| guard-interval (any | long; Default: any) | Whether to allow the use of short guard interval (refer to 802.11n MCS specification to see how this may affect throughput). "any" will use either short or long, depending on data rate, "long" will use long only. |
| hide-ssid (yes | no; Default: ) |
|
| hw-protection-mode (; Default: ) | |
| hw-retries (; Default: ) | |
| installation (any | indoor | outdoor; Default: any) | |
| keepalive-frames (enabled | disabled; Default: enabled) | |
| load-balancing-group (string; Default: ) | Tags the interface to the load balancing group. For a client to connect to interface in this group, the interface should have the same number of already connected clients as all other interfaces in the group or smaller. Useful in setups where ranges of CAPs mostly overlap. |
| max-sta-count (integer [1..2007]; Default: ) | Maximum number of associated clients. |
| mode (; Default: ap) | Set operational mode. Only ap currently supported. |
| multicast-helper (default | disabled | full; Default: default) | When set to full multicast packets will be sent with unicast destination MAC address, resolving multicast problem on a wireless link. This option should be enabled only on the access point, clients should be configured in station-bridge mode. Available starting from v5.15.
|
| name (string; Default: ) | Descriptive name for the Configuration Profile |
| rates (; Default: ) | User defined list taken from Rates names (/caps-man rates) |
| rates.basic (1Mbps | 2Mbps | 5.5Mbps | 6Mbps | 11Mbps | 11Mbps | 12Mbps | 18Mbps | 24Mbps | 36Mbps | 48Mbps | 54Mbps; Default: ) | |
| rates.supported (1Mbps | 2Mbps | 5.5Mbps | 6Mbps | 11Mbps | 11Mbps | 12Mbps | 18Mbps | 24Mbps | 36Mbps | 48Mbps | 54Mbps; Default: ) | |
| rates.ht-basic-mcs (list of (mcs-0 | mcs-1 | mcs-2 | mcs-3 | mcs-4 | mcs-5 | mcs-6 | mcs-7 | mcs-8 | mcs-9 | mcs-10 | mcs-11 | mcs-12 | mcs-13 | mcs-14 | mcs-15 | mcs-16 | mcs-17 | mcs-18 | mcs-19 | mcs-20 | mcs-21 | mcs-22 | mcs-23); Default: mcs-0; mcs-1; mcs-2; mcs-3; mcs-4; mcs-5; mcs-6; mcs-7) | Modulation and Coding Schemes that every connecting client must support. Refer to 802.11n for MCS specification. |
| rates.ht-supported-mcs (list of (mcs-0 | mcs-1 | mcs-2 | mcs-3 | mcs-4 | mcs-5 | mcs-6 | mcs-7 | mcs-8 | mcs-9 | mcs-10 | mcs-11 | mcs-12 | mcs-13 | mcs-14 | mcs-15 | mcs-16 | mcs-17 | mcs-18 | mcs-19 | mcs-20 | mcs-21 | mcs-22 | mcs-23); Default: mcs-0; mcs-1; mcs-2; mcs-3; mcs-4; mcs-5; mcs-6; mcs-7; mcs-8; mcs-9; mcs-10; mcs-11; mcs-12; mcs-13; mcs-14; mcs-15; mcs-16; mcs-17; mcs-18; mcs-19; mcs-20; mcs-21; mcs-22; mcs-23) | Modulation and Coding Schemes that this device advertises as supported. Refer to 802.11n for MCS specification. |
| rates.vht-basic-mcs (none | MCS 0-7 | MCS 0-8 | MCS 0-9; Default: none) | Modulation and Coding Schemes that every connecting client must support. Refer to 802.11ac for MCS specification. You can set MCS interval for each of Spatial Stream
|
| rates.vht-supported-mcs (none | MCS 0-7 | MCS 0-8 | MCS 0-9; Default: none) | Modulation and Coding Schemes that this device advertises as supported. Refer to 802.11ac for MCS specification. You can set MCS interval for each of Spatial Stream
|
| rx-chains (list of integer [0..2]; Default: 0) | Which antennas to use for receive. |
| security (string; Default: none) | Name of security configuration from /caps-man security |
| security.authentication-types (list of string; Default: none) | Specify the type of Authentication from wpa-psk, wpa2-psk, wpa-eap or wpa2-eap |
| security.disable-pmkid (; Default: ) | |
| security.eap-methods (eap-tls | passthrough; Default: none) |
|
| security.eap-radius-accounting (; Default: ) | |
| security.encryption (aes-ccm | tkip; Default: aes-ccm) | Set type of unicast encryption algorithm used |
| security.group-encryption (aes-ccm | tkip; Default: aes-ccm) | Access Point advertises one of these ciphers, multiple values can be selected. Access Point uses it to encrypt all broadcast and multicast frames. Client attempts connection only to Access Points that use one of the specified group ciphers.
|
| security.group-key-update (time: 30s..1h; Default: 5m) | Controls how often Access Point updates the group key. This key is used to encrypt all broadcast and multicast frames. property only has effect for Access Points. |
| security.passphrase (string; Default: ) | WPA or WPA2 pre-shared key |
| security.tls-certificate (none | name; Default: ) | Access Point always needs a certificate when configured when security.tls-mode is set to verify-certificate, or is set to dont-verify-certificate. |
| security.tls-mode (verify-certificate | dont-verify-certificate | no-certificates; Default: ) | This property has effect only when security.eap-methods contains eap-tls.
|
| ssid (string (0..32 chars); Default: ) | SSID (service set identifier) is a name broadcast in the beacons that identifies wireless network. |
| tx-chains (list of integer [0..2]; Default: 0) | Which antennas to use for transmit. |
Channel Groups
Channel group settings allows for the configuration of lists of radio channel related settings, such as radio band, frequency, Tx Power extension channel and width.
Channel group settings are configured in the Channels profile menu /caps-man channels
| Property | Description |
|---|---|
| band (2ghz-b | 2ghz-b/g | 2ghz-b/g/n | 2ghz-onlyg | 2ghz-onlyn | 5ghz-a | 5ghz-a/n | 5ghz-onlyn; Default: ) | Define operational radio frequency band and mode taken from hardware capability of wireless card |
| comment (string; Default: ) | Short description of the Channel Group profile |
| extension-channel (Ce | Ceee | eC | eCee | eeCe | eeeC | disabled; Default: ) | Extension channel configuration. (E.g. Ce = extension channel is above Control channel, eC = extension channel is below Control channel) |
| frequency (integer [0..4294967295]; Default: ) | Channel frequency value in MHz on which AP will operate. |
| name (string; Default: ) | Descriptive name for the Channel Group Profile |
| tx-power (integer [-30..40]; Default: ) | TX Power for CAP interface (for the whole interface not for individual chains) in dBm. It is not possible to set higher than allowed by country regulations or interface. By default max allowed by country or interface is used. |
| width (; Default: ) | Sets Channel Width in MHz. (E.g. 20, 40) |
| save-selected (; Default: yes) | Saves selected channel for the CAP Radio - will select this channel after the CAP reconnects to CAPsMAN and use it till the channel Re-optimize is done for this CAP. |
Datapath Configuration
Datapath settings control data forwarding related aspects. On CAPsMAN datapath settings are configured in datapath profile menu /caps-man datapath or directly in a configuration profile or interface menu as settings with datapath. prefix.
There are 2 major forwarding modes:
- local forwarding mode, where CAP is locally forwarding data to and from wireless interface
- manager forwarding mode, where CAP sends to CAPsMAN all data received over wireless and only sends out the wireless data received from CAPsMAN. In this mode even client-to-client forwarding is controlled and performed by CAPsMAN.
Forwarding mode is configured on a per-interface basis - so if one CAP provides 2 radio interfaces, one can be configured to operate in local forwarding mode and the other in manager forwarding mode. The same applies to Virtual-AP interfaces - each can have different forwarding mode from master interface or other Virtual-AP interfaces.
Most of the datapath settings are used only when in manager forwarding mode, because in local forwarding mode CAPsMAN does not have control over data forwarding.
There are the following datapath settings:
- bridge -- bridge interface to add interface to, as a bridge port, when enabled
- bridge-cost -- bridge port cost to use when adding as bridge port
- bridge-horizon -- bridge horizon to use when adding as bridge port
- client-to-client-forwarding -- controls if client-to-client forwarding between wireless clients connected to interface should be allowed, in local forwarding mode this function is performed by CAP, otherwise it is performed by CAPsMAN.
- local-forwarding -- controls forwarding mode
- openflow-switch -- OpenFlow switch to add interface to, as port when enabled
- vlan-id -- VLAN ID to assign to interface if vlan-mode enables use of VLAN tagging
- vlan-mode -- VLAN tagging mode specifies if VLAN tag should be assigned to interface (causes all received data to get tagged with VLAN tag and allows interface to only send out data tagged with given tag)
Local Forwarding Mode
In this mode wireless interface on CAP behaves as a normal interface and takes part in normal data forwarding. Wireless interface will accept/pass data to networking stack on CAP. CAPsMAN will not participate in data forwarding and will not process any of data frames, it will only control interface configuration and client association process.
Wireless interface on CAP will change its configuration to 'enabled' and its state and some relevant parameters (e.g. mac-address, arp, mtu) will reflect that of the interface on CAPsMAN. Note that wireless related configuration will not reflect actual interface configuration as applied by CAPsMAN:
[admin@CAP] /interface wireless> pr
Flags: X - disabled, R - running
 0  R ;;; managed by CAPsMAN
      ;;; channel: 5180/20-Ceee/ac, SSID: master, local forwarding
      name="wlan2" mtu=1500 mac-address=00:03:7F:48:CC:07 arp=enabled
      interface-type=Atheros AR9888 mode=ap-bridge ssid="merlin"
      frequency=5240 band=5ghz-a/n channel-width=20/40mhz-eC scan-list=default
      ...
Virtual-AP interfaces in local forwarding mode will appear as enabled and dynamic Virtual-AP interfaces:
[admin@CAP] /interface> pr
Flags: D - dynamic, X - disabled, R - running, S - slave
 #     NAME                                TYPE         MTU L2MTU  MAX-L2MTU
 ...
 2  RS ;;; managed by CAPsMAN
       ;;; channel: 5180/20-Ceee/ac, SSID: master, local forwarding
       wlan2                               wlan        1500  1600
 3 DRS ;;; managed by CAPsMAN
       ;;; SSID: slave, local forwarding
       wlan6                               wlan        1500  1600
 ...
[admin@CAP] /interface> wireless pr
Flags: X - disabled, R - running
 ...
 2  R ;;; managed by CAPsMAN
      ;;; SSID: slave, local forwarding
      name="wlan6" mtu=1500 mac-address=00:00:00:00:00:00 arp=enabled
      interface-type=virtual-AP master-interface=wlan2
The fact that Virtual-AP interfaces are added as dynamic, somewhat limits static configuration possibilities on CAP for data forwarding, such as assigning addresses to Virtual-AP interface. This does not apply to master wireless interface.
To overcome this it is possible to use the static-virtual setting on the CAP which will create Static Virtual Interfaces instead of Dynamic and allows the possibility to assign IP configuration to those interfaces. MAC address is used to remember each static-interface when applying the configuration from the CAPsMAN. If two or more static interfaces will have the same MAC address the configuration could be applied in random order.
To facilitate data forwarding configuration, CAP can be configured with bridge to which interfaces are automatically added as ports when interfaces are enabled by CAPsMAN. This can be done in /interface wireless cap menu.
Manager Forwarding Mode
In this mode CAP sends all data received over wireless to CAPsMAN and only sends out over wireless, data received from CAPsMAN. CAPsMAN has full control over data forwarding including client-to-client forwarding. Wireless interface on CAP is disabled and does not participate in networking:
 ...
 1 X  ;;; managed by CAPsMAN
      ;;; channel: 5180/20-Ceee/ac, SSID: master, manager forwarding
      name="wlan2" mtu=1500 mac-address=00:03:7F:48:CC:07 arp=enabled
      interface-type=Atheros AR9888 mode=ap-bridge ssid="merlin"
 ...
Virtual-AP interfaces are also created as 'disabled' and do not take part in data forwarding on CAP.
Access List
Access list on CAPsMAN is an ordered list of rules that is used to allow/deny clients to connect to any CAP under CAPsMAN control. When client attempts to connect to a CAP that is controlled by CAPsMAN, CAP forwards that request to CAPsMAN. As a part of registration process, CAPsMAN consults access list to determine if client should be allowed to connect. The default behaviour of the access list is to allow connection.
Access list rules are processed one by one until matching rule is found. Then the action in the matching rule is executed. If action specifies that client should be accepted, client is accepted, potentially overriding it's default connection parameters with ones specified in access list rule.
Access list is configured in /caps-man access-list menu. There are the following parameters for access list rules:
- client matching parameters:
- address - MAC address of client (or, if mask is specified, only those parts will be checked as per the mask, so to match vendor D8 from "D8:1C:79:6E:1E:FE", simply enter a bogus entry, such as "D8:00:00:00:00" and then use the mask as per next line)
- mask - MAC address mask to apply when comparing client address. For example, use FF:00:00:00:00:00 to match only the first octet of the specified MAC address. In above example, regardless of entered MAC, it will match only first octet. Similarly, entering 00:00:00:00:FF will only match the last octet (FE) of a hypotetical MAC "D8:1C:79:6E:1E:FE"). So in the mac line, you could just enter 00:00:00:00:00:FE, if you would use such a mask.
- interface - optional interface to compare with interface to which client actually connects to
- time - time of day and days when rule matches
- signal-range - range in which client signal must fit for rule to match
- action parameter - specifies action to take when client matches:
- accept - accept client
- reject - reject client
- query-radius - query RADIUS server if particular client is allowed to connect
- connection parameters:
- ap-tx-limit - tx speed limit in direction to client
- client-tx-limit - tx speed limit in direction to AP (applies to RouterOS clients only)
- client-to-client-forwarding - specifies whether to allow forwarding data received from this client to other clients connected to the same interface
- private-passphrase - PSK passphrase to use for this client if some PSK authentication algorithm is used
- radius-accounting - specifies if RADIUS traffic accounting should be used if RADIUS authentication gets done for this client
- vlan-mode - VLAN tagging mode specifies if traffic coming from client should get tagged (and untagged when going to client).
- vlan-id - VLAN ID to use if doing VLAN tagging.
Registration Table
Registration table contains a list of clients that are connected to radios controlled by CAPsMAN and is available in /caps-man registration-table menu:
[admin@CM] /caps-man> registration-table print
 # INTERFACE                   MAC-ADDRESS       UPTIME                RX-SIGNAL
 0 cap1                        00:03:7F:48:CC:0B 1h38m9s210ms                -36
Examples
Basic configuration with master and slave interface
Create security profile for WPA2 PSK, without specifying passphrase:
[admin@CM] /caps-man security>add name="wpa2psk" authentication-types=wpa2-psk encryption=aes-ccm
Create configuration profile to be used by master interface
- specify WPA2 passphrase in configuration
- specify channel settings in configuration:
[admin@CM] /caps-man configuration> add name=master-cfg ssid=master security=wpa2psk
security.passphrase=12345678 channel.frequency=5180 channel.width=20 channel.band=5ghz-a
Create configuration profile to be used by virtual AP interface
- specify different WPA2 passphrase in configuration:
[admin@CM] /caps-man configuration> add name=slave-cfg ssid=slave security=wpa2psk
security.passphrase=87654321
Create provisioning rule that matches any radio and creates dynamic interfaces using master-cfg and slave-cfg:
[admin@CM] /caps-man provisioning> add action=create-dynamic-enabled master-configuration=master-cfg
slave-configurations=slave-cfg
Now when AP connects and is provisioned 2 dynamic interfaces (one master and one slave) will get created:
[admin@CM] /caps-man interface> print detail
Flags: M - master, D - dynamic, B - bound, X - disabled, I - inactive, R - running
 0 MDB  name="cap1" mtu=1500 l2mtu=2300 radio-mac=00:0C:42:1B:4E:F5 master-interface=none
        configuration=master-cfg

 1  DB  name="cap2" mtu=1500 l2mtu=2300 radio-mac=00:00:00:00:00:00 master-interface=cap1
        configuration=slave-cfg
Consider an AP, that does not support configured frequency connects and can not become operational:
[admin@CM] /caps-man interface> pr
Flags: M - master, D - dynamic, B - bound, X - disabled, I - inactive, R - running
 #      NAME                                 RADIO-MAC         MASTER-INTERFACE
 0 MDB  ;;; unsupported band or channel
        cap3                                 00:0C:42:1B:4E:FF none
 ...
We can override channel settings for this particular radio in interface settings, without affecting master-cfg profile:
[admin@CM] /caps-man interface> set cap3 channel.frequency=2142 channel.band=2ghz-b/g
Allow Specific MAC address range to match the Access-list, for example, match all the Apple devices:
[admin@CM] /caps-man access-list> add mac-address=18:34:51:00:00:00 mac-address-mask=FF:FF:FF:00:00:00 action=accept
Configuring DHCP Server Option 138 for setting the CAPsMAN address on the CAP boards
[admin@CM] /ip dhcp-server network set <network-id> caps-manager=<capsman-server-ip>
DHCP client this CAPsMAN IP will see in "/ip dhcp-client print detail"
Configuration with certificates
You would want to configure certificates in your CAPsMAN to use options as Require Peer Certificate and Lock To Caps Man. These options increase security and in some cases stability of your CAPsMAN network. CAPs won't connect to CAPsMAN without a specific certificate and vice versa.
Fast and easy configuration
This is a basic configuration for using certificates in your CAPsMAN setup. This example assumes that you already have basic configuration on your CAPsMAN and CAP. It is best to use this configuration in CAPsMAN networks which are not constantly growing. For more details read about CAP to CAPsMAN Connection.
CAPsMAN device:
In CAPsMAN Manager menu set Certificate and CA Certificate to auto:
/caps-man manager
set ca-certificate=auto certificate=auto
Print output:
[admin@CAPsMAN] /caps-man manager print
                   enabled: yes
               certificate: auto
            ca-certificate: auto
              package-path:
            upgrade-policy: none
  require-peer-certificate: no
     generated-certificate: CAPsMAN-D4CA6D987C26
  generated-ca-certificate: CAPsMAN-CA-D4CA6D987C26
CAPsMAN device first will generate CA-Certificate and then it will generate Certificate which depends on CA-Certificate.
CAP device:
Set in CAP configuration to request certificate:
/interface wireless cap
set certificate=request
CAP will connect to CAPsMAN and request certificate. CAP will receive CA-Certificate form CAPsMAN and another certificate will be created for use on CAP.
In Result
On CAP device in CAP menu Requested Certificate is set:
[admin@CAP] /interface wireless cap print
                            enabled: yes
                         interfaces: wlan1
                        certificate: request
                   lock-to-caps-man: no
               discovery-interfaces: ether1
                 caps-man-addresses:
                     caps-man-names:
  caps-man-certificate-common-names:
                             bridge: none
                     static-virtual: no
         -->  requested-certificate: CAP-D4CA6D7F45BA  <--
Also, two certificates are gained and are seen in Certificate menu:
[admin@CAP] > /certificate print
Flags: K - private-key, D - dsa, L - crl, C - smart-card-key, A - authority, I - issued, R - revoked, E - expired, T - trusted
 #          NAME              COMMON-NAME              SUBJECT-ALT-NAME                                           FINGERPRINT
 0     A  T _0                CAPsMAN-CA-D4CA6D987C26                                                             383e63d7b...
 1 K        CAP-D4CA6D7F45BA  CAP-D4CA6D7F45BA                                                                    d495d1a94...
On CAPsMAN device in Certificate menu three certificates are created. CAPsMAN and CAPsMAN-CA certificates, as well as a certificate which is issued to CAP:
[admin@CAPsMAN] > /certificate print
Flags: K - private-key, D - dsa, L - crl, C - smart-card-key, A - authority, I - issued, R - revoked, E - expired, T - trusted
 #          NAME                     COMMON-NAME              SUBJECT-ALT-NAME                                    FINGERPRINT
 0 K   A  T CAPsMAN-CA-D4CA6D987C26  CAPsMAN-CA-D4CA6D987C26                                                      383e63d7b...
 1 K    I   CAPsMAN-D4CA6D987C26     CAPsMAN-D4CA6D987C26                                                         02b0f7ff4...
 2      I   issued_1                 CAP-D4CA6D7F45BA                                                             d495d1a94...
Additionally
If you want to allow only CAPs with a valid certificate to connect to this CAPsMAN you can set Require Peer Certificate to yes on CAPsMAN device:
/caps-man manager
set require-peer-certificate=yes
However, when you will want to add new CAP devices to your CAPsMAN network you will have to set this option to no and then back to yes after CAP has gained certificates. Every time you change this option CAPsMAN will drop all dynamic interfaces and CAPs will try to connect again.
If you want to lock CAP to specific CAPsMAN and be sure it won't connect to other CAPsMANs you should set option Lock To CAPsMAN to yes. Additionally, you can specify CAPsMAN to lock to by setting CAPsMAN Certificate Common Names on CAP device:
/interface wireless cap
set lock-to-caps-man=yes
set caps-man-certificate-common-names=CAPsMAN-D4CA6D987C26
Manual certificates and issuing with SCEP
With this example, you can create your own certificates for CAPsMAN and take control over issuing certificates to CAPs. This configuration can be useful in big, growing CAPsMAN networks. Many segments of this example can be done differently depending on your situation and needs. At this point, some knowledge about Certificates and their application can be useful.
CAPsMAN device:
In Certificate menu add certificate templates for CA certificate and CAPsMAN server certificate:
/certificate
add name=CA-temp common-name=CA
add name=CAPsMAN-temp common-name=CAPsMAN
Now Sign the certifiace templates. First Sign the CA certificate and use CAPsMAN device IP as CA CRL Host:
/certificate
sign CA-temp ca-crl-host=10.5.138.157 name=CA
sign CAPsMAN-temp ca=CA name=CAPsMAN
Alternatively, previous two steps can be done with auto setting in Certificate and CA-Certificate option in CAPsMAN Manager menu, see the Fast and easy configuration.
Export CA certificate. You will have to Import it on CAP device. You can use Download -> Drag&Drop to CAP device, in this example fetch command is used later from CAP device. Using long passphrase is advisable - longer passphrase will take longer to crack if it gets into the wrong hands:
/certificate
export-certificate CA export-passphrase=thelongerthebetterpassphrase
Create SCEP server which will be used to issue and grant certificates to CAP devices:
/certificate scep-server
add ca-cert=CA path=/scep/CAPsMAN
Set certificates in CAPsMAN Manager menu and set Require Peer Certificate to yes:
/caps-man manager
set ca-certificate=CA certificate=CAPsMAN
set require-peer-certificate=yes
At this point, only CAPs with a valid certificate will be able to connect.
CAP device
Download export of CA certificate from CAPsMAN device to CAP device. In this example fetch is used, however, there are multiple other ways:
/tool fetch address=10.5.138.157 src-path=cert_export_CA.crt user=admin password="123" mode=ftp
Import CA certificate from CAPsMAN device in Certificate menu:
/certificate> import file-name=cert_export_CA.crt passphrase=thelongerthebetterpassphrase
Add certificate template for CAP:
/certificate
add name=CAP1 common-name=CAP1
Ask CAPsMAN device to grant this certificate with a key using SCEP:
/certificate
add-scep template=CAP1 scep-url="https://10.5.138.157/scep/CAPsMAN"
You will have to return to CAPsMAN device to grant key to this certificate.
In CAP menu set just created certificate:
/interface wireless cap
set certificate=CAP1
CAPsMAN device:
Return to CAPsMAN device to grant a key to CAP certificate in Certificate Request menu:
/certificate scep-server requests
grant numbers=0
In Result
Now CAP should be able to connect to CAPsMAN, see in CAPsMAN interfaces if it connects. In CAPsMAN device Certificate menu three certificates can be seen: CA, CAPsMAN, and the one which is issued to CAP:
[admin@CAPsMAN] /certificate print
Flags: K - private-key, D - dsa, L - crl, C - smart-card-key, A - authority, I - issued, R - revoked,
E - expired, T - trusted
 #          NAME        COMMON-NAME      SUBJECT-ALT-NAME                                   FINGERPRINT
 0 K L A  T CA          CA                                                                  752775b457a37...
 1 K   A    CAPsMAN     CAPsMAN                                                             12911ba445b3b...
 2      I   issued_1    CAP1                                                                5b9a52b6ce3fb...
In CAP devices Certificate menu two acquired certificates can be seen:
[admin@CAP1] /interface wireless> /certificate print
Flags: K - private-key, D - dsa, L - crl, C - smart-card-key, A - authority, I - issued, R - revoked,
E - expired, T - trusted
 #          NAME        COMMON-NAME      SUBJECT-ALT-NAME                                   FINGERPRINT
 0   L A  T cert_exp... CA                                                                  752775b457a37...
 1 K      T CAP1        CAP1                                                                5b9a52b6ce3fb...