Overview
MikroTik Beacon Manager application is designed for Bluetooth tag (TG-BT5-XX) configuration. Since the tags are Bluetooth-based devices, you have to enable Bluetooth on the phone before proceeding with the configuration.
For Android devices, you can find the app following the link.
Beacon manager screen
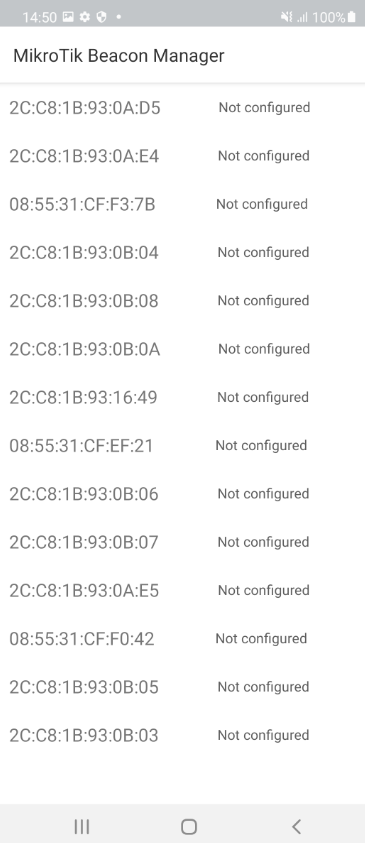
The first screen you see when you launch the app is the "MikroTik Beacon Manager" screen where all the nearby Bluetooth tags are shown.
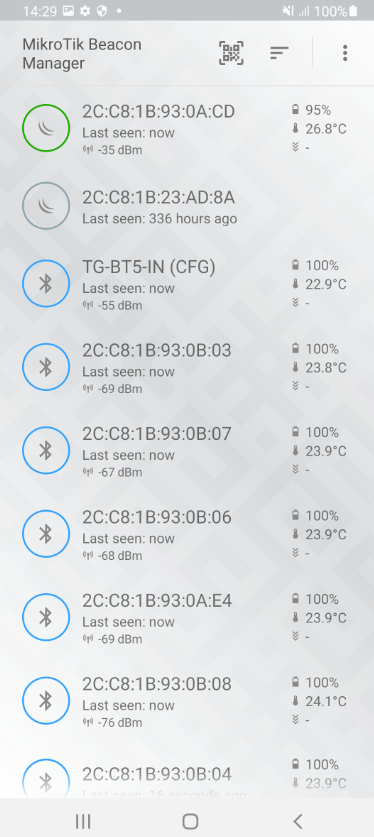
If the list is empty, it means that all the nearby tags are in factory-sleep mode. Once the tag is in advertising or configuration mode, it will show up on the list. To wake up the tag from the factory sleep mode, put the magnet over the tag (activate the reed-switch) for 3-10 seconds.
In the right upper corner of the screen there are 3 buttons:
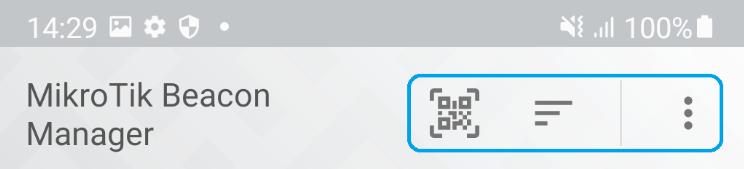
OR Code Reader
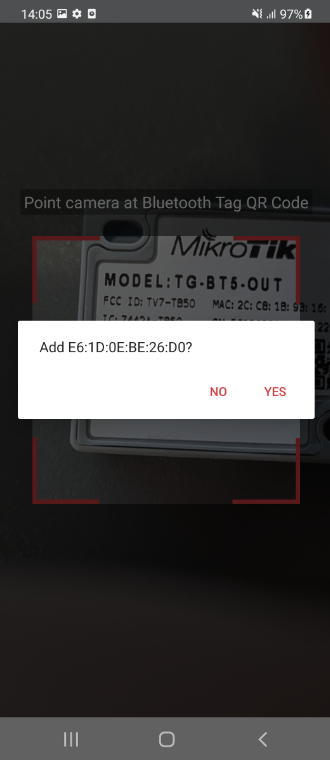
"QR Code reader" button which allows you to add the tag via QR code (MAC address is used as tag's ID):
NFC support
note: this section is available only for the TG-BT5-OUT model
You can also find the tag (similar to the QR code reader feature) using NFC (MAC address is used as tag's ID).
All you need to do is to enable NFC in your phone settings and open the MikroTik Beacon Manager app.
Once you see the initial screen (list of tags), position the tag near the phone's NFC antenna and you will be provided with an option to open device settings:
If you press "YES", you will be redirected to the page shown below. In the menu, you have an option to delete the device from the list or to enter configuration mode via the "Configure" button.
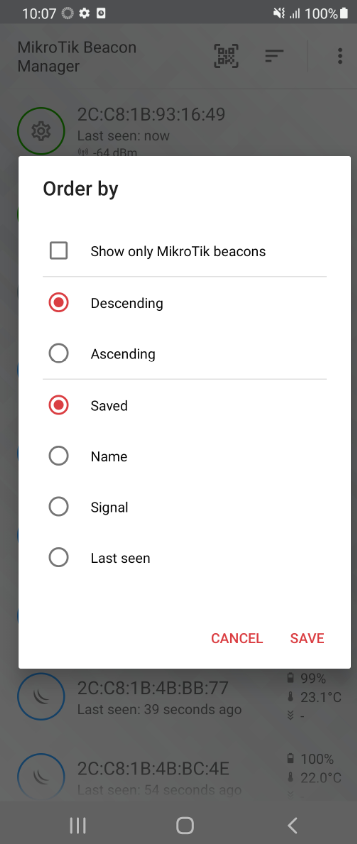
Order by
The "Order by" button, which allows you to change the order of the device list or just filter the list to only show MikroTik beacons by checking the "Show only MikroTik beacons" checkbox:
Settings and Batch Configuration
The "⋮" tab is divided into 2 sub-tabs - "Settings" and "Batch Configuration".
Settings
The first option in this tab is to set up a "Discovery refresh interval", which is the interval for scanning for the nearby tags.
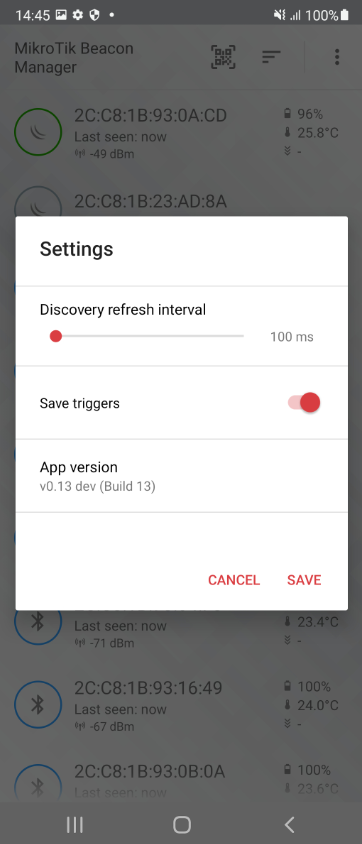
The second option is to enable or disable the "Save triggers" setting. When enabled, the app saves detected triggers in the database. You can check the triggers in the "Sensor Triggers" menu (the "Sensor Triggers" menu is shown in the "Tag Management" section of this guide). If this option is disabled, "Sensor Triggers" data is erased as soon as the app is closed.
And, lastly, the "App version" field displays the current app version/build.
Batch Configuration
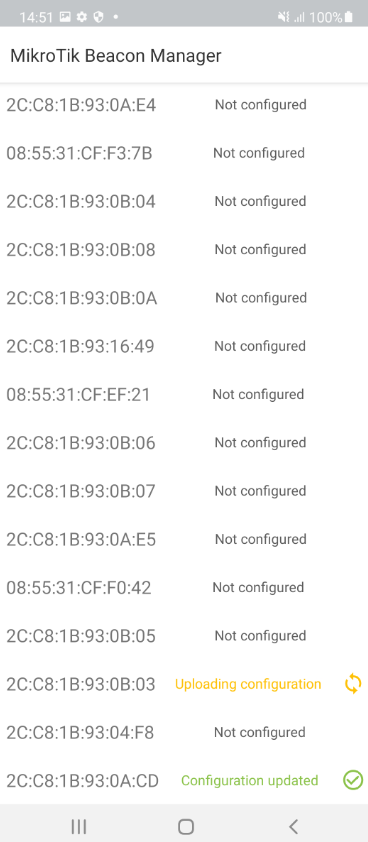
This option allows you to mass-configure multiple tags with the same settings.
In order to do that, you will need to export the configuration file from one of the tags. Tag's configuration exporting and importing is shown in the "Tag Configuration" section of this guide.
After you have saved the configuration file, just press the "Batch Configuration" button and it will take you to the file menu where you need to select the file. Choose the configuration file (that you wish to apply to multiple units) and the app will show you the screen with all the nearby-detected tags:
The last step is to put those tags into the configuration mode (by putting the magnet over the tag for 5-10 seconds). After the device is put into configuration mode, you will see the "Uploading configuration" message. The message will change to "Configuration updated" when the configuration is successfully applied.
Tag Management
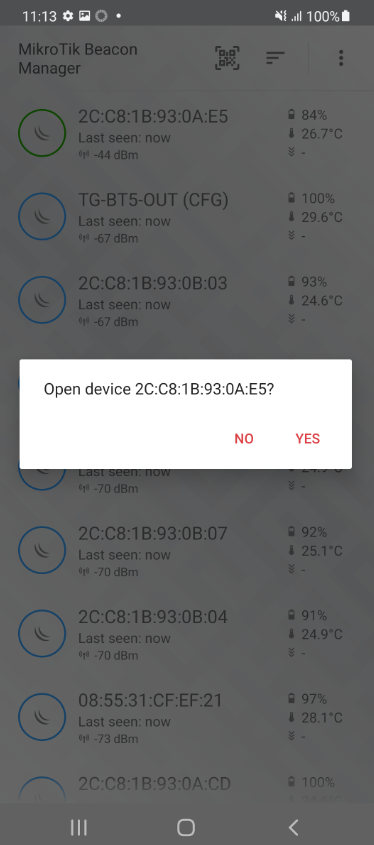
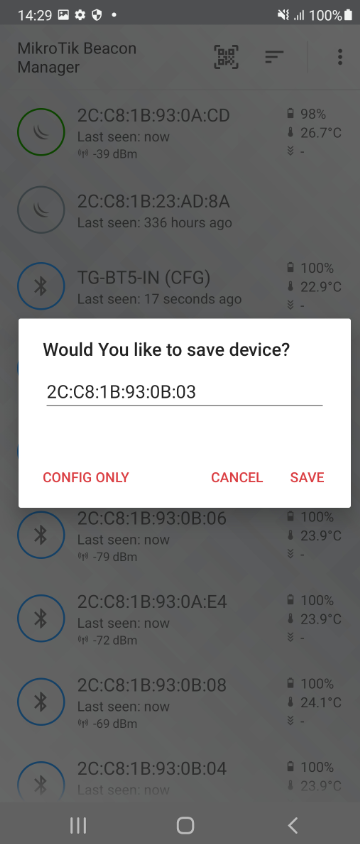
When the tag is on the list, you can click on its MAC address and you will be presented with the following options:
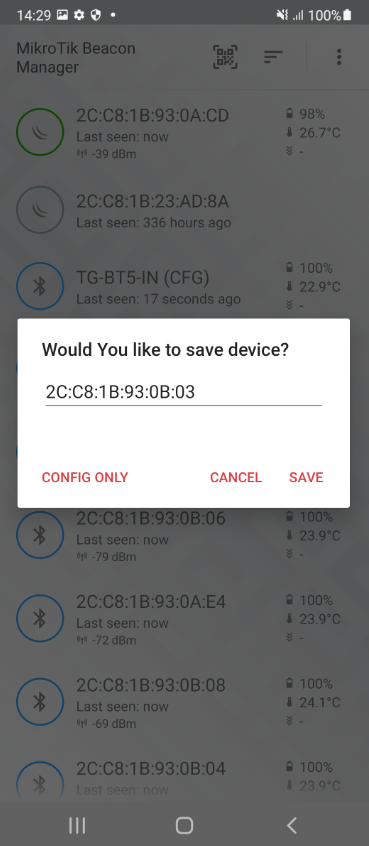
To "SAVE" the tag or to immediately go to the tag's configuration menu via the "CONFIG ONLY" button.
First, we will explain the "SAVE" option in more detail. The tag's configuration menu is going to be explained later on in the "Tag Configuration" section.
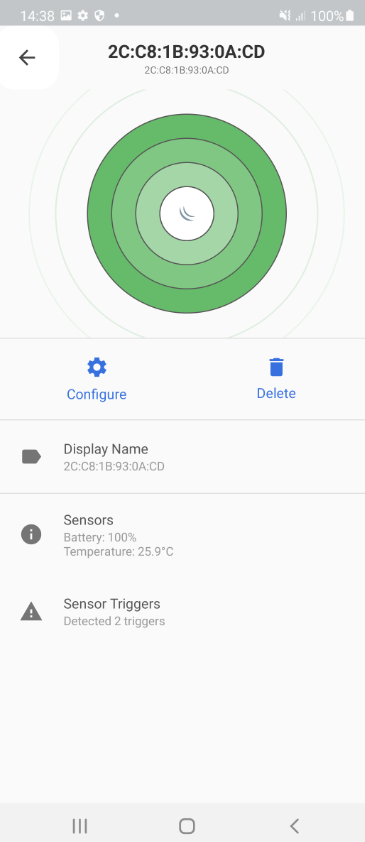
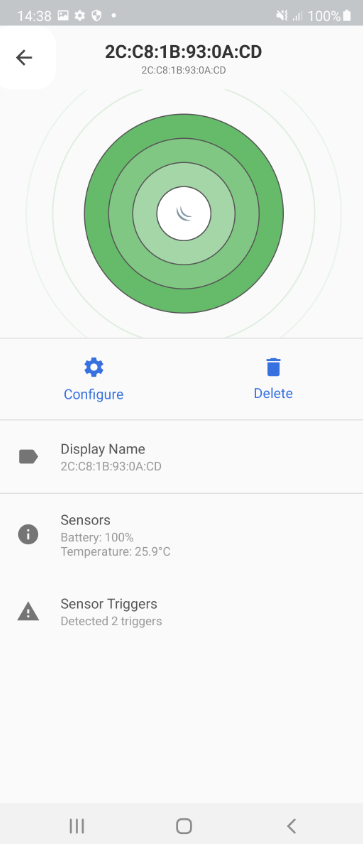
When you click on the tag that was previously saved, you will see the following menu:
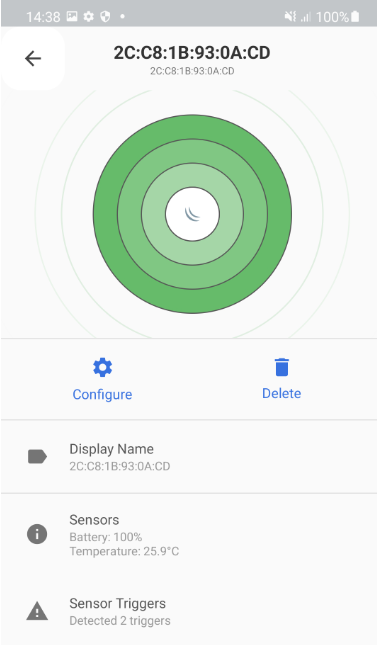
The first thing you should notice is the signal strength indication (RSSI signal for the tag - how far the tag is). When all circles are green, it means the signal strength is about -60 RSSI. When only 2 circles are green, it means the signal strength is about -70 RSSI. When only one circle is green, it means that the signal strength is at -80 RSSI. When no circles are green, it means that the signal strength is at -90 RSSI or more.
Under the signal strength indicator, you have 2 options - to go to the tag's configuration menu ("Configure" button) or to delete the device ("Delete" button).
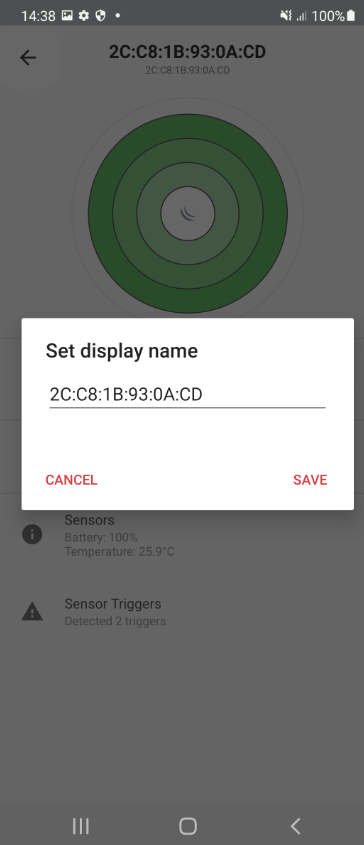
In the "Display Name" field, you can change the tag's name:
In the "Sensors" field, you can check the tag's battery level or temperature.
note: TG-BT5-IN model does not have a temperature sensor
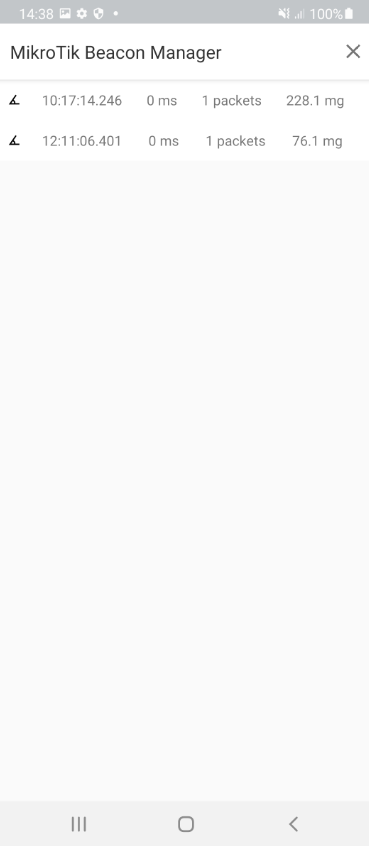
In the "Sensor Triggers" field, you can check triggers that were reported by the tag:
Tag Configuration
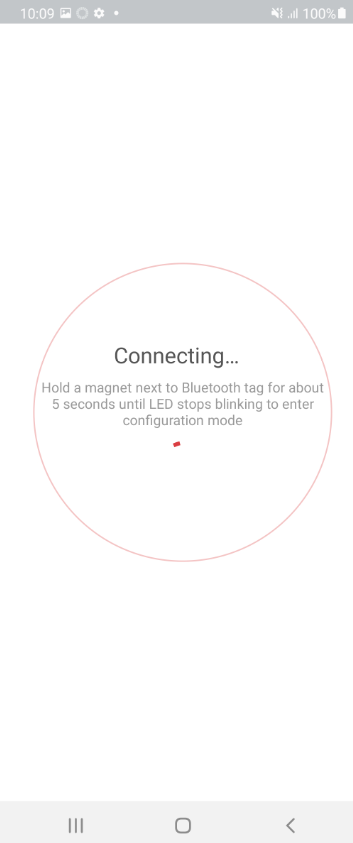
In order to access the tag's configuration menu, you need to either press the "CONFIG ONLY" button or the "Configure" button as shown below:
Right after that, you will need to put a magnet over the reed-switch for 5-10 seconds:
After a short wind up time, the device should be in the configuration mode:
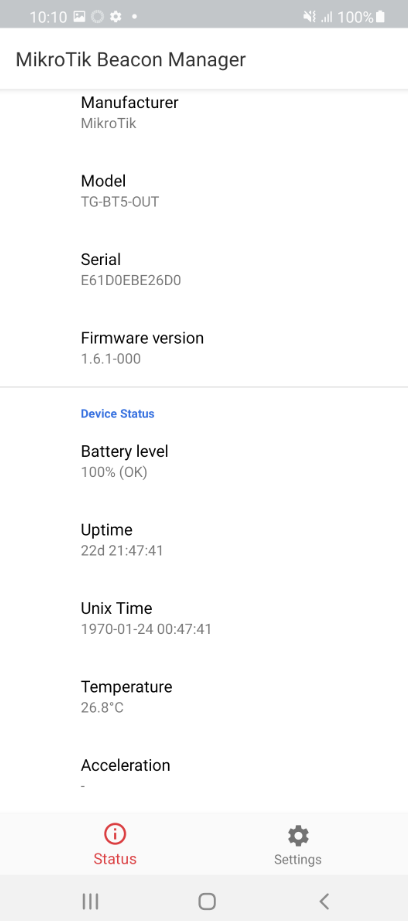
The app will show general information about the tag in the "Status" tab (as shown in the screenshot above).
Configuration can be altered in the "Settings" tab:
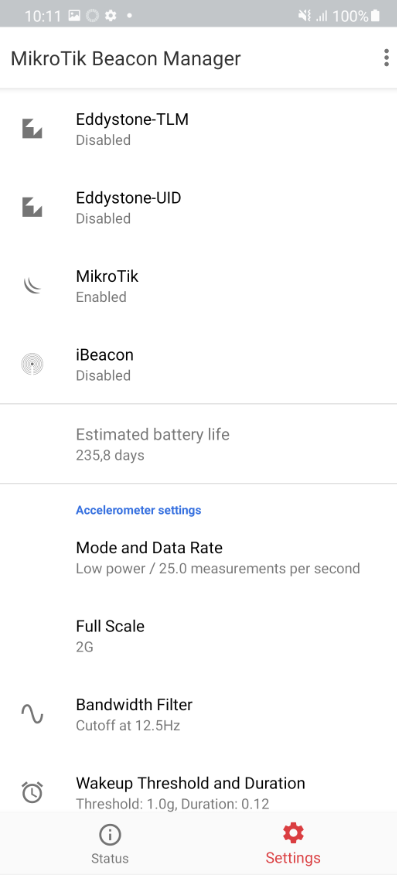
Beacon settings
In advertising mode, the tag broadcasts information about itself in Bluetooth advertising packets. Information depends on the advertising packet type (the type can be changed in the settings).
At the moment, these are all the supported types:
Eddystone-TLM, Eddystone-UID, MikroTik, and iBeacon.
Eddystone-TLM, Eddystone-UID and iBeacon formats have an option to configure 4 parameters. MikroTik format has an option to configure an additional parameter called "encrypt":
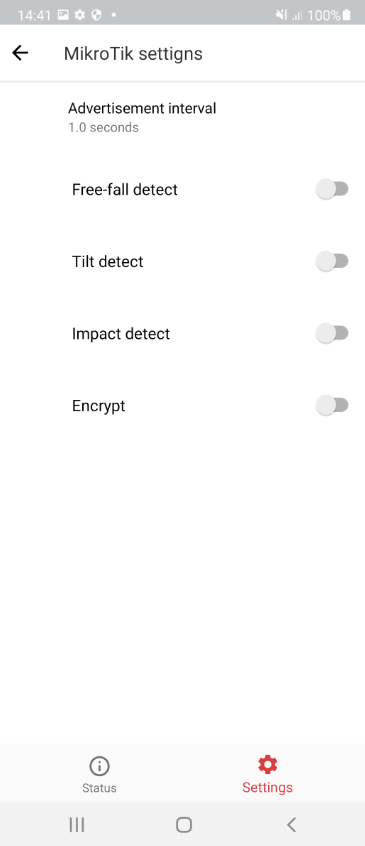
| Advertisement interval (20ms...10s or disable) | the interval in milliseconds after which an advertisement packet will be broadcasted by the tag |
| Freefall detect (on/off) | whether to send an advertisement packet when the accelerometer (the tag) detects a freefall trigger |
| Tilt detect (on/off) | whether to send an advertisement when the accelerometer (the tag) detects a tilt trigger |
| Impact detect (on/off) | whether to send an advertisement when the accelerometer (the tag) detects an impact/wake up trigger |
Encrypt (on/off) note: only available for MikroTik format | whether to encrypt acceleration, temperature, uptime, trigger action, and battery percentage parameters in the hex payload |
- When you have only advertisement interval configured without any triggers enabled - advertisement packets will be broadcasted based on the interval time set (each x seconds).
- When the tilt trigger is enabled and the device is tilted - the advertisement packet will be broadcasted immediately.
- When the freefall trigger is enabled and freefall is detected, as soon as the tag detects the freefalling condition - the packet is sent.
- When the impact trigger is enabled and the device is pushed/moved - the advertisement packet is sent at once.
- When encrypt parameter is enabled, the hex payload data (like acceleration, temperature, uptime, trigger action, and battery percentage) is encrypted with a private key. This key is known only to the tag's owner (it is obtained with the purchase).
You can decipher the trigger/conditions in the hex dump of the advertisement packet. You can find more information on how to do that following the link.
Estimated battery life
This section displays the estimated battery life:

Estimated battery life is heavily dependant on the number of advertising packets sent (configured to be sent). The app calculates how many packets are estimated to be broadcasted daily, for how long the tag will be active, and the estimate for the average daily power consumption.
Accelerometer settings
This section allows you to change the parameters shown in the screenshot below:
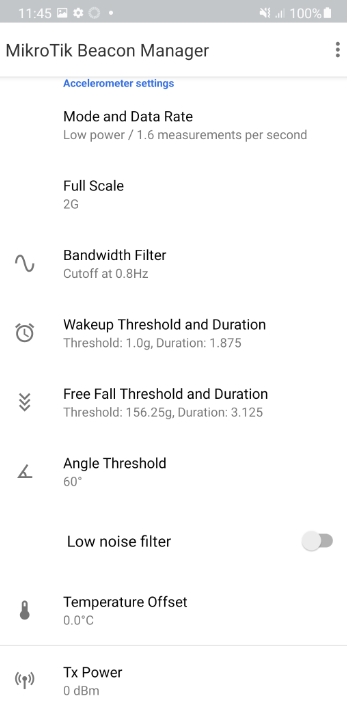
Mode and Data Rate
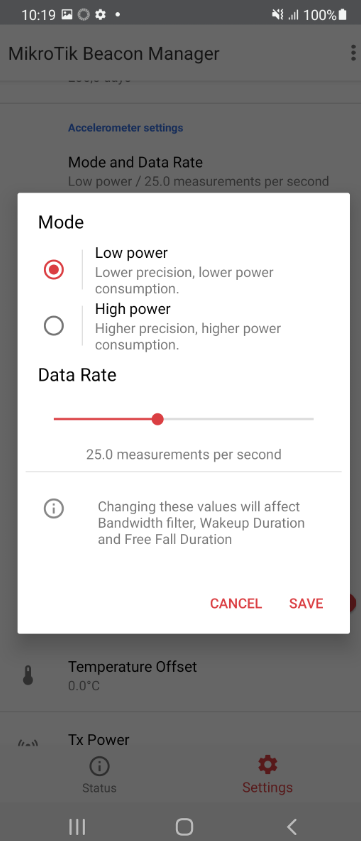
This menu allows you to choose between 2 modes: "Low power" and "High power". In "Low power" mode, you will get lower precision but also lower power consumption. In "High power" mode, you will get higher precision but also higher power consumption.
You can also change "Data Rate" settings which dictates how often the tag is going to broadcast advertising packets (per second). The fewer packets per second are sent → the lower the power consumption is.
Full Scale
Can vary between (2g...16g). It is the measurement range that is used to calculate the wake-up threshold. Full scale defines the range of acceleration, that the accelerometer is capable of measuring (the bigger the range, the lower the accuracy of the measured acceleration).
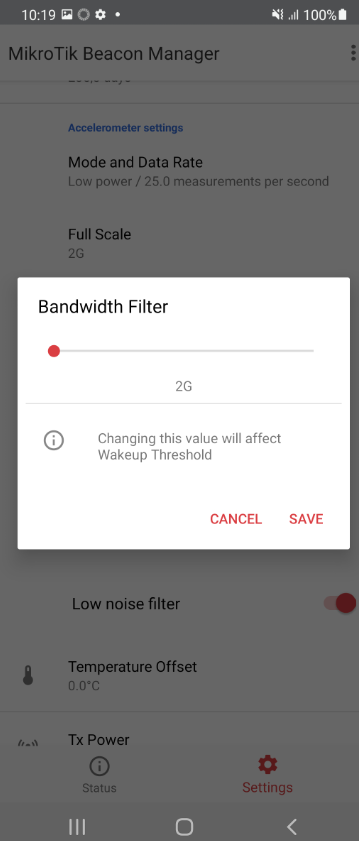
Bandwith Filter
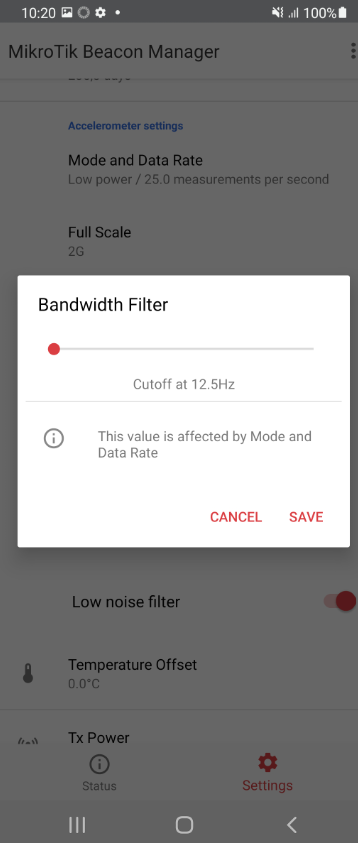
Is a digital filtering cutoff (a high pass filter bandwidth).
If the bandwidth = "x" Hz, then the tag will filter out changes to acceleration that happen less frequently than "x" times a second.
For example, if the device is laying on the table, the acceleration will show 0g (instead of 1g), even though the earth's gravity is present → (because the earth's gravity is constant - its frequency of change is 0 Hz, which is < "x" Hz) it gets filtered out.
Wakeup Threshold and Duration
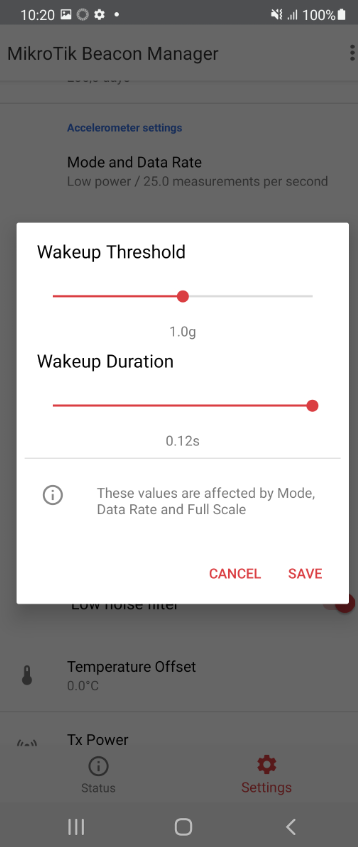
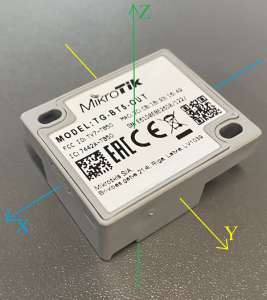
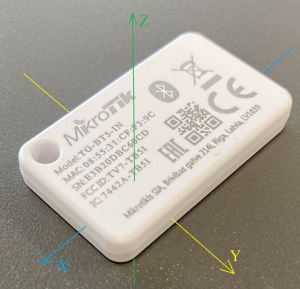
The "Wakeup Threshold" defines a wakeup zone/acceleration range. The "Wakeup Duration" defines the time during which the acceleration is over the configured wakeup threshold. A wakeup event will be generated (a wakeup condition will be triggered) when the acceleration on any axis (X, Y, or Z) exceeds a threshold for the configured wakeup duration. To better understand what is meant by "acceleration on any axis (X, Y, or Z)", imagine a 3-D Cartesian coordinate system and in the origin point (common point) the tag's accelerometer or the tag itself:
For example, the wakeup threshold is set to 1.0g (it means that any acceleration between -1.0g to +1.0g falls under the configured threshold/acceleration range) and the wakeup duration is set to 0.12s. As a result, as soon as the device is pushed/thrown against any of the axis (the device begins moving in any direction) with the acceleration exceeding the configured threshold (acceleration> +1.0g or acceleration< -1.0g) for longer than 0.12s → wakeup condition is triggered.
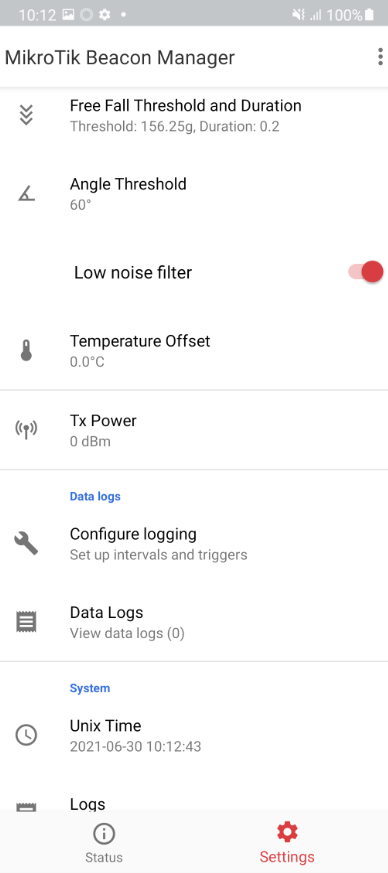
Free Fall Threshold and Duration
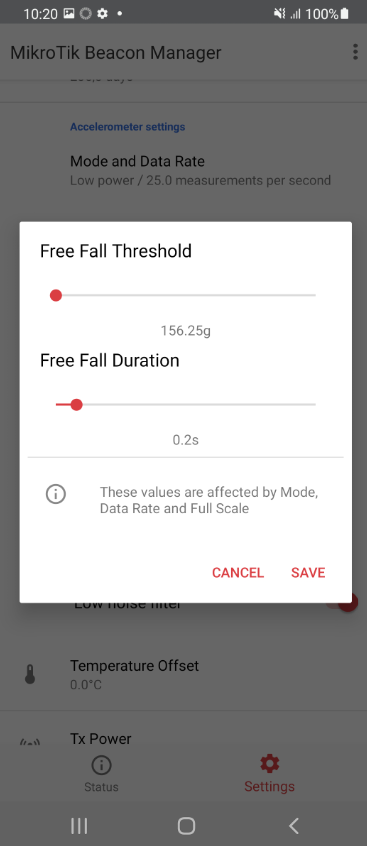
The "Free Fall Threshold" defines a free-fall zone/acceleration range. The "Free Fall Duration" defines the time during which the acceleration is going to be within the configured free-fall threshold. The free-fall event will be generated (free-falling condition will be triggered) when the acceleration on all 3 axes (X, Y, and Z) is within the free-fall zone/threshold for the configured free-fall duration. To better understand what is meant by "acceleration on all axis (X, Y, and Z)", check the device photoes above in the "Wakeup Threshold and Duration" section.
For example, the freefall threshold is set to 156.25g (it means that any acceleration between -156.25g to +156.25g falls under the configured threshold/acceleration range) and the freefall duration is set to 0.2s. As a result, as soon as the device is in a freefalling state with acceleration on all axis within the configured threshold (-156.25g<acceleration<+156.25g) for longer than 0.2s → a freefalling condition is triggered.
Angle Threshold
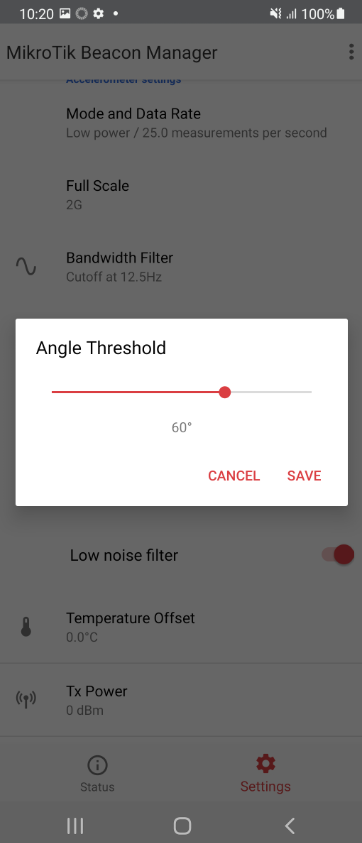
Can vary between 50°...80°. It is the threshold for a tilt function. When the threshold is set to, for example, 60° and the device is tilted by that degree - the tilt action is triggered and the advertisement packet is sent.
Low noise filter

An option to enable or disable a low noise filter. A low noise filter is used to reduce noise density in the measurements. Enabling this feature will slightly increase power consumption.
Temperature Offset
note: TG-BT5-IN model does not have a temperature sensor
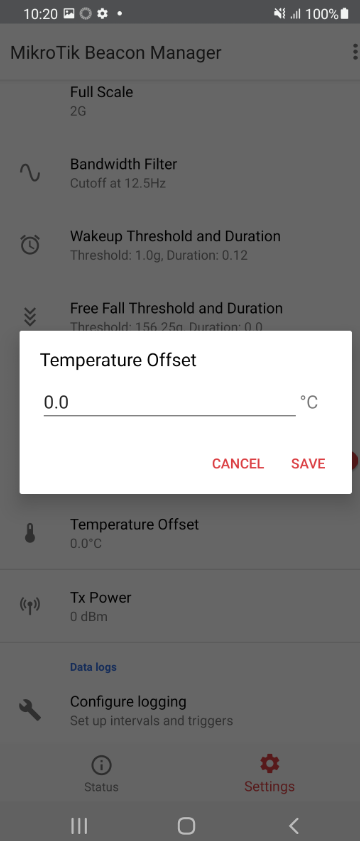
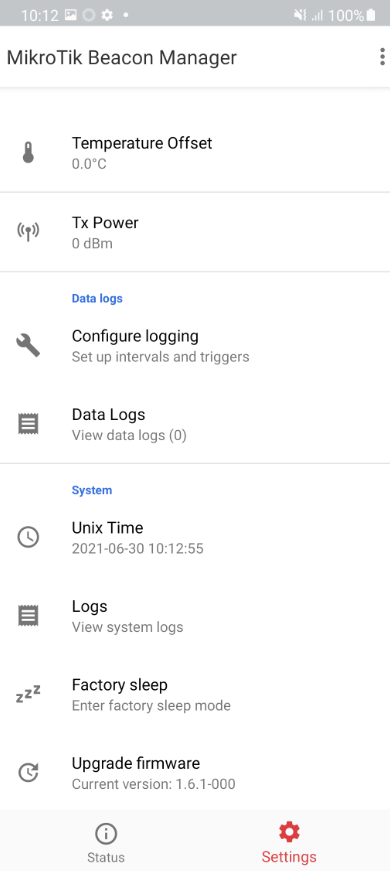
Can vary between -10°C...+10°C. Offset in centicelsius to apply to raw temperature measurements.
Tx Power
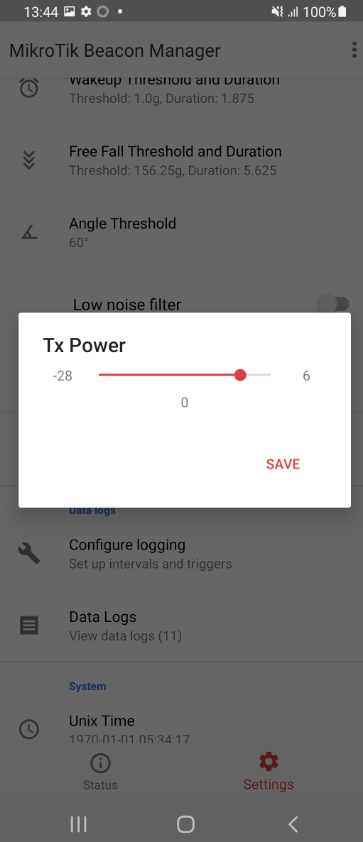
The transmit power level in decibel-milliwatts. Can vary between -28dBm...6dBm. Tx Power is simply used to increase/decrease transmit power of the tag.
Data logs
note: this section is available only for the TG-BT5-OUT model
This section allows you to configure/view logs (that are only accessible using the app):
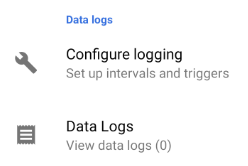
Configure logging
In the "Configure logging" menu, you can set up logging settings:
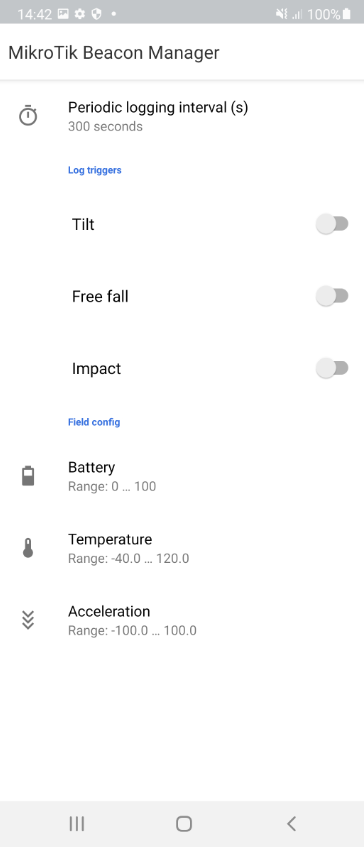
You have an option to set up "Periodic logging interval (s)" (or you can disable it). When enabled, the data logs will automatically get saved every "x" seconds:
Another option is to enable "Log Triggers" (periodic logging and trigger logging can be used together). When log triggers are used - logs will be saved whenever the tilt, free fall, and/or impact action is detected.
For example, when a tilt trigger is enabled and is detected by the tag - the message is logged.
You can set up which parameters are going to be logged in the "Field config" section:
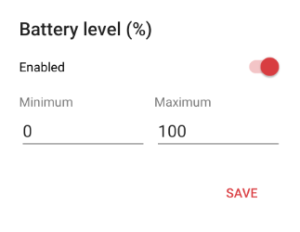

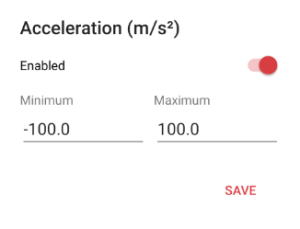
You have an option to log 3 parameters: 1) Battery level; 2) Temperature; 3) Acceleration.
You can disable each parameter if you are not interested in it and you can also set up the thresholds for them.
If you are not interested in logging battery level unless it is less than 40%, you can set up a threshold from minimum=0% to maximum=40%, and, as a result, the battery level (battery level percentage) is going to be displayed in the log only when it is in-between the configured range. The same principle applies to the other 2 parameters.
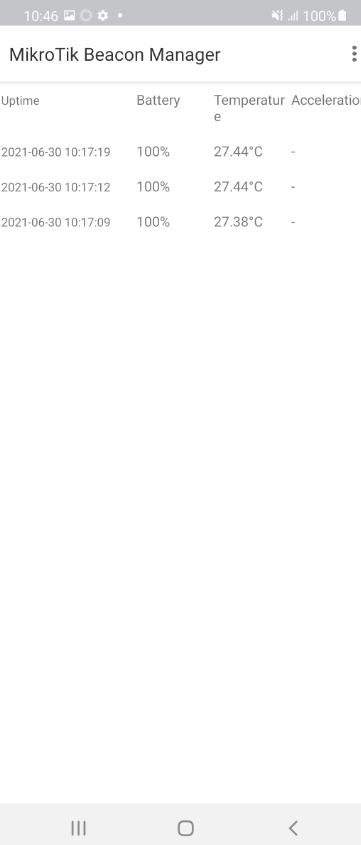
Data Logs
The logged messages will be displayed in the "Data Logs" tab:
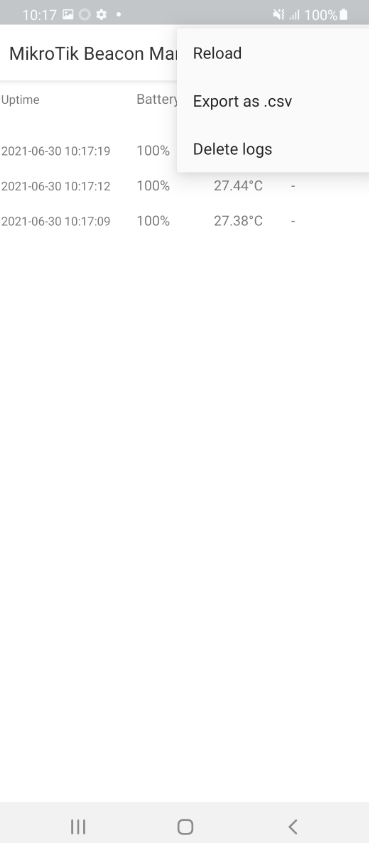
You can export the log as a .csv file via "Export as .csv" button:
System
In the "System" tab you synchronize the time, view the system log, put the tag into a factory sleep mode, and upgrade the firmware:
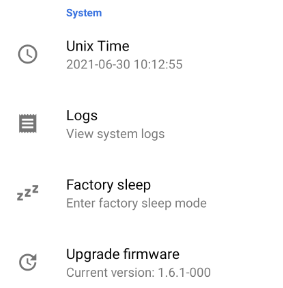
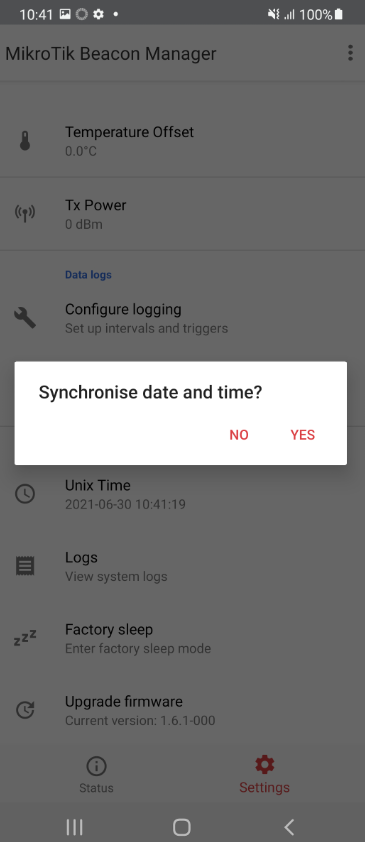
Unix Time
Using this setting, you can synchronize the current time and date for the tag:
Logs
Menu, where you can view system log:
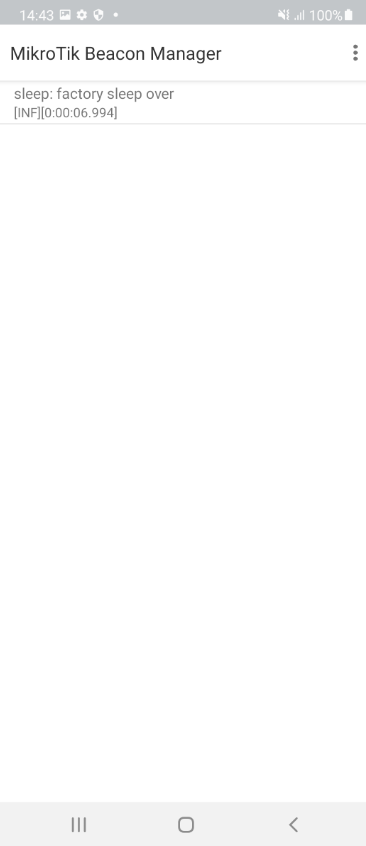
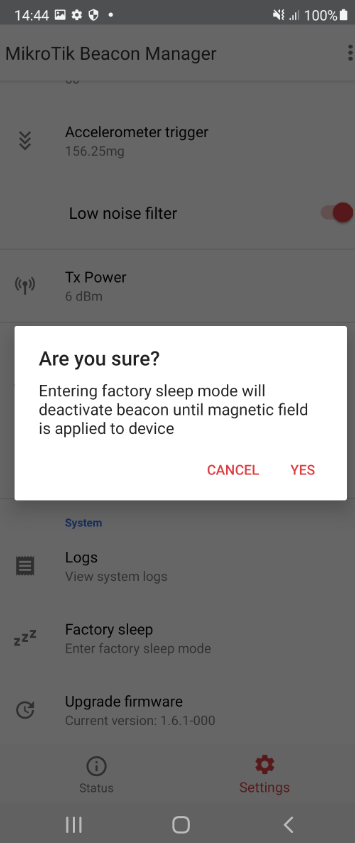
Factory sleep
This option can initiate factory sleep mode for the tag:
Upgrade Firmware
This menu allows you to upgrade the tag's firmware version:
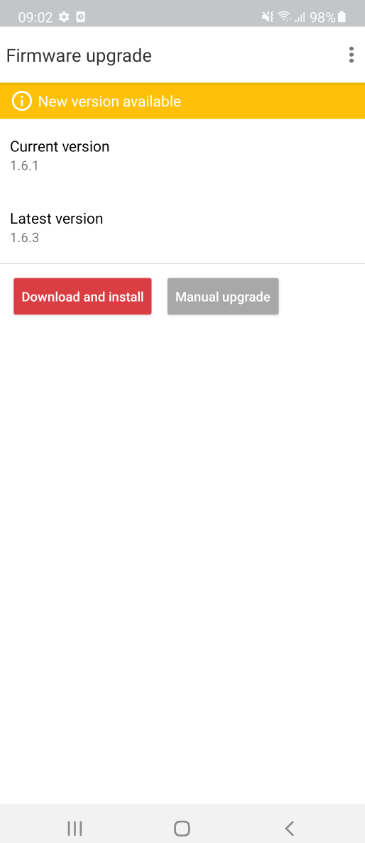
Click "Download and install" and wait for the device to reboot.
Import/Export
In the right upper corner of the screen, you have an option to import/export current settings:
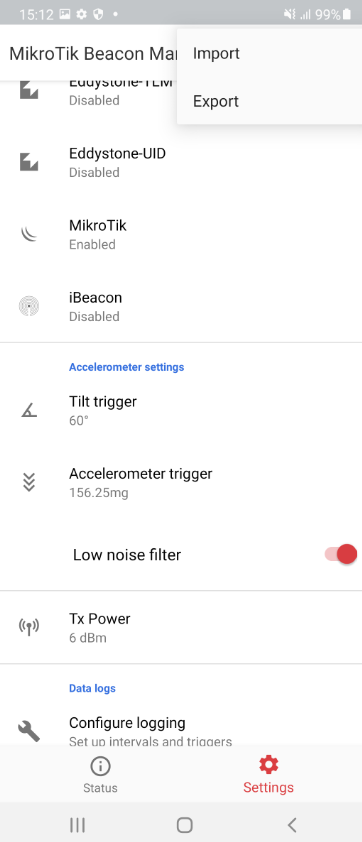
If you press the export button, the app will open the phone's file menu, where you can name the configuration file and save it.
If you press the import button, the app will open the phone's file menu, where you can select the configuration file and apply it.