...
The Chateau is a home router to be used with a cellular network provider sim card.
...
Before you work on any equipment, be aware of the hazards involved with electrical circuitry, and be familiar with standard practices for preventing accidents.
Ultimate disposal of this product should be handled according to all national laws and regulations.
The Installation of the equipment must comply with local and national electrical codes.
This unit is intended to be installed in the rackmount. Please read the mounting instructions carefully before beginning installation. Failure to use the correct hardware or to follow the correct procedures could result in a hazardous situation to people and damage to the system.
This product is intended to be installed indoors. Keep this product away from water, fire, humidity, or hot environments.
Use only the power supply and accessories approved by the manufacturer, and which can be found in the original packaging of this product.
Read the installation instructions before connecting the system to the power source.
We cannot guarantee that no accidents or damage will occur due to the improper use of the device. Please use this product with care and operate at your own risk!
In the case of device failure, please disconnect it from power. The fastest way to do so is by unplugging the power plug from the power outlet.
It is the customer's responsibility to follow local country regulations, including operation within legal frequency channels, output power, cabling requirements, and Dynamic Frequency Selection (DFS) requirements. All Mikrotik radio devices must be professionally installed.
Exposure to Radio Frequency Radiation: This MikroTik equipment complies with the FCC, IC, and European Union radiation exposure limits set forth for an uncontrolled environment. This MikroTik device should be installed and operated no closer than 20 centimeters from your body, occupational user, or the general public.
...
- Connect the power adapter to the DC jack;
- Once the device is powered on and the PC connected to the device, open https://192.168.88.1
 in your web browser to start the configuration;
 - User name: admin and there is no password by default you will be logged in automatically to the Quick Set screen (or, for some models, check user and wireless passwords on the sticker);
- We recommend clicking the "Check for updates" button on the right side and updating your RouterOS software to the latest version to ensure the best performance and stability, Must have a valid SIM card inserted;
- To manually update the device, please go to https://mikrotik.com/download
- Choose ARM packages for this device and download it to your PC.
- Upload downloaded packages to the WebFig "Files" menu and reboot the device.
- Updating your RouterOS software to the latest version will ensure the best performance, stability, and security updates.
- To personalize your wireless network, SSID can be changed in the fields "Network Name";
- Choose your country on the left side of the screen in the field "Country", to apply country regulation settings;
- Set up your wireless network password in the field "WiFi Password" the password must be at least eight symbols;
- Set up your router password in the bottom field "Password" to the right and repeat it in the field "Confirm Password", it will be used to login log in next time;
- Click on the "Apply Configuration" to save changes.
...
- Reset button.
- Powering DC jack 2.0 mm.
- Five Gigabit ports, supporting automatic cross/straight cable correction (Auto MDI/X). Either straight or crossover cable cables can be used for connecting to other network devices.
- USB type-A.
- SIM slot for Micro sim card.
- Mode button.
- Cover for external SMA antenna connectors.
- WPS Sync button.
...
- Direct-input power jack (5.5 mm outside and 2 mm inside, female, pin-positive plug) 12-28 V DC⎓.
...
We recommend checking for updates frequently to receive the latest updates for your RouterOS software to ensure the best performance and stability.
RouterOS includes many configuration options in addition to what is described in this document. We suggest starting here to get yourself accustomed to the possibilities: https://mt.lv/help. In case IP connection is not available, the Winbox tool (https://mt.lv/winbox) can be used to connect to the MAC address of the device from the LAN side (all access is blocked from the Internet port by default).
For recovery purposes, it is possible to boot the device for reinstallation, see section Buttons and Jumpers.
Mode button
Mode button is located on the back of the unit, to the right side (see "Expansion slots and ports")
The Default configuration for the Mode button is dark mode - to turn off all LEDs. The button can be configured in RouterOS to run any user-specified scripts.
Sync button
Sync The sync button is located on the top of the unit. The WPS Sync button, if configured on the wireless interface, can be used to connect new clients.
...
- Press and hold the WPS button for 1 – 5 seconds to enable WPS for wireless interfaces.
Front LED status


- Wireless network activity.
- Ethernet port activity.
...
- System LED.
- LTE signal strength.
| Info |
|---|
Cellular connection technology based on system/power the System LED color: |
...
SIM card slot is designed to use with Micro SIM cards.
Nano SIM cards have different thickness, usage with an adapter are not recommended.
...
- Hold this button during boot time until the LED light starts flashing, and release the button to reset the RouterOS configuration (total 5 seconds).
- Keep holding for 5 more seconds, LED turns solid, release now to turn on CAP mode. The device will now look for a CAPsMAN server (total 10 seconds).
- Or Keep holding the button for 5 more seconds until LED turns off, then release it to make the RouterBOARD look for Netinstall servers (total 15 seconds).
...
- Open doors by pulling them upwards.
- Screw the LTE antenna to the SMA connector located on the left side. The maximum diameter for antennas antenna connectors or any other adapters used is 13 mm.
...
| Info |
|---|
Please connect and disconnect the antenna, when the device is turned off! We recommend using our antenna https://mikrotik.com/product/mant_lte_5o |
Removing
...
front cover to access PCB
In case there is a need to access PCB, the back front cover can be removed.
- Remove center screw;
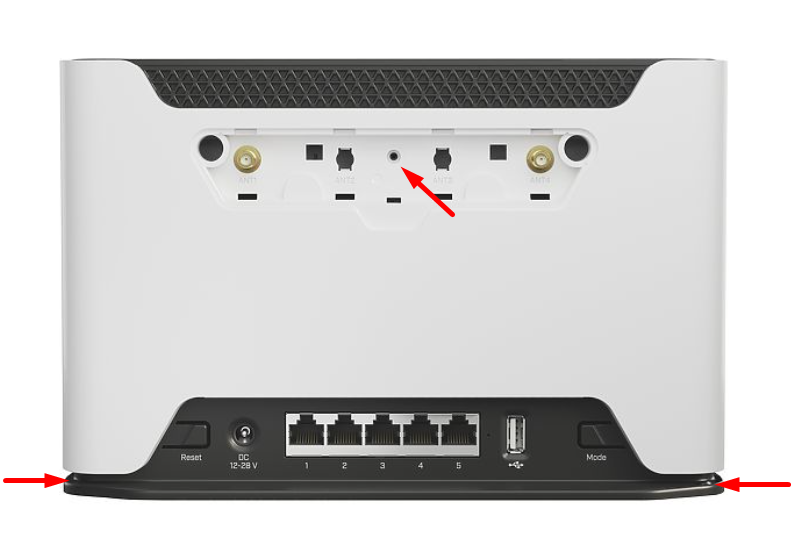
- Use a small screwdriver to pry open backplate cover in marked spots;
- Continue to pry it open by going up;
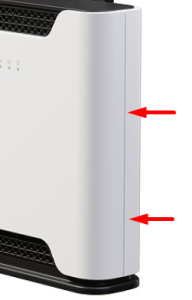
- At the end lift off the whole backplatecover.
Operating system support
...
| Note |
|---|
To avoid pollution of the environment, please separate the device from household waste and dispose of it in a safe manner, such as in at designated waste disposal sites. Familiarize yourself with the procedures for the proper transportation of the equipment to the designated disposal sites in your area. |
...