...
- Use a Phillips head screwdriver to loosen the screw, which secures the bottom lid (see 15303269 Bottom Lid).
- Insert the SIM card into the slot with the chip facing up.
- Choose your powering solution, please see the 15303269 Powering section for possibilities.
- Open network connections on your PC and search for the SSID that begins with "MikroTik".
- Connect to the wireless network, open https://192.168.88.1
 in your web browser to start the configuration.
 - User name: admin and there is no password by default you will be logged in automatically to the Quick Set screen.
- Update the device by clicking the "Check for updates" button on the right side and updating your RouterOS software to the latest version to ensure the best performance and stability. Must have a valid SIM card inserted.
- To manually update the device, please go https://mikrotik.com/download
- Choose ARM packages for this device and download it to your PC.
- Upload downloaded packages to the WebFig "Files" menu and reboot the device.
- Updating your RouterOS software to the latest version will ensure the best performance, stability, and security updates.
- To personalize your wireless network, SSID can be changed in the fields "Network Name";
- Choose your country on the left side of the screen in the field "Country", to apply country regulation settings.
- Set up your wireless network password in the field "WiFi Password" the password must be at least eight symbols.
- Set up your router password in the bottom field "Password" to the right and repeat it in the field "Confirm Password", it will be used to login next time.
- Click on the "Apply Configuration" to save changes.
...
- Mount plastic tie straps to steel brackets guiding them through holes.
- Mount bracket to the device.
- Secure them with a screw.
- Mount and align the device on the pole or mast.
- Guide Ethernet cable through the opening and connect to the Ethernet port.
- Close bottom latch and secure with a screw.
 It It's recommended to secure Ethernet cable to the pole using zip ties. With the distance from the device approximately 30 cm.
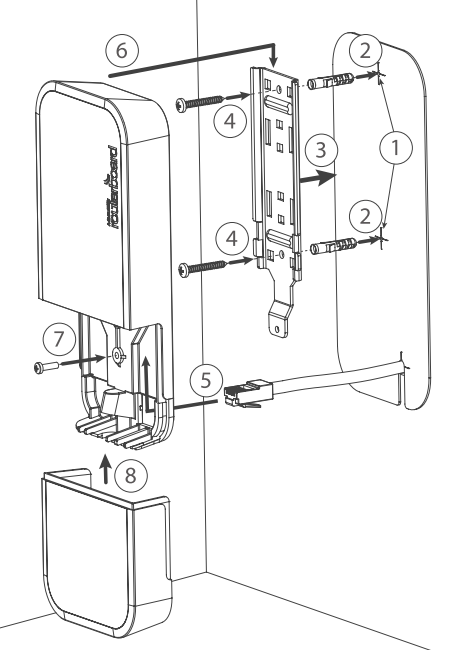
Mounting unit on the wall:
...
- Remove the screw using Philips PH2 screwdriver and slide down the bottom lid to remove it;
- Remove both screws below the power jack and slide out the wAP PCB board;
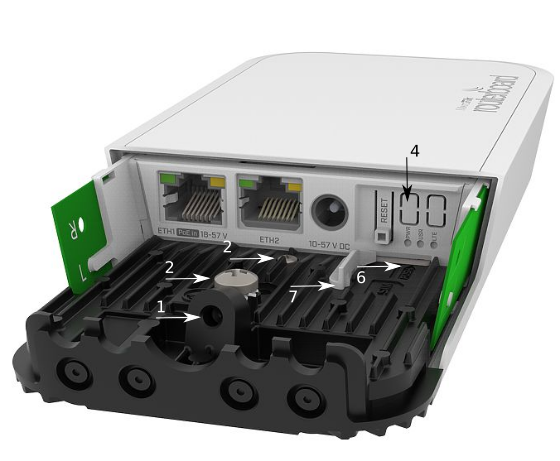
- Disconnect the grey uFL connector from the MAIN antenna connector of the modem, disconnect the black cable from the other (or AUX) connector;
- Remove two plastic doors using a flat screwdriver or similar tool and feed antenna wires through the holes and connect to the LTE6 card installed;
- After you have reinserted the wAP board into the case and secured it with the screw that was removed earlier;
- Slide in the SIM card from your mobile operator into the SIM slot, with the chip facing up. The slot accepts miniSIM (2FF);
- The SIM slot protects the SIM card from falling out with a plastic latch. You can press the latch to the left side to unlock and then insert the SIM card or replacing it using tweezers or a similar tool.
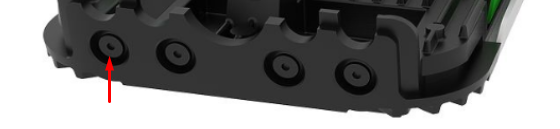
When using external antennas, please attach connectors to the case:
- Make openings and use a 6.5 mm drill bit, and drill in any of four pre-designed spots;
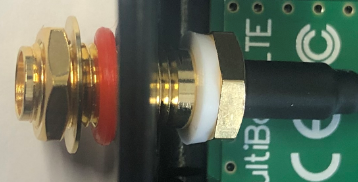
- Guide your ACSMAUFL connectors and secure them in place, see the picture below for reference on how to place rubber seals for best water protection:
Buttons and jumpers
The reset button has three functions:
...