...
- Connect your computer to one of the Ethernet ports;
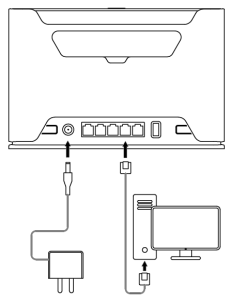
- Connect the power adapter to the DC jack;
- Once the device is powered on and PC connected to the device, open https://192.168.88.1
 in your web browser to start the configuration;
 - User name: admin and there is no password by default you will be logged in automatically to the Quick Set screen;
- We recommend clicking the "Check for updates" button on the right side and updating your RouterOS software to the latest version to ensure the best performance and stability, Must have a valid SIM card inserted;
- To manually update the device, please go to https://mikrotik.com/download
- Choose ARM packages for this device and download them to your PC.
- Upload downloaded packages to the WebFig "Files" menu and reboot the device.
- Updating your RouterOS software to the latest version will ensure the best performance, stability, and security updates.
- To personalize your wireless network, SSID can be changed in the fields "Network Name";
- Choose your country on the left side of the screen in the field "Country", to apply country regulation settings;
- Set up your wireless network password in the field "WiFi Password" the password must be at least eight symbols;
- Set up your router password in the bottom field "Password" to the right and repeat it in the field "Confirm Password", it will be used to login log in next time;
- Click on the "Apply Configuration" to save changes.
...
Mode button located on the back of the unit, to the right side.
The Default configuration for the Mode button is dark mode - to turn off all LEDs. The button can be configured in RouterOS to run any user-specified - scripts.
Sync button
Sync button located on the top of the unit. WPS Sync button, if configured on the wireless interface, can be used to connect new clients.
...
SIM card slot is designed to use with Micro SIM cards.
Nano SIM cards have different thicknesses, usage with adapter are is not recommended.
Reset button
...
- ADAPT1_ EU/US Switching Power Supply 24V, 1.2A.
- CAB3_ CAT5E UTP Flat Cable, 8P8C, AWG32, 1.5m.
- ANT8-9_ external LTE antenna.
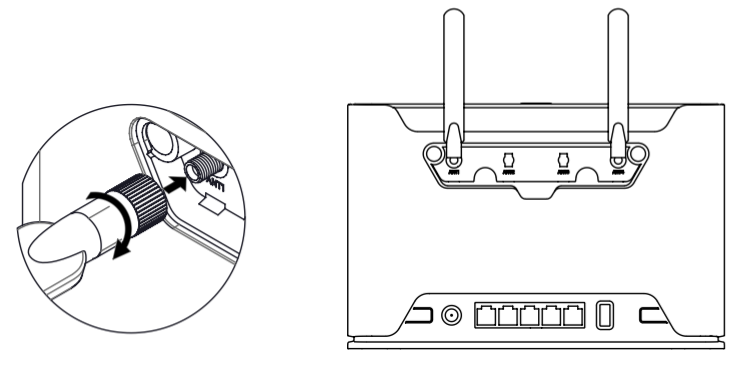
Antenna usage
...
Switch off the device before connecting the antennas, otherwise, the device may be damaged!
External antenna sockets are located on the back
...
of the
...
device.
Screw
the antenna both antennas to the SMA
connector located on the left side. The maximum diameter for antenna connectors or any other adapters used is 13 mm.
...
| Info |
|---|
When using one antenna, please connect to the SMA connector on the left side (ANT1). |
...
sockets (Follow the instructions in the illustrations).
Removing back cover to access PCB
...