...
| Code Block |
|---|
|
/ip firewall raw
add action=notrack chain=prerouting src-address=10.1.101.0/24 dst-address=10.1.202.0/24
add action=notrack chain=prerouting src-address=10.1.202.0/24 dst-address=10.1.101.0/24 |
...
Site to Site GRE tunnel over IPsec (IKEv2) using DNS
This example explains how it is possible to establish a secure IPsec connection between a device connected to the Internet (road warrior client) and a device running RouterOS acting as a server.
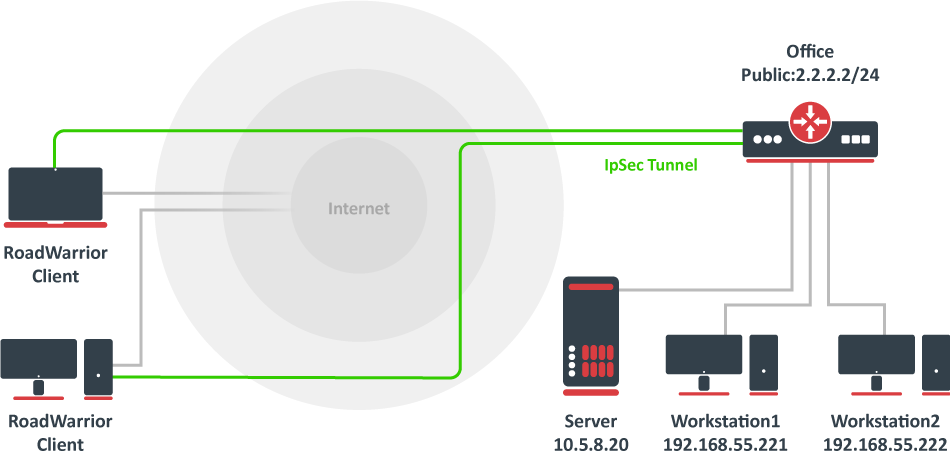 Image Removed
RouterOS server configuration
Before configuring IPsec, it is required to set up certificates. It is possible to use a separate Certificate Authority for certificate management, however in this example, self-signed certificates are generated in RouterOS System/Certificates menu. Some certificate requirements should be met to connect various devices to the server:
- Common name should contain IP or DNS name of the server;
- SAN (subject alternative name) should have IP or DNS of the server;
- EKU (extended key usage) tls-server and tls-client are required.
and encrypted GRE tunnel between two RouterOS devices when one or both sites do not have a static IP address. Before making this configuration possible, it is necessary to have a DNS name assigned to one of the devices which will act as a responder (server). For simplicity, we will use RouterOS built-in DDNS service IP/Cloud.
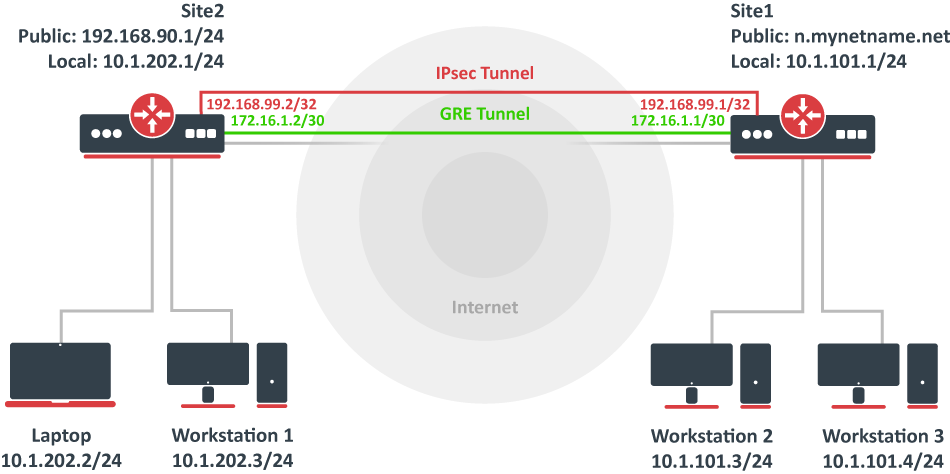 Image Added
Site 1 (server) configuration
This is the side that will listen to incoming connections and act as a responder. We will use mode config to provide an IP address for the second site, but first, create a loopback (blank) bridge and assign an IP address to it that will be used later for GRE tunnel establishment.Considering all requirements above, generate CA and server certificates:
| Code Block |
|---|
|
/certificateinterface bridge
add common-name=ca name=ca
sign ca ca-crl-host=2.2.2.2
add common-name=2.2.2.2 subject-alt-name=IP:2.2.2.2 key-usage=tls-server name=server1
sign server1 ca=caloopback
/ip address
add address=192.168.99.1 interface=loopback |
Continuing with the IPsec configuration, start off by creating Now that valid certificates are created on the router, add a new Phase 1 profile and Phase 2 proposal entries with pfs-group=none:using stronger or weaker encryption parameters that suit your needs. Note that this configuration example will listen to all incoming IKEv2 requests, meaning the profile configuration will be shared between all other configurations (e.g. RoadWarrior).
| Code Block |
|---|
|
/ip ipsec profile
add dh-group=ecp256,modp2048,modp1024 enc-algorithm=aes-256,aes-192,aes-128 name=ike2
/ip ipsec proposal
add name=ike2auth-algorithms=null enc-algorithms=aes-128-gcm name=ike2-gre pfs-group=none |
Mode config is used for address distribution from IP/Pools:Next, create a new mode config entry with responder=yes. This will provide an IP configuration for the other site as well as the host (loopback address) for policy generation.
| Code Block |
|---|
|
[admin@MikroTik] > /ip firewall nat print
Flags: X - disabled, I - invalid, D - dynamic
0 D ;;; ipsec mode-config
chain=srcnat action=src-nat to-addressesadd address=192.168.7799.2542 srcaddress-addressprefix-listlength=local32 dst-address-list=!localname=ike2-gre split-include=192.168.99.1/32 system-dns=no |
It Since that the policy template must be adjusted to allow only specific network policies, it is advised to create a separate new policy group and templateto separate this configuration from any existing or future IPsec configuration.
| Code Block |
|---|
|
/ip ipsec policy group
add name=ike2-gre |
Now it is time to set up a new policy template that will match the remote peers new dynamic address and the loopback address.
| Code Block |
|---|
|
policies
/ip ipsec policy
add dst-address=192.168.7799.02/2432 group=ike2-policiesgre proposal=ike2-gre src-address=0192.0168.099.01/032 template=yes |
Create a new IPsec The next step is to create a peer entry configuration that will listen to all incoming IKEv2 requests. If you already have such an entry, you can skip this step.
| Code Block |
|---|
|
/ip ipsec peer
add exchange-mode=ike2 name=ike2 passive=yes profile=ike2 |
Identity configuration
...
Lastly, set up an identity that will match our remote peer by pre-shared-key authentication with a specific secret.
| Code Block |
|---|
|
/ip ipsec identity
add auth-method=digital-signature certificate=server1 generate-policy=port-strict mode-config=ike2-confgre peer=ike2 policy-template-group=ike2-policies |
| Note |
|---|
If the peer's ID (ID_i) is not matching with the certificate it sends, the identity lookup will fail. See remote-id in the identities section. |
...
The server side is now configured and listening to all IKEv2 requests. Please make sure the firewall is not blocking UDP/4500 port.
The last step is to create the GRE interface itself. This can also be done later when an IPsec connection is established from the client-side
...
.
| Code Block |
|---|
|
/ip ipsec mode-configinterface gre
add local-address=192.168.66.2 address-prefix-length=3299.1 name=usr_A split-includegre-tunnel1 remote-address=192.168.55.0/24 system-dns=no |
...
Site 2 (client) configuration
Similarly to server configuration, start off by creating a new Phase 1 profile and Phase 2 proposal configurations. Since this site will be the initiator, we can use a more specific profile configuration to control which exact encryption parameters are used, just make sure they overlap with what is configured on the server-side.
| Code Block |
|---|
|
/ip ipsec identityprofile
add authdh-methodgroup=digital-signature certificate=server1 generate-policy=port-strict match-by=certificate mode-config=usr_A peer=ike2 policy-template-group=ike2-policies remote-certificate=rw-client1 |
Split tunnel configuration
Split tunneling is a method that allows road warrior clients to only access a specific secured network and at the same time send the rest of the traffic based on their internal routing table (as opposed to sending all traffic over the tunnel). To configure split tunneling, changes to mode config parameters are needed.
For example, we will allow our road warrior clients to only access the 10.5.8.0/24 network.
ecp256 enc-algorithm=aes-256 name=ike2-gre
/ip ipsec proposal
add auth-algorithms=null enc-algorithms=aes-128-gcm name=ike2-gre pfs-group=none |
Next, create a new mode config entry with responder=no. This will make sure the peer requests IP and split-network configuration from the server.
| Code Block |
|---|
| Code Block |
|---|
|
/ip ipsec mode-confconfig
setadd [find name="rw-conf"] split-include=10.5.8.0/24ike2-gre responder=no |
It is also
...
advised to create a new policy group to separate this configuration from any existing or future IPsec configuration.
| Code Block |
|---|
|
/ip ipsec policy group
add name=ike2-gre |
Create a new policy template on the client-side as well send a specific DNS server for the client to use. By default, system-dns=yes is used, which sends DNS servers that are configured on the router itself in IP/DNS. We can force the client to use a different DNS server by using the static-dns parameter.
| Code Block |
|---|
|
/ip ipsec mode-confpolicy
set [find name="rw-conf"] system-dns=no static-dns=10.5.8.1add dst-address=192.168.99.1/32 group=ike2-gre proposal=ike2-gre src-address=192.168.99.2/32 template=yes |
Move on to peer configuration. Now we can specify the DNS name for the server under the address parameter. Obviously, you can use an IP address as wellWhile it is possible to adjust the IPsec policy template to only allow road warrior clients to generate policies to network configured by split-include parameter, this can cause compatibility issues with different vendor implementations (see known limitations). Instead of adjusting the policy template, allow access to a secured network in IP/Firewall/Filter and drop everything else.
| Code Block |
|---|
|
/ip firewallipsec filterpeer
add action=drop chain=forward src-address=192.168.77.0/24 dst-address=!10.5.8.0/24 |
| Note |
|---|
Split networking is not a security measure. The client (initiator) can still request a different Phase 2 traffic selector. |
Generating client certificates
To generate a new certificate for the client and sign it with a previously created CA.
| Code Block |
|---|
|
/certificate
add common-name=rw-client1 name=rw-client1 key-usage=tls-client
sign rw-client1 ca=ca |
address=n.mynetname.net exchange-mode=ike2 name=p1.ez profile=ike2-gre |
Lastly, create an identity for our newly created peers.
| Code Block |
|---|
|
/ip ipsec identity
add generate-policy=port-strict mode-config=ike2-gre peer=p1.ez policy-template-group=ike2-gre secret=test |
If everything was done properly, there should be a new dynamic policy presentPKCS12 format is accepted by most client implementations, so when exporting the certificate, make sure PKCS12 is specified.
| Code Block |
|---|
|
/certificate
export-certificate rw-client1 export-passphrase=1234567890 type=pkcs12 |
A file named cert_export_rw-client1.p12 is now located in the routers System/File section. This file should be securely transported to the client's device.
Typically PKCS12 bundle contains also a CA certificate, but some vendors may not install this CA, so a self-signed CA certificate must be exported separately using PEM format.
| Code Block |
|---|
|
/certificate
export-certificate ca type=pem |
A file named cert_export_ca.crt is now located in the routers System/File section. This file should also be securely transported to the client's device.
PEM is another certificate format for use in client software that does not support PKCS12. The principle is pretty much the same.
| Code Block |
|---|
|
/certificate
export-certificate ca
export-certificate rw-client1 export-passphrase=1234567890 |
Three files are now located in the routers Files section: cert_export_ca.crt, cert_export_rw-client1.crt and cert_export_rw-client1.key which should be securely transported to the client device.
Known limitations
Here is a list of known limitations by popular client software IKEv2 implementations.
- Windows will always ignore networks received by split-include and request policy with destination 0.0.0.0/0 (TSr). When IPsec-SA is generated, Windows requests DHCP option 249 to which RouterOS will respond with configured split-include networks automatically.
- Both Apple macOS and iOS will only accept the first split-include network.
- Both Apple macOS and iOS will use the DNS servers from system-dns and static-dns parameters only when 0.0.0.0/0 split-include is used.
- While some implementations can make use of different PFS group for phase 2, it is advised to use pfs-group=none under proposals to avoid any compatibility issues.
RouterOS client configuration
...
ip ipsec policy print
Flags: T - template, X - disabled, D - dynamic, I - invalid, A - active, * - default
0 T * group=default src-address=::/0 dst-address=::/0 protocol=all proposal=default template=yes

1 T group=ike2-gre src-address=192.168.99.2/32 dst-address=192.168.99.1/32 protocol=all proposal=ike2-gre template=yes

2 DA src-address=192.168.99.2/32 src-port=any dst-address=192.168.99.1/32 dst-port=any protocol=all action=encrypt level=unique ipsec-protocols=esp
tunnel=yes sa-src-address=172.17.2.1 sa-dst-address=172.17.2.2 proposal=ike2-gre ph2-count=1 |
A secure tunnel is now established between both sites which will encrypt all traffic between 192.168.99.2 <=> 192.168.99.1 addresses. We can use these addresses to create a GRE tunnel.
| Code Block |
|---|
|
/certificateinterface importgre
add filelocal-name=cert_export_RouterOS_client.p12 passphrase=1234567890 |
There should now be the self-signed CA certificate and the client certificate in the Certificate menu. Find out the name of the client certificate.
| Code Block |
|---|
|
/certificate print |
cert_export_RouterOS_client.p12_0 is the client certificate.
It is advised to create a separate Phase 1 profile and Phase 2 proposal configurations to not interfere with any existing IPsec configuration.
address=192.168.99.2 name=gre-tunnel1 remote-address=192.168.99.1 |
Road Warrior setup using IKEv2 with RSA authentication
This example explains how to establish a secure IPsec connection between a device connected to the Internet (road warrior client) and a device running RouterOS acting as a server.
Image Added
RouterOS server configuration
Before configuring IPsec, it is required to set up certificates. It is possible to use a separate Certificate Authority for certificate management, however in this example, self-signed certificates are generated in RouterOS System/Certificates menu. Some certificate requirements should be met to connect various devices to the server:
- Common name should contain IP or DNS name of the server;
- SAN (subject alternative name) should have IP or DNS of the server;
- EKU (extended key usage) tls-server and tls-client are required.
Considering all requirements above, generate CA and server certificates:
| Code Block |
|---|
|
/ip ipsec profilecertificate
add common-name=ca name=ike2-rw
/ip ipsec proposalca
sign ca ca-crl-host=2.2.2.2
add common-name=ike2-rw pfs-group=none2.2.2.2 subject-alt-name=IP:2.2.2.2 key-usage=tls-server name=server1
sign server1 ca=ca |
Now that valid certificates are created on the router, add a new Phase 1 profile and Phase 2 proposal entries with pfs-group=none:While it is possible to use the default policy template for policy generation, it is better to create a new policy group and template to separate this configuration from any other IPsec configuration.
| Code Block |
|---|
|
/ip ipsec policy groupprofile
add name=ike2-rw
/ip ipsec policyproposal
add groupname=ike2 pfs-rw proposal=ike2-rw template=yesgroup=none |
Mode config is used for address distribution from IP/Pools:Create a new mode config entry with responder=no that will request configuration parameters from the server.
| Code Block |
|---|
|
[admin@MikroTik] > /ip ipsec mode-config
add name=ike2-rw responder=no |
Lastly, create peer and identity configurations.
| Code Block |
|---|
|
/ip ipsec peer
add address=2.2.2.2/32 exchange-mode=ike2 name=ike2-rw-client
/ip ipsec identity
add auth-method=digital-signature certificate=cert_export_RouterOS_client.p12_0 generate-policy=port-strict mode-config=ike2-rw peer=ike2-rw-client policy-template-group=ike2-rw |
firewall nat print
Flags: X - disabled, I - invalid, D - dynamic
0 D ;;; ipsec mode-config
chain=srcnat action=src-nat to-addresses=192.168.77.254 src-address-list=local dst-address-list=!local |
Since that the policy template must be adjusted to allow only specific network policies, it is advised to create a separate policy group and templateVerify that the connection is successfully established.
| Code Block |
|---|
|
/ip ipsec
active-peers print
installed-sa print |
Enabling dynamic source NAT rule generation
If we look at the generated dynamic policies, we see that only traffic with a specific (received by mode config) source address will be sent through the tunnel. But a router in most cases will need to route a specific device or network through the tunnel. In such case, we can use source NAT to change the source address of packets to match the mode config address. Since the mode config address is dynamic, it is impossible to create a static source NAT rule. In RouterOS, it is possible to generate dynamic source NAT rules for mode config clients.
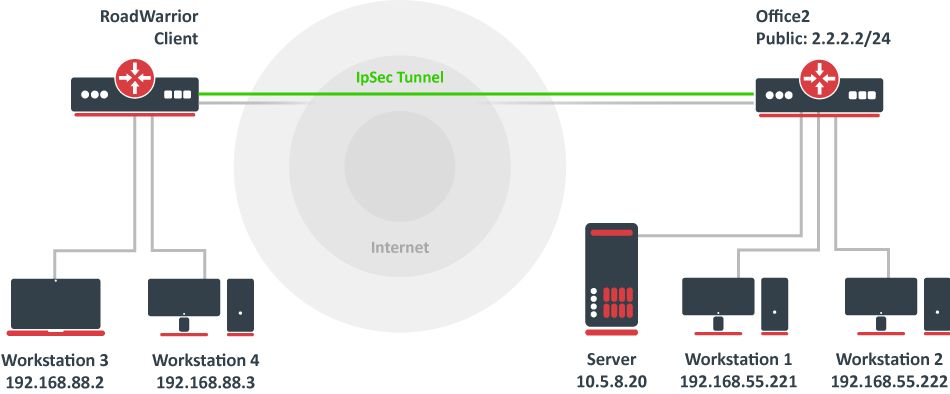 Image Removed
 policy group
add name=ike2-policies
/ip ipsec policy
add dst-address=192.168.77.0/24 group=ike2-policies proposal=ike2 src-address=0.0.0.0/0 template=yes |
Create a new IPsec peer entry that will listen to all incoming IKEv2 requests.
| Code Block |
|---|
|
/ip ipsec peer
add exchange-mode=ike2 name=ike2 passive=yes profile=ike2 |
Identity configuration
The identity menu allows to match specific remote peers and assign different configurations for each one of them. First, create a default identity, that will accept all peers, but will verify the peer's identity with its certificate.For example, we have a local network 192.168.88.0/24 behind the router and we want all traffic from this network to be sent over the tunnel. First of all, we have to make a new IP/Firewall/Address list which consists of our local network
| Code Block |
|---|
|
/ip firewallipsec address-listidentity
add address=192.168.88.0/24 list=local |
...
auth-method=digital-signature certificate=server1 generate-policy=port-strict mode-config=ike2-conf peer=ike2 policy-template-group=ike2-policies |
| Note |
|---|
If the peer's ID (ID_i) is not matching with the certificate it sends, the identity lookup will fail. See remote-id in the identities section. |
For example, we want to assign a different mode config for user "A", who uses certificate "rw-client1" to authenticate itself to the server. First of all, make sure a new mode config is created and ready to be applied for the specific user.
| Code Block |
|---|
|
/ip ipsec mode-config
set [ find name=ike2-rw ] src-address-list=localadd address=192.168.66.2 address-prefix-length=32 name=usr_A split-include=192.168.55.0/24 system-dns=no |
It is possible to apply this configuration for user "A" by using the match-by=certificate parameter and specifying his certificate with remote-certificateVerify correct source NAT rule is dynamically generated when the tunnel is established.
| Code Block |
|---|
|
[admin@MikroTik] > /ip firewall nat print
Flags: X - disabled, I - invalid, D - dynamic
0 D ;;; ipsec mode-config
chain=srcnat action=src-nat to-addresses=192.168.77.254 src-address-list=local dst-address-list=!local |
| Warning |
|---|
Make sure the dynamic mode config address is not a part of a local network. |
Windows client configuration
Open PKCS12 format certificate file on the Windows computer. Install the certificate by following the instructions. Make sure you select the Local Machine store location. Image Removed You can now proceed to Network and Internet settings -> VPN and add a new configuration. Fill in the Connection name, Server name, or address parameters. Select IKEv2 under VPN type. When it is done, it is necessary to select "Use machine certificates". This can be done in Network and Sharing Center by clicking the Properties menu for the VPN connection. The setting is located under the Security tab.
 Image Removed
Currently, Windows 10 is compatible with the following Phase 1 ( profiles) and Phase 2 ( proposals) proposal sets:
...
macOS client configuration
Open the PKCS12 format certificate file on the macOS computer and install the certificate in the "System" keychain. It is necessary to mark the CA certificate as trusted manually since it is self-signed. Locate the certificate macOS Keychain Access app under the System tab and mark it as Always Trust.
 Image Removed
You can now proceed to System Preferences -> Network and add a new configuration by clicking the + button. Select Interface: VPN, VPN Type: IKEv2 and name your connection. Remote ID must be set equal to common-name or subjAltName of server's certificate. Local ID can be left blank. Under Authentication Settings select None and choose the client certificate. You can now test the connectivity.
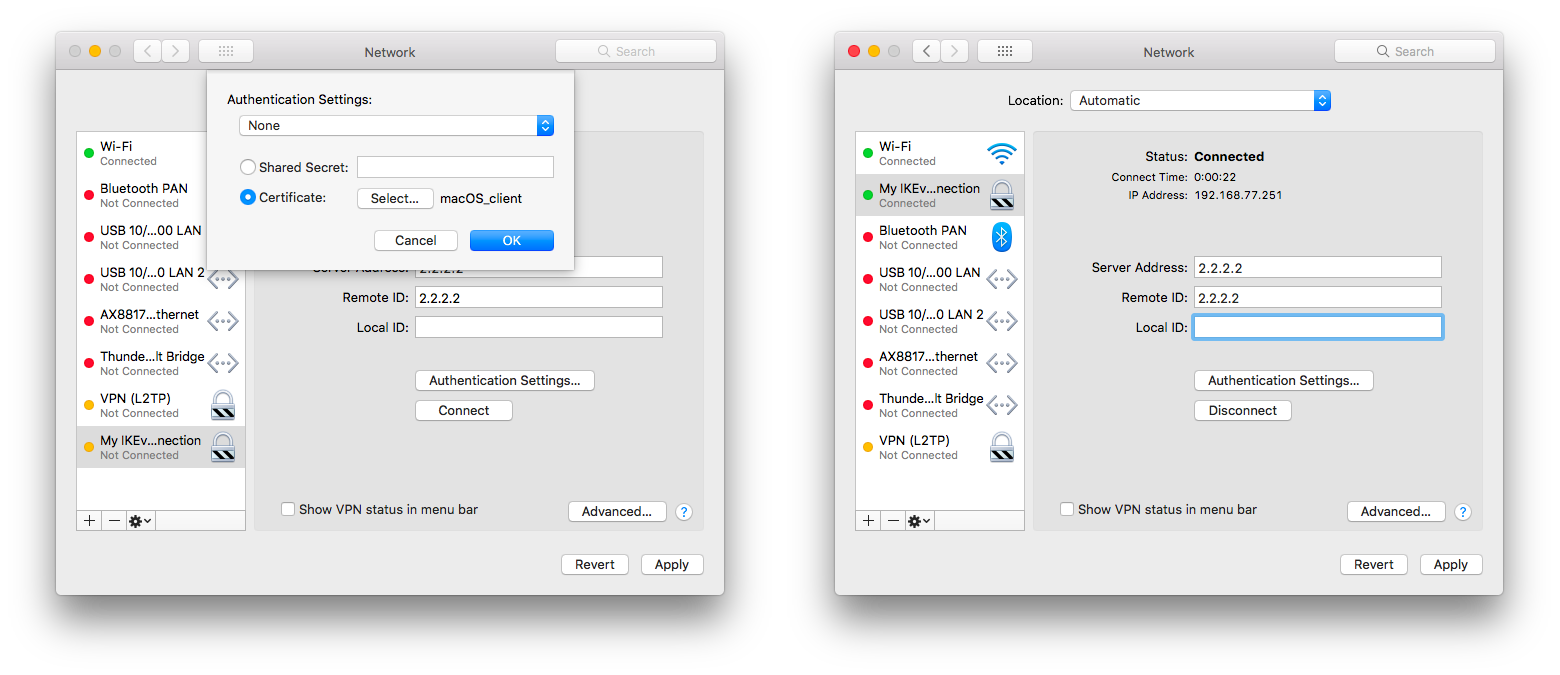 Image Removed
Currently, macOS is compatible with the following Phase 1 ( profiles) and Phase 2 ( proposals) proposal sets:
...
iOS client configuration
Typically PKCS12 bundle contains also a CA certificate, but iOS does not install this CA, so a self-signed CA certificate must be installed separately using PEM format. Open these files on the iOS device and install both certificates by following the instructions. It is necessary to mark the self-signed CA certificate as trusted on the iOS device. This can be done in Settings -> General -> About -> Certificate Trust Settings menu. When it is done, check whether both certificates are marked as "verified" under the Settings -> General -> Profiles menu.
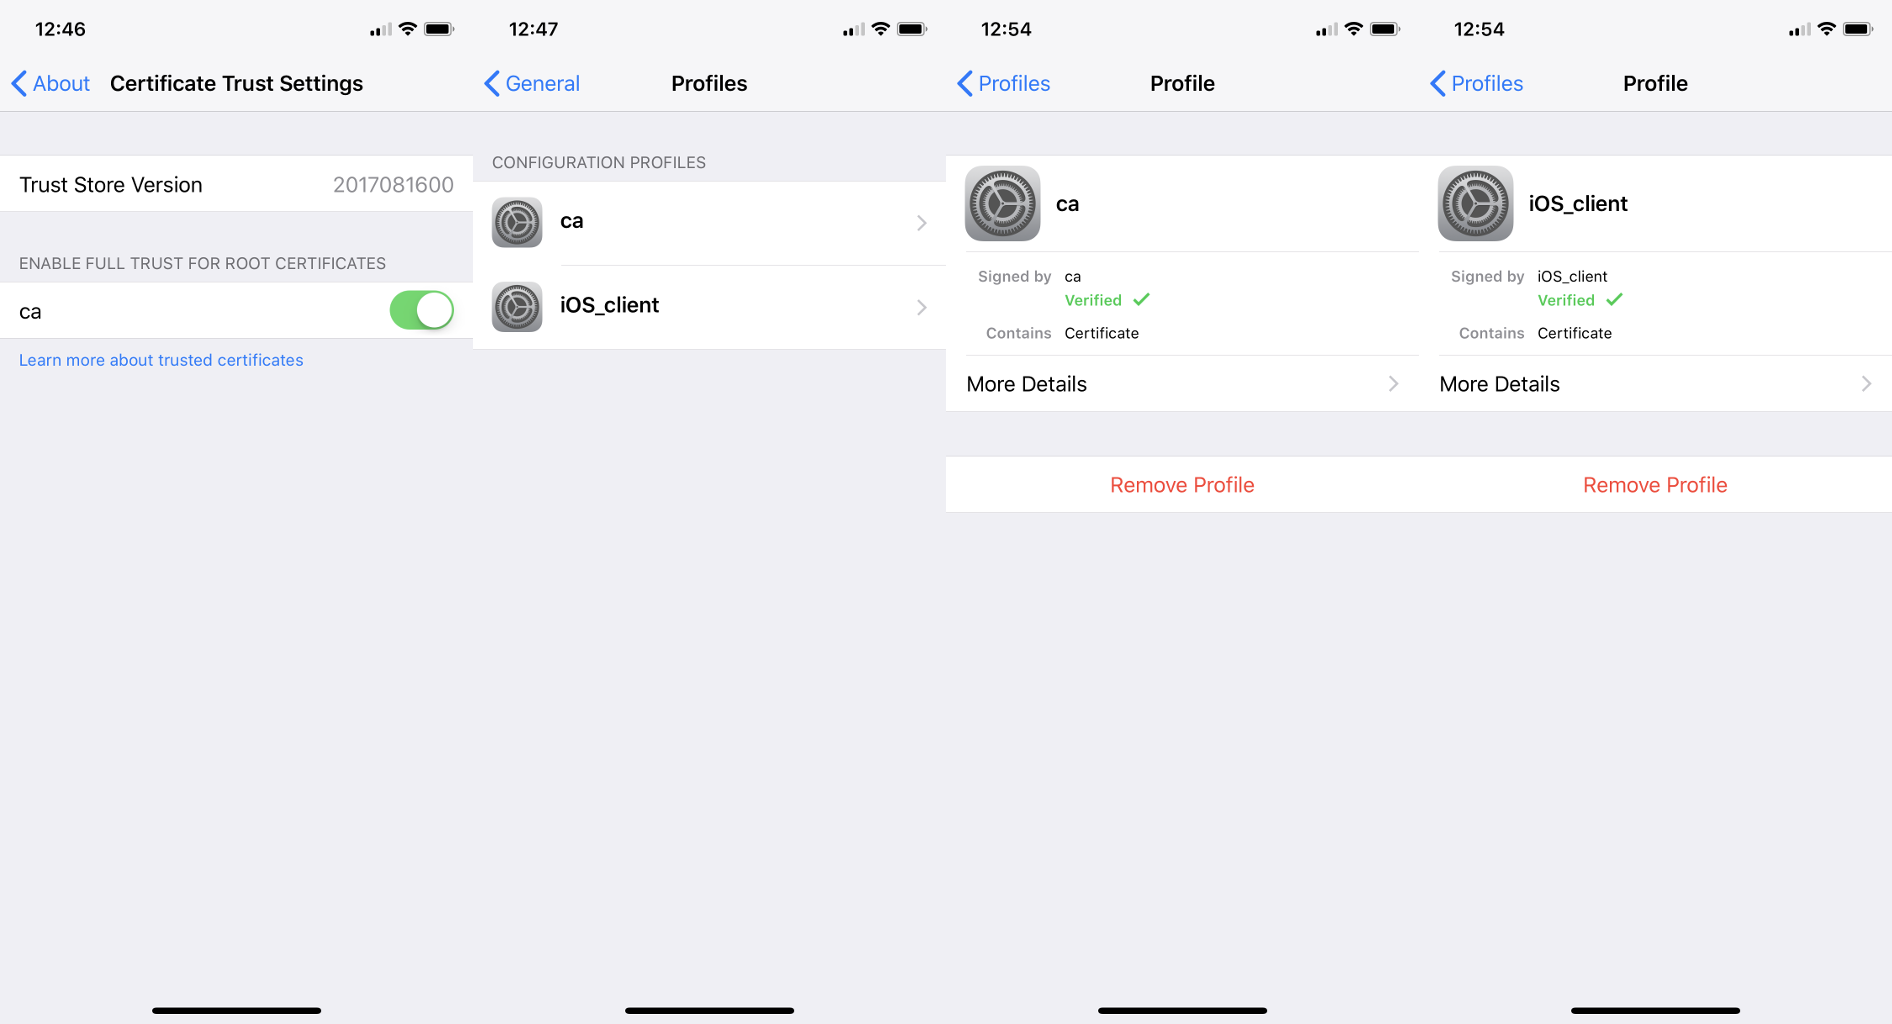 Image Removed
You can now proceed to Settings -> General -> VPN menu and add a new configuration. Remote ID must be set equal to common-name or subjAltName of server's certificate. Local ID can be left blank.
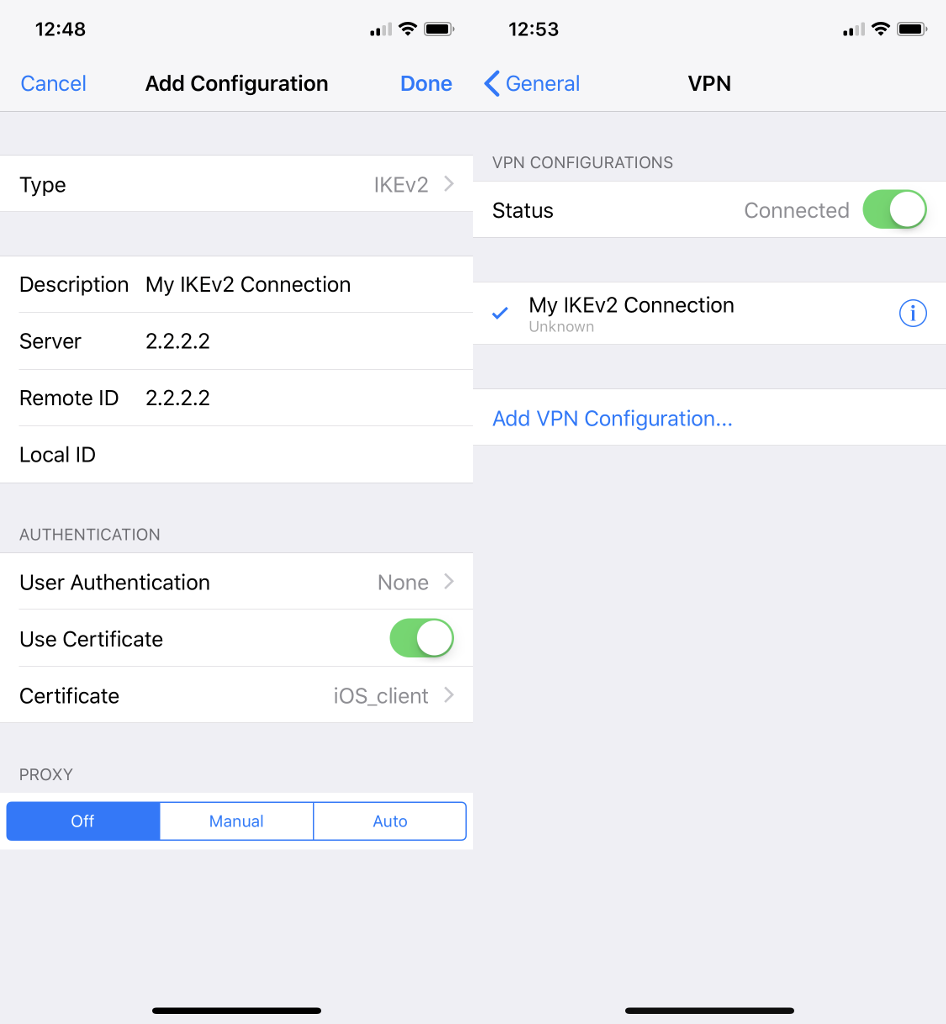 Image Removed
Currently, iOS is compatible with the following Phase 1 ( profiles) and Phase 2 ( proposals) proposal sets:
...
| Note |
|---|
If you are connected to the VPN over WiFi, the iOS device can go into sleep mode and disconnect from the network. |
Android (strongSwan) client configuration
Currently, there is no IKEv2 native support in Android, however, it is possible to use strongSwan from Google Play Store which brings IKEv2 to Android. StrongSwan accepts PKCS12 format certificates, so before setting up the VPN connection in strongSwan, make sure you download the PKCS12 bundle to your Android device. When it is done, create a new VPN profile in strongSwan, type in the server IP, and choose "IKEv2 Certificate" as VPN Type. When selecting a User certificate, press Install and follow the certificate extract procedure by specifying the PKCS12 bundle. Save the profile and test the connection by pressing on the VPN profile.
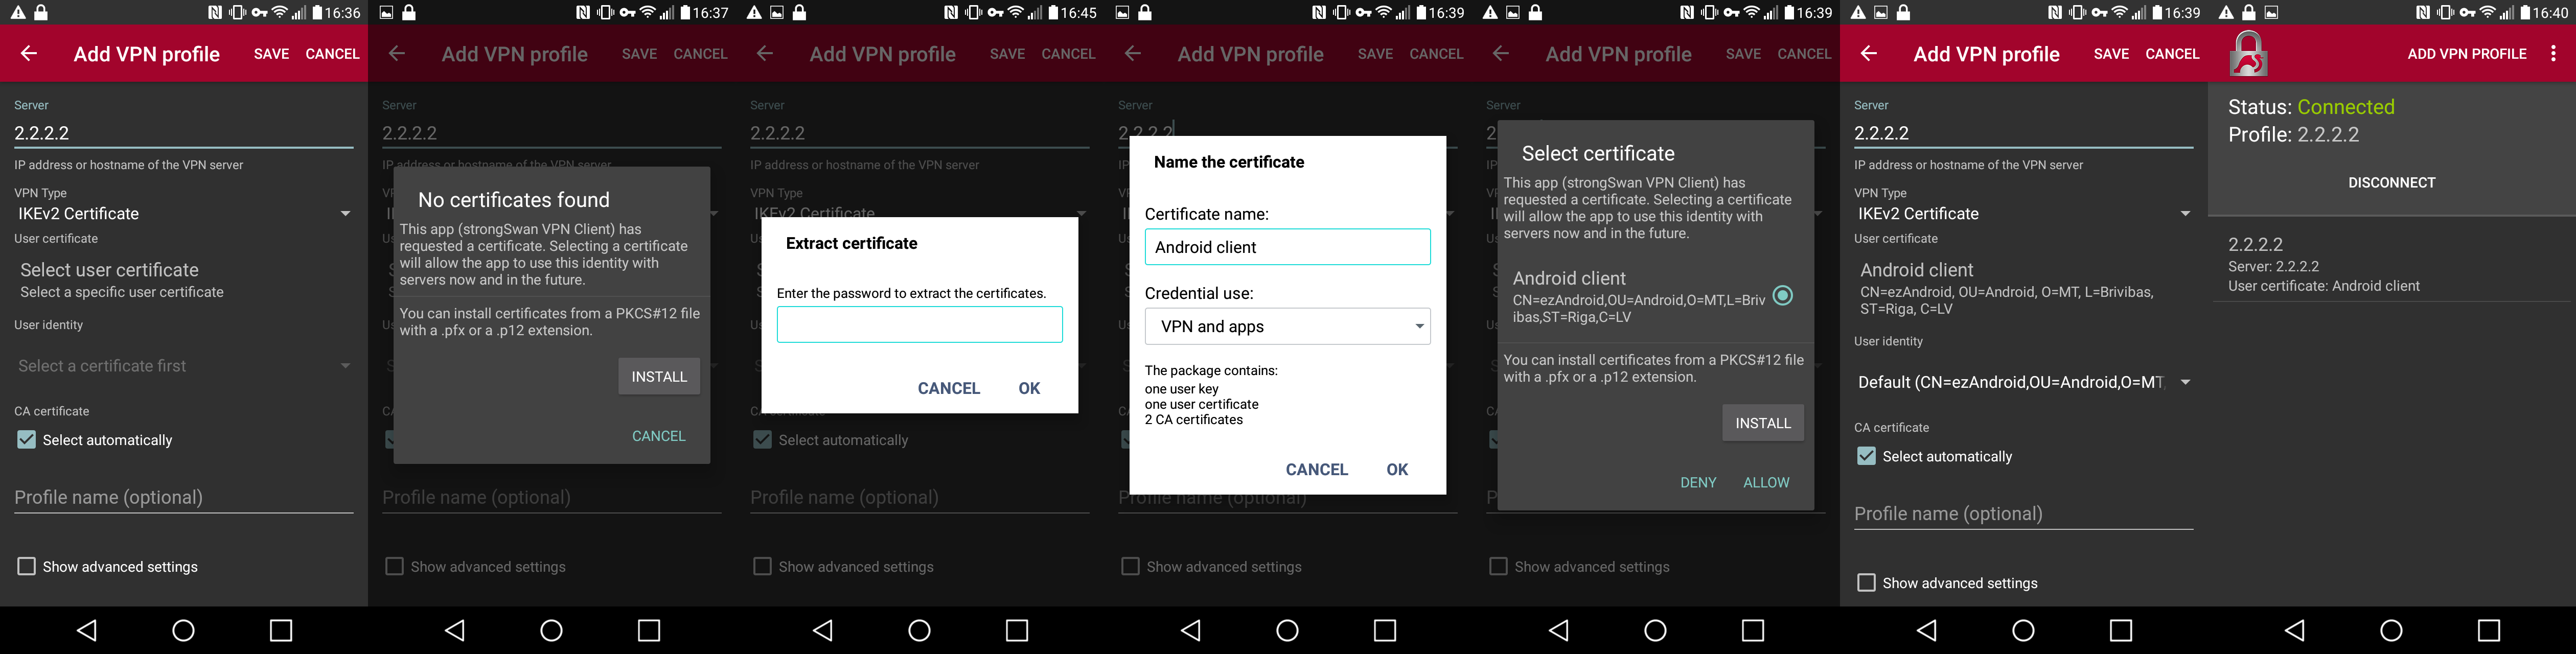 Image Removed
It is possible to specify custom encryption settings in strongSwan by ticking the "Show advanced settings" checkbox. Currently, strongSwan by default is compatible with the following Phase 1 ( profiles) and Phase 2 ( proposals) proposal sets:
...
Linux (strongSwan) client configuration
Download the PKCS12 certificate bundle and move it to /etc/ipsec.d/private directory.
Add exported passphrase for the private key to /etc/ipsec.secrets file where "strongSwan_client.p12" is the file name and "1234567890" is the passphrase.
| Code Block |
|---|
|
: P12 strongSwan_client.p12 "1234567890" |
Add a new connection to /etc/ipsec.conf file
| Code Block |
|---|
|
conn "ikev2"
keyexchange=ikev2
ike=aes128-sha1-modp2048
esp=aes128-sha1
leftsourceip=%modeconfig
leftcert=strongSwan_client.p12
leftfirewall=yes
right=2.2.2.2
rightid="CN=2.2.2.2"
rightsubnet=0.0.0.0/0
auto=add |
You can now restart (or start) the ipsec daemon and initialize the connection
| Code Block |
|---|
|
$ ipsec restart
$ ipsec up ikev2 |
Basic L2TP/IPsec setup
This example demonstrates how to easily set up an L2TP/IPsec server on RouterOS for road warrior connections (works with Windows, Android, iOS, macOS, and other vendor L2TP/IPsec implementations).
RouterOS server configuration
The first step is to enable the L2TP server:
| Code Block |
|---|
|
/interface l2tp-server server
set enabled=yes use-ipsec=required ipsec-secret=mySecret default-profile=default |
use-ipsec is set to required to make sure that only IPsec encapsulated L2TP connections are accepted.
Now what it does is enables an L2TP server and creates a dynamic IPsec peer with a specified secret.
| Code Block |
|---|
|
[admin@MikroTik] /ip ipsec peer> print
0 D address=0.0.0.0/0 local-address=0.0.0.0 passive=yes port=500
auth-method=pre-shared-key secret="123" generate-policy=port-strict
exchange-mode=main-l2tp send-initial-contact=yes nat-traversal=yes
hash-algorithm=sha1 enc-algorithm=3des,aes-128,aes-192,aes-256
dh-group=modp1024 lifetime=1d dpd-interval=2m dpd-maximum-failures=5 |
| Note |
|---|
Care must be taken if static IPsec peer configuration exists. |
The next step is to create a VPN pool and add some users.
| Code Block |
|---|
|
/ip pool add name=vpn-pool range=192.168.99.2-192.168.99.100

/ppp profile
set default local-address=192.168.99.1 remote-address=vpn-pool

/ppp secret
add name=user1 password=123
add name=user2 password=234 |
Now the router is ready to accept L2TP/IPsec client connections.
RouterOS client configuration
For RouterOS to work as L2TP/IPsec client, it is as simple as adding a new L2TP client.
| Code Block |
|---|
|
/interface l2tp-client
add connect-to=1.1.1.1 disabled=no ipsec-secret=mySecret name=l2tp-out1 \
password=123 use-ipsec=yes user=user1 |
It will automatically create dynamic IPsec peer and policy configurations.
Site to Site GRE tunnel over IPsec (IKEv2) using DNS
This example explains how it is possible to establish a secure and encrypted GRE tunnel between two RouterOS devices when one or both sites do not have a static IP address. Before making this configuration possible, it is necessary to have a DNS name assigned to one of the devices which will act as a responder (server). For simplicity, we will use RouterOS built-in DDNS service IP/Cloud.
Image Removed
Site 1 (server) configuration
This is the side that will listen to incoming connections and act as a responder. We will use mode config to provide an IP address for the second site, but first, create a loopback (blank) bridge and assign an IP address to it that will be used later for GRE tunnel establishment.
| Code Block |
|---|
|
/interface bridge
add name=loopback
/ip address
add address=192.168.99.1 interface=loopback |
Continuing with the IPsec configuration, start off by creating a new Phase 1 profile and Phase 2 proposal entries using stronger or weaker encryption parameters that suit your needs. Note that this configuration example will listen to all incoming IKEv2 requests, meaning the profile configuration will be shared between all other configurations (e.g. RoadWarrior).
| Code Block |
|---|
|
/ip ipsec profile
add dh-group=ecp256,modp2048,modp1024 enc-algorithm=aes-256,aes-192,aes-128 name=ike2
/ip ipsec proposal
add auth-algorithms=null enc-algorithms=aes-128-gcm name=ike2-gre pfs-group=none |
Next, create a new mode config entry with responder=yes. This will provide an IP configuration for the other site as well as the host (loopback address) for policy generation.
| Code Block |
|---|
|
/ip ipsec mode-config
add address=192.168.99.2 address-prefix-length=32 name=ike2-gre split-include=192.168.99.1/32 system-dns=no |
It is advised to create a new policy group to separate this configuration from any existing or future IPsec configuration.
| Code Block |
|---|
|
/ip ipsec policy group
add name=ike2-gre |
Now it is time to set up a new policy template that will match the remote peers new dynamic address and the loopback address.
| Code Block |
|---|
|
/ip ipsec policy
add dst-address=192.168.99.2/32 group=ike2-gre proposal=ike2-gre src-address=192.168.99.1/32 template=yes |
The next step is to create a peer configuration that will listen to all IKEv2 requests. If you already have such an entry, you can skip this step.
| Code Block |
|---|
|
/ip ipsec peer
add exchange-mode=ike2 name=ike2 passive=yes profile=ike2 |
Lastly, set up an identity that will match our remote peer by pre-shared-key authentication with a specific secret.
| Code Block |
|---|
|
/ip ipsec identity
add generate-policy=port-strict mode-config=ike2-gre peer=ike2 policy-template-group=ike2-gre secret=test |
The server side is now configured and listening to all IKEv2 requests. Please make sure the firewall is not blocking UDP/4500 port.
The last step is to create the GRE interface itself. This can also be done later when an IPsec connection is established from the client-side.
| Code Block |
|---|
|
/interface gre
add local-address=192.168.99.1 name=gre-tunnel1 remote-address=192.168.99.2 |
Site 2 (client) configuration
Similarly to server configuration, start off by creating a new Phase 1 profile and Phase 2 proposal configurations. Since this site will be the initiator, we can use a more specific profile configuration to control which exact encryption parameters are used, just make sure they overlap with what is configured on the server-side.
| Code Block |
|---|
|
/ip ipsec profile
add dh-group=ecp256 enc-algorithm=aes-256 name=ike2-gre
/ip ipsec proposal
add auth-algorithms=null enc-algorithms=aes-128-gcm name=ike2-gre pfs-group=none |
Next, create a new mode config entry with responder=no. This will make sure the peer requests IP and split-network configuration from the server.
| Code Block |
|---|
|
/ip ipsec mode-config
add name=ike2-gre responder=no |
It is also advised to create a new policy group to separate this configuration from any existing or future IPsec configuration.
| Code Block |
|---|
|
/ip ipsec policy group
add name=ike2-gre |
Create a new policy template on the client-side as well.
| Code Block |
|---|
|
/ip ipsec policy
add dst-address=192.168.99.1/32 group=ike2-gre proposal=ike2-gre src-address=192.168.99.2/32 template=yes |
Move on to peer configuration. Now we can specify the DNS name for the server under the address parameter. Obviously, you can use an IP address as well.
| Code Block |
|---|
|
/ip ipsec peer
add address=n.mynetname.net exchange-mode=ike2 name=p1.ez profile=ike2-gre |
Lastly, create an identity for our newly created peers.
| Code Block |
|---|
|
/ip ipsec identity
add generate-policy=port-strict mode-config=ike2-gre peer=p1.ez policy-template-group=ike2-gre secret=test |
If everything was done properly, there should be a new dynamic policy present.
| Code Block |
|---|
|
/ip ipsec policy print
Flags: T - template, X - disabled, D - dynamic, I - invalid, A - active, * - default
0 T * group=default src-address=::/0 dst-address=::/0 protocol=all proposal=default template=yes

1 T group=ike2-gre src-address=192.168.99.2/32 dst-address=192.168.99.1/32 protocol=all proposal=ike2-gre template=yes

2 DA src-address=192.168.99.2/32 src-port=any dst-address=192.168.99.1/32 dst-port=any protocol=all action=encrypt level=unique ipsec-protocols=esp
tunnel=yes sa-src-address=172.17.2.1 sa-dst-address=172.17.2.2 proposal=ike2-gre ph2-count=1 |
...
ipsec identity
add auth-method=digital-signature certificate=server1 generate-policy=port-strict match-by=certificate mode-config=usr_A peer=ike2 policy-template-group=ike2-policies remote-certificate=rw-client1 |
Split tunnel configuration
Split tunneling is a method that allows road warrior clients to only access a specific secured network and at the same time send the rest of the traffic based on their internal routing table (as opposed to sending all traffic over the tunnel). To configure split tunneling, changes to mode config parameters are needed.
For example, we will allow our road warrior clients to only access the 10.5.8.0/24 network.
| Code Block |
|---|
|
/ip ipsec mode-conf
set [find name="rw-conf"] split-include=10.5.8.0/24 |
It is also possible to send a specific DNS server for the client to use. By default, system-dns=yes is used, which sends DNS servers that are configured on the router itself in IP/DNS. We can force the client to use a different DNS server by using the static-dns parameter.
| Code Block |
|---|
|
/ip ipsec mode-conf
set [find name="rw-conf"] system-dns=no static-dns=10.5.8.1 |
While it is possible to adjust the IPsec policy template to only allow road warrior clients to generate policies to network configured by split-include parameter, this can cause compatibility issues with different vendor implementations (see known limitations). Instead of adjusting the policy template, allow access to a secured network in IP/Firewall/Filter and drop everything else.
| Code Block |
|---|
|
/ip firewall filter
add action=drop chain=forward src-address=192.168.77.0/24 dst-address=!10.5.8.0/24 |
| Note |
|---|
Split networking is not a security measure. The client (initiator) can still request a different Phase 2 traffic selector. |
Generating client certificates
To generate a new certificate for the client and sign it with a previously created CA.
| Code Block |
|---|
|
/certificate
add common-name=rw-client1 name=rw-client1 key-usage=tls-client
sign rw-client1 ca=ca |
PKCS12 format is accepted by most client implementations, so when exporting the certificate, make sure PKCS12 is specified.
| Code Block |
|---|
|
/certificate
export-certificate rw-client1 export-passphrase=1234567890 type=pkcs12 |
A file named cert_export_rw-client1.p12 is now located in the routers System/File section. This file should be securely transported to the client's device.
Typically PKCS12 bundle contains also a CA certificate, but some vendors may not install this CA, so a self-signed CA certificate must be exported separately using PEM format.
| Code Block |
|---|
|
/certificate
export-certificate ca type=pem |
A file named cert_export_ca.crt is now located in the routers System/File section. This file should also be securely transported to the client's device.
PEM is another certificate format for use in client software that does not support PKCS12. The principle is pretty much the same.
| Code Block |
|---|
|
/certificate
export-certificate ca
export-certificate rw-client1 export-passphrase=1234567890 |
Three files are now located in the routers Files section: cert_export_ca.crt, cert_export_rw-client1.crt and cert_export_rw-client1.key which should be securely transported to the client device.
Known limitations
Here is a list of known limitations by popular client software IKEv2 implementations.
- Windows will always ignore networks received by split-include and request policy with destination 0.0.0.0/0 (TSr). When IPsec-SA is generated, Windows requests DHCP option 249 to which RouterOS will respond with configured split-include networks automatically.
- Both Apple macOS and iOS will only accept the first split-include network.
- Both Apple macOS and iOS will use the DNS servers from system-dns and static-dns parameters only when 0.0.0.0/0 split-include is used.
- While some implementations can make use of different PFS group for phase 2, it is advised to use pfs-group=none under proposals to avoid any compatibility issues.
RouterOS client configuration
Import a PKCS12 format certificate in RouterOS.
| Code Block |
|---|
|
/certificate import file-name=cert_export_RouterOS_client.p12 passphrase=1234567890 |
There should now be the self-signed CA certificate and the client certificate in the Certificate menu. Find out the name of the client certificate.
| Code Block |
|---|
|
/certificate print |
cert_export_RouterOS_client.p12_0 is the client certificate.
It is advised to create a separate Phase 1 profile and Phase 2 proposal configurations to not interfere with any existing IPsec configuration.
| Code Block |
|---|
|
/ip ipsec profile
add name=ike2-rw
/ip ipsec proposal
add name=ike2-rw pfs-group=none |
While it is possible to use the default policy template for policy generation, it is better to create a new policy group and template to separate this configuration from any other IPsec configuration.
| Code Block |
|---|
|
/ip ipsec policy group
add name=ike2-rw
/ip ipsec policy
add group=ike2-rw proposal=ike2-rw template=yes |
Create a new mode config entry with responder=no that will request configuration parameters from the server.
| Code Block |
|---|
|
/ip ipsec mode-config
add name=ike2-rw responder=no |
Lastly, create peer and identity configurations.
| Code Block |
|---|
|
/ip ipsec peer
add address=2.2.2.2/32 exchange-mode=ike2 name=ike2-rw-client
/ip ipsec identity
add auth-method=digital-signature certificate=cert_export_RouterOS_client.p12_0 generate-policy=port-strict mode-config=ike2-rw peer=ike2-rw-client policy-template-group=ike2-rw |
Verify that the connection is successfully established.
| Code Block |
|---|
|
/ip ipsec
active-peers print
installed-sa print |
Enabling dynamic source NAT rule generation
If we look at the generated dynamic policies, we see that only traffic with a specific (received by mode config) source address will be sent through the tunnel. But a router in most cases will need to route a specific device or network through the tunnel. In such case, we can use source NAT to change the source address of packets to match the mode config address. Since the mode config address is dynamic, it is impossible to create a static source NAT rule. In RouterOS, it is possible to generate dynamic source NAT rules for mode config clients.
Image Added
For example, we have a local network 192.168.88.0/24 behind the router and we want all traffic from this network to be sent over the tunnel. First of all, we have to make a new IP/Firewall/Address list which consists of our local network
| Code Block |
|---|
|
/ip firewall address-list
add address=192.168.88.0/24 list=local |
When it is done, we can assign the newly created IP/Firewall/Address list to the mode config configuration.
| Code Block |
|---|
|
/ip ipsec mode-config
set [ find name=ike2-rw ] src-address-list=local |
Verify correct source NAT rule is dynamically generated when the tunnel is established.
| Code Block |
|---|
|
[admin@MikroTik] > /ip firewall nat print
Flags: X - disabled, I - invalid, D - dynamic
0 D ;;; ipsec mode-config
chain=srcnat action=src-nat to-addresses=192.168.77.254 src-address-list=local dst-address-list=!local |
| Warning |
|---|
Make sure the dynamic mode config address is not a part of a local network. |
Windows client configuration
Open PKCS12 format certificate file on the Windows computer. Install the certificate by following the instructions. Make sure you select the Local Machine store location.Image Added You can now proceed to Network and Internet settings -> VPN and add a new configuration. Fill in the Connection name, Server name, or address parameters. Select IKEv2 under VPN type. When it is done, it is necessary to select "Use machine certificates". This can be done in Network and Sharing Center by clicking the Properties menu for the VPN connection. The setting is located under the Security tab.
Image Added
Currently, Windows 10 is compatible with the following Phase 1 ( profiles) and Phase 2 ( proposals) proposal sets:
| Phase 1 |
|---|
| Hash Algorithm | Encryption Algorithm | DH Group |
|---|
| SHA1 | 3DES | modp1024 |
| SHA256 | 3DES | modp1024 |
| SHA1 | AES-128-CBC | modp1024 |
| SHA256 | AES-128-CBC | modp1024 |
| SHA1 | AES-192-CBC | modp1024 |
| SHA256 | AES-192-CBC | modp1024 |
| SHA1 | AES-256-CBC | modp1024 |
| SHA256 | AES-256-CBC | modp1024 |
| SHA1 | AES-128-GCM | modp1024 |
| SHA256 | AES-128-GCM | modp1024 |
| SHA1 | AES-256-GCM | modp1024 |
| SHA256 | AES-256-GCM | modp1024 |
| Phase 2 |
|---|
| Hash Algorithm | Encryption Algorithm | PFS Group |
|---|
| SHA1 | AES-256-CBC | none |
| SHA1 | AES-128-CBC | none |
| SHA1 | 3DES | none |
| SHA1 | DES | none |
| SHA1 | none | none |
macOS client configuration
Open the PKCS12 format certificate file on the macOS computer and install the certificate in the "System" keychain. It is necessary to mark the CA certificate as trusted manually since it is self-signed. Locate the certificate macOS Keychain Access app under the System tab and mark it as Always Trust.
Image Added
You can now proceed to System Preferences -> Network and add a new configuration by clicking the + button. Select Interface: VPN, VPN Type: IKEv2 and name your connection. Remote ID must be set equal to common-name or subjAltName of server's certificate. Local ID can be left blank. Under Authentication Settings select None and choose the client certificate. You can now test the connectivity.
Image Added
Currently, macOS is compatible with the following Phase 1 ( profiles) and Phase 2 ( proposals) proposal sets:
| Phase 1 |
|---|
| Hash Algorithm | Encryption Algorithm | DH Group |
|---|
| SHA256 | AES-256-CBC | modp2048 |
| SHA256 | AES-256-CBC | ecp256 |
| SHA256 | AES-256-CBC | modp1536 |
| SHA1 | AES-128-CBC | modp1024 |
| SHA1 | 3DES | modp1024 |
| Phase 2 |
|---|
| Hash Algorithm | Encryption Algorithm | PFS Group |
|---|
| SHA256 | AES-256-CBC | none |
| SHA1 | AES-128-CBC | none |
| SHA1 | 3DES | none |
iOS client configuration
Typically PKCS12 bundle contains also a CA certificate, but iOS does not install this CA, so a self-signed CA certificate must be installed separately using PEM format. Open these files on the iOS device and install both certificates by following the instructions. It is necessary to mark the self-signed CA certificate as trusted on the iOS device. This can be done in Settings -> General -> About -> Certificate Trust Settings menu. When it is done, check whether both certificates are marked as "verified" under the Settings -> General -> Profiles menu.
Image Added
You can now proceed to Settings -> General -> VPN menu and add a new configuration. Remote ID must be set equal to common-name or subjAltName of server's certificate. Local ID can be left blank.
Image Added
Currently, iOS is compatible with the following Phase 1 ( profiles) and Phase 2 ( proposals) proposal sets:
| Phase 1 |
|---|
| Hash Algorithm | Encryption Algorithm | DH Group |
|---|
| SHA256 | AES-256-CBC | modp2048 |
| SHA256 | AES-256-CBC | ecp256 |
| SHA256 | AES-256-CBC | modp1536 |
| SHA1 | AES-128-CBC | modp1024 |
| SHA1 | 3DES | modp1024 |
| Phase 2 |
|---|
| Hash Algorithm | Encryption Algorithm | PFS Group |
|---|
| SHA256 | AES-256-CBC | none |
| SHA1 | AES-128-CBC | none |
| SHA1 | 3DES | none |
| Note |
|---|
If you are connected to the VPN over WiFi, the iOS device can go into sleep mode and disconnect from the network. |
Android (strongSwan) client configuration
Currently, there is no IKEv2 native support in Android, however, it is possible to use strongSwan from Google Play Store which brings IKEv2 to Android. StrongSwan accepts PKCS12 format certificates, so before setting up the VPN connection in strongSwan, make sure you download the PKCS12 bundle to your Android device. When it is done, create a new VPN profile in strongSwan, type in the server IP, and choose "IKEv2 Certificate" as VPN Type. When selecting a User certificate, press Install and follow the certificate extract procedure by specifying the PKCS12 bundle. Save the profile and test the connection by pressing on the VPN profile.
Image Added
It is possible to specify custom encryption settings in strongSwan by ticking the "Show advanced settings" checkbox. Currently, strongSwan by default is compatible with the following Phase 1 ( profiles) and Phase 2 ( proposals) proposal sets:
| Phase 1 |
|---|
| Hash Algorithm | Encryption Algorithm | DH Group |
|---|
| SHA* | AES-*-CBC | modp2048 |
| SHA* | AES-*-CBC | ecp256 |
| SHA* | AES-*-CBC | ecp384 |
| SHA* | AES-*-CBC | ecp521 |
| SHA* | AES-*-CBC | modp3072 |
| SHA* | AES-*-CBC | modp4096 |
| SHA* | AES-*-CBC | modp6144 |
| SHA* | AES-*-CBC | modp8192 |
| SHA* | AES-*-GCM | modp2048 |
| SHA* | AES-*-GCM | ecp256 |
| SHA* | AES-*-GCM | ecp384 |
| SHA* | AES-*-GCM | ecp521 |
| SHA* | AES-*-GCM | modp3072 |
| SHA* | AES-*-GCM | modp4096 |
| SHA* | AES-*-GCM | modp6144 |
| SHA* | AES-*-GCM | modp8192 |
| Phase 2 |
|---|
| Hash Algorithm | Encryption Algorithm | PFS Group |
|---|
| none | AES-256-GCM | none |
| none | AES-128-GCM | none |
| SHA256 | AES-256-CBC | none |
| SHA512 | AES-256-CBC | none |
| SHA1 | AES-256-CBC | none |
| SHA256 | AES-192-CBC | none |
| SHA512 | AES-192-CBC | none |
| SHA1 | AES-192-CBC | none |
| SHA256 | AES-128-CBC | none |
| SHA512 | AES-128-CBC | none |
| SHA1 | AES-128-CBC | none |
Linux (strongSwan) client configuration
Download the PKCS12 certificate bundle and move it to /etc/ipsec.d/private directory.
Add exported passphrase for the private key to /etc/ipsec.secrets file where "strongSwan_client.p12" is the file name and "1234567890" is the passphrase.
| Code Block |
|---|
|
: P12 strongSwan_client.p12 "1234567890" |
Add a new connection to /etc/ipsec.conf file
| Code Block |
|---|
|
conn "ikev2"
keyexchange=ikev2
ike=aes128-sha1-modp2048
esp=aes128-sha1
leftsourceip=%modeconfig
leftcert=strongSwan_client.p12
leftfirewall=yes
right=2.2.2.2
rightid="CN=2.2.2.2"
rightsubnet=0.0.0.0/0
auto=add |
You can now restart (or start) the ipsec daemon and initialize the connection
| Code Block |
|---|
|
$ ipsec restart
$ ipsec up ikev2 |
Basic L2TP/IPsec setup
This example demonstrates how to easily set up an L2TP/IPsec server on RouterOS for road warrior connections (works with Windows, Android, iOS, macOS, and other vendor L2TP/IPsec implementations).
RouterOS server configuration
The first step is to enable the L2TP server:
| Code Block |
|---|
|
/interface l2tp-server server
set enabled=yes use-ipsec=required ipsec-secret=mySecret default-profile=default |
use-ipsec is set to required to make sure that only IPsec encapsulated L2TP connections are accepted.
Now what it does is enables an L2TP server and creates a dynamic IPsec peer with a specified secret.
| Code Block |
|---|
|
[admin@MikroTik] /ip ipsec peer> print
0 D address=0.0.0.0/0 local-address=0.0.0.0 passive=yes port=500
auth-method=pre-shared-key secret="123" generate-policy=port-strict
exchange-mode=main-l2tp send-initial-contact=yes nat-traversal=yes
hash-algorithm=sha1 enc-algorithm=3des,aes-128,aes-192,aes-256
dh-group=modp1024 lifetime=1d dpd-interval=2m dpd-maximum-failures=5 |
| Note |
|---|
Care must be taken if static IPsec peer configuration exists. |
The next step is to create a VPN pool and add some users.
| Code Block |
|---|
|
/ip pool add name=vpn-pool range=192.168.99.2-192.168.99.100

/ppp profile
set default local-address=192.168.99.1 remote-address=vpn-pool

/ppp secret
add name=user1 password=123
add name=user2 password=234 |
Now the router is ready to accept L2TP/IPsec client connections.
RouterOS client configuration
For RouterOS to work as L2TP/IPsec client, it is as simple as adding a new L2TP client.
| Code Block |
|---|
|
/interface grel2tp-client
add localconnect-addressto=1921.1681.99.21.1 disabled=no ipsec-secret=mySecret name=gre-tunnel1 remote-address=192.168.99.1l2tp-out1 \
password=123 use-ipsec=yes user=user1 |
It will automatically create dynamic IPsec peer and policy configurations.
IKEv2 EAP between NordVPN and RouterOS
...