...
| Code Block | ||
|---|---|---|
| ||
/ip firewall nat add action=accept chain=srcnat protocol=udp src-port=500,4500 place-before=0 |
Application examples
Site to Site IPsec (IKEv1) tunnel
Consider setup as illustrated below. Two remote office routers are connected to the internet and office workstations are behind NAT. Each office has its own local subnet, 10.1.202.0/24 for Office1 and 10.1.101.0/24 for Office2. Both remote offices need secure tunnels to local networks behind routers.
...
Currently, Windows 10 is compatible with the following Phase 1 ( profiles) and Phase 2 ( proposals) proposal sets:
| Phase 1 | ||
|---|---|---|
| Hash Algorithm | Encryption Algorithm | DH Group |
| SHA1 | 3DES | modp1024 |
| SHA256 | 3DES | modp1024 |
| SHA1 | AES-128-CBC | modp1024 |
| SHA256 | AES-128-CBC | modp1024 |
| SHA1 | AES-192-CBC | modp1024 |
| SHA256 | AES-192-CBC | modp1024 |
| SHA1 | AES-256-CBC | modp1024 |
| SHA256 | AES-256-CBC | modp1024 |
| SHA1 | AES-128-GCM | modp1024 |
| SHA256 | AES-128-GCM | modp1024 |
| SHA1 | AES-256-GCM | modp1024 |
| SHA256 | AES-256-GCM | modp1024 |
| Phase 2 | ||
|---|---|---|
| Hash Algorithm | Encryption Algorithm | PFS Group |
| SHA1 | AES-256-CBC | none |
| SHA1 | AES-128-CBC | none |
| SHA1 | 3DES | none |
| SHA1 | DES | none |
| SHA1 | none | none |
macOS client configuration
...
Currently, macOS is compatible with the following Phase 1 ( profiles) and Phase 2 ( proposals) proposal sets:
| Phase 1 | ||
|---|---|---|
| Hash Algorithm | Encryption Algorithm | DH Group |
| SHA256 | AES-256-CBC | modp2048 |
| SHA256 | AES-256-CBC | ecp256 |
| SHA256 | AES-256-CBC | modp1536 |
| SHA1 | AES-128-CBC | modp1024 |
| SHA1 | 3DES | modp1024 |
| Phase 2 | ||
|---|---|---|
| Hash Algorithm | Encryption Algorithm | PFS Group |
| SHA256 | AES-256-CBC | none |
| SHA1 | AES-128-CBC | none |
| SHA1 | 3DES | none |
iOS client configuration
Typically PKCS12 bundle contains also a CA certificate, but iOS does not install this CA, so a self-signed CA certificate must be installed separately using PEM format. Open these files on the iOS device and install both certificates by following the instructions. It is necessary to mark the self-signed CA certificate as trusted on the iOS device. This can be done in Settings -> General -> About -> Certificate Trust Settings menu. When it is done, check whether both certificates are marked as "verified" under the Settings -> General -> Profiles menu.
...
Currently, iOS is compatible with the following Phase 1 ( profiles) and Phase 2 ( proposals) proposal sets:
| Phase 1 | ||
|---|---|---|
| Hash Algorithm | Encryption Algorithm | DH Group |
| SHA256 | AES-256-CBC | modp2048 |
| SHA256 | AES-256-CBC | ecp256 |
| SHA256 | AES-256-CBC | modp1536 |
| SHA1 | AES-128-CBC | modp1024 |
| SHA1 | 3DES | modp1024 |
| Phase 2 | ||
|---|---|---|
| Hash Algorithm | Encryption Algorithm | PFS Group |
| SHA256 | AES-256-CBC | none |
| SHA1 | AES-128-CBC | none |
| SHA1 | 3DES | none |
| Note |
|---|
If you are connected to the VPN over WiFi, the iOS device can go into sleep mode and disconnect from the network. |
...
It is possible to specify custom encryption settings in strongSwan by ticking the "Show advanced settings" checkbox. Currently, strongSwan by default is compatible with the following Phase 1 ( profiles) and Phase 2 ( proposals) proposal sets:
| Phase 1 | ||
|---|---|---|
| Hash Algorithm | Encryption Algorithm | DH Group |
| SHA* | AES-*-CBC | modp2048 |
| SHA* | AES-*-CBC | ecp256 |
| SHA* | AES-*-CBC | ecp384 |
| SHA* | AES-*-CBC | ecp521 |
| SHA* | AES-*-CBC | modp3072 |
| SHA* | AES-*-CBC | modp4096 |
| SHA* | AES-*-CBC | modp6144 |
| SHA* | AES-*-CBC | modp8192 |
| SHA* | AES-*-GCM | modp2048 |
| SHA* | AES-*-GCM | ecp256 |
| SHA* | AES-*-GCM | ecp384 |
| SHA* | AES-*-GCM | ecp521 |
| SHA* | AES-*-GCM | modp3072 |
| SHA* | AES-*-GCM | modp4096 |
| SHA* | AES-*-GCM | modp6144 |
| SHA* | AES-*-GCM | modp8192 |
| Phase 2 | ||
|---|---|---|
| Hash Algorithm | Encryption Algorithm | PFS Group |
| none | AES-256-GCM | none |
| none | AES-128-GCM | none |
| SHA256 | AES-256-CBC | none |
| SHA512 | AES-256-CBC | none |
| SHA1 | AES-256-CBC | none |
| SHA256 | AES-192-CBC | none |
| SHA512 | AES-192-CBC | none |
| SHA1 | AES-192-CBC | none |
| SHA256 | AES-128-CBC | none |
| SHA512 | AES-128-CBC | none |
| SHA1 | AES-128-CBC | none |
Linux (strongSwan) client configuration
...
| Code Block | ||
|---|---|---|
| ||
$ ipsec restart $ ipsec up ikev2 |
Basic L2TP/IPsec setup
This example demonstrates how to easily set up an L2TP/IPsec server on RouterOS for road warrior connections (works with Windows, Android, iOS, macOS, and other vendor L2TP/IPsec implementations).
RouterOS server configuration
The first step is to enable the L2TP server:
| Code Block | ||
|---|---|---|
| ||
/interface l2tp-server server set enabled=yes use-ipsec=required ipsec-secret=mySecret default-profile=default |
use-ipsec is set to required to make sure that only IPsec encapsulated L2TP connections are accepted.
Now what it does is enables an L2TP server and creates a dynamic IPsec peer with a specified secret.
| Code Block | ||
|---|---|---|
| ||
[admin@MikroTik] /ip ipsec peer> print 0 D address=0.0.0.0/0 local-address=0.0.0.0 passive=yes port=500 auth-method=pre-shared-key secret="123" generate-policy=port-strict exchange-mode=main-l2tp send-initial-contact=yes nat-traversal=yes hash-algorithm=sha1 enc-algorithm=3des,aes-128,aes-192,aes-256 dh-group=modp1024 lifetime=1d dpd-interval=2m dpd-maximum-failures=5 |
...
Now the router is ready to accept L2TP/IPsec client connections.
RouterOS client configuration
For RouterOS to work as L2TP/IPsec client, it is as simple as adding a new L2TP client.
...
It will automatically create dynamic IPsec peer and policy configurations.
Site to Site GRE tunnel over IPsec (IKEv2) using DNS
This example explains how it is possible to establish a secure and encrypted GRE tunnel between two RouterOS devices when one or both sites do not have a static IP address. Before making this configuration possible, it is necessary to have a DNS name assigned to one of the devices which will act as a responder (server). For simplicity, we will use RouterOS built-in DDNS service IP/Cloud.
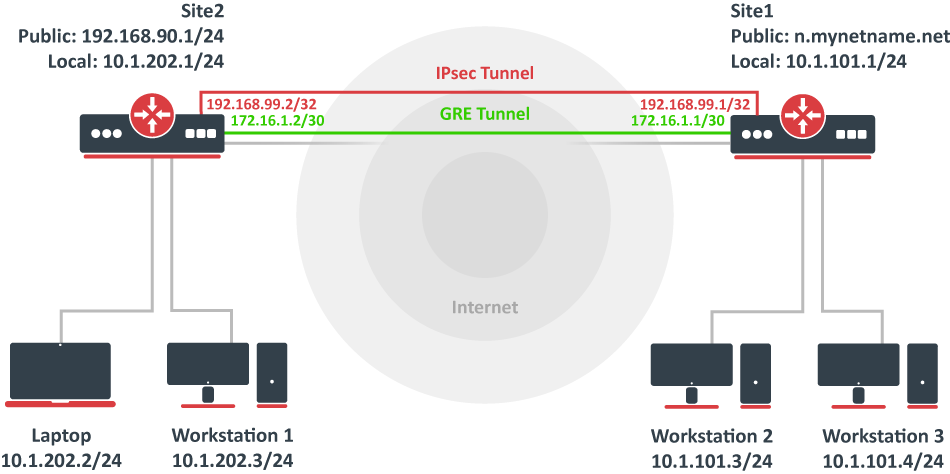
Site 1 (server) configuration
This is the side that will listen to incoming connections and act as a responder. We will use mode config to provide an IP address for the second site, but first, create a loopback (blank) bridge and assign an IP address to it that will be used later for GRE tunnel establishment.
| Code Block | ||
|---|---|---|
| ||
/interface bridge add name=loopback /ip address add address=192.168.99.1 interface=loopback |
...
| Code Block | ||
|---|---|---|
| ||
/ip ipsec identity add generate-policy=port-strict mode-config=ike2-gre peer=ike2 policy-template-group=ike2-gre secret=test |
The server side is now configured and listening to all IKEv2 requests. Please make sure the firewall is not blocking UDP/4500 port.
The last step is to create the GRE interface itself. This can also be done later when an IPsec connection is established from the client-side.
| Code Block | ||
|---|---|---|
| ||
/interface gre add local-address=192.168.99.1 name=gre-tunnel1 remote-address=192.168.99.2 |
Site 2 (client) configuration
Similarly to server configuration, start off by creating a new Phase 1 profile and Phase 2 proposal configurations. Since this site will be the initiator, we can use a more specific profile configuration to control which exact encryption parameters are used, just make sure they overlap with what is configured on the server-side.
...
| Code Block | ||
|---|---|---|
| ||
/interface gre add local-address=192.168.99.2 name=gre-tunnel1 remote-address=192.168.99.1 |
IKEv2 EAP between NordVPN and RouterOS
Troubleshooting/FAQ
Phase 1 Failed to get a valid proposal
...