PWR-LINE PRO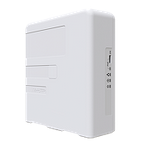
The PWR-LINE PRO allows Ethernet-like connectivity between supported devices over regular electrical power lines. When plugged into the same electrical circuit, the device will establish Ethernet connectivity by using the HomePlug AV 2 standard. PWR-LINE PRO does not require any system software or configuration, it's ready to use.
...
- Plug one PWR-LINE PRO device into a power socket.
- Connect to one of the LAN ports of your MikroTik router to the PWR-LINE PRO Ethernet port.
- Plug another PWR-LINE PRO unit (or any other compatible device) somewhere in the same electrical circuit.
- Use the sync button to connect the devices and your local network will automatically be extended. Please see the PWR connection button (sync) 14222531 section on how to pair additional PWR-LINE PRO devices.
- PWR-LINE PRO supports PoE out from Ethernet port to power another Mikrotik device, this can be activated with a switch, please see LED lights and PoE switch 14222531 section.
Mounting
PWR-LINE PRO can be mounted on the wall using four provided screws:
...
- Mark four points for screw holes in the desired place on the wall for PWR-LINE PRO.
- Drill using a 5 mm drill bit for dowel holes and insert them by slight tapping if necessary.
- Mount PWR-LINE PRO and close top cover, center screw tightening force 0.5 – 0.7 Nm, attach provided 3M sticker to cover center screw.
...
- .
Powering
The device accepts powering directly from power from a wall socket where it is plugged into.
100-230 V AC ⏦, ~50/60 Hz wall socket it is plugged into.
The power consumption under maximum load can reach 5 W. Max power consumption with PoE-Out 14 W.
| Info |
|---|
In order to reach a speed of 600 Mbps, your electrical sockets need needs to be grounded. |
...
- Blue LED indicates device power ON state.
- Amber LED indicates that the device is paired, blinking amber indicated that the device is in search mode. It can be activated with a sync button. Please refer to the PWR connection button (sync) 14222531 section.
- Green LED indicates Ethernet port connectivity.
- Red LED indicates that PoE is active.
- PoE switch by default settings position is set to OFF. A standard ballpoint pen can be used to switch positions. The Red light will indicate that PoE is active.
...
This equipment has been tested and found to comply with the limits for a Class B digital device, pursuant to Part 15 of the FCC Rules. These limits are designed to provide reasonable protection against harmful interference in a residential installation.
This equipment generates, uses and can radiate radio frequency energy and, if not installed and used in accordance with the instructions, may cause harmful interference to radio communications. However, there is no guarantee that interference will not occur in a particular installation. If this equipment does cause harmful interference to radio or television reception, which can be determined by turning the equipment off and on, the user is encouraged to try to correct the interference by one of the following measures:

- Reorient or relocate the receiving antenna.
- Increase the separation between the equipment and receiver.
- Connect the equipment into an outlet on a circuit different from that to which the receiver is connected.
- Consult the dealer or an experienced radio/TV technician for help.
...
This device complies with Industry Canada licence's license-exempt RSS standard(s). Operation is subject to the following two conditions: (1) this device may not cause interference, and (2) this device must accept any interference, including interference that may cause undesired operation of the device.
Le présent appareil est conforme aux CNR d'Industrie Canada applicables aux appareils radio exempts de licence. L'exploitation est autorisée aux deux conditions suivantes: (1) l'appareil ne doit pas produire de brouillage, et (2) l'utilisateur de l'appareil doit accepter tout brouillage radioélectrique subi, même si le brouillage est susceptible d'en compromettre le fonctionnement.
...
Note. Information contained here is subject to change. Please visit the product page on www.mikrotik.com for the most up to date version of this document.![]()
BG. Инструкция: Свържете адаптера на захранване, за да включите устройството. Отворете 192.168.88.1 в уеб браузър, за да настроите продукта. Повече информация в {+}https://mt.lv/help-bg+![]()
CS. Návod k použití: Připojte napájecí adaptér k zapnutí přístroje. Otevřete 192.168.88.1 ve webovém prohlížeči pro konfiguraci produktu. Více informací najdete v {+}https://mt.lv/help-cs+![]()
DA. Instruktionsbog: Tilslut strømadapteren for at tænde for enheden. Åbn 192.168.88.1 i en webbrowser til at konfigurere produktet. Mere information i {+}https://mt.lv/help-da+![]()
DE. Bedienungsanleitung: Verbinden Sie das Netzteil, um das Gerät einzuschalten. Öffnen Sie 192.168.88.1 in einem Web-Browser, um das Produkt zu konfigurieren. Weitere Informationen im {+}https://mt.lv/help-de+![]()
EL. εγχειρίδιο οδηγιών: Συνδέστε τον προσαρμογέα τροφοδοσίας για να ενεργοποιήσετε τη μονάδα. Ανοίξτε 192.168.88.1 σε ένα πρόγραμμα περιήγησης στο Web για να διαμορφώσετε το προϊόν. Περισσότερες πληροφορίες στο {+}https://mt.lv/help-el+![]()
EN. Instruction manual: Connect the power adapter to turn on the device. Open 192.168.88.1 in your web browser, to configure it. More information on {+}https://mt.lv/help+![]()
ES. Manual de instrucciones: Conecte el adaptador de alimentación para encender la unidad. Abra 192.168.88.1 en un navegador web para configurar el producto. Más información en {+}https://mt.lv/help-es+![]()
ET. Kasutusjuhend: Ühendage toiteadapter seadme sisselülitamiseks. Avatud 192.168.88.1 in veebilehitseja seadistada toodet. Rohkem teavet {+}https://mt.lv/help-et+![]()
FI. Käyttöohje: Kytke virtalähde päälle laitteen. Avaa 192.168.88.1 in selaimen määrittää tuotteen. Lisää tietoa {+}https://mt.lv/help-fi+![]()
FR. Mode d'emploi: Connectez l'adaptateur d'alimentation pour allumer l'appareil. Ouvrez 192.168.88.1 dans un navigateur Web pour configurer le produit. Plus d'informations dans {+}https://mt.lv/help-fr+![]()
HR. Uputa za uporabu: Priključite napajanje i uključite uređaj. Za konfiguraciju uređaja u pregledniku otvorite 192.168.88.1. Više informacija je na {+}https://mt.lv/help-hr+![]()
HU. Használati utasítás: Csatlakoztassa a hálózati adaptert a készülék bekapcsolásához. Megnyitása 192.168.88.1 egy webböngészőben beállítani a terméket. Több információ {+}https://mt.lv/help-hu+![]()
IT. Manuale di istruzioni: Collegare l'adattatore di alimentazione per accendere l'unità. Aprire 192.168.88.1 in un browser Web per configurare il prodotto. Maggiori informazioni in {+}https://mt.lv/help-it+![]()
IS. Notkunarleiðbeiningar: Tengdu straumbreytinn til að kveikja á tækinu. Opnaðu 192.168.88.1 í vafra til að stilla það. Nánari
upplýsingar á {+}https://mt.lv/help-is+![]()
NO. Instruksjonsmanual: Koble strømadapteren for å slå på enheten. Åpne 192.168.88.1 i nettleseren din for å konfigurere den. Mer informasjon på {+}https://mt.lv/help-no+![]()
LT. Naudojimosi instrukcija: Prijunkite maitinimo adapterį įjunkite įrenginį. Į interneto naršyklę 192.168.88.1 Atidarykite galite konfigūruoti gaminį. Daugiau informacijos rasite {+}https://mt.lv/help-lt+![]()
LV. Lietošanas instrukcija: Pievienojiet Strāvas adapteri, lai ieslēgtu ierīci. Atvērt 192.168.88.1 ar interneta pārlūku, lai konfigurētu produktu. Plašāka informācija {+}https://mt.lv/help-lv+![]()
MT. Manwal tal-istruzzjoni: Qabbad l-adapter tal-qawwa biex iddawwar it-tagħmir. Iftaħ 192.168.88.1 fil-web browser tiegħek, biex jiġi kkonfigurat. Aktar informazzjoni fuq {+}https://mt.lv/help-mt+![]()
NL. Handleiding: Sluit voedingsadapter aan op het apparaat in te schakelen. Open 192.168.88.1 in een webbrowser om het product te configureren. Meer informatie in {+}https://mt.lv/help-nl+![]()
PL. Instrukcja obsługi: Podłącz adapter zasilania, aby włączyć urządzenie. Otwórz 192.168.88.1 w przeglądarce internetowej, aby skonfigurować urządzenie. Więcej informacji w {+}https://mt.lv/help-pl+![]()
PT. Manual de instruções: Conecte o adaptador de alimentação para ligar o aparelho. Abra 192.168.88.1 em um navegador da web para configurar o produto. Mais informações em {+}https://mt.lv/help-pt+![]()
RO. Instrucțiuni de utilizare: Conectați adaptorul de alimentare pentru a porni aparatul. Deschide 192.168.88.1 într-un browser web pentru a configura produsul. Mai multe informații în {+}https://mt.lv/help-ro+![]()
SK. Navodila: Priključite napajalnik za vklop naprave. Odprite 192.168.88.1 v spletnem brskalniku nastaviti izdelek. Več informacij v
{+}https://mt.lv/help-sk+![]()
SL. Návod na použitie: Pripojte napájací adaptér k zapnutiu prístroja. Otvorte 192.168.88.1 vo webovom prehliadači pre konfiguráciu produktu. Viac informácií nájdete v {+}https://mt.lv/help-sl+![]()
SV. Instruktionsmanual: Anslut nätadaptern för att slå på enheten. Öppna 192.168.88.1 i en webbläsare för att konfigurera produkten. Mer information på {+}https://mt.lv/help-sv+![]()
NO. Bruksanvisningen: Koble strømadapteren for å slå på enheten. Åpne 192.168.88.1 i en nettleser for å konfigurere produktet. Mer informasjon på {+}https://mt.lv/help-no+![]()
RU. Руководство по эксплуатации: подключите адаптер питания чтобы включить устройство. Откройте 192.168.88.1 в своем веб-браузере для конфигурации. Дополнительная информация https://mt.lv/help-ru
CN. 说明书。 连接电源适配器以打开设备。 在Web浏览器中打开192.168.88.1进行配置。 有关{+}https://mt.lv/help-zh+![]() 的更多信息
的更多信息